android canvas paint绘制相关图形
来源:互联网 发布:山人太极服淘宝 编辑:程序博客网 时间:2024/05/20 11:36
首先看canvas 从android doc 可以看到:
The Canvas class holds the "draw" calls.
To draw something, you need 4 basic components: A Bitmap to hold the pixels, a Canvas to host the draw calls (writing into the bitmap), a drawing primitive (e.g. Rect, Path, text, Bitmap), and a paint (to describe the colors and styles for the drawing).
如果我们把Canvas当做绘画师来看,那么Paint就是我们绘画的工具,比如画笔、画刷、颜料等等。
之后看paint ,来自于http://emmet1988.iteye.com/blog/1058526
- /**
- * Paint类介绍
- *
- * Paint即画笔,在绘图过程中起到了极其重要的作用,画笔主要保存了颜色,
- * 样式等绘制信息,指定了如何绘制文本和图形,画笔对象有很多设置方法,
- * 大体上可以分为两类,一类与图形绘制相关,一类与文本绘制相关。
- *
- * 1.图形绘制
- * setARGB(int a,int r,int g,int b);
- * 设置绘制的颜色,a代表透明度,r,g,b代表颜色值。
- *
- * setAlpha(int a);
- * 设置绘制图形的透明度。
- *
- * setColor(int color);
- * 设置绘制的颜色,使用颜色值来表示,该颜色值包括透明度和RGB颜色。
- *
- * setAntiAlias(boolean aa);
- * 设置是否使用抗锯齿功能,会消耗较大资源,绘制图形速度会变慢。
- *
- * setDither(boolean dither);
- * 设定是否使用图像抖动处理,会使绘制出来的图片颜色更加平滑和饱满,图像更加清晰
- *
- * setFilterBitmap(boolean filter);
- * 如果该项设置为true,则图像在动画进行中会滤掉对Bitmap图像的优化操作,加快显示
- * 速度,本设置项依赖于dither和xfermode的设置
- *
- * setMaskFilter(MaskFilter maskfilter);
- * 设置MaskFilter,可以用不同的MaskFilter实现滤镜的效果,如滤化,立体等
- *
- * setColorFilter(ColorFilter colorfilter);
- * 设置颜色过滤器,可以在绘制颜色时实现不用颜色的变换效果
- *
- * setPathEffect(PathEffect effect);
- * 设置绘制路径的效果,如点画线等
- *
- * setShader(Shader shader);
- * 设置图像效果,使用Shader可以绘制出各种渐变效果
- *
- * setShadowLayer(float radius ,float dx,float dy,int color);
- * 在图形下面设置阴影层,产生阴影效果,radius为阴影的角度,dx和dy为阴影在x轴和y轴上的距离,color为阴影的颜色
- *
- * setStyle(Paint.Style style);
- * 设置画笔的样式,为FILL,FILL_OR_STROKE,或STROKE
- *
- * setStrokeCap(Paint.Cap cap);
- * 当画笔样式为STROKE或FILL_OR_STROKE时,设置笔刷的图形样式,如圆形样式
- * Cap.ROUND,或方形样式Cap.SQUARE
- *
- * setSrokeJoin(Paint.Join join);
- * 设置绘制时各图形的结合方式,如平滑效果等
- *
- * setStrokeWidth(float width);
- * 当画笔样式为STROKE或FILL_OR_STROKE时,设置笔刷的粗细度
- *
- * setXfermode(Xfermode xfermode);
- * 设置图形重叠时的处理方式,如合并,取交集或并集,经常用来制作橡皮的擦除效果
- *
- * 2.文本绘制
- * setFakeBoldText(boolean fakeBoldText);
- * 模拟实现粗体文字,设置在小字体上效果会非常差
- *
- * setSubpixelText(boolean subpixelText);
- * 设置该项为true,将有助于文本在LCD屏幕上的显示效果
- *
- * setTextAlign(Paint.Align align);
- * 设置绘制文字的对齐方向
- *
- * setTextScaleX(float scaleX);
- * 设置绘制文字x轴的缩放比例,可以实现文字的拉伸的效果
- *
- * setTextSize(float textSize);
- * 设置绘制文字的字号大小
- *
- * setTextSkewX(float skewX);
- * 设置斜体文字,skewX为倾斜弧度
- *
- * setTypeface(Typeface typeface);
- * 设置Typeface对象,即字体风格,包括粗体,斜体以及衬线体,非衬线体等
- *
- * setUnderlineText(boolean underlineText);
- * 设置带有下划线的文字效果
- *
- * setStrikeThruText(boolean strikeThruText);
- * 设置带有删除线的效果
- *
- */
例子:
- import android.content.Context;
- import android.graphics.Canvas;
- import android.graphics.Color;
- import android.graphics.Paint;
- import android.graphics.Path;
- import android.graphics.RectF;
- import android.graphics.Xfermode;
- import android.graphics.drawable.ShapeDrawable;
- import android.graphics.drawable.shapes.OvalShape;
- import android.view.View;
- public class LineView extends View {
- // private ShapeDrawable mDrawable;
- public LineView(Context context) {
- super(context);
- // mDrawable = new ShapeDrawable();
- }
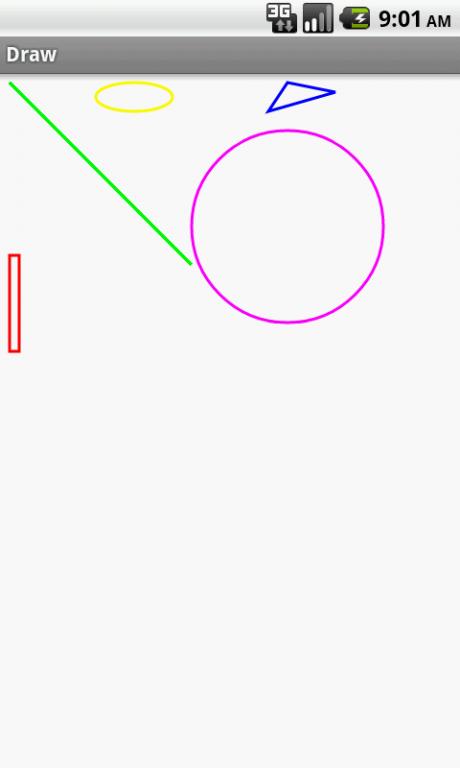
- protected void onDraw(Canvas canvas) {
- canvas.drawColor(Color.WHITE);
- Paint mPaint=new Paint();
- mPaint.setColor(Color.GREEN);
- mPaint.setStrokeWidth(3.0f);
- canvas.drawLine(10, 10, 200, 200, mPaint);
- // 画个圆
- mPaint.setColor(Color.MAGENTA);
- mPaint.setAntiAlias(true);
- // 设置实心 还是 空心 stroke
- // mPaint.setStyle(Paint.Style.STROKE);
- canvas.drawCircle(300, 160, 100, mPaint);
- // 画一个空心长方形
- mPaint.setColor(Color.RED);
- canvas.drawRect(10, 190, 20, 290, mPaint);
- // 画一个空心椭圆形
- mPaint.setColor(Color.YELLOW);
- RectF re = new RectF(100,10,180,40);
- canvas.drawOval(re, mPaint);
- // 画一个空心三角形
- mPaint.setColor(Color.BLUE);
- Path path= new Path();
- path.moveTo(300, 10);
- path.lineTo(350, 20);
- path.lineTo(280, 40);
- path.close();
- canvas.drawPath(path, mPaint);
- }
- }

也可以通过以下代码实现 颜色的渐变
- Shader mShader = new LinearGradient(0, 0, 100, 100, new int[]{Color.RED,Color.GREEN,Color.BLUE,Color.YELLOW}, null, Shader.TileMode.REPEAT);
- mPaint.setShader(mShader);
0 0
- android canvas paint绘制相关图形
- Android自定义控件绘制流程与Paint, Canvas相关API
- Canvas+Paint绘制路径,文字与图形
- 图形绘制 Canvas Paint Path 详解
- Android Canvas Paint绘制文本
- Android Canvas 图形绘制
- Android隐喻(三) 图形绘制: Canvas、SurfaceView、Paint、Surface、SurfaceHolder、Bitmap
- android游戏开发中图形绘制:Canvas和Paint的使用
- 图形绘制: Canvas、SurfaceView、Paint、Surface、SurfaceHolder、Bitmap
- 绘制基础知识-canvas paint
- Android利用canvas画各种图形 及Paint用法
- Android利用canvas画各种图形 及Paint用法
- Android利用canvas画各种图形 及Paint用法
- Android利用canvas画各种图形 及Paint用法
- Android Canvas and Drawables (android 图形绘制 canvas 和 Drawables)
- canvas 绘制图形1
- canvas 绘制图形2
- Canvas绘制图形
- 黑马程序员——C基础之一维数组
- Tvos模拟器遥控的快捷键
- Hadoop
- JAVA反射常用方法
- iBwave
- android canvas paint绘制相关图形
- 21分钟 MySQL 入门教程
- JSON.parse()和JSON.stringify()
- AndroidManifest.xml文件supports-screens详解
- delphi idhttpsever
- 【thinkphp3.x】thinkphp3.x中使用A方法实例化控制器对象
- Ajax 跨域问题最佳解决方案
- 移动端网络优化
- UIDatePicker常用属性 NSDateFormatter 时间戳转为本地时间