Azure Storm入门(二)—— 事务处理
来源:互联网 发布:屏幕截图软件下载 编辑:程序博客网 时间:2024/06/04 23:24
这是Azure Storm系列文章。此前的文章包括:
Azure Storm入门(一)——从一个例子开始
此前我们通过一个例子了解了Storm的基本执行流程。这里我们再通过一个例子来探讨一下Storm的事务处理部分。
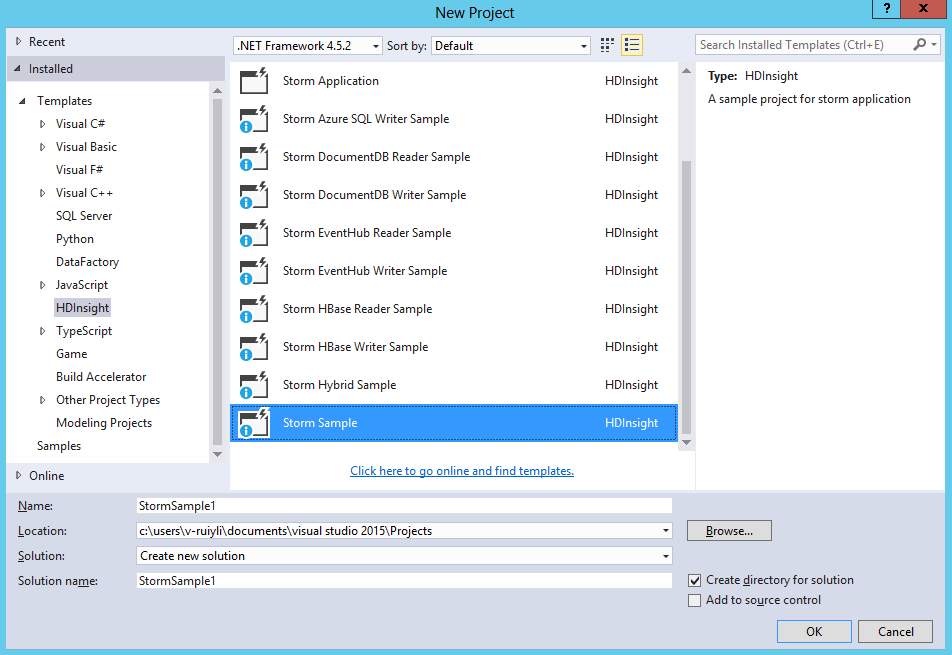
1、文件-》新建-》项目,选择HDInsight-》Storm示例,名字改为StormSample1。注意源码位置应与.sln文件在同一个文件夹下,否则可能会出错。
2、产生的文件有:
(1)Program.cs:程序入口,会有一个类HelloWorld,继承TopologyDescriptor。一旦提交到Storm中,会启动此类的GetTopologyBuilder方法。GetTopologyBuilder方法定义Storm的拓扑结构,即数据流向。
(2)Generator.cs:Spout,继承ISCPSpout类。产生数据的地方。通过这个文件随机产生一些句子发送到其他bolt(下文的Splitter)中
(3)Splitter.cs:继承ISCPBolt类,接收来自Genetator的数据。将Spout发过来的句子分割成单词,并发送数据到另外一个bolt中(下文的Counter)
(4)Counter.cs:继承ISCPBolt类,接收来自Splitter.cs的数据。统计单词出现的个数。
(5)Generator.config:Spout的配置文件。
(6)LocalTest.cs:本地测试类。本节暂时不会阐述。
3、此程序与Azure Storm入门(一)的区别主要有:
(1)Program.cs文件中,定义Spout时的代码如下:
// Set a User customized config (Generator.config) for the GeneratortopologyBuilder.SetSpout( "generator", Generator.Get, new Dictionary<string, List<string>>() { {Constants.DEFAULT_STREAM_ID, new List<string>(){"sentence"}} }, 1, "Generator.config");最后一句自定义了用户配置文件。
我们要修改program.cs的源码,因为默认是不支持Ack的。修改后的代码如下:
using System;using System.Collections.Generic;using System.IO;using System.Threading;using System.Linq;using System.Text;using System.Threading.Tasks;using Microsoft.SCP;using Microsoft.SCP.Topology; /// <summary>/// This program shows the ability to create a SCP.NET topology using C# Spouts and Bolts./// For how to use SCP.NET, please refer to: http://go.microsoft.com/fwlink/?LinkID=525500&clcid=0x409/// For more Storm samples, please refer to our GitHub repository: http://go.microsoft.com/fwlink/?LinkID=525495&clcid=0x409/// </summary> namespace StormSample1{ /// <summary> /// Implements the TopologyDescriptor interface to describe the topology in C#, /// and return a ITopologyBuilder instance. /// This TopologyDescriptor is marked as Active /// </summary> [Active(true)] class HelloWorld : TopologyDescriptor { /// <summary> /// Use Topology Specification API to describe the topology /// </summary> /// <returns></returns> public ITopologyBuilder GetTopologyBuilder() { // Use TopologyBuilder to define a Non-Tx topology // And define each spouts/bolts one by one TopologyBuilder topologyBuilder = new TopologyBuilder(typeof(HelloWorld).Name + DateTime.Now.ToString("yyyyMMddHHmmss")); // Set a User customized config (Generator.config) for the Generator topologyBuilder.SetSpout( "generator", Generator.Get, new Dictionary<string, List<string>>() { {Constants.DEFAULT_STREAM_ID, new List<string>(){"sentence"}} //定义输出格式 }, 2, //设置该Task的executor(进程)的数量 "Generator.config", //自定义配置 true); //允许ack topologyBuilder.SetBolt( "splitter", Splitter.Get, new Dictionary<string, List<string>>() { {Constants.DEFAULT_STREAM_ID, new List<string>(){"word", "firstLetterOfWord"}} //定义输出格式 }, 2, true).shuffleGrouping("generator"); //定义输入,以及输入的分组方式 // Use scp-field-group from Splitter to Counter, // and specify the second field in the Output schema of Splitter (Input schema of Counter) as the field grouping target // by passing the index array [1] (index start from 0) topologyBuilder.SetBolt( "counter", Counter.Get, new Dictionary<string, List<string>>() { {Constants.DEFAULT_STREAM_ID, new List<string>(){"word", "count"}} }, 2, true).fieldsGrouping("splitter", new List<int>() { 1 }); // Add topology config topologyBuilder.SetTopologyConfig(new Dictionary<string, string>() { {"topology.kryo.register","[\"[B\"]"} }); return topologyBuilder; } }}(2)在Generagor.cs文件中,增加了4个字段:private const int MAX_PENDING_TUPLE_NUM = 10; //最大同时处理的数目 private bool enableAck = false; //是否允许Ack,在Generagor的构造函数中通过读取配置文件赋值private long lastSeqId = 0;private Dictionary<long, string> cachedTuples = new Dictionary<long, string>(); //将所有已经发出去的句子存储起来(3)在Generagor.cs的构造函数中,parms是在Program.cs中传入的,即本节的第(1)点。构造函数如下所示:
public Generator(Context ctx, Dictionary<string, Object> parms = null){ Context.Logger.Info("StormSample1, Generator constructor called"); this.ctx = ctx; // Demo how to get User customized config from parms if (parms != null && parms.ContainsKey("UserConfig")) { this.cfg = (Configuration)parms["UserConfig"]; } if (cfg != null) { //这里展示如何获得用户自定义信息 Context.Logger.Info("StormSample1, Generator " + string.Format("New \"Generator\" instance created with config setting: {0}={1}.", "BatchSize", cfg.AppSettings.Settings["BatchSize"].Value)); } // Declare Output schema Dictionary<string, List<Type>> outputSchema = new Dictionary<string, List<Type>>(); outputSchema.Add("default", new List<Type>() { typeof(string) }); this.ctx.DeclareComponentSchema(new ComponentStreamSchema(null, outputSchema)); // Demo how to get pluginConf info and enable ACK in Non-Tx topology if (Context.Config.pluginConf.ContainsKey(Constants.NONTRANSACTIONAL_ENABLE_ACK)) { //这里展示如何判断是否支持Ack enableAck = (bool)(Context.Config.pluginConf[Constants.NONTRANSACTIONAL_ENABLE_ACK]); } Context.Logger.Info("StormSample1, Generator enableAck: {0}", enableAck);}一定要修改Program的代码,否则不会支持Ack!
(4)Generator.cs的NextTuple函数如下。Spout 必须存储所发出数据的元数据,这样,在失败时,就可以检索和发出数据。此示例所发出的数据太少,因此为了重放,每个 Tuple 的原始数据都会存储在字典中。
public void NextTuple(Dictionary<string, Object> parms){ Thread.Sleep(1000 * 60); Context.Logger.Info("StormSample1, Generator NextTuple enter"); string sentence; if (enableAck) { //这里当未处理完毕的Tuple大于给定数值时,不再发送。 //利用成员变量存储已经发送过的sentence,其中序列id作为唯一标记。 if (cachedTuples.Count <= MAX_PENDING_TUPLE_NUM) { lastSeqId++; sentence = sentences[rand.Next(0, sentences.Length - 1)]; Context.Logger.Info("StormSample1, Generator Emit: {0}, seqId: {1}", sentence, lastSeqId); this.ctx.Emit(Constants.DEFAULT_STREAM_ID, new Values(sentence), lastSeqId); cachedTuples[lastSeqId] = sentence; } else { // if have nothing to emit, then sleep for a little while to release CPU Thread.Sleep(50); } Context.Logger.Info("StormSample1, Generator cached tuple num: {0}", cachedTuples.Count); } else { sentence = sentences[rand.Next(0, sentences.Length - 1)]; Context.Logger.Info("StormSample1, Generator Emit: {0}", sentence); this.ctx.Emit(new Values(sentence)); } Context.Logger.Info("StormSample1, Generator NextTx exit");}(5)Generator.cs中,Ack方法不再是空,其代码如下。当每个bolt完成时,调用ack函数。当其中一条拓扑路径完成时,会激发此函数的调用。因此我们可以通过seqId来判断哪个句子完成统计了。这段代码将已经完成的Tuple删除。public void Ack(long seqId, Dictionary<string, Object> parms){ Context.Logger.Info("StormSample1, Generator Ack, seqId: {0}", seqId); bool result = cachedTuples.Remove(seqId); if (!result) { Context.Logger.Warn("StormSample1, Ack(), Generator remove cached tuple for seqId {0} fail!", seqId); }}(6)Generator.cs中,Fail方法不再是空,其代码如下。当Tuple发出的时间超过用户自定义的时间,却仍没有收到确认消息,那么就调用此函数。这个函数的作用重发数据。public void Fail(long seqId, Dictionary<string, Object> parms){ Context.Logger.Info("StormSample1, Generator Fail, seqId: {0}", seqId); if (cachedTuples.ContainsKey(seqId)) { string sentence = cachedTuples[seqId]; Context.Logger.Info("StormSample1, Generator Re-Emit: {0}, seqId: {1}", sentence, seqId); this.ctx.Emit(Constants.DEFAULT_STREAM_ID, new Values(sentence), seqId); } else { Context.Logger.Warn("StormSample1, Fail(), Generator can't find cached tuple for seqId {0}!", seqId); }}(7)Splitter.cs文件的execute代码如下。首先获得来自generagor的数据,然后模拟随机处理失败和延时。这里如果成功,调用Ack方法,通知成功。若处理失败,调用Fail方法。若延时,则会自动调用Fail方法。public void Execute(SCPTuple tuple){ Context.Logger.Info("StormSample1, Splitter Execute enter"); string sentence = tuple.GetString(0); foreach (string word in sentence.Split(' ')) { Context.Logger.Info("StormSample1, Splitter Emit: {0}", word); this.ctx.Emit(Constants.DEFAULT_STREAM_ID, new List<SCPTuple> { tuple }, new Values(word, word[0])); } if (enableAck) { if (Sample(50)) // this is to demo how to fail tuple. We do it randomly { Context.Logger.Info("StormSample1, Splitter fail tuple: tupleId: {0}", tuple.GetTupleId()); this.ctx.Fail(tuple); } else { if (Sample(50)) // this is to simulate timeout { Context.Logger.Info("StormSample1, Splitter sleep {0} seconds", msgTimeoutSecs + 1); Thread.Sleep((msgTimeoutSecs + 1) * 1000); } Context.Logger.Info("StormSample1, Splitter Ack tuple: tupleId: {0}", tuple.GetTupleId()); this.ctx.Ack(tuple); } } Context.Logger.Info("StormSample1, Splitter Execute exit");}(8)同样,Counter.cs中的execute方法在处理成功后也会调用Ack方法。这里会传播到Generator,让其调用Ack方法。public void Execute(SCPTuple tuple){ Context.Logger.Info("StormSample1, Counter Execute enter"); string word = tuple.GetString(0); int count = counts.ContainsKey(word) ? counts[word] : 0; count++; counts[word] = count; Context.Logger.Info("StormSample1, Counter Emit: {0}, count: {1}", word, count); this.ctx.Emit(Constants.DEFAULT_STREAM_ID, new List<SCPTuple> { tuple }, new Values(word, count)); if (enableAck) { Context.Logger.Info("StormSample1, Counter Ack tuple: tupleId: {0}", tuple.GetTupleId()); this.ctx.Ack(tuple); } // log some info to out file for bvt test validataion if (taskIndex == 0) // For component with multiple parallism, only one of them need to log info { string fileName = @"..\..\..\..\..\HelloWorldOutput" + Process.GetCurrentProcess().Id + ".txt"; FileStream fs = new FileStream(fileName, FileMode.Append); using (StreamWriter writer = new StreamWriter(fs)) { writer.WriteLine("word: {0}, count: {1}", word, count); } } Context.Logger.Info("StormSample1, Counter Execute exit");}目前我实验一下,发现有以下几点应该注意。
(1)要想支持Ack机制,需要在创建拓扑的时候指定支持ACK,否则不能执行Ack机制。
(2)读取的topology.message.timeout.secs延迟不正确。我在StormUI中看到的这个值为30,但是程序日志却为1000。可以在Program.cs中设置config。
(3)创建Spout/Bolt时,可以指定并行数目。这个并行数目是指执行的进程个数。如果执行Spout为2,那么构造函数就会执行两次。
(4)目前Linux的Storm不支持VS提交作业。只有Windows下的Storm支持。
- Azure Storm入门(二)—— 事务处理
- Azure Storm入门(一)
- Azure入门学习(二)
- storm入门第一章——storm初解(集群搭建)
- Storm Topologies 示例——(入门)
- Apache Storm 的安装、配置及入门基础(二)
- PHP on Windows Azure 入门教学系列(2) ——利用SQL Azure做一个简单的访问计数器
- PHP on Windows Azure 入门教学系列(3) ——在Windows Azure中部署Wordpress
- storm自带例子详解 (二)——BasicDRPCTopology
- Storm高级原语(二) — DRPC
- Storm高级原语(二) — DRPC
- Storm高级原语(二) — DRPC
- Storm入门程序——WordCount
- Storm简单使用——一举入门
- Storm 入门(拓扑)
- storm学习(二)
- Storm入门教程(二)
- Storm(三):Storm入门Demo
- Android-Universal-Image-Loader是一个开源的UI组件程序
- 自定义PopupWindow实现Spinner
- Android 开发中,有哪些坑需要注意?
- 挑战面试编程:查找数组中第k大的数
- table表格锁定任意数量列或行
- Azure Storm入门(二)—— 事务处理
- eclipse 中设置content assist 如何设置空格不上屏
- GSM模块--SIM900A短信功能
- 将数据库中的用户名和密码显示到JSP页面
- mysql------常用命令
- 菜鸟学python(2) 常见运算符
- Cocos2D瓦块地图高清屏(retina)显示比例问题的解决
- 【Linux学习】epoll详解
- openCL学习记录