Android之AlarmManager
来源:互联网 发布:网络密匙是什么 编辑:程序博客网 时间:2024/06/06 20:01
Android平台中,Alarm Manager Service控制着闹钟和唤醒功能。和其他系统服务一样,提供了一个辅助管理类-AlarmManager,我们只需要使用AlarmManager即可调用Alarm Manager Service。
在AlarmManager提供了如下方法:

1、void cancel(pendingIntent operatioin):取消一个已注册的定时器
2、void set(int type,long triggerAtTime,PendingIntent operation):设置一个新的定时器。
3、void setInecactRepeating(int type,long triggerAtMillis,long intervalMills,PendingIntent operation):设置一个不精确的重复类型的定时器。
4、void setRepeating(int type,long triggerAtMills,long intervalMills,PendingIntent operation):设置一个重复类型的定时器
5、void setTime(long millis):设置系统时钟时间。
6、void setTimeZone(String timeZone):设置时区
在上面设置时钟的方法中,第一个参数要设置一个闹钟的类型,在系统中提供了如下类型:
1、ELAPSED_REALTIME:此类型的闹钟在系统休眠状态下是不可用的,不能唤醒系统。使用的时间是相对于系统的启动时间,该时间可以通过SystemClock.elapsedRealTime()来获取。
2、ELAPSED_REALTIME_WAKEUP:此类型的闹钟在系统休眠状态下是可用的,使用的时间是相对于系统的启动时间。
3、RTC:此类型在系统休眠状态下是不可用的,使用的是真实时间。
4、RTC_WAKEUP:此类型在系统休眠状态下可用,使用的是真实时间。
在上面的设置可重复的时钟的方法中,intervalMillis参数的取值可以如下:
1、INTERVAL_FIFTEEN_MINUTES
2、INTERVAL_HALF_HOUR
3、INTERVAL_HOUR
4、INTERVAL_HALF_DAY
5、INTERVAL_DAY

具体如何使用AlarmManager呢,我们通过一个案例来说明。
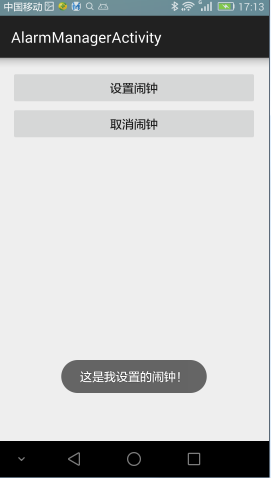
public class AlarmManagerActivity extends ActionBarActivity { private AlarmManager alarmManager; @Override protected void onCreate(Bundle savedInstanceState) { super.onCreate(savedInstanceState); setContentView(R.layout.activity_alarm_manager); alarmManager = (AlarmManager)getSystemService(Context.ALARM_SERVICE); IntentFilter filter = new IntentFilter("com.jredu.action.MyAlarm"); registerReceiver(receiver,filter); } public void setClock(View v){ Intent i = new Intent("com.jredu.action.MyAlarm"); PendingIntent intent= PendingIntent.getBroadcast(this,0,i,PendingIntent.FLAG_UPDATE_CURRENT); alarmManager.setRepeating(AlarmManager.RTC_WAKEUP, System.currentTimeMillis(), 30*1000,intent); } public void cancleClock(View v){ Intent i = new Intent("com.jredu.action.MyAlarm"); PendingIntent intent= PendingIntent.getBroadcast(this,0,i,PendingIntent.FLAG_UPDATE_CURRENT); alarmManager.cancel(intent); } private BroadcastReceiver receiver = new BroadcastReceiver() { @Override public void onReceive(Context context, Intent intent) { if(intent.getAction().equals("com.jredu.action.MyAlarm")){ Toast.makeText(AlarmManagerActivity.this,"这是我设置的闹钟!",Toast.LENGTH_LONG).show(); } } }; @Override protected void onDestroy() { super.onDestroy(); unregisterReceiver(receiver); }}
运行效果图如下:

出处:http://www.cnblogs.com/jerehedu/
版权声明:本文版权归烟台杰瑞教育科技有限公司和CSDN共有,欢迎转载,但未经作者同意必须保留此段声明,且在文章页面明显位置给出原文连接,否则保留追究法律责任的权利。
技术咨询:

- android之定时器AlarmManager
- android之定时器AlarmManager
- android之定时器AlarmManager .
- Android之AlarmManager
- Android之AlarmManager
- android之alarmManager
- android之AlarmManager
- Android之AlarmManager
- android之定时器AlarmManager
- android之定时器AlarmManager
- Android之AlarmManager
- Android开发之AlarmManager
- Android之AlarmManager
- android之AlarmManager
- Android之AlarmManager
- Android之AlarmManager
- android开发之AlarmManager
- Android之AlarmManager
- Double类型精度缺失-19.9变为19.89
- 启动活动的最佳写法
- windows下安装redis
- "Mac OS X"想要进行更改。键入管理员的名称和密码以允许执行此操作("Mac OS X"想使用系统钥匙串)
- CodeForces 624 A. Save Luke(水~)
- Android之AlarmManager
- oc 中tableView的汇总
- IIS服务器同时设置多个网站的三种方式
- No resource found that matches the given name Theme.AppCompat.Light.*
- 此证书签发者无效
- OS视图控制对象生命周期-init、viewDidLoad、viewWillAppear、viewDidAppear、viewWillDisappear、view
- HDU 1850 Being a Good Boy in Spring Festival (Nimm Game)
- 怎么理解负值的margin
- 字符串搜索算法总结