Android的AsyncTask类的解读

来源:互联网 发布:04年总决赛科比数据 编辑:程序博客网 时间:2024/05/22 07:39

AsyncTask类,因为这两个类使我们在Android进行耗时的操作的时候,不影响主线

程的情况下经常使用的两个类,我们先来看一下AsyncTask类源码中定义的变量:

[java] view plain copy
 在CODE上查看代码片派生到我的代码片
  1. private static final ThreadFactory sThreadFactory = new ThreadFactory() {  
  2.     private final AtomicInteger mCount = new AtomicInteger(1);  
  3.   
  4.     public Thread newThread(Runnable r) {  
  5.         return new Thread(r, "AsyncTask #" + mCount.getAndIncrement());  
  6.     }  
  7. };  
  8.   
  9. private static final BlockingQueue<Runnable> sPoolWorkQueue = new LinkedBlockingQueue<Runnable>(128);  
  10.   
  11. /** 
  12.  * An {@link Executor} that can be used to execute tasks in parallel. 
  13.  */  
  14. public static final Executor THREAD_POOL_EXECUTOR = new ThreadPoolExecutor(CORE_POOL_SIZE, MAXIMUM_POOL_SIZE, KEEP_ALIVE,  
  15.         TimeUnit.SECONDS, sPoolWorkQueue, sThreadFactory);  
  16.   
  17. private static final InternalHandler sHandler = new InternalHandler();  
  18.   
  19. private volatile Status mStatus = Status.PENDING;  
  20.   
  21. private final WorkerRunnable<Params, Result> mWorker;  
  22.   
  23. private final AtomicBoolean mCancelled = new AtomicBoolean();  
  24.   
  25. private final FutureTask<Result> mFuture;  

看到这些字段之后,我们可能发现,貌似好多类型我们都不知道,所以这里在先说AsyncTask类之前,需要做一些准备工作,介绍

一些这些类型。其实我们还需要了解一下Java5.0加入的并发库的相关知识,参看这篇文章:

http://blog.csdn.net/jiangwei0910410003/article/details/20373497


第一、ThreadFactory类

看看他的源码:

[java] view plain copy
 在CODE上查看代码片派生到我的代码片
  1. public interface ThreadFactory {  
  2.   
  3.     /** 
  4.      * Constructs a new {@code Thread}.  Implementations may also initialize 
  5.      * priority, name, daemon status, {@code ThreadGroup}, etc. 
  6.      * 
  7.      * @param r a runnable to be executed by new thread instance 
  8.      * @return constructed thread, or {@code null} if the request to 
  9.      *         create a thread is rejected 
  10.      */  
  11.     Thread newThread(Runnable r);  
  12. }  
好吧,好简单呀,就是一个接口,有一个回调方法newThread,用于创建一个Thread.


第二、BlockQueue类

是一个阻塞队列,这里就不做介绍了,参考这篇文章:

http://blog.csdn.net/jiangwei0910410003/article/details/20373497

第三、ThreadPoolExecutor类

主要是看他的构造函数的几个参数的含义,就能够了解这个类的作用了:

[java] view plain copy
 在CODE上查看代码片派生到我的代码片
  1. public ThreadPoolExecutor(int corePoolSize,    
  2.                           int maximumPoolSize,    
  3.                           long keepAliveTime,    
  4.                           TimeUnit unit,    
  5.                           BlockingQueue<Runnable> workQueue,    
  6.                           ThreadFactory threadFactory,    
  7.                           RejectedExecutionHandler handler)  
看这个参数很容易让人以为是线程池里保持corePoolSize个线程,如果不够用,就加线程入池直至maximumPoolSize大小,如果还

不够就往workQueue里加,如果workQueue也不够就用RejectedExecutionHandler来做拒绝处理。

但实际情况不是这样,具体流程如下:

1)当池子大小小于corePoolSize就新建线程,并处理请求

2)当池子大小等于corePoolSize,把请求放入workQueue中,池子里的空闲线程就去从workQueue中取任务并处理

3)当workQueue放不下新入的任务时,新建线程入池,并处理请求,如果池子大小撑到了maximumPoolSize就用

RejectedExecutionHandler来做拒绝处理

4)另外,当池子的线程数大于corePoolSize的时候,多余的线程会等待keepAliveTime长的时间,如果无请求可处理就自行销毁

内部结构如下所示:


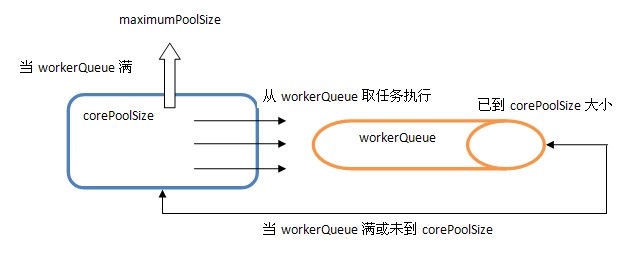
从中可以发现ThreadPoolExecutor就是依靠BlockingQueue的阻塞机制来维持线程池,当池子里的线程无事可干的时候就通过

workQueue.take()阻塞住。


第四、InternalHandler类

这个类我们在后面详细分析AsyncTask类的时候,会发现他其实就是一个Handler,所以这里我们可以看出AsyncTask类其实是基于

Handler+并发库技术实现的,后续解析代码的时候会体现的更明显。


第五、Status类型

这个类型其实是一个枚举,我们这里的关注点不是类型,而是修饰符volatile,这个修饰符的作用这里不做介绍了,请看下面一篇文

章:http://blog.csdn.net/jiangwei0910410003/article/details/20369811


第六、WorkerRunnable类

这个类是在AsyncTask类中定义的:

[html] view plain copy
 在CODE上查看代码片派生到我的代码片
  1. private static abstract class WorkerRunnable<Params, Result> implements Callable<Result> {  
  2.     Params[] mParams;  
  3. }  
他是个抽象类,实现了Callable接口,这里的Param和Result是AsyncTask定义的泛型类型


第七、FutureTask类

[java] view plain copy
 在CODE上查看代码片派生到我的代码片
  1. public class FutureTask<V> implements RunnableFuture<V>{  
  2.     //.....  
  3. }  

在看一下RunnableFuture接口:

[java] view plain copy
 在CODE上查看代码片派生到我的代码片
  1. public interface RunnableFuture<V> extends Runnable, Future<V> {  
  2.     /** 
  3.      * Sets this Future to the result of its computation 
  4.      * unless it has been cancelled. 
  5.      */  
  6.     void run();  
  7. }  
FutureTask类其实是实现了Future和Runnable接口,具备了这两个接口的功能,关于Future和上面的Callable可以参考下面文章:

http://blog.csdn.net/jiangwei0910410003/article/details/20373497

注意:刚才也说了AsyncTask其实是基于Handler+并发库技术实现的,但是并发库中也是有很多知识的,这里用到的核心技术就

是Future+Callable

下面来看看一下Future类的主要方法:

1) boolean cancel(boolean mayInterruptIfRunning):试图取消对此任务的执行。如果任务已完成、或已取消,或者由于某些其

他原因而无法取消,则此尝试将失败。当调用 cancel 时,如果调用成功,而此任务尚未启动,则此任务将永不运行。如果任务已经

启动,则 mayInterruptIfRunning 参数确定是否应该以试图停止任务的方式来中断执行此任务的线程。此方法返回后,对 isDone() 的

后续调用将始终返回 true。如果此方法返回 true,则对 isCancelled() 的后续调用将始终返回 true。 

2)boolean isCancelled():如果在任务正常完成前将其取消,则返回 true。 

3)boolean isDone():如果任务已完成,则返回 true。 可能由于正常终止、异常或取消而完成,在所有这些情况中,此方法都将

返回 true。 

4)V get()throws InterruptedException,ExecutionException:如有必要,等待计算完成,然后获取其结果。 

5)V get(long timeout,TimeUnit unit) throws InterruptedException,ExecutionException,TimeoutException:如有必要,最

多等待为使计算完成所给定的时间之后,获取其结果(如果结果可用)。


第八、AtomicBoolean类

这个类,我们可能不会经常用到,但是我们通过它的名字会发现他是对Boolean类型添加了原子操作的功能,那么当然还有其他7种

基本类型对应的类(AtomicInteger等)

看一下他的源码:

[java] view plain copy
 在CODE上查看代码片派生到我的代码片
  1. private static final long serialVersionUID = 4654671469794556979L;  
  2. // setup to use Unsafe.compareAndSwapInt for updates  
  3. private static final Unsafe unsafe = Unsafe.getUnsafe();  
  4. private static final long valueOffset;  
  5.   
  6. static {  
  7.     try {  
  8.         valueOffset = unsafe.objectFieldOffset  
  9.                 (AtomicBoolean.class.getDeclaredField("value"));  
  10.     } catch (Exception ex) { throw new Error(ex); }  
  11. }  
  12.   
  13. private volatile int value;  

value值是个int类型的,这里使用int类型来模拟Boolean类型的,0就是false,1就是true.

这里有一个很重要的类Unsafe,但是这个类,他是属于JDK的核心包中,所以要查看他的源码的话,只能从网上去搜了:

http://www.docjar.com/html/api/sun/misc/Unsafe.java.html

这个类是用于执行低级别、不安全操作的方法集合。尽管这个类和所有的方法都是公开的(public),但是这个类的使用仍然受限,

你无法在自己的java程序中直接使用该类,因为只有授信的代码才能获得该类的实例。从上面的描述,可以了解到该类是用来执行

较低级别的操作的,比如获取某个属性在内存中的位置,不过一般人很少会有这样的需求。

上面的静态代码块中的代码的功能就是用来获取AtomicBoolean实例中的value属性在内存中的位置。这里使用了Unsafe的

objectFieldOffset方法。这个方法是一个本地方法, 该方法用来获取一个给定的静态属性的位置。


在来看一下AtomicBoolean类的一个重要的方法:

[java] view plain copy
 在CODE上查看代码片派生到我的代码片
  1. /** 
  2.  * Atomically sets the value to the given updated value 
  3.  * if the current value {@code ==} the expected value. 
  4.  * 
  5.  * @param expect the expected value 
  6.  * @param update the new value 
  7.  * @return true if successful. False return indicates that 
  8.  * the actual value was not equal to the expected value. 
  9.  */  
  10. public final boolean compareAndSet(boolean expect, boolean update) {  
  11.     int e = expect ? 1 : 0;  
  12.     int u = update ? 1 : 0;  
  13.     return unsafe.compareAndSwapInt(this, valueOffset, e, u);  
  14. }  

[html] view plain copy
 在CODE上查看代码片派生到我的代码片
  1. /**  
  2.  * Eventually sets to the given value.  
  3.  *  
  4.  * @param newValue the new value  
  5.  * @since 1.6  
  6.  */  
  7. public final void lazySet(boolean newValue) {  
  8.     int v = newValue ? 1 : 0;  
  9.     unsafe.putOrderedInt(this, valueOffset, v);  
  10. }  

这里有个疑问,为什么需要获取属性在内存中的位置?在AtomicBoolean源码中,在这样几个地方使用到了这个valueOffset值:

查找资料后,发现lazySet方法大多用在并发的数据结构中,用于低级别的优化。compareAndSet这个方法多见于并发控制中,简称

CAS(Compare And Swap),意思是如果valueOffset位置包含的值与expect值相同,则更新valueOffset位置的值为update,并返回

true,否则不更新,返回false。这里可以举个例子来说明compareAndSet的作用,如支持并发的计数器,在进行计数的时候,首先

读取当前的值,假设值为a,对当前值 + 1得到b,但是+1操作完以后,并不能直接修改原值为b,因为在进行+1操作的过程中,可能

会有其它线程已经对原值进行了修改,所以在更新之前需要判断原值是不是等于a,如果不等于a,说明有其它线程修改了,需要重

新读取原值进行操作,如果等于a,说明在+1的操作过程中,没有其它线程来修改值,我们就可以放心的更新原值了。


AsyncTask源码解析

所有的类型都说完之后,下面来看一下AsyncTask类的源码

一、构造方法

首先来看一下构造方法:

[java] view plain copy
  1. /** 
  2.  * Creates a new asynchronous task. This constructor must be invoked on the UI thread. 
  3.  */  
  4. public AsyncTask() {  
  5.     mWorker = new WorkerRunnable<Params, Result>() {  
  6.         public Result call() throws Exception {  
  7.             mTaskInvoked.set(true);  
  8.   
  9.             Process.setThreadPriority(Process.THREAD_PRIORITY_BACKGROUND);  
  10.             //noinspection unchecked  
  11.             return postResult(doInBackground(mParams));  
  12.         }  
  13.     };  
  14.   
  15.     mFuture = new FutureTask<Result>(mWorker) {  
  16.         @Override  
  17.         protected void done() {  
  18.             try {  
  19.                 postResultIfNotInvoked(get());  
  20.             } catch (InterruptedException e) {  
  21.                 android.util.Log.w(LOG_TAG, e);  
  22.             } catch (ExecutionException e) {  
  23.                 throw new RuntimeException("An error occured while executing doInBackground()",  
  24.                         e.getCause());  
  25.             } catch (CancellationException e) {  
  26.                 postResultIfNotInvoked(null);  
  27.             }  
  28.         }  
  29.     };  
  30. }  
构造方法主要初始化WorkerRunnable类和FutureTask

在WorkerRunnable的call方法中主要调用了postResult(doInBackground(mParams)),之前看到了WorkerRunnable实现了Callable接口的,这里就实现了他的call方法,执行完这个方法之后,需要返回执行之后的结果

先看一下:doInBackground方法:

[java] view plain copy
 在CODE上查看代码片派生到我的代码片
  1. protected abstract Result doInBackground(Params... params);  
是一个抽象的方法,这个需要我们自己去实现它


再来看一下postResult方法,这个方法里面我们可以看到就是将Result类型的结果值发送给InternalHandler进行处理

[java] view plain copy
 在CODE上查看代码片派生到我的代码片
  1. private Result postResult(Result result) {  
  2.     @SuppressWarnings("unchecked")  
  3.     Message message = sHandler.obtainMessage(MESSAGE_POST_RESULT,  
  4.             new AsyncTaskResult<Result>(this, result));  
  5.     message.sendToTarget();  
  6.     return result;  
  7. }  

看一下InternalHandler类的定义:

[java] view plain copy
 在CODE上查看代码片派生到我的代码片
  1. private static class InternalHandler extends Handler {  
  2.     @SuppressWarnings({"unchecked""RawUseOfParameterizedType"})  
  3.     @Override  
  4.     public void handleMessage(Message msg) {  
  5.         AsyncTaskResult result = (AsyncTaskResult) msg.obj;  
  6.         switch (msg.what) {  
  7.         case MESSAGE_POST_RESULT:  
  8.             // There is only one result  
  9.             result.mTask.finish(result.mData[0]);  
  10.             break;  
  11.         case MESSAGE_POST_PROGRESS:  
  12.             result.mTask.onProgressUpdate(result.mData);  
  13.             break;  
  14.         }  
  15.     }  
  16. }  
这个Handler中处理两个状态的信息:

MESSAGE_POST_RESULT:处理结果的

这里调用了finish方法:

[java] view plain copy
 在CODE上查看代码片派生到我的代码片
  1. private void finish(Result result) {  
  2.     if (isCancelled()) {  
  3.         onCancelled(result);  
  4.     } else {  
  5.         onPostExecute(result);  
  6.     }  
  7.     mStatus = Status.FINISHED;  
  8. }  
在这个方法里面,会判断取消状态,然后执行对应的方法,因为任务结束有两个原因:

一个是被取消了:回调onCancelled方法

一个是完成:回调onPostExecute方法

MESSAGE_POST_PROGRESS:处理过程的

这里调用onProgressUpdate方法

[java] view plain copy
 在CODE上查看代码片派生到我的代码片
  1. /** 
  2.  * Runs on the UI thread after {@link #publishProgress} is invoked. 
  3.  * The specified values are the values passed to {@link #publishProgress}. 
  4.  * 
  5.  * @param values The values indicating progress. 
  6.  * 
  7.  * @see #publishProgress 
  8.  * @see #doInBackground 
  9.  */  
  10. @SuppressWarnings({"UnusedDeclaration"})  
  11. protected void onProgressUpdate(Progress... values) {  
  12. }  
这个方法也是我们可以重写的方法


下面再看一下FutureTask类的初始化:

[java] view plain copy
 在CODE上查看代码片派生到我的代码片
  1. mFuture = new FutureTask<Result>(mWorker) {  
  2.     @Override  
  3.     protected void done() {  
  4.         try {  
  5.             postResultIfNotInvoked(get());  
  6.         } catch (InterruptedException e) {  
  7.             android.util.Log.w(LOG_TAG, e);  
  8.         } catch (ExecutionException e) {  
  9.             throw new RuntimeException("An error occured while executing doInBackground()",  
  10.                     e.getCause());  
  11.         } catch (CancellationException e) {  
  12.             postResultIfNotInvoked(null);  
  13.         }  
  14.     }  
  15. };  

这里调用了一个重要的方法:postResultIfNotInvoked(get());

FutureTask的构造方法需要传递一个Callable接口对象进去,内部可以通过调用这个接口对象的call方法,获取结果,可以查看一下FutureTask类的源码:

构造方法:

[java] view plain copy
 在CODE上查看代码片派生到我的代码片
  1. public FutureTask(Callable<V> callable) {  
  2.     if (callable == null)  
  3.         throw new NullPointerException();  
  4.     this.callable = callable;  
  5.     this.state = NEW;       // ensure visibility of callable  
  6. }  

保存一下Callable接口对象


因为也实现了Runnable接口,所以要实现run方法:
[java] view plain copy
 在CODE上查看代码片派生到我的代码片
  1. public void run() {  
  2.     if (state != NEW ||  
  3.             !UNSAFE.compareAndSwapObject(this, runnerOffset,  
  4.                     null, Thread.currentThread()))  
  5.         return;  
  6.     try {  
  7.         Callable<V> c = callable;  
  8.         if (c != null && state == NEW) {  
  9.             V result;  
  10.             boolean ran;  
  11.             try {  
  12.                 result = c.call();  
  13.                 ran = true;  
  14.             } catch (Throwable ex) {  
  15.                 result = null;  
  16.                 ran = false;  
  17.                 setException(ex);  
  18.             }  
  19.             if (ran)  
  20.                 set(result);  
  21.         }  
  22.     } finally {  
  23.         // runner must be non-null until state is settled to  
  24.         // prevent concurrent calls to run()  
  25.         runner = null;  
  26.         // state must be re-read after nulling runner to prevent  
  27.         // leaked interrupts  
  28.         int s = state;  
  29.         if (s >= INTERRUPTING)  
  30.             handlePossibleCancellationInterrupt(s);  
  31.     }  
  32. }  
在这个run方法中我们看到会调用c.call方法获取结果。然后set(result),以后就可以通过get()方法获取到result,在看一下set方法的源码:
[java] view plain copy
 在CODE上查看代码片派生到我的代码片
  1. protected void set(V v) {  
  2.     if (UNSAFE.compareAndSwapInt(this, stateOffset, NEW, COMPLETING)) {  
  3.         outcome = v;  
  4.         UNSAFE.putOrderedInt(this, stateOffset, NORMAL); // final state  
  5.         finishCompletion();  
  6.     }  
  7. }  


看一下finishCompletion方法:

[java] view plain copy
 在CODE上查看代码片派生到我的代码片
  1. private void finishCompletion() {  
  2.     // assert state > COMPLETING;  
  3.     for (WaitNode q; (q = waiters) != null;) {  
  4.         if (UNSAFE.compareAndSwapObject(this, waitersOffset, q, null)) {  
  5.             for (;;) {  
  6.                 Thread t = q.thread;  
  7.                 if (t != null) {  
  8.                     q.thread = null;  
  9.                     LockSupport.unpark(t);  
  10.                 }  
  11.                 WaitNode next = q.next;  
  12.                 if (next == null)  
  13.                     break;  
  14.                 q.next = null// unlink to help gc  
  15.                 q = next;  
  16.             }  
  17.             break;  
  18.         }  
  19.     }  
  20.   
  21.     done();  
  22.   
  23.     callable = null;        // to reduce footprint  
  24. }  
这里就看到调用了FutureTask类的done方法:
[java] view plain copy
 在CODE上查看代码片派生到我的代码片
  1. protected void done() { }  
这是个空方法,需要子类重写这个方法。下面就看到重写这个done方法

这里FutureTask重写了done方法,在这个方法中处理(WorkerRunnable)Callable任务执行的结果的。

首先来看一下get()方法:

[java] view plain copy
 在CODE上查看代码片派生到我的代码片
  1. /** 
  2.  * Waits if necessary for the computation to complete, and then 
  3.  * retrieves its result. 
  4.  * 
  5.  * @return The computed result. 
  6.  * 
  7.  * @throws CancellationException If the computation was cancelled. 
  8.  * @throws ExecutionException If the computation threw an exception. 
  9.  * @throws InterruptedException If the current thread was interrupted 
  10.  *         while waiting. 
  11.  */  
  12. public final Result get() throws InterruptedException, ExecutionException {  
  13.     return mFuture.get();  
  14. }  
这里就是调用了FutureTask的取数据方法get,获取执行结果


再来看一下postResultIfNotInvoked方法:

[java] view plain copy
 在CODE上查看代码片派生到我的代码片
  1. private void postResultIfNotInvoked(Result result) {  
  2.     final boolean wasTaskInvoked = mTaskInvoked.get();  
  3.     if (!wasTaskInvoked) {  
  4.         postResult(result);  
  5.     }  
  6. }  
这个方法会判断一下,当前的Task有没有执行过,如果没有执行过,就执行postResult方法


二、execute方法

AsyncTask类的构造方法看完之后,下面来看一下他的执行方法execute

[java] view plain copy
 在CODE上查看代码片派生到我的代码片
  1. public final AsyncTask<Params, Progress, Result> execute(Params... params) {  
  2.     return executeOnExecutor(sDefaultExecutor, params);  
  3. }  


再看executeOnExecutor方法:

[java] view plain copy
 在CODE上查看代码片派生到我的代码片
  1. public final AsyncTask<Params, Progress, Result> executeOnExecutor(Executor exec,  
  2.         Params... params) {  
  3.     if (mStatus != Status.PENDING) {  
  4.         switch (mStatus) {  
  5.         case RUNNING:  
  6.             throw new IllegalStateException("Cannot execute task:"  
  7.                     + " the task is already running.");  
  8.         case FINISHED:  
  9.             throw new IllegalStateException("Cannot execute task:"  
  10.                     + " the task has already been executed "  
  11.                     + "(a task can be executed only once)");  
  12.         }  
  13.     }  
  14.   
  15.     mStatus = Status.RUNNING;  
  16.   
  17.     onPreExecute();  
  18.   
  19.     mWorker.mParams = params;  
  20.     exec.execute(mFuture);  
  21.   
  22.     return this;  
  23. }  


这个方法需要传递一个执行器,这个执行器的定义如下:
[html] view plain copy
 在CODE上查看代码片派生到我的代码片
  1. private static class SerialExecutor implements Executor {  
  2.     final ArrayDeque<Runnable> mTasks = new ArrayDeque<Runnable>();  
  3.     Runnable mActive;  
  4.   
  5.     public synchronized void execute(final Runnable r) {  
  6.         mTasks.offer(new Runnable() {  
  7.             public void run() {  
  8.                 try {  
  9.                     r.run();  
  10.                 } finally {  
  11.                     scheduleNext();  
  12.                 }  
  13.             }  
  14.         });  
  15.         if (mActive == null) {  
  16.             scheduleNext();  
  17.         }  
  18.     }  
  19.   
  20.     protected synchronized void scheduleNext() {  
  21.         if ((mActive = mTasks.poll()) != null) {  
  22.             THREAD_POOL_EXECUTOR.execute(mActive);  
  23.         }  
  24.     }  
  25. }  
这个执行器,我们可以看到他的execute方法,顺序执行任务。这里的THREAD_POOL_EXECUTOR就是一个线程池,在开始讲字

段定义的时候说过他,主要使用任务池中拿去Runnable去执行。这里传递进来的是我们在构造方法中初始化的FutureTask类,那么

就是在这里执行它的run方法。

在这个方法中调用onPreExecute方法:

[java] view plain copy
 在CODE上查看代码片派生到我的代码片
  1. protected void onPreExecute() {  
  2. }  

这个也是一个空方法,我们可以去重写的,然后就开始使用执行器执行任务,这里需要将任务FutureTask传递进去。


这里我们可以看到,AsyncTask类的三个主要的方法:

doInBackground(...):他是一个抽象的方法,需要实现的

onPreExecute(...):是开始预备的方法,我们可以重写(可选择的)

onPostExecute(...):是执行结束之后的方法,我们可以重写(可选择的)

onProgressUpdate(...):是执行中的方法,我们可以重写(可选择)

通过上面的分析,我们可以看到只有doInBackground方法是在线程池中执行的,就是在WorkerRunnable中的call方法中。其他的两

个方法都是在外部线程中执行的

onPreExecute是在AsyncTask类的execute方法中执行的。

onPostExecute是在finish方法中执行的,而finish方法又是在InternalHandler中的MESSAGE_POST_RESULT状态下执行的。

onProgressUpdate是在InternalHandler中的MESSAGE_POST_PROGRESS状态下执行的

(这里的InternalHandler采用的是默认构造方法创建的,所以他的Looper是创建AsyncTask类的线程,如果你想在子线程中创建

AsyncTask的话,会报异常的,必须将该线程Looper.prepare一下才可以)。


总结

1、AsyncTask类中有Param,Result等类型,这些是泛型类型,所以这里不要混淆就可以了

2、AsyncTask类用到的技术:Handler+FutureTask(实现了Future和Runnable接口)+Callable

3、AsyncTask类的执行周期:

1)在构造方法中,

初始化WorkerRunnable(实现了Callable接口),实现call方法,在这个方法中回调AsyncTask类的doInBackground方法,并且返回一

个result值。

初始化FutureTask(实现了Runnable,Future接口),复写了FutureTask中的done方法,在这个方法中通过FutureTask的get方法获取

result。同时我们在初始化的时候需要传递一个Callable(WorkerRunnable)类型,之前看FutureTask的源码发现,在他的run方法中,

会调用传递进来的Callable类型的call方法,并将这个方法的返回值result在调用set方法设置一下,同时会调用done方法。


2)在execute方法中

调用了executeOnExecutor方法,在这个方法中会调用AsyncTask类的onPreExecute方法,然后在调用ThreadPoolExecutor开始执

行FutureTask任务


3)在InternalHandler定义中

有两个状态:

一个是执行完成了,会调用finish方法,在这个方法中会调用AsyncTask类的onPostExecute方法

一个是执行中的方法,会调用AsyncTask类的onProgressUpdate方法

这个Handler的Looper是创建AsyncTask类的线程Looper。

0 0
原创粉丝点击