Fast RCNN 训练自己的数据集(3训练和检测)
来源:互联网 发布:围棋棋力测试软件 编辑:程序博客网 时间:2024/06/04 23:42
转载请注明出处,楼燚(yì)航的blog,http://www.cnblogs.com/louyihang-loves-baiyan/
https://github.com/YihangLou/fast-rcnn-train-another-dataset 这是我在github上修改的几个文件的链接,求星星啊,求星星啊(原谅我那么不要脸~~)
在之前两篇文章中我介绍了怎么编译Fast RCNN,和怎么修改Fast RCNN的读取数据接口,接下来我来说明一下怎么来训练网络和之后的检测过程
先给看一下极好的检测效果
https://github.com/YihangLou/fast-rcnn-train-another-dataset
1.预训练模型介绍
首先在data目录下,有两个目录就是之前在1中解压好
- fast_rcnn_models/
- imagenet_models/
fast_rcnn_model文件夹下面是作者用fast rcnn训练好的三个网络,分别对应着小、中、大型网络,大家可以试用一下这几个网络,看一些检测效果,他们训练都迭代了40000次,数据集都是pascal_voc的数据集。
- caffenet_fast_rcnn_iter_40000.caffemodel
- vgg_cnn_m_1024_fast_rcnn_iter_40000.caffemodel
- vgg16_fast_rcnn_iter_40000.caffemodel
imagenet_model文件夹下面是在Imagenet上训练好的通用模型,在这里用来初始化网络的参数
- CaffeNet.v2.caffemodel
- VGG_CNN_M_1024.v2.caffemodel
- VGG16.v2.caffemodel
在这里我比较推荐先用中型网络训练,中型网络训练和检测的速度都比较快,效果也都比较理想,大型网络的话训练速度比较慢,我当时是5000多个标注信息,网络配置默认,中型网络训练大概两三个小时,大型网络的话用十几个小时,需要注意的是网络训练最好用GPU,CPU的话太慢了,我当时用的实验室的服务器,有16块Tesla K80,用起来真的是灰常爽!
2. 修改模型文件配置
模型文件在models下面对应的网络文件夹下,在这里我用中型网络的配置文件修改为例子
比如:我的检测目标物是car ,那么我的类别就有两个类别即 background 和 car
因此,首先打开网络的模型文件夹,打开train.prototxt
修改的地方重要有三个
分别是个地方
- 首先在data层把num_classes 从原来的21类 20类+背景 ,改成 2类 车+背景
- 接在在cls_score层把num_output 从原来的21 改成 2
- 在bbox_pred层把num_output 从原来的84 改成8, 为检测类别个数乘以4,比如这里是2类那就是2*4=8

OK,如果你要进一步修改网络训练中的学习速率,步长,gamma值,以及输出模型的名字,需要在同目录下的solver.prototxt中修改。
如下图:
train_net: "models/VGG_CNN_M_1024/train.prototxt"base_lr: 0.001lr_policy: "step"gamma: 0.1stepsize: 30000display: 20average_loss: 100momentum: 0.9weight_decay: 0.0005# We disable standard caffe solver snapshotting and implement our own snapshot# functionsnapshot: 0# We still use the snapshot prefix, thoughsnapshot_prefix: "vgg_cnn_m_1024_fast_rcnn"#debug_info: true3.启动Fast RCNN网络训练
启动训练:
./tools/train_net.py --gpu 11 --solver models/VGG_CNN_M_1024_LOUYIHANG/solver.prototxt --weights data/imagenet_models/VGG_CNN_M_1024.v2.caffemodel --imdb KakouTrain
参数讲解:
- 这里的--是两个-,markdown写的,大家不要输错
- train_net.py是网络的训练文件,之后的参数都是附带的输入参数
- --gpu 代表机器上的GPU编号,如果是nvidia系列的tesla显卡,可以在终端中输入nvidia-smi来查看当前的显卡负荷,选择合适的显卡
- --solver 代表模型的配置文件,train.prototxt的文件路径已经包含在这个文件之中
- --weights 代表初始化的权重文件,这里用的是Imagenet上预训练好的模型,中型的网络我们选择用VGG_CNN_M_1024.v2.caffemodel
- --imdb 这里给出的训练的数据库名字需要在factory.py的__sets中,我在文件里面有__sets['KakouTrain'],train_net.py这个文件会调用factory.py再生成kakou这个类,来读取数据
4.启动Fast RCNN网络检测
我修改了tools下面的demo.py这个文件,用来做检测,并且将检测的坐标结果输出到相应的txt文件中
可以看到原始的demo.py 是用网络测试了两张图像,并做可视化输出,有具体的检测效果,但是我是在Linux服务器的终端下,没有display device,因此部分代码要少做修改
下面是原始的demo.py:
#!/usr/bin/env python# --------------------------------------------------------# Fast R-CNN# Copyright (c) 2015 Microsoft# Licensed under The MIT License [see LICENSE for details]# Written by Ross Girshick# --------------------------------------------------------"""Demo script showing detections in sample images.See README.md for installation instructions before running."""import _init_pathsfrom fast_rcnn.config import cfgfrom fast_rcnn.test import im_detectfrom utils.cython_nms import nmsfrom utils.timer import Timerimport matplotlib.pyplot as pltimport numpy as npimport scipy.io as sioimport caffe, os, sys, cv2import argparseCLASSES = ('__background__', 'aeroplane', 'bicycle', 'bird', 'boat', 'bottle', 'bus', 'car', 'cat', 'chair', 'cow', 'diningtable', 'dog', 'horse', 'motorbike', 'person', 'pottedplant', 'sheep', 'sofa', 'train', 'tvmonitor')NETS = {'vgg16': ('VGG16', 'vgg16_fast_rcnn_iter_40000.caffemodel'), 'vgg_cnn_m_1024': ('VGG_CNN_M_1024', 'vgg_cnn_m_1024_fast_rcnn_iter_40000.caffemodel'), 'caffenet': ('CaffeNet', 'caffenet_fast_rcnn_iter_40000.caffemodel')}def vis_detections(im, class_name, dets, thresh=0.5): """Draw detected bounding boxes.""" inds = np.where(dets[:, -1] >= thresh)[0] if len(inds) == 0: return im = im[:, :, (2, 1, 0)] fig, ax = plt.subplots(figsize=(12, 12)) ax.imshow(im, aspect='equal') for i in inds: bbox = dets[i, :4] score = dets[i, -1] ax.add_patch( plt.Rectangle((bbox[0], bbox[1]), bbox[2] - bbox[0], bbox[3] - bbox[1], fill=False, edgecolor='red', linewidth=3.5) ) ax.text(bbox[0], bbox[1] - 2, '{:s} {:.3f}'.format(class_name, score), bbox=dict(facecolor='blue', alpha=0.5), fontsize=14, color='white') ax.set_title(('{} detections with ' 'p({} | box) >= {:.1f}').format(class_name, class_name, thresh), fontsize=14) plt.axis('off') plt.tight_layout() plt.draw()def demo(net, image_name, classes): """Detect object classes in an image using pre-computed object proposals.""" # Load pre-computed Selected Search object proposals box_file = os.path.join(cfg.ROOT_DIR, 'data', 'demo', image_name + '_boxes.mat') obj_proposals = sio.loadmat(box_file)['boxes'] # Load the demo image im_file = os.path.join(cfg.ROOT_DIR, 'data', 'demo', image_name + '.jpg') im = cv2.imread(im_file) # Detect all object classes and regress object bounds timer = Timer() timer.tic() scores, boxes = im_detect(net, im, obj_proposals) timer.toc() print ('Detection took {:.3f}s for ' '{:d} object proposals').format(timer.total_time, boxes.shape[0]) # Visualize detections for each class CONF_THRESH = 0.8 NMS_THRESH = 0.3 for cls in classes: cls_ind = CLASSES.index(cls) cls_boxes = boxes[:, 4*cls_ind:4*(cls_ind + 1)] cls_scores = scores[:, cls_ind] dets = np.hstack((cls_boxes, cls_scores[:, np.newaxis])).astype(np.float32) keep = nms(dets, NMS_THRESH) dets = dets[keep, :] print 'All {} detections with p({} | box) >= {:.1f}'.format(cls, cls, CONF_THRESH) vis_detections(im, cls, dets, thresh=CONF_THRESH)def parse_args(): """Parse input arguments.""" parser = argparse.ArgumentParser(description='Train a Fast R-CNN network') parser.add_argument('--gpu', dest='gpu_id', help='GPU device id to use [0]', default=0, type=int) parser.add_argument('--cpu', dest='cpu_mode', help='Use CPU mode (overrides --gpu)', action='store_true') parser.add_argument('--net', dest='demo_net', help='Network to use [vgg16]', choices=NETS.keys(), default='vgg16') args = parser.parse_args() return argsif __name__ == '__main__': args = parse_args() prototxt = os.path.join(cfg.ROOT_DIR, 'models', NETS[args.demo_net][0], 'test.prototxt') caffemodel = os.path.join(cfg.ROOT_DIR, 'data', 'fast_rcnn_models', NETS[args.demo_net][1]) if not os.path.isfile(caffemodel): raise IOError(('{:s} not found.\nDid you run ./data/script/' 'fetch_fast_rcnn_models.sh?').format(caffemodel)) if args.cpu_mode: caffe.set_mode_cpu() else: caffe.set_mode_gpu() caffe.set_device(args.gpu_id) net = caffe.Net(prototxt, caffemodel, caffe.TEST) print '\n\nLoaded network {:s}'.format(caffemodel) print '~~~~~~~~~~~~~~~~~~~~~~~~~~~~~~~~~~~' print 'Demo for data/demo/000004.jpg' demo(net, '000004', ('car',)) print '~~~~~~~~~~~~~~~~~~~~~~~~~~~~~~~~~~~' print 'Demo for data/demo/001551.jpg' demo(net, '001551', ('sofa', 'tvmonitor')) plt.show()复制这个demo.py 修改成CarFaceTest.py,下面是修改后的文件
修改后的文件主要是添加了outputDetectionResult和runDetection两个函数, 添加了部分注释
#!/usr/bin/env python# --------------------------------------------------------# Fast R-CNN# Copyright (c) 2015 Microsoft# Licensed under The MIT License [see LICENSE for details]# Written by Ross Girshick# --------------------------------------------------------"""Demo script showing detections in sample images.See README.md for installation instructions before running."""import _init_pathsfrom fast_rcnn.config import cfgfrom fast_rcnn.test import im_detectfrom utils.cython_nms import nmsfrom utils.timer import Timerimport matplotlib.pyplot as pltimport numpy as npimport scipy.io as sioimport caffe, os, sys, cv2import argparse#CLASSES = ('__background__','aeroplane','bicycle','bird','boat',# 'bottle','bus','car','cat','chair','cow','diningtable','dog','horse'# 'motorbike','person','pottedplant','sheep','sofa','train','tvmonitor')CLASSES = ('__background__','car') #需要跟自己训练的数据集中的类别一致,原来是21类的voc数据集,自己的数据集就是car和backgroundNETS = {'vgg16': ('VGG16', 'vgg16_fast_rcnn_iter_40000.caffemodel'), 'vgg_cnn_m_1024': ('VGG_CNN_M_1024', 'vgg_cnn_m_1024_fast_rcnn_iter_40000.caffemodel'), 'vgg_cnn_m_1024_louyihang': ('VGG_CNN_M_1024_LOUYIHANG', 'vgg_cnn_m_1024_fast_rcnn_louyihang_iter_40000.caffemodel'), 'caffenet': ('CaffeNet', 'caffenet_fast_rcnn_iter_40000.caffemodel'), 'caffenet_louyihang':('CaffeNet_LOUYIHANG', 'caffenet_fast_rcnn_louyihang_iter_40000.caffemodel'), 'vgg16_louyihang':('VGG16_LOUYIHANG', 'vgg16_fast_rcnn_louyihang_iter_40000.caffemodel')}#映射到对应的模型文件def outputDetectionResult(im, class_name, dets, thresh=0.5): #打开相应的输出文件 outputFile = open('CarDetectionResult.txt') inds = np.where(dets[:,-1] >= thresh)[0] if len(inds) == 0: returndef runDetection (net, basePath, testFileName,classes):#这个函数是自己后加的,取代了demo函数,给定测试数据列表 ftest = open(testFileName,'r') imageFileName = basePath+'/' + ftest.readline().strip() num = 1 outputFile = open('CarDetectionResult.txt','w') while imageFileName: print imageFileName print 'now is ', num num +=1 imageFileBaseName = os.path.basename(imageFileName) imageFileDir = os.path.dirname(imageFileName) boxFileName = imageFileDir +'/'+imageFileBaseName.replace('.jpg','_boxes.mat') print boxFileName obj_proposals = sio.loadmat(boxFileName)['boxes'] #obj_proposals[:,2] = obj_proposals[:, 2] + obj_proposals[:, 0]#这里也需要注意,OP里面的坐标数据是否为x1y1x2y2还是x1y1wh #obj_proposals[:,3] = obj_proposals[:, 3] + obj_proposals[:, 1] im = cv2.imread(imageFileName) timer = Timer() timer.tic() scores, boxes = im_detect(net, im, obj_proposals)#检测函数 timer.toc() print ('Detection took {:.3f} for ' '{:d} object proposals').format(timer.total_time, boxes.shape[0]) CONF_THRESH = 0.8 NMS_THRESH = 0.3#NMS参数用来控制非极大值抑制 for cls in classes: cls_ind = CLASSES.index(cls) cls_boxes = boxes[:, 4*cls_ind:4*(cls_ind + 1)] cls_scores = scores[:, cls_ind] dets = np.hstack((cls_boxes, cls_scores[:, np.newaxis])).astype(np.float32) keep = nms(dets, NMS_THRESH) dets = dets[keep, :] print 'All {} detections with p({} | box) >= {:.1f}'.format(cls, cls, CONF_THRESH) inds = np.where(dets[:, -1] >= CONF_THRESH)[0] print 'inds.size', inds.size if len(inds) != 0: outputFile.write(imageFileName+' ') outputFile.write(str(inds.size)+' ')将检测的结果写出相应的文件里 for i in inds: bbox = dets[i, :4] outputFile.write(str(int(bbox[0]))+' '+ str(int(bbox[1]))+' '+ str(int(bbox[2]))+' '+ str(int(bbox[3]))+' ') outputFile.write('\n') else: outputFile.write(imageFileName +' 0' '\n') temp = ftest.readline().strip() if temp: imageFileName = basePath+'/' + temp else: breakdef vis_detections(im, class_name, dets, thresh=0.5):#这个函数需要加以说明,这个函数虽然没有用,但是我的服务器上没有输出设备 """Draw detected bounding boxes."""#因此要将部分用到显示的函数给注释掉,否则运行会报错 inds = np.where(dets[:, -1] >= thresh)[0] print 'inds.shape', inds.shape print inds print 'inds.size', inds.size if len(inds) == 0: return #im = im[:, :, (2, 1, 0)] #fig, ax = plt.subplots(figsize=(12, 12)) #ax.imshow(im, aspect='equal') #for i in inds: # bbox = dets[i, :4] # score = dets[i, -1] # ax.add_patch( # plt.Rectangle((bbox[0], bbox[1]), # bbox[2] - bbox[0], # bbox[3] - bbox[1], fill=False, # edgecolor='red', linewidth=3.5) # ) # ax.text(bbox[0], bbox[1] - 2, # '{:s} {:.3f}'.format(class_name, score), # bbox=dict(facecolor='blue', alpha=0.5), # fontsize=14, color='white') #ax.set_title(('{} detections with ' # 'p({} | box) >= {:.1f}').format(class_name, class_name, # thresh), # fontsize=14) #plt.axis('off') #plt.tight_layout() #plt.draw()def demo(net, image_name, classes):#原来的demo函数,没有修改 """Detect object classes in an image using pre-computed object proposals.""" # Load pre-computed Selected Search object proposals #box_file = os.path.join(cfg.ROOT_DIR, 'data', 'demo',image_name + '_boxes.mat') basePath='/home/chenjie/DataSet/500CarTestDataSet2' box_file = os.path.join(basePath,image_name + '_boxes.mat') obj_proposals = sio.loadmat(box_file)['boxes'] # Load the demo image #im_file = os.path.join(cfg.ROOT_DIR, 'data', 'demo', image_name + '.jpg') im_file = os.path.join(basePath, image_name + '.jpg') im = cv2.imread(im_file) # Detect all object classes and regress object bounds timer = Timer() timer.tic() scores, boxes = im_detect(net, im, obj_proposals) timer.toc() print ('Detection took {:.3f}s for ' '{:d} object proposals').format(timer.total_time, boxes.shape[0]) # Visualize detections for each class CONF_THRESH = 0.8 NMS_THRESH = 0.3 for cls in classes: cls_ind = CLASSES.index(cls) cls_boxes = boxes[:, 4*cls_ind:4*(cls_ind + 1)] cls_scores = scores[:, cls_ind] dets = np.hstack((cls_boxes, cls_scores[:, np.newaxis])).astype(np.float32) keep = nms(dets, NMS_THRESH) dets = dets[keep, :] print 'All {} detections with p({} | box) >= {:.1f}'.format(cls, cls, CONF_THRESH) vis_detections(im, cls, dets, thresh=CONF_THRESH)def parse_args(): """Parse input arguments.""" parser = argparse.ArgumentParser(description='Train a Fast R-CNN network') parser.add_argument('--gpu', dest='gpu_id', help='GPU device id to use [0]', default=0, type=int) parser.add_argument('--cpu', dest='cpu_mode', help='Use CPU mode (overrides --gpu)', action='store_true') parser.add_argument('--net', dest='demo_net', help='Network to use [vgg16]', choices=NETS.keys(), default='vgg16') args = parser.parse_args() return argsif __name__ == '__main__': args = parse_args() prototxt = os.path.join(cfg.ROOT_DIR, 'models', NETS[args.demo_net][0], 'test.prototxt') #caffemodel = os.path.join(cfg.ROOT_DIR, 'data', 'fast_rcnn_models', # NETS[args.demo_net][1]) #caffemodel = '/home/chenjie/fast-rcnn/output/default/KakouTrain/vgg16_fast_rcnn_louyihang_iter_40000.caffemodel' #caffemodel = '/home/chenjie/louyihang/fast-rcnn/output/default/KakouTrain/caffenet_fast_rcnn_louyihang_iter_40000.caffemodel' caffemodel = '/home/chenjie/fast-rcnn/output/default/KakouTrain/vgg_cnn_m_1024_fast_rcnn_louyihang_iter_40000.caffemodel'#我在这里直接指定了训练好的模型文件,训练好的模型文件是在工程根目录下的,output/default/对应的数据库名字下面 if not os.path.isfile(caffemodel): raise IOError(('{:s} not found.\nDid you run ./data/script/' 'fetch_fast_rcnn_models.sh?').format(caffemodel)) if args.cpu_mode: caffe.set_mode_cpu() else: caffe.set_mode_gpu() caffe.set_device(args.gpu_id) net = caffe.Net(prototxt, caffemodel, caffe.TEST) print '\n\nLoaded network {:s}'.format(caffemodel) #demo(net, 'Target0/000001', ('car',)) #输入对应的测试图像列表,需要在同级目录下摆放同名的_boxes.mat文件,它会自动的替换后缀名! #runDetection(net, '/home/chenjie/DataSet/temptest','/home/chenjie/DataSet/temptest/Imagelist.txt',('car',)) runDetection(net, '/home/chenjie/DataSet/500CarTestDataSet2','/home/chenjie/DataSet/500CarTestDataSet2/Imagelist.txt',('car',)) #runDetection(net, '/home/chenjie/DataSet/Kakou_Test_Scale0.25/','/home/chenjie/DataSet/Kakou_Test_Scale0.25/imagelist.txt',('car',)) #runDetection(net, '/home/chenjie/DataSet/Images_Version1_Test_Boxes','/home/chenjie/DataSet/Images_Version1_Test_Boxes/ImageList_Version1_List.txt',('car',)) #plt.show()5.检测结果
训练数据集
首先给出我的训练数据集,其实我的训练数据集并不是太复杂的
测试数据集
输出检测结果到txt文件中,
测试效果
**在复杂场景下的测试效果非常好,速度也非常快,中型网络监测平均每张在K80显卡下时0.1~0.2S左右,图像的尺寸是480*640,6000张测试数据集下达到的准确率是98%!!!**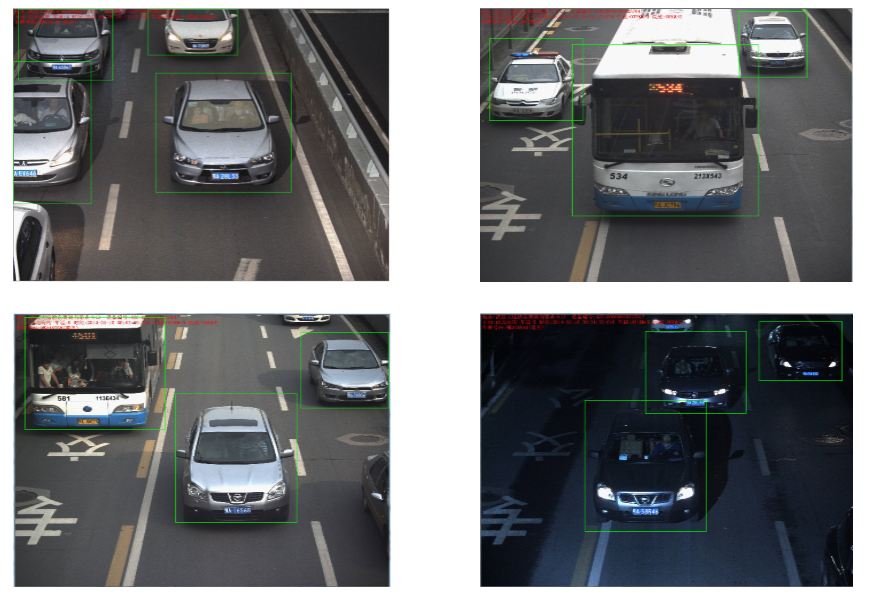
- Fast RCNN 训练自己的数据集(3训练和检测)
- Fast RCNN 训练自己的数据集(3训练和检测)
- Fast RCNN 训练自己的数据集(3训练和检测)
- Fast RCNN 训练自己的数据集(3训练和检测)
- Fast RCNN 训练自己的数据集(3训练和检测)
- Fast RCNN 训练自己的数据集(3训练和检测)
- fast rcnn 训练自己的数据集(训练和检测)
- Fast-rcnn 训练(3)- 训练自己的数据集
- Fast RCNN训练自己的数据集
- Fast rcnn cpu 训练自己的数据
- fast-rcnn训练自己的数据
- 利用Fast RCNN训练自己的数据做无人机检测(一)
- Fast RCNN 训练自己数据集 (1编译配置)
- fast-rcnn训练自己数据集以及demo代码解读和总结(面向fast-rcnn初学者)
- fast-rcnn训练自己数据集以及demo代码解读和总结(面向fast-rcnn初学者)
- Fast RCNN训练自己的数据集 (2修改读写接口)
- Fast RCNN训练自己的数据集 (2修改读写接口)
- Fast RCNN训练自己的数据集 (修改读写接口)
- iOS开发资源汇总
- 线程
- python 示列:抓取网页所有<a>连接
- Docker Remote API 初步尝试
- 自学之重要性
- Fast RCNN 训练自己的数据集(3训练和检测)
- GIS+=地理信息+行业+大数据——GeoWave安装部署实践
- android listview点赞问题
- x509与x509v3文件夹下的文件功用分析
- Stanford ML 笔记1-Linear Regression与Logistic Regression
- Linux 线程通信与pthread_cond_wait()的使用
- #define STRINGIZE(x) #x
- 深入分析DWR的Engine._execute方法
- 一道计数DP