使用Andorid Studio 创建unity 插件
来源:互联网 发布:帝国cms后台模板 编辑:程序博客网 时间:2024/05/18 09:53
原文地址需翻墙:http://www.thegamecontriver.com/2015/04/android-plugin-unity-android-studio.html
Create An Android Plugin For Unity Using Android Studio
9:31 PM android , unity
This is one post which I wanted to write badly, not because it is difficult but because it is so useful to know how to add the core Android features which Unity doesn't have built in. In this post we will be Creating a Share Your Game / App Plugin using Intents. Of course, this is very simple. But hey, it's pretty useful to let users have the luxury of sharing your game with just a click.
We will write an Android Activity which will let the users share some text / description about your game, for instance, the Play Store link to your game. Isn't that super useful? You bet it is. Let's get started.
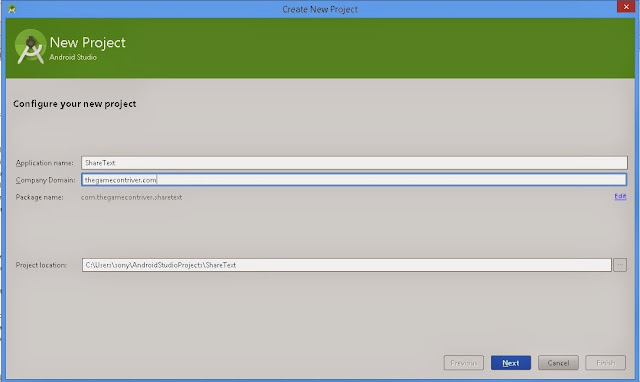 Fig 1: Android Plugin For Unity using Android Studio - New Android Studio Project
Create a New Android Studio Project and specify the details as in Fig 1. Press Next and it should ask you to select the Form Factors the app will run on. Keep the default settings and press Next. Now, it will ask you to add an Activity. Keep it to default (Blank Activity) as well and press Next. We do not want to customize the Activity and we press Finish. Once you click on Finish, it will take some time to load the new Project.
2. Add External Jar file as Library in Android Studio
Until it loads, navigate to the following location C:\Program Files (x86)\Unity\Editor\Data\PlaybackEngines\androidplayer\release\bin and copy the Classes.jar file.
The Android Studio should have loaded the new project by now. Switch to the Project view and you should have something like the screenshot below
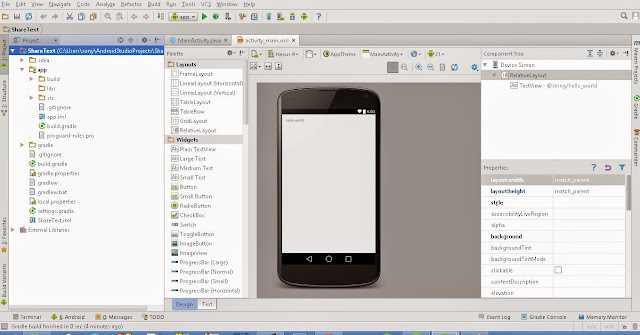 Fig 2: Android Plugin For Unity using Android Studio - Project View
Paste the copied Classes.jar file into the libs folder under app. Right click on the the Classes.jar file added and select Add as Library for us to use import the UnityPlayerActivity class and other contents of this jar.
Many of them don't know how to add an external jar as library in the Android Studio, well, maybe you can show them how it's done now that you know it.
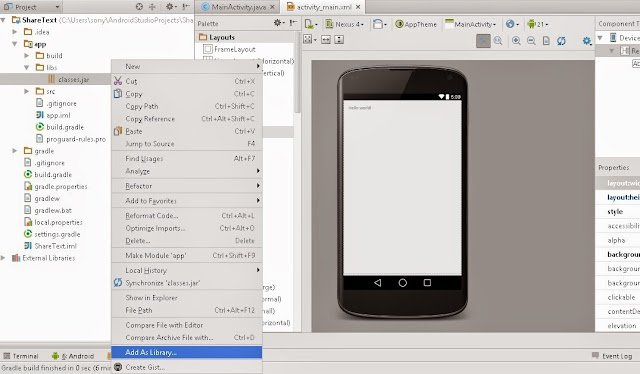 Fig 3: Android Plugin For Unity using Android Studio - Add external jar as Library If you have correctly followed the steps, then you should have the build.gradle file under the app folder as below
The 25th line being the one which is added as a result of adding the jar as Library.
3. Write code to Share text using Intents
Paste the below code inside the MainActivity.java file
The above class has a method shareText which takes in two string parameters subject and body, which as they say are the subject and body of the text that is to be shared.
4. Adding tasks to build.gradle file to export as jar
Change the contents of the build.gradle under the app folder to the content given below
Resync the project and Rebuild it just to confirm that everything is all fine.
Once this is done, you should have a new task created in the Gradle tab which will be named asexportJar.
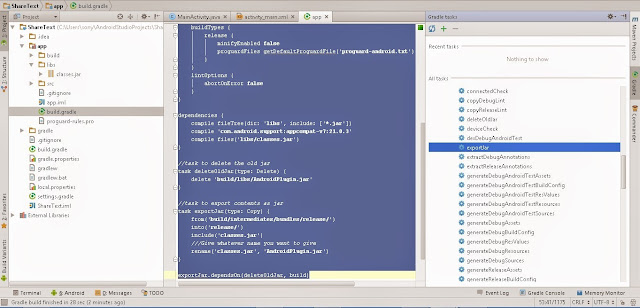 Fig 4: Android Plugin For Unity using Android Studio - Export JAR Double click on exportJar and it should start building a jar file. Once you see the BUILD SUCCESSFUL message in the Run window. Navigate to \AndroidStudioProjects\ShareText\app\release and you should have a AndroidPlugin.jar file built. That is the file we needed. That is the plugin which we will be using in our Unity project to Share text.
Copy this file and navigate to Unity and create a New Folder called Plugins under the Assets folder of you project. Under the Plugins folder, create another folder named Android. Paste the AndroidPlugin.jar file under this folder.
Create a new xml file named AndroidManifest.xml in the same Android folder and paste the following content
Save the file and move to Unity. Now, you are ready to use this Share Feature. You just need to call it from your script.
Save the script and move back to unity. Attach this script to the Main Camera.
Create a new Button and add an On Click event to this button. Drag and drop the Main Camera under the GameObject field and select ShareApp->callShareApp function in the function to be called field.
Save the scene and now this little app is ready to be tested. However, there is one last change to be made. The Bundle Identifier should be changed to the package name that we used while creating the Android plugin, i.e., com.thegamecontriver.shareapp
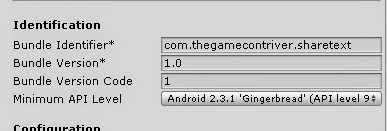 Fig 5: Android Plugin For Unity using Android Studio - Bundle IdentifierOnce you build the app and test it. On clicking the button you should get something like the one that is shown screenshot below
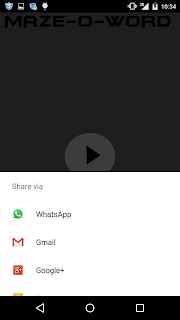 Fig 5: Android Plugin For Unity using Android Studio - Share AppHope this post will be of some use to you guys.
See you around.
We will write an Android Activity which will let the users share some text / description about your game, for instance, the Play Store link to your game. Isn't that super useful? You bet it is. Let's get started.
Exporting the jar from the Android Studio for Unity
Watch the video below to export the jar or simply follow the steps listed beneath the video
This step used to be straight forward using Eclipse IDE. However, there are some modifications to be done in the Gradle file in terms of creating new tasks so as to be able to export the jar file. Some of them tend to export the jar by adding a Module. However, TGC will show you a very simple way to achieve this by adding task to the Gradle which will let you build the jar using Android Studio.
This step used to be straight forward using Eclipse IDE. However, there are some modifications to be done in the Gradle file in terms of creating new tasks so as to be able to export the jar file. Some of them tend to export the jar by adding a Module. However, TGC will show you a very simple way to achieve this by adding task to the Gradle which will let you build the jar using Android Studio.
1. Create a new Android Studio project
Fig 1: Android Plugin For Unity using Android Studio - New Android Studio ProjectCreate a New Android Studio Project and specify the details as in Fig 1. Press Next and it should ask you to select the Form Factors the app will run on. Keep the default settings and press Next. Now, it will ask you to add an Activity. Keep it to default (Blank Activity) as well and press Next. We do not want to customize the Activity and we press Finish. Once you click on Finish, it will take some time to load the new Project.
2. Add External Jar file as Library in Android Studio
Until it loads, navigate to the following location C:\Program Files (x86)\Unity\Editor\Data\PlaybackEngines\androidplayer\release\bin and copy the Classes.jar file.
The Android Studio should have loaded the new project by now. Switch to the Project view and you should have something like the screenshot below
Fig 2: Android Plugin For Unity using Android Studio - Project ViewPaste the copied Classes.jar file into the libs folder under app. Right click on the the Classes.jar file added and select Add as Library for us to use import the UnityPlayerActivity class and other contents of this jar.
Many of them don't know how to add an external jar as library in the Android Studio, well, maybe you can show them how it's done now that you know it.
Fig 3: Android Plugin For Unity using Android Studio - Add external jar as Library If you have correctly followed the steps, then you should have the build.gradle file under the app folder as below1
2
3
4
5
6
7
8
9
10
11
12
13
14
15
16
17
18
19
20
21
22
23
24
25
26
apply plugin: 'com.android.application'android { compileSdkVersion 21 buildToolsVersion "21.1.2" defaultConfig { applicationId "com.thegamecontriver.sharetext" minSdkVersion 15 targetSdkVersion 21 versionCode 1 versionName "1.0" } buildTypes { release { minifyEnabled false proguardFiles getDefaultProguardFile('proguard-android.txt'), 'proguard-rules.pro' } }}dependencies { compile fileTree(dir: 'libs', include: ['*.jar']) compile 'com.android.support:appcompat-v7:21.0.3' compile files('libs/classes.jar')}The 25th line being the one which is added as a result of adding the jar as Library.
3. Write code to Share text using Intents
Paste the below code inside the MainActivity.java file
1
2
3
4
5
6
7
8
9
10
11
12
13
14
15
16
packagecom.thegamecontriver.sharetext;importandroid.content.Intent;importcom.unity3d.player.UnityPlayerActivity;publicclass MainActivity extendsUnityPlayerActivity { publicvoid shareText(String subject, String body) { Intent sharingIntent = newIntent(android.content.Intent.ACTION_SEND); sharingIntent.setType("text/plain"); sharingIntent.putExtra(android.content.Intent.EXTRA_SUBJECT, subject); sharingIntent.putExtra(android.content.Intent.EXTRA_TEXT, body); startActivity(Intent.createChooser(sharingIntent,"Share via")); } }The above class has a method shareText which takes in two string parameters subject and body, which as they say are the subject and body of the text that is to be shared.
4. Adding tasks to build.gradle file to export as jar
Change the contents of the build.gradle under the app folder to the content given below
1
2
3
4
5
6
7
8
9
10
11
12
13
14
15
16
17
18
19
20
21
22
23
24
25
26
27
28
29
30
31
32
33
34
35
36
37
38
39
40
41
42
43
44
45
46
47
48
49
50
51
52
53
//indicates that this is a libraryapply plugin: 'com.android.library'android { compileSdkVersion 21 buildToolsVersion "21.1.2" sourceSets { main { //Path to your source code java { srcDir 'src/main/java' } } } defaultConfig { minSdkVersion 15 targetSdkVersion 21 } buildTypes { release { minifyEnabled false proguardFiles getDefaultProguardFile('proguard-android.txt'), 'proguard-rules.txt' } } lintOptions { abortOnError false }}dependencies { compile fileTree(dir: 'libs', include: ['*.jar']) compile 'com.android.support:appcompat-v7:21.0.3' compile files('libs/classes.jar')}//task to delete the old jartask deleteOldJar(type: Delete) { delete 'release/AndroidPlugin.jar'}//task to export contents as jartask exportJar(type: Copy) { from('build/intermediates/bundles/release/') into('release/') include('classes.jar') ///Rename the jar rename('classes.jar', 'AndroidPlugin.jar')}exportJar.dependsOn(deleteOldJar, build)Resync the project and Rebuild it just to confirm that everything is all fine.
Once this is done, you should have a new task created in the Gradle tab which will be named asexportJar.
Fig 4: Android Plugin For Unity using Android Studio - Export JAR Double click on exportJar and it should start building a jar file. Once you see the BUILD SUCCESSFUL message in the Run window. Navigate to \AndroidStudioProjects\ShareText\app\release and you should have a AndroidPlugin.jar file built. That is the file we needed. That is the plugin which we will be using in our Unity project to Share text.Copy this file and navigate to Unity and create a New Folder called Plugins under the Assets folder of you project. Under the Plugins folder, create another folder named Android. Paste the AndroidPlugin.jar file under this folder.
Create a new xml file named AndroidManifest.xml in the same Android folder and paste the following content
1
2
3
4
5
6
7
8
9
10
11
12
13
14
15
16
<?xmlversion="1.0"encoding="utf-8"?><manifestxmlns:android="http://schemas.android.com/apk/res/android" package="com.thegamecontriver.sharetext" android:versionCode="1" android:versionName="1.0"> <uses-sdkandroid:minSdkVersion="9"/> <applicationandroid:label="@string/app_name"> <activityandroid:name=".MainActivity" android:label="@string/app_name"> <intent-filter> <actionandroid:name="android.intent.action.MAIN"/> <categoryandroid:name="android.intent.category.LAUNCHER"/> </intent-filter> </activity> </application></manifest>Save the file and move to Unity. Now, you are ready to use this Share Feature. You just need to call it from your script.
Use the JAR in Unity
Create a new C# Script named ShareApp and add the following code to it1
2
3
4
5
6
7
8
9
10
11
12
13
14
usingUnityEngine;usingSystem.Collections;publicclass ShareApp : MonoBehaviour { stringsubject = "WORD-O-MAZE"; stringbody = "PLAY THIS AWESOME. GET IT ON THE PLAYSTORE"; publicvoid callShareApp(){ AndroidJavaClass unity = newAndroidJavaClass ("com.unity3d.player.UnityPlayer"); AndroidJavaObject currentActivity = unity.GetStatic<AndroidJavaObject> ("currentActivity"); currentActivity.Call ("shareText", subject, body); }}Save the script and move back to unity. Attach this script to the Main Camera.
Create a new Button and add an On Click event to this button. Drag and drop the Main Camera under the GameObject field and select ShareApp->callShareApp function in the function to be called field.
Save the scene and now this little app is ready to be tested. However, there is one last change to be made. The Bundle Identifier should be changed to the package name that we used while creating the Android plugin, i.e., com.thegamecontriver.shareapp
Fig 5: Android Plugin For Unity using Android Studio - Bundle IdentifierOnce you build the app and test it. On clicking the button you should get something like the one that is shown screenshot belowFig 5: Android Plugin For Unity using Android Studio - Share AppHope this post will be of some use to you guys.See you around.
0 0
- 使用Andorid Studio 创建unity 插件
- andorid studio之GsonFormat插件的使用
- Android Studio创建Unity插件
- Andorid Studio使用技巧
- Andorid Studio使用技巧
- unity上面调用andorid相册的插件-unity部分
- unity上面调用andorid相册的插件-android部分
- 使用andorid studio遇到的问题
- Mac 上使用 andorid studio 小记
- Andorid Studio中使用lambda的配置
- 【Unity插件】FingerGestures 插件使用
- Unity如何使用插件
- Unity Puppet2D插件使用
- Unity插件使用--UniWebView2
- unity插件visual studio 20** tools
- Android Studio如何导出可供Unity使用的aar插件详解
- unity插件使用--Unitybmob插件使用记录
- 使用Android Studio打Andorid apk包的流程
- quick-cocos2d-x数据存储之GameState
- Android 自定义View 入门——FlowLayout实例(流布局)
- 两种IO模式:Proactor与Reactor模式
- 分布式学习第一章 SOA服务简述
- 内存泄漏、内存溢出
- 使用Andorid Studio 创建unity 插件
- What is Suricata 翻译
- CGContext用法详解
- 史上最详细的Android Studio系列教程(转载)
- html关于mailto用法详解
- c++第一次上机作业1-2
- GDI+ 如何将图片绘制成圆形的图片
- c++第一次实验:循环3
- View的事件体系续