rabbitmq 综合资源整合帖子
来源:互联网 发布:淘宝网页版电脑版 编辑:程序博客网 时间:2024/05/16 08:16
http://bbs.csdn.net/topics/390744360 安装的话,可以参考这个链接。
下载不下来的,直接将链接赋值到浏览器里面。进行下载。源码安装比较好。不然用命令行的话,会老是提示,版本不匹配的错误。
service rabbitmq-server stop
service rabbitmq-server start
service rabbitmq-server restart
rabbitmq-plugins enable rabbitmq_management //使能网页管理功能。ip+端口:15672
首先关闭rabbitmq: rabbitmqctl stop_app
还原: rabbitmqctl reset
启动: rabbitmqctl start_app
添加用户: rabbitmqctl add_user root root
设置权限:rabbitmqctl set_permissions -p / root ".*" ".*" ".*"
查看用户: rabbitmqctl list_users
安装最新版本的rabbitmq(3.3.1),并启用management plugin后,使用默认的账号guest登陆管理控制台,却提示登陆失败。
翻看官方的release文档后,得知由于账号guest具有所有的操作权限,并且又是默认账号,出于安全因素的考虑,guest用户只能通过localhost登陆使用,并建议修改guest用户的密码以及新建其他账号管理使用rabbitmq(该功能是在3.3.0版本引入的)。
虽然可以以比较猥琐的方式:将ebin目录下rabbit.app中loopback_users里的<<"guest">>删除,或者在配置文件rabbitmq.config中对该项进行配置,

并重启rabbitmq,可通过任意IP使用guest账号登陆管理控制台,但始终是违背了设计者的初衷,再加上以前对这一块了解也不多,因此有必要总结一下。
1. 用户管理
用户管理包括增加用户,删除用户,查看用户列表,修改用户密码。
相应的命令
(1) 新增一个用户
rabbitmqctl add_user Username Password
(2) 删除一个用户
rabbitmqctl delete_user Username
(3) 修改用户的密码
rabbitmqctl change_password Username Newpassword
(4) 查看当前用户列表
rabbitmqctl list_users
2. 用户角色
按照个人理解,用户角色可分为五类,超级管理员, 监控者, 策略制定者, 普通管理者以及其他。
(1) 超级管理员(administrator)
可登陆管理控制台(启用management plugin的情况下),可查看所有的信息,并且可以对用户,策略(policy)进行操作。
(2) 监控者(monitoring)
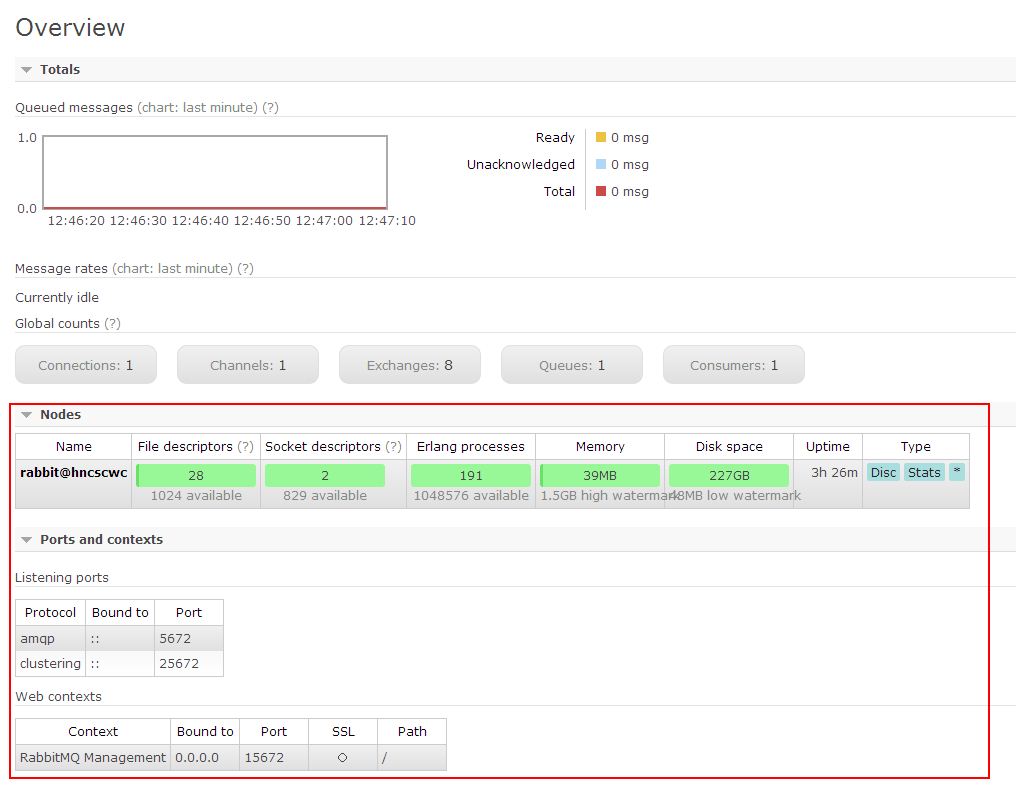
可登陆管理控制台(启用management plugin的情况下),同时可以查看rabbitmq节点的相关信息(进程数,内存使用情况,磁盘使用情况等)
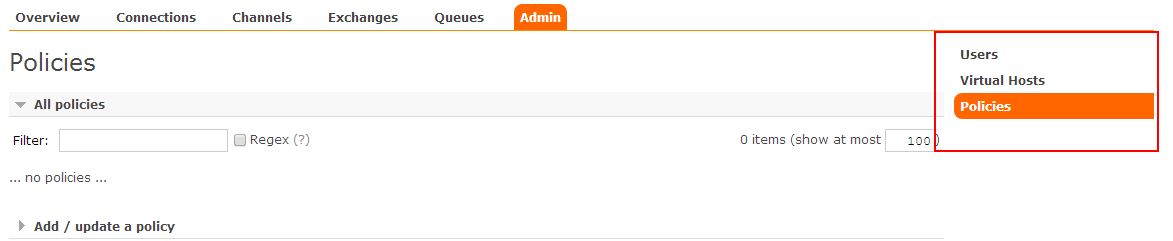
(3) 策略制定者(policymaker)
可登陆管理控制台(启用management plugin的情况下), 同时可以对policy进行管理。但无法查看节点的相关信息(上图红框标识的部分)。

与administrator的对比,administrator能看到这些内容
(4) 普通管理者(management)
仅可登陆管理控制台(启用management plugin的情况下),无法看到节点信息,也无法对策略进行管理。
(5) 其他
无法登陆管理控制台,通常就是普通的生产者和消费者。
了解了这些后,就可以根据需要给不同的用户设置不同的角色,以便按需管理。
设置用户角色的命令为:
rabbitmqctl set_user_tags User Tag
User为用户名, Tag为角色名(对应于上面的administrator,monitoring,policymaker,management,或其他自定义名称)。
也可以给同一用户设置多个角色,例如
rabbitmqctl set_user_tags hncscwc monitoring policymaker
3. 用户权限
用户权限指的是用户对exchange,queue的操作权限,包括配置权限,读写权限。配置权限会影响到exchange,queue的声明和删除。读写权限影响到从queue里取消息,向exchange发送消息以及queue和exchange的绑定(bind)操作。
例如: 将queue绑定到某exchange上,需要具有queue的可写权限,以及exchange的可读权限;向exchange发送消息需要具有exchange的可写权限;从queue里取数据需要具有queue的可读权限。详细请参考官方文档中"How permissions work"部分。
相关命令为:
(1) 设置用户权限
rabbitmqctl set_permissions -p VHostPath User ConfP WriteP ReadP
(2) 查看(指定hostpath)所有用户的权限信息
rabbitmqctl list_permissions [-p VHostPath]
(3) 查看指定用户的权限信息
rabbitmqctl list_user_permissions User
(4) 清除用户的权限信息
rabbitmqctl clear_permissions [-p VHostPath] User
===============================
import java.io.IOException;
import java.util.concurrent.TimeoutException;
import com.rabbitmq.client.Channel;
import com.rabbitmq.client.Connection;
import com.rabbitmq.client.ConnectionFactory;
public abstract class RabbitMqBase {
protected Channel channel;
protected Connection connection;
protected String queueName;
static final String host = "*****.**.**.**";
static final String username = "xiaolonghun";
static final String password = "xiaolonghun";
public RabbitMqBase(String queueName) throws IOException, TimeoutException {
this.queueName = queueName;
// Create a connection factory
ConnectionFactory factory = new ConnectionFactory();
factory.setRequestedHeartbeat(60);
// hostname of your rabbitmq server
factory.setHost(host);
factory.setUsername(username);
factory.setPassword(password);
factory.setAutomaticRecoveryEnabled(true);
// getting a connection
connection = factory.newConnection();
// creating a channel
channel = connection.createChannel();
// channel.exchangeDeclare(exchangeName, "direct");
// declaring a queue for this channel. If queue does not exist,
// it will be created on the server.
channel.queueDeclare(queueName, true, false, false, null);
// channel.queueBind(queueName, exchangeName, routingKey);
}
/**
*close channel and connection
*Is not necessary, because the implicit is automatically invoked.
* @throws IOException
* @throws TimeoutException
*/
public void close() throws IOException, TimeoutException {
this.channel.close();
this.connection.close();
}
public void handleRecoverOk() {
// TODO Auto-generated method stub
}
}
import java.io.IOException;
import java.util.concurrent.TimeoutException;
import com.rabbitmq.client.AMQP.BasicProperties;
import com.rabbitmq.client.Consumer;
import com.rabbitmq.client.Envelope;
import com.rabbitmq.client.ShutdownSignalException;
public class QueueConsumer extends RabbitMqBase implements Runnable, Consumer {
// private Handler mHandler = null;Handler mHandler,
public QueueConsumer(String queueName) throws IOException, TimeoutException {
super(queueName);
// this.mHandler = mHandler;
}
public void run() {
try {
// start consuming messages. Auto acknowledge messages.
channel.basicConsume(queueName, true, this);
System.out.println(" waiting for message recieve");
} catch (IOException e) {
e.printStackTrace();
}
}
/**
* Called when consumer is registered.
*/
public void handleConsumeOk(String consumerTag) {
System.out.println("Consumer " + consumerTag + " registered");
}
/**
* Called when new message is available.
*/
public void handleDelivery(String consumerTag, Envelope env,
BasicProperties props, byte[] body) throws IOException {
String routingKey = env.getRoutingKey();
String contentType = props.getContentType();
long deliveryTag = env.getDeliveryTag();
String message = new String(body,"UTF-8");
System.out.println(" Received:'" + message + "'");
// CommandAnalysis.commandAnalysis(message);
}
public void handleCancel(String consumerTag) {
}
public void handleCancelOk(String consumerTag) {
}
public void handleRecoverOk(String consumerTag) {
}
public void handleShutdownSignal(String consumerTag,
ShutdownSignalException arg1) {
}
@Override
public void handleRecoverOk() {
// TODO Auto-generated method stub
}
}
通过这个在封装一个接受的的进程就可以接收了。
发送端的代码
import java.io.IOException;
import java.util.concurrent.TimeoutException;
import com.rabbitmq.client.Channel;
import com.rabbitmq.client.Connection;
import com.rabbitmq.client.ConnectionFactory;
public class test_send {
private final static String QUEUE_NAME = "kkk_quname";
static final String host = "**";//ip地址
static final String username = "rainbird";
static final String password = "password";
public static void main(String[] args) throws IOException {
ConnectionFactory factory = new ConnectionFactory();
factory.setHost(host);
factory.setUsername(username);
factory.setPassword(password);
factory.setAutomaticRecoveryEnabled(true);
Connection connection = null;
try {
connection = factory.newConnection();
} catch (TimeoutException e) {
// TODO Auto-generated catch block
e.printStackTrace();
}
Channel channel = connection.createChannel();
channel.queueDeclare(QUEUE_NAME, true, false, false, null);
// channel.queueDeclare(queueName, true, false, false, null);
String message = "Hello World";
channel.basicPublish("", QUEUE_NAME, null, message.getBytes());
System.out.println(" Sent: '" + message + "'");
try {
channel.close();
} catch (TimeoutException e) {
// TODO Auto-generated catch block
e.printStackTrace();
}
connection.close();
}
}
- rabbitmq 综合资源整合帖子
- 安卓sdk相关资源整合帖子
- 资源整合
- 【资源整合】
- 8.ActiveMQ,RabbitMQ,Kafka综合对比
- MQ选型对比文档 综合选择RabbitMq
- 帖子
- 帖子
- 测试资源整合
- 资源整合---------------------------MyHao123
- 最强资源整合
- LVS资源整合
- Android资源整合
- Android 资源整合
- tensorflow资源整合
- 资源整合之我见
- 项目开发中的资源整合
- p2p 了解资源整合
- android 5.0后对于apk 跑32 64 的逻辑
- linux文件权限管理
- 使用android:layout_weight属性消除视图中的空白
- java堆与栈内存概念的个人理解
- Ui_Spinner
- rabbitmq 综合资源整合帖子
- Ubuntu Redis3.0集群测试
- 【OpenCV】IplImag、HImage相互转换
- Ubuntu快捷键
- 类似安卓的提示框,由黑色背景,和一段文字组成。自动消失,时间可以自行斟酌。 已经封装成了类方法,可以放到工具类方法中随时使用。
- 应用安全开发之浅谈加密算法的坑
- traceview 用法
- Java通过Jedis操作Redis
- 2.SOAP 语法