AndroidStudio中如何在android style文件中使用自定义属性
来源:互联网 发布:薇姿适合什么年龄知乎 编辑:程序博客网 时间:2024/06/04 19:28
今天在看android froyo的launcher2 源码的时候,在launcher.xml中看到有这么一段代码:
<com.android.launcher2.DragLayer xmlns:android="http://schemas.android.com/apk/res/android" xmlns:launcher="http://schemas.android.com/apk/res/com.android.launcher" android:id="@+id/drag_layer" android:layout_width="match_parent" android:layout_height="match_parent"> <includelayout="@layout/all_apps" /> <!-- The workspace contains 3 screens of cells --> <com.android.launcher2.Workspace android:id="@+id/workspace" android:layout_width="match_parent" android:layout_height="match_parent" android:scrollbars="horizontal" android:fadeScrollbars="true" launcher:defaultScreen="2">注意到其中的两处:
xmlns:launcher=”http://schemas.android.com/apk/res/com.android.launcher”
和
launcher:defaultScreen="2"
可以看出在这个布局文件中,使用了自定义属性。
以前没遇到过,既然这里碰到了,就顺便学习下,下面就写个简单的示例,权当学习笔记,便于以后查阅。
1. 定义一些自定义属性
建立一个属性xml文件: values/attrs.xml, 内容如下:
<?xmlversion="1.0" encoding="utf-8" ?><resources> <!-- the relation between the icon and text. --> <attrname="relation"> <enumname="icon_left" value="0" /> <enumname="icon_right" value="1" /> <enumname="icon_above" value="2" /> <enumname="icon_below" value="3" /> </attr> <skip/> <declare-styleablename="IconText"> <attrname="relation" /> <attrname="icon" format="reference" /> <attrname="text" format="string" /> <attrname="text_size" format="dimension" /> <attrname="text_color" format="integer" /> <attrname="space" format="dimension" /> </declare-styleable> </resources>解释如下:
属性relation有4种可选值:icon_left, icon_right, icon_above,icon_below.
属性icon的可选值为引用: 例如:"@/drawbable/icon".
属性text的可选值为string, 例如: "Hello world", 也可是string的引用"@string/hello".
属性text_size的可选值为尺寸大小,例如:20sp、18dip、20px等.
属性text_color的可选值为整数,例如:"0xfffffff", 也可以是color的引用"@color/white".
2. 定义一个能够处理这些属性值的view或者layout类
package com.braincol.viewattrs;import android.content.Context;import android.content.res.TypedArray;import android.util.AttributeSet;import android.util.Log;import android.widget.ImageView;import android.widget.LinearLayout;import android.widget.TextView;public class IconTextView extendsLinearLayout { privatefinal static String TAG = "IconTextView"; privatefinal int ICON_LEFT = 0; privatefinal int ICON_RIGHT = 1; privatefinal int ICON_ABOVE = 2; privatefinal int ICON_BELOW = 3; privateTextView mTextView; privateImageView mImageView; privateint mRelation = ICON_LEFT; privateString mText = ""; privateint mIconId; privatefloat mTextSize; privateint mSpace; publicIconTextView(Context context, AttributeSet attrs){ super(context, attrs); TypedArray a = context.obtainStyledAttributes(attrs, R.styleable.IconText); mRelation = a.getInt(R.styleable.IconText_relation, ICON_LEFT); Log.d(TAG,"mRelation: "+mRelation); mText = a.getString(R.styleable.IconText_text); Log.d(TAG,"mText: "+mText); mTextSize = a.getDimensionPixelSize(R.styleable.IconText_text_size,12); Log.d(TAG,"mTextSize: "+mTextSize); mSpace = a.getDimensionPixelSize(R.styleable.IconText_space,5); Log.d(TAG,"mSpace: "+mSpace); mIconId = a.getResourceId(R.styleable.IconText_icon, R.drawable.icon); Log.d(TAG,"mIconId: "+mIconId); a.recycle(); mTextView =new TextView(context); mTextView.setText(mText); mTextView.setTextSize(mTextSize); mImageView =new ImageView(context); mImageView.setImageResource(mIconId); intleft = 0; inttop = 0; intright = 0; intbottom = 0; intorientation = HORIZONTAL; inttextViewIndex = 0; switch(mRelation){ caseICON_ABOVE: orientation = VERTICAL; bottom = mSpace; textViewIndex =1; break; caseICON_BELOW: orientation = VERTICAL; top = mSpace; break; caseICON_LEFT: right = mSpace; textViewIndex =1; break; caseICON_RIGHT: left = mSpace; break; } this.setOrientation(orientation); this.addView(mImageView); mImageView.setPadding(left, top, right, bottom); this.addView(mTextView, textViewIndex); }}可以看出这个LinearLayout 子类IconTextView中只有两个元素,ImageView 和mTextView,通过从xml配置文件中读取属性值来决定icon和text的内容、相对位置及其它属性。
3. 在layout布局文件中使用这个自定布局及其属性
layout/main.xml:
<?xmlversion="1.0" encoding="utf-8"?><LinearLayoutxmlns:android="http://schemas.android.com/apk/res/android" android:orientation="vertical" android:layout_width="fill_parent" android:layout_height="fill_parent" ><com.braincol.viewattrs.IconTextView android:id="@+id/icontext_01" xmlns:android="http://schemas.android.com/apk/res/android" xmlns:icontext="http://schemas.android.com/apk/res/com.braincol.viewattrs" android:layout_width="wrap_content" android:layout_height="wrap_content" icontext:relation="icon_left" icontext:icon="@drawable/hi" icontext:text="hi,how are you!" icontext:text_size="12sp" /> </LinearLayout>可以看到我们在这个布局文件中加入了一个新的命名空间:
xmlns:icontext="http://schemas.android.com/apk/res/com.braincol.viewattrs"
并使用我们自定义的那些属性:
icontext:relation="icon_left"
icontext:icon="@drawable/hi"
icontext:text="hi, how are you !"
icontext:text_size="30sp"
4. 在Activity中使用该布局
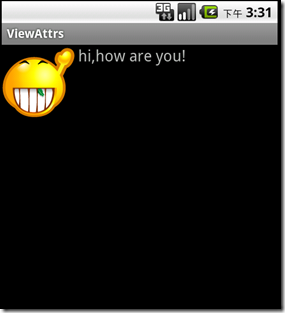
package com.braincol.viewattrs;import android.app.Activity;import android.os.Bundle;public class ViewAttrs extendsActivity { /** Called when the activity is first created. */ @Override publicvoid onCreate(Bundle savedInstanceState) { super.onCreate(savedInstanceState); setContentView(R.layout.main); }}运行效果:

- AndroidStudio中如何在android style文件中使用自定义属性
- 如何在android style文件中使用自定义属性
- 如何在android style文件中使用自定义属性
- 如何在android style/layout文件中使用自定义属性。
- 如何在android style文件中使用自定义属性
- 如何在android style文件中使用自定义属性
- 如何在android style文件中使用自定义属性
- 如何在android style文件中使用自定义属性
- 如何在android style文件中使用自定义属性
- 在android style文件中使用自定义属性
- 在android style.xml文件中使用自定义属性
- 在android style文件中使用自定义属性
- Android中style内使用自定义属性
- android在style中使用自定义属性 error: style attribute not found.
- AndroidStudio中自定义属性及使用
- android 如何在XML中自定义属性
- android 在布局中使用自定义属性
- ArcMap中使用自定义Style文件
- typedef的使用
- 我们为什么不使用NSLog
- [LeetCode]120. Triangle
- 史上最全最强SpringMVC详细示例实战教程
- 用Vc++写的音视频即时通话程序(部分代码)
- AndroidStudio中如何在android style文件中使用自定义属性
- UVa 136 Ugly Numbers
- [剑指offer]数组中的逆序对
- 【bzoj 2502】清理雪道(有上下界的网络流)
- Hibernate Restrictions.or 以及 Restrictions.disjunction实现逻辑或
- 实现1-1000中所有素数的和
- 解决“Dynamic Web Module 3.0 requires Java 1.6 or newer.”错误
- DHCP Relay Configuration on SonicOS
- [剑指offer]两个链表公共节点


