Android移动APP开发笔记——Cordova(PhoneGap)通过CordovaPlugin插件调用 Activity 实例
来源:互联网 发布:淘宝正道体育 编辑:程序博客网 时间:2024/05/19 03:29
Cordova(PhoneGap)采用的是HTML5+JavaScript混合模式来开发移动手机APP,因此当页面需要获取手机内部某些信息时(例如:联系人信息,坐标定位,短信等),程序就需要调用手机内部的API跟页面进行信息交换。Cordova 特别为此定制了完善的解决方案,以方便用户进行程序编辑。在这一章里将为大家逐一介绍Cordova与Actitity通讯的实现原理。
目录
一、CordovaPlugin类简介
二、页面通过 cordova.exec 函数调用 CordovaPlugin 插件
三、CordovaInterface接口说明
四、页面通过CordovaPlugin插件调用Activity开发实例
一、CordovaPlugin类简介
CordovaPlugin是Cordova插件的父类,用户自定义的插件必须继承父类,它的主要常用属性如下
属性详细说明CordovaWebView视图管理器,当中包括PluginManager、CordovaWebViewEngine、ICordovaCookieManager等多个对象,用于管理界面渲染,视图加载过程中的生命周期 CordovaInterface定义startActivityForResult、setActivityResultCallback等主要方法,获取调用上下文中的Activity对象CordovaPreferences用于管理bundle中的属性值表格1.1
CordovaPlugin的常用方法如下
方法详细说明void privateInitialize(String serviceName, CordovaInterface cordova, CordovaWebView webView, CordovaPreferences preferences)插件初始化时执行,用于定义service名称,cordovaInterface接口,CodovaWebView视图,CordovaPreferences 属性等值boolean execute(String action, String rawArgs, CallbackContext callbackContext)在开发插件时,用户的自定义方法,当页面调用插件时系统首先将会运行此方法 boolean execute(String action, JSONArray args, CallbackContext callbackContext)同上boolean execute(String action, CordovaArgs args, CallbackContext callbackContext)同上void onActivityResult(int requestCode, int resultCode, Intent intent)在开发插件时,用户的自定义方法,插件调用startActivityForResult后的回调函数。String getServiceName()获取在config文件中该服务的名称Boolean shouldAllowRequest(String url) 判断是否允许此请求Boolean shouldAllowNavigation(String url) 判断是否允许此导航Boolean shouldOpenExternalUrl(String url) 判断是否打开外部链接boolean onReceivedHttpAuthRequest(CordovaWebView view, ICordovaHttpAuthHandler handler, String host, String realm) boolean onReceivedClientCertRequest(CordovaWebView view, ICordovaClientCertRequest request)表格1.2
CordovaPlugin的详细解析可参考官网
http://cordova.apache.org/docs/en/3.4.0/guide_hybrid_plugins_index.md.html#Plugin%20Development%20Guide
回到目录
二、页面调用 CordovaPlugin 插件实例
大概了解 CordovaPlugin 类的使用方法后,下面为大家介绍一下页面调用插件的例子。首先打开文件res/xml/config.xml为插件进行配置。
<preference/>可用于运行环境中的常用参数,例如:全屏设置,滚动条设置,背景色设置等等
<preference name="Fullscreen" value="true" />
<preference name="DisallowOverscroll" value="true"/>
<preference name="BackgroundColor" value="0xff0000ff"/>
<feature></feature>节点用于设置插件描述,feature的name属性是设置插件的唯一标示,在页面调用插件时将通过name找到此插件
在开发插件时,先为此插件添加一个<feature>节点,在<param>中绑定插件的后台执行文件ShowMessagePlugin.java
<param name="android-package" value="org.apache.cordova.showmessage.ShowMessagePlugin" />
1 <?xml version='1.0' encoding='utf-8'?> 2 <widget id="com.sun.androidapp" version="0.0.1" xmlns="http://www.w3.org/ns/widgets" xmlns:cdv="http://cordova.apache.org/ns/1.0"> 3 <!--设置运行环境中的参数值 --> 4 <preference name="loglevel" value="DEBUG" /> 5 <!-- 插件描述 --> 6 <feature name="Whitelist"> 7 <param name="android-package" value="org.apache.cordova.whitelist.WhitelistPlugin" /> 8 <param name="onload" value="true" /> 9 </feature>10 <feature name="ShowMessage">11 <param name="android-package" value="org.apache.cordova.showmessage.ShowMessagePlugin" />12 </feature>13 <allow-intent href="market:*" />14 <!-- 该APP名称 -->15 <name>AndroidTest</name>16 <!-- APP描述 -->17 <description>18 A sample Apache Cordova application that responds to the deviceready event.19 </description>20 <!-- 作者信息描述 -->21 <author email="dev@cordova.apache.org" href="http://cordova.io">22 Apache Cordova Team23 </author>24 <!-- 默认启动页面 -->25 <content src="index.html" />26 <!-- 指定app可进行通信的域名,*为所有 -->27 <access origin="*" />28 <!-- App默认只请允许通过手机端直接打开,若想通过网站,SMS等方式调用APP,则需要设置allow-intent配置 -->29 <allow-intent href="http://*/*" />30 <allow-intent href="https://*/*" />31 <allow-intent href="tel:*" />32 <allow-intent href="sms:*" />33 <allow-intent href="mailto:*" />34 <allow-intent href="geo:*" />35 </widget>
建立org.apache.cordova.showmessage.ShowMessagePlugin类,且继承CordovaPlugin基类,并实现
bool execute(action,args,callbackcontext) 方法。当页面调用此插件时,默认执行此方法。
action 是唯一标识符,系统可根据不同的action进行不同的操作。
args是页面传入的参数,支持String, JsonArray,CordovaArgs 等三种不同的类型。
callbackcontext是系统的上下文,当完成操作后调用callbackcontext.success(支持多类型参数)方法,表示插件操作已完成,并把参数返还到页面。最终返回true代表插件执行成功,false代表执行失败
1 package org.apache.cordova.showmessage; 2 3 public class ShowMessagePlugin extends CordovaPlugin { 4 @Override 5 public boolean execute(String action,JSONArray args,CallbackContext context) 6 throws JSONException{ 7 if(action.equals("mydream")){ 8 String msg=args.getString(0)+"'s dream is to become a "+args.getString(1); 9 context.success(msg);10 return true;11 }12 return false;13 }14 }
在 cordova.js 包中,最常用的是 cordova.exec(success,failed,service,action,args)函数,页面正是通过此函数调用插件。
success 用于绑定插件执行成功后回调的回调函数
failed用于绑定执行失败的回调函数
service与config.xml配置文件中feature字节的name属性相对应
action与ShowMessagePlugin对象boolean excute方法中action参数对应,用于分辨插件执行的方法类型,插件可根据action类型的不同作出分类处理。
args为输入参数
1 Name: <input type="text" id="txt1"/> 2 Dream:<input type="text" id="txt2"/> 3 <input type="button" onclick="btnclick()" name="btn" value="Click"/> <br/> 4 <label id="label"></label> 5 6 <script type="text/javascript"> 7 8 function btnclick(){ 9 var name=$("#txt1").val();10 var dream=$("#txt2").val();11 //通过 cordova.exec (success,failed,serviceName,action,args)函数调用插件12 cordova.exec(success,failed,"ShowMessage","mydream",[name,dream])13 }14 15 //成功调用插件,获取返回值后的页面处理函数 16 function success(result){17 if(result!=null)18 $("#label").html(result);19 else20 alert("no message");21 }22 23 //调用失败后的处理函数24 function failed(msg){25 ......26 }27 </script>
测试结果

回到目录
三、CordovaInterface接口说明
CordovaInterface 接口默认是由 CordovaInterfaceImpl 类实现的,当中包括了一个Activity对象。当打开APP时 Cordova 会默认启动此 Activity 以承载 Cordova 核心引擎对程序进行管理。ExecutorService 则负责对象对线程池进行管理,PluginManager则负责对插件进行管理,CordovaPlugin则是Cordova插件的父类,所有插件都必须继承CordovaPlugin。
属性详细说明Activity打开APP时 Cordova 会默认启动此 Activity 以承载 Cordova 核心引擎对程序进行管理ExecutorService对线程池进行管理PluginManager插件管理器,用于管理插件的生成,运行,结束等生命周期CordovaPlugin通过startActivityForResult方法绑定CordovaPlugin插件 ActivityResultHolder内部类,封装了requestCode, resultCode, intent等对象表格2.1
CordovaInterfaceImpl定义了三个最常用方法
方法详细说明void startActivityForResult(CordovaPlugin command, Intent intent, int requestCode)绑定CordovaPlugin参数,并调用Activity对象的startActivityForResult(intent, requestCode)方法,根据 intent 绑定值跳转到对应的activityvoid setActivityResultCallback(CordovaPlugin plugin)激发CordovaPlugin对象的onActivityResult事件 boolean onActivityResult(int requestCode, int resultCode, Intent intent)封装Acticity对象的onActivityResult回调函数, 激发CordovaPlugin对象的onActivityResult事件表格2.2
回到目录
四、页面通过CordovaPlugin插件调用Activity开发实例
类似于第一节实例,在页面通过cordova.exec(success,failed,service,action,args)方法调用插件,返回时调用success函数进行处理显示结果
1 出游省份: 2 <select id="select1"> 3 <option value='1' selected='selected'>黑龙江</option> 4 <option value='2'>吉林</option> 5 <option value='3'>辽宁</option> 6 </select> 7 <input type="button" onclick="btnclick()" name="btn" value="查找"/> <br/> 8 路线景点: 9 <label id="label"></label><br/> 10 11 <script type="text/javascript">12 13 function btnclick(){14 var province=$("#select1").val();15 //通过 cordova.exec (success,failed,serviceName,actionName,args)函数调用插件16 cordova.exec(success,null,"ShowMessage","showMessage",[province]);17 }18 19 //成功调用插件,获取返回值后的页面处理函数 20 function success(result){21 if(result!=null)22 $("#label").html(result);23 else24 alert("no message");25 }26 </script>

插件通过判断action参数判断进行不同的处理,然后通过Intent对象绑定将要启动的Activity,最后通过CordovaInterface中的startActivityForResult(cordovaPlugin,intent,int)方法启动该Activity。当 Activity 结束后,系统将调用回调函数 onActivityResult(int requestCode, int resultCode, Intent intent)
在此说明一下Intent类的用途,此类主要用于绑定当前的活动与子活动之间关系,当中包含6种构造函数。
1、Intent() 空构造函数
2、Intent(Intent o) 拷贝构造函数
3、Intent(String action) 指定action类型的构造函数
4、Intent(String action, Uri uri) 指定Action类型和Uri的构造函数,URI主要是结合程序之间的数据共享ContentProvider
5、Intent(Context packageContext, Class<?> cls) 传入组件的构造函数,也就是此例子中使用到的
6、Intent(String action, Uri uri, Context packageContext, Class<?> cls) 前两种结合体
Intent 类中封装了一个Bundle 对象 mExtras,可用于主活动与子活动之间传值,系统可通过 putExtra 方法把参数传入mExtras, 也可通过 getShortExtra、getIntExtra、getBooleanExtra、getByteExtra 等多个方法从mExtras 获取参数值。
1 public class ShowMessagePlugin extends CordovaPlugin { 2 private CallbackContext context; 3 4 @Override 5 public boolean execute(String action,JSONArray args,CallbackContext context) 6 throws JSONException{ 7 this.context=context; 8 //根据action判断调用方法 9 if(action.equals("showMessage")){10 //通过Intent绑定将要调用的Activity11 Intent intent=new Intent(this.cordova.getActivity(),SpotActivity.class);12 //加入将要传输到activity中的参数13 intent.putExtra("province", args.getString(0));14 //启动activity15 this.cordova.startActivityForResult(this, intent, 0);16 }17 return true;18 }19 20 @Override21 public void onActivityResult(int requestCode, int resultCode, Intent intent) {22 // 根据resultCode判断处理结果23 if(resultCode==Activity.RESULT_OK){24 String spot=intent.getStringExtra("spot");25 context.success(spot);26 }27 }28 }
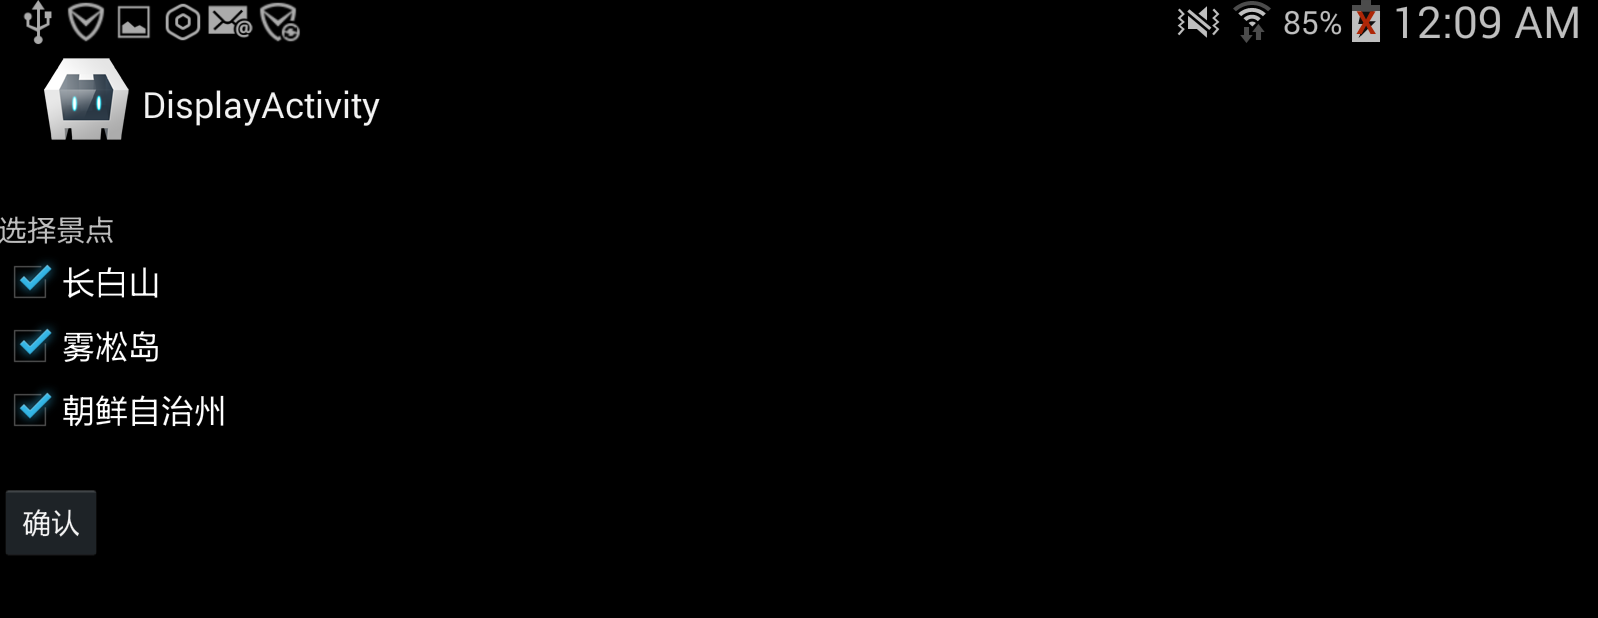
Activity 被触发后先通过 setContentView 方法绑定视图,再从intent 对象中获取输入参数进行处理。
完成操作后,通过 Activity 类 setResult(int resultCode,Intent data) 方法绑定返回值,其中resultCode可被cordovaPlugin 插件用作判断返回值的处理结果。
最后调用 Activity 对象的 finish 方法关闭 SpotActivity,把返回值回传到 CordovaPlugin。
1 public class SpotActivity extends Activity{ 2 private CheckBox chk1,chk2,chk3; 3 4 @Override 5 public void onCreate(Bundle savedInstanceState){ 6 super.onCreate(savedInstanceState); 7 //绑定视图 8 setContentView(R.layout.goods_list); 9 //从intent中获取输入参数10 Integer province=Integer.parseInt(this.getIntent().getStringExtra("province"));11 setSpots(province);12 }13 14 private void setSpots(Integer n){15 this.chk1=(CheckBox)this.findViewById(R.id.checkBox1);16 this.chk2=(CheckBox)this.findViewById(R.id.checkBox2);17 this.chk3=(CheckBox)this.findViewById(R.id.checkBox3);18 switch(n){19 case 1:20 chk1.setText("漠河");21 chk2.setText("北极村");22 chk3.setText("九曲十八湾");23 break;24 case 2:25 chk1.setText("长白山");26 chk2.setText("雾凇岛");27 chk3.setText("朝鲜自治州");28 break;29 case 3:30 chk1.setText("鸭绿江");31 chk2.setText("笔架山");32 chk3.setText("凤凰山");33 break;34 default:35 break;36 }37 }38 39 public void btn_onClick(View view){40 String spot="";41 if(chk1.isChecked())42 spot+=chk1.getText();43 if(chk2.isChecked())44 spot+=" "+chk2.getText();45 if(chk3.isChecked())46 spot+=" "+chk3.getText();47 //通过setResult绑定返回值48 Intent intent=new Intent();49 intent.putExtra("spot",spot);50 setResult(RESULT_OK,intent);51 //关闭该activity,把返回值传回到cordovaPlugin插件52 this.finish();53 }54 }
Activity 视图
1 <?xml version="1.0" encoding="utf-8"?> 2 <LinearLayout xmlns:android="http://schemas.android.com/apk/res/android" 3 android:layout_width="match_parent" 4 android:layout_height="match_parent" 5 android:layout_alignParentBottom="true" 6 android:orientation="vertical" > 7 <TextView 8 android:layout_width="wrap_content" 9 android:layout_height="wrap_content"10 android:text="选择景点"11 android:layout_marginTop="80dp"/>12 <CheckBox13 android:id="@+id/checkBox1"14 android:layout_width="wrap_content"15 android:layout_height="wrap_content"/>16 <CheckBox17 android:id="@+id/checkBox2"18 android:layout_width="wrap_content"19 android:layout_height="wrap_content"/>20 <CheckBox21 android:id="@+id/checkBox3"22 android:layout_width="wrap_content"23 android:layout_height="wrap_content"/>24 <Button25 android:id="@+id/button1"26 style="?android:attr/buttonStyleSmall"27 android:layout_width="wrap_content"28 android:layout_height="40dp"29 android:text="确认" 30 android:layout_marginTop="20dp"31 android:onClick="btn_onClick"/>32 </LinearLayout>

activity 关闭后,cordovaPlugin 插件将调用回调函数 onActivityResult(int requestCode, int resultCode, Intent intent),回调函数中可根据 resultCode 参数判断处理情况,根据不同的结果对intent 中的返回值 bundler 对象进行不同处理。 最后使用 callbackContext 对象中的 success(string) 方法把处理结果回传到页面;
处理结果:

回到目录
作者:风尘浪子
http://www.cnblogs.com/leslies2/p/cordovaPlugin.html
原创作品,转载时请注明作者及出处
- Android移动APP开发笔记——Cordova(PhoneGap)通过CordovaPlugin插件调用 Activity 实例
- Cordova通过CordovaPlugin插件调用 Activity
- Android移动APP开发笔记——最新版Cordova 5.3.1(PhoneGap)搭建开发环境
- Android 移动APP开发——最新版Cordova 5.3.1(PhoneGap)搭建开发环境
- [Phonegap+Sencha Touch] 移动开发76 让cordova app访问远端网站也能调用cordova插件功能
- [Phonegap+Sencha Touch] 移动开发64 Phonegap/Cordova 插件开发
- XX程序媛学习笔记--Cordova(PhoneGap)通过plugins调用Android Native并回调
- [Phonegap+Sencha Touch] 移动开发77 Cordova Hot Code Push插件实现自动更新App的Web内容
- 用sencha touch+cordova(phoneGap)开发APP(一)——第一个界面
- PhoneGap(Cordova)通过插件读取android配置信息
- Cordova插件调用Android原生Activity
- phonegap跳转Activity android插件调用原生
- phoneGap(cordova)插件开发学习
- Cordova(PhoneGap)通过plugins调用Android Native并回调
- vue+phonegap(cordova)整合Android开发
- phonegap(cordova)移动支付宝接口调用
- Cordova插件CordovaPlugin包名问题
- 小白学phoneGap《构建跨平台APP:phoneGap移动应用实战》连载三(通过实例来体验生命周期)
- PHP session 失效不传递的解决办法
- Jquery dom查找方法 性能分析
- android中xml tools属性详解
- iPhone4/4s运行iOS7慢怎么办
- 简单封装一下 win内核线程池 以后直接继承 不用复写
- Android移动APP开发笔记——Cordova(PhoneGap)通过CordovaPlugin插件调用 Activity 实例
- android webview js alert对话框 不能弹出 解决办法
- iOS UILabel详解
- 依赖倒置原则
- 用Canvas画带动画的渐变数字圆环
- windows10刻录并在新硬盘安装Fedora25
- ListView 卡顿的原因
- 面向对象方式解决比赛名单类问题(Java实现)
- Hibernate 之 cascade 和 inverse


