Spring 4 and Hibernate 4 integration tutorial part 1 xml configuration
来源:互联网 发布:阿里云服务器配置l2tp 编辑:程序博客网 时间:2024/05/13 11:54
In enterprise Java application development, perhaps Spring and Hibernate integration is one of the most-demanded topic which most programmers are looking for and are facing with. Spring is the leading enterprise application framework, and Hibernate is the leading ORM framework so combination of these two guys would be a preferable choice in order to develop robust enterprise applications.
This is a step-by-step tutorial that helps you build a Spring-Hibernate application easily in a clear and concise way. In this first part, we demonstrate how to code a simple Spring MVC application that displays a list of users from MySQL database. The DAO implementation uses Hibernate’s SessionFactory to query against the database, instead of using JdbcTemplate.The following configuration approaches are used in the demo application:- Spring MVC: Annotations for controller and XML for bean definitions.
- Hibernate: XML mapping for model class.
- Web Application: using web.xml deployment descriptor file.
- Java 7
- Spring framework 4.0.3.RELEASED
- Hibernate ORM 4.3.5.Final
- Spring Tool Suite IDE 3.5.1
- Maven 3
- Tomcat 7

1. How Spring supports Hibernate Integration
Basically, in order to support Hibernate integration, Spring provides two key beans available in theorg.springframework.orm.hibernate4 package:- LocalSessionFactoryBean: creates a Hibernate’s SessionFactory which is injected into Hibernate-based DAO classes.
- HibernateTransactionManager: provides transaction support code for a SessionFactory. Programmers can use @Transactional annotation in DAO methods to avoid writing boiler-plate transaction code explicitly.
2. Setting up Project
Let’s create a Spring MVC project using Spring Tool Suite IDE (See example: Spring MVC beginner tutorial with Spring Tool Suite IDE), name it as SpringMvcHibernateXML.Setting up DatabaseExecute the following MySQL script in order to create a database named usersdb with a table named users:1
2
3
4
5
6
7
8
9
create database usersdb;CREATE TABLE `users` ( `user_id` int(11) NOT NULL AUTO_INCREMENT, `username` varchar(45) NOT NULL, `password` varchar(45) NOT NULL, `email` varchar(45) NOT NULL, PRIMARY KEY (`user_id`)) ENGINE=InnoDB AUTO_INCREMENT=16 DEFAULT CHARSET=latin1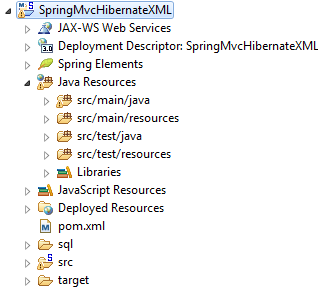 NOTE: After completing this tutorial, you will create a project structure looks like the above.Maven DependenciesDeclare versions for Java and Spring framework:
1
2
3
4
<properties> <java-version>1.7</java-version> <org.springframework-version>4.0.3.RELEASE</org.springframework-version></properties>- Spring framework dependencies:123456789101112131415161718
<dependency><groupId>org.springframework</groupId><artifactId>spring-context</artifactId><version>${org.springframework-version}</version></dependency><dependency><groupId>org.springframework</groupId><artifactId>spring-webmvc</artifactId><version>${org.springframework-version}</version></dependency><dependency><groupId>org.springframework</groupId><artifactId>spring-orm</artifactId><version>${org.springframework-version}</version><type>jar</type><scope>compile</scope></dependency> - Hibernate ORM framework dependencies:12345
<dependency><groupId>org.hibernate</groupId><artifactId>hibernate-core</artifactId><version>4.3.5.Final</version></dependency> - Java Servlet and JSP dependencies (for compilation only):123456789101112
<dependency><groupId>javax.servlet</groupId><artifactId>javax.servlet-api</artifactId><version>3.1.0</version><scope>provided</scope></dependency><dependency><groupId>javax.servlet.jsp</groupId><artifactId>javax.servlet.jsp-api</artifactId><version>2.3.1</version><scope>provided</scope></dependency> - JSTL dependency:12345
<dependency><groupId>jstl</groupId><artifactId>jstl</artifactId><version>1.2</version></dependency> - Apache Commons DBCP dependency (for database connection pooling):12345
<dependency><groupId>org.apache.commons</groupId><artifactId>commons-dbcp2</artifactId><version>2.0</version></dependency> - MySQL Connector Java dependency (JDBC driver for MySQL):12345
<dependency><groupId>mysql</groupId><artifactId>mysql-connector-java</artifactId><version>5.1.30</version></dependency>
This book: Getting started with Spring Framework helps you master all major concepts like Spring core modules, dependency injection, Spring AOP, annotation-driven development, and more.
3. Coding Model Class Configuring Hibernate Mapping
Writing Model ClassCreate a new class named User.java in the package net.codejava.spring.model with the following source code:1
2
3
4
5
6
7
8
9
10
11
packagenet.codejava.spring.model;publicclass User { privateint id; privateString username; privateString password; privateString email; // getters and setters are removed for brevity}1
2
3
4
5
6
7
8
9
10
11
12
13
14
<?xmlversion="1.0"encoding="UTF-8"?><!DOCTYPE hibernate-mapping PUBLIC "-//Hibernate/Hibernate Mapping DTD 3.0//EN" "http://www.hibernate.org/dtd/hibernate-mapping-3.0.dtd"><hibernate-mappingpackage="net.codejava.spring.model"> <classname="User"table="USERS"> <idname="id"column="USER_ID"> <generatorclass="native"/> </id> <propertyname="username"column="USERNAME"/> <propertyname="password"column="PASSWORD"/> <propertyname="email"column="EMAIL"/> </class> </hibernate-mapping>1
2
3
4
5
6
7
8
9
10
11
<?xmlversion='1.0'encoding='utf-8'?><!DOCTYPE hibernate-configuration PUBLIC "-//Hibernate/Hibernate Configuration DTD 3.0//EN" "http://www.hibernate.org/dtd/hibernate-configuration-3.0.dtd"><hibernate-configuration> <session-factory> <propertyname="dialect">org.hibernate.dialect.MySQLDialect</property> <propertyname="show_sql">true</property> <mappingresource="net/codejava/spring/model/User.hbm.xml"/> </session-factory></hibernate-configuration>
4. Coding DAO Classes
Writing UserDAO interfaceCreate a very simple DAO interface for the User class as the following UserDAO.java class:1
2
3
4
5
6
7
8
9
packagenet.codejava.spring.dao;importjava.util.List;importnet.codejava.spring.model.User;publicinterface UserDAO { publicList<User> list();}1
2
3
4
5
6
7
8
9
10
11
12
13
14
15
16
17
18
19
20
21
22
23
24
25
26
27
28
29
packagenet.codejava.spring.dao;importjava.util.List;importnet.codejava.spring.model.User;importorg.hibernate.Criteria;importorg.hibernate.SessionFactory;importorg.springframework.transaction.annotation.Transactional;publicclass UserDAOImpl implementsUserDAO { privateSessionFactory sessionFactory; publicUserDAOImpl(SessionFactory sessionFactory) { this.sessionFactory = sessionFactory; } @Override @Transactional publicList<User> list() { @SuppressWarnings("unchecked") List<User> listUser = (List<User>) sessionFactory.getCurrentSession() .createCriteria(User.class) .setResultTransformer(Criteria.DISTINCT_ROOT_ENTITY).list(); returnlistUser; }}
5. Configuring Spring Application Context
Now, we come to the most important part that wires Spring and Hibernate together through some XML configuration. Open the servlet-context.xml file under src/main/webapp/WEB-INF/spring/appServlet and update its content as follows.Configuring Spring MVC View ResolversAs usual, add the following declarations for Spring MVC annotation driven approach:1
2
3
<mvc:annotation-driven/><mvc:resourcesmapping="/resources/**"location="/resources/"/><context:component-scanbase-package="net.codejava.spring"/>1
2
3
4
<beanclass="org.springframework.web.servlet.view.InternalResourceViewResolver"> <propertyname="prefix"value="/WEB-INF/views/"/> <propertyname="suffix"value=".jsp"/></bean>1
2
3
4
5
6
<beanid="dataSource"class="org.apache.commons.dbcp2.BasicDataSource"destroy-method="close"> <propertyname="driverClassName"value="com.mysql.jdbc.Driver"/> <propertyname="url"value="jdbc:mysql://localhost:3306/usersdb"/> <propertyname="username"value="root"/> <propertyname="password"value="secret"/></bean>1
2
3
4
5
<beanid="sessionFactory" class="org.springframework.orm.hibernate4.LocalSessionFactoryBean"> <propertyname="dataSource"ref="dataSource"/> <propertyname="configLocation"value="classpath:hibernate.cfg.xml"/></bean>1
2
3
4
5
<tx:annotation-driven/><beanid="transactionManager" class="org.springframework.orm.hibernate4.HibernateTransactionManager"> <propertyname="sessionFactory"ref="sessionFactory"/></bean>1
2
3
4
5
<beanid="userDao"class="net.codejava.spring.dao.UserDAOImpl"> <constructor-arg> <refbean="sessionFactory"/> </constructor-arg></bean>
6. Coding Controller Classes
Write our Spring MVC controller class (HomeController.java) under the net.codejava.spring package with the following code:1
2
3
4
5
6
7
8
9
10
11
12
13
14
15
16
17
18
19
20
21
22
23
24
25
26
27
28
29
30
packagenet.codejava.spring;importjava.util.List;importnet.codejava.spring.dao.UserDAO;importnet.codejava.spring.model.User;importorg.springframework.beans.factory.annotation.Autowired;importorg.springframework.stereotype.Controller;importorg.springframework.web.bind.annotation.RequestMapping;importorg.springframework.web.servlet.ModelAndView;/** * Handles requests for the application home page. */@Controllerpublicclass HomeController { @Autowired privateUserDAO userDao; @RequestMapping(value="/") publicModelAndView home() { List<User> listUsers = userDao.list(); ModelAndView model = newModelAndView("home"); model.addObject("userList", listUsers); returnmodel; } }
7. Coding View Page
Create a home.jsp under the src/main/webapp/WEB-INF/views directory with the following content:1
2
3
4
5
6
7
8
9
10
11
12
13
14
15
16
17
18
19
20
21
22
23
24
25
26
27
28
29
30
<%@page contentType="text/html" pageEncoding="UTF-8"%><!DOCTYPE HTML PUBLIC "-//W3C//DTD HTML 4.01 Transitional//EN" "http://www.w3.org/TR/html4/loose.dtd"><%@ taglib uri="http://java.sun.com/jsp/jstl/core" prefix="c" %><html> <head> <metahttp-equiv="Content-Type"content="text/html; charset=UTF-8"> <title>Home</title> </head> <body> <divalign="center"> <h1>Contact List</h1> <tableborder="1"> <th>No</th> <th>Username</th> <th>Email</th> <c:forEachvar="user"items="${userList}"varStatus="status"> <tr> <td>${status.index + 1}</td> <td>${user.username}</td> <td>${user.email}</td> </tr> </c:forEach> </table> </div> </body></html>This book: Spring in Practice covers 66 Spring development techniques that help you solve practical issues you will encounter when using Spring framework.
8. Testing the Application
Deploy the SpringMvcHibernateXML application on Tomcat server and access its default page via the following URL:http://localhost:8080/SpringMvcHibernateXML
If everything is going fine, you would see the following result: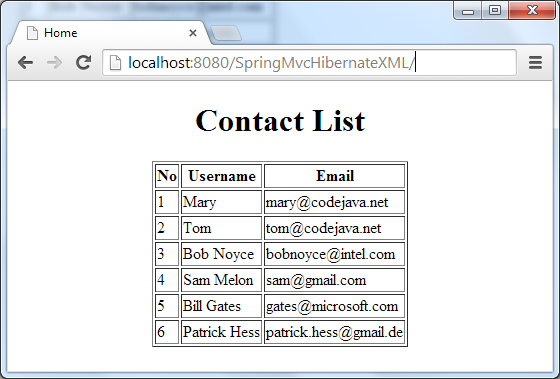 Congratulations! You have completed our first part of Spring-Hibernate Integration series. You can download the attached project and experiment yourself. A deployable WAR file is also provided for your convenience.
 0 0
- Spring 4 and Hibernate 4 integration tutorial part 1 xml configuration
- Spring and Hibernate Integration Part 1
- Spring, Hibernate, Maven, and Struts2 integration tutorial
- Spring and Hibernate Integration Part 2
- Hibernate and Spring Integration
- Struts 2 + Spring + Hibernate integration Tutorial
- Struts Hibernate Integration Tutorial
- spring integration hibernate pom.xml (annotation)
- Hibernate EhCache configuration tutorial
- Siri Integration in iOS 10 with Swift – SiriKit Tutorial (Part 1)
- Asterisk and Kamailio realtime integration tutorial
- Enterprise Integration Pattern and Spring integration
- MyBatis 3 – Spring integration tutorial
- Struts 2 and Hibernate Integration
- Debug Tutorial Part 1: Beginning Debugging Using CDB and NTSD
- Maven Tutorial 01 Part 1- Introduction and Setting up
- hibernate xml configuration record
- Spring 4 MVC HelloWorld Tutorial – Full XML Example
- [学习笔记]easyui 为表格行添加事件
- 人人,金山西山居,腾讯互娱,微信,网易游戏offer及面经
- [学习笔记]zTree是一个很好的js插件实现加载树形结构
- MNIST是什么鬼?
- [学习笔记]Struts文件下载
- Spring 4 and Hibernate 4 integration tutorial part 1 xml configuration
- [学习笔记]JPA入门
- [学习笔记]Calendar获取指定日期
- Java Web项目中使用Freemarker生成Word文档
- 贪心法
- Table控件及内容居中
- LeetCode:Merge k Sorted Lists
- 线性表的基本实现与操作
- HBase介绍(列存储)