低功耗蓝牙(BLE)在 Android APP 中的应用
来源:互联网 发布:it知名企业 编辑:程序博客网 时间:2024/04/29 15:17
低功耗蓝牙(BLE)在 Android APP 中的应用
前言
最近公司接了一个新项目,用户可以把自己的乐器跟Phone或Pad连接起来,当弹奏乐器的时候,会把演奏情况同步反馈到设备上,方便用户练习,有点类似于之前玩过的一款叫 [ 吉他英雄 ]的游戏。不过这次不用插线,直接蓝牙无线连接就可以了。
那么问题来了,因为弹奏的时候数据传输一直在进行,但是如果要一直打开蓝牙的话是很费电的,也许没几首曲子下来设备的电量就耗掉了不少,这当然是无法接受的。那有没有什么好的解决方案呢?
运气真好,Android在4.3之后加入了BLE技术,可以大大节省设备功耗。那么什么是BLE呢?它跟经典蓝牙有什么区别呢?开发中又要注意哪些问题呢?
什么是BLE?
BLE 是Bluetooth Low Energy低功耗蓝牙的缩写,顾名思义,其功耗较低。
跟经典蓝牙的区别
我们知道,现在移动设备上使用的蓝牙大多是4.0,而蓝牙 4.0 有两个分支,经典 4.0 和 BLE4.0,经典 4.0 就是传统的3.0 蓝牙升级而成,向下兼容。而 BLE 4.0 是一个新的分支,不向下兼容。
相较于经典蓝牙,BLE的优点是快速搜索,快速连接,超低功耗保持连接和传输数据,弱点是数据传输速率低,物理带宽只有 1M,实际传输速度在 1~6KB 之间。
BLE开发中要注意的问题
关键术语和概念
Generic Attribute Profile(GATT)—GATT配置文件是一个通用规范,用于在BLE链路上发送和接收被称为“属性”的数据块。目前所有的BLE应用都基于GATT。 蓝牙SIG规定了许多低功耗设备的配置文件。配置文件是设备如何在特定的应用程序中工作的规格说明。注意一个设备可以实现多个配置文件。例如,一个设备可能包括心率监测仪和电量检测。
Attribute Protocol(ATT)—GATT在ATT协议基础上建立,也被称为GATT/ATT。ATT对在BLE设备上运行进行了优化,为此,它使用了尽可能少的字节。每个属性通过一个唯一的的统一标识符(UUID)来标识,每个String类型UUID使用128 bit标准格式。属性通过ATT被格式化为characteristics和services。
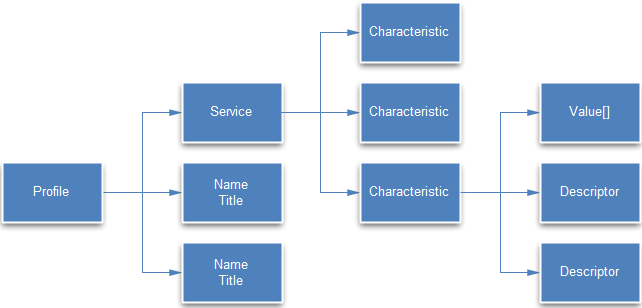
Characteristic 一个characteristic包括一个单一变量和0-n个用来描述characteristic变量的descriptor,characteristic可以被认为是一个类型,类似于类。
Descriptor Descriptor用来描述characteristic变量的属性。例如,一个descriptor可以规定一个可读的描述,或者一个characteristic变量可接受的范围,或者一个characteristic变量特定的测量单位。
Service service是characteristic的集合。例如,你可能有一个叫“Heart Rate Monitor(心率监测仪)”的service,它包括了很多characteristics,如“heart rate measurement(心率测量)”等。你可以在bluetooth.org 找到一个目前支持的基于GATT的配置文件和服务列表。
上面一大串专业术语没看懂的,看下面这张图:

怎么样,看完是不是清晰了很多~
角色和职责
Android设备与BLE设备交互有两组角色:
中心设备和外围设备(Central vs. peripheral):
中心设备和外围设备的概念针对的是BLE连接本身。Central角色负责scan advertisement。而peripheral角色负责make advertisement。GATT server vs. GATT client:
这两种角色取决于BLE连接成功后,两个设备间通信的方式。
举例说明:
现 有一个活动追踪的BLE设备和一个支持BLE的Android设备。Android设备支持Central角色,而BLE设备支持peripheral角 色。创建一个BLE连接需要这两个角色都存在,都仅支持Central角色或者都仅支持peripheral角色则无法建立连接。
当 连接建立后,它们之间就需要传输GATT数据。谁做server,谁做client,则取决于具体数据传输的情况。例如,如果活动追踪的BLE设备需要向 Android设备传输sensor数据,则活动追踪器自然成为了server端;而如果活动追踪器需要从Android设备获取更新信息,则 Android设备作为server端可能更合适。
建立连接的流程
1.使用BluetoothAdapter.startLeScan来扫描BLE设备;2.在扫描到设备的回调函数onLeScan中会得到BluetoothDevice对象;3.使用BluetoothDevice.connectGatt(参数之一BluetoothGattCallback用于传递一些连接状态及结果)来获取到BluetoothGatt对象,BluetoothGatt.connect建立连接;4.上面的BluetoothGattCallback参数为BluetoothGattCallback的匿名内部类, 通过重写一些方法来对客户端进行操作,例如读取BluetoothGattService与BluetoothGattCharacteristic。下面结合Google官方的 Sample:BluetoothLeGatt,来讲讲具体的流程。
BLE权限
和经典蓝牙一样,app使用BLE,需要声明BLUETOOTH权限。利用这个权限去执行蓝牙通信,例如请求连接、接受连接、和传输数据。
如果想让你的app启动设备发现或操纵蓝牙设置,必须声明BLUETOOTH_ADMIN权限。注意:如果你使用BLUETOOTH_ADMIN权限,你也必须声明BLUETOOTH权限。
在你的app manifest文件中声明蓝牙权限:
<uses-permission android:name="android.permission.BLUETOOTH"/><uses-permission android:name="android.permission.BLUETOOTH_ADMIN"/>如果想声明你的app只为具有BLE的设备提供,在manifest文件中包括:
<uses-feature android:name="android.hardware.bluetooth_le" android:required="true"/>但是如果想让你的app提供给那些不支持BLE的设备,需要在manifest中包括上面代码并设置required=”false”,然后在运行时可以通过使用PackageManager.hasSystemFeature()确定BLE的可用性:
// 使用此检查确定BLE是否支持在设备上,然后你可以有选择性禁用BLE相关的功能 if (!getPackageManager().hasSystemFeature(PackageManager.FEATURE_BLUETOOTH_LE)) { Toast.makeText(this, R.string.ble_not_supported, Toast.LENGTH_SHORT).show(); finish();} 启动蓝牙
你的app与BLE通信之前,你需要确认设备是否支持BLE,如果支持,确认已经启用。注意如果<uses-feature.../>设置为false,这个检查才是必需的。
如果不支持BLE,那么你应该适当地禁用部分BLE功能。如果支持BLE但被禁用,你可以无需离开应用程序而要求用户启动蓝牙。使用BluetoothAdapter两步完成该设置。
1.获取 BluetoothAdapter
BluetoothAdapter是Android系统中所有蓝牙操作都需要的,它对应本地Android设备的蓝牙模块,在整个系统中BluetoothAdapter是单例的。当你获取到它的示例之后,就能进行相关的蓝牙操作了。下面的代码片段显示了如何得到适配器。注意该方法使用getSystemService()返回BluetoothManager,然后将其用于获取适配器的一个实例。Android 4.3(API 18)引入BluetoothManager。
// 初始化蓝牙适配器 final BluetoothManager bluetoothManager = (BluetoothManager) getSystemService(Context.BLUETOOTH_SERVICE); mBluetoothAdapter = bluetoothManager.getAdapter();2.开启蓝牙
接下来,你需要确认蓝牙是否开启。调用isEnabled()去检测蓝牙当前是否开启。如果该方法返回false,蓝牙被禁用。下面的代码检查蓝牙是否开启,如果没有开启,将显示错误提示用户去设置开启蓝牙。
// 确保蓝牙在设备上可以开启if (mBluetoothAdapter == null || !mBluetoothAdapter.isEnabled()) { Intent enableBtIntent = new Intent(BluetoothAdapter.ACTION_REQUEST_ENABLE); startActivityForResult(enableBtIntent, REQUEST_ENABLE_BT);}搜索BLE设备
通过调用BluetoothAdapter的startLeScan()搜索BLE设备。调用此方法时需要传入 BluetoothAdapter.LeScanCallback参数。
因此你需要实现 BluetoothAdapter.LeScanCallback接口,BLE设备的搜索结果将通过这个callback返回。
因为扫描BLE设备是电源密集型操作,浪费电量,因此要保证以下原则:
1、当找到对应的设备后,立即停止扫描;
2、不要循环搜索设备,为每次搜索设置适合的时间限制。避免设备不在可用范围的时候持续不停扫描,消耗电量。
private BluetoothAdapter mBluetoothAdapter;private boolean mScanning;private Handler mHandler; // Stops scanning after 10 seconds.private static final long SCAN_PERIOD = 10000;private void scanLeDevice(final boolean enable) { if (enable) { // 经过预定扫描期后停止扫描 mHandler.postDelayed(new Runnable() { @Override public void run() { mScanning = false; mBluetoothAdapter.stopLeScan(mLeScanCallback); } }, SCAN_PERIOD); mScanning = true; mBluetoothAdapter.startLeScan(mLeScanCallback); } else { mScanning = false; mBluetoothAdapter.stopLeScan(mLeScanCallback); } }如果你只想扫描指定类型的外围设备,可以改为调用startLeScan(UUID[], BluetoothAdapter.LeScanCallback)),需要提供你的app支持的GATT services的UUID对象数组。
作为BLE扫描结果的接口,下面是BluetoothAdapter.LeScanCallback的实现。
// Device scan callback. private BluetoothAdapter.LeScanCallback mLeScanCallback = new BluetoothAdapter.LeScanCallback() { @Override public void onLeScan(final BluetoothDevice device, int rssi, byte[] scanRecord) { runOnUiThread(new Runnable() { @Override public void run() { mLeDeviceListAdapter.addDevice(device); mLeDeviceListAdapter.notifyDataSetChanged(); } }); } };亲测,使用这种方式智能搜索到BLE设备,经典蓝牙设备搜不到的。
连接到GATT服务端
与一个BLE设备交互的第一步就是连接它——更具体的,连接到BLE设备上的GATT服务端。为了连接到BLE设备上的GATT服务端,需要使用connectGatt( )方法。这个方法需要三个参数:一个Context对象,autoConnect(boolean值,表示只要BLE设备可用是否自动连接到它),和BluetoothGattCallback调用。 mBluetoothGatt = device.connectGatt(this, false, mGattCallback);
连接到GATT服务端时,由BLE设备做主机,并返回一个BluetoothGatt实例,然后你可以使用这个实例来进行GATT客户端操作。请求方(Android app)是GATT客户端。BluetoothGattCallback用于传递结果给用户,例如连接状态,以及任何进一步GATT客户端操作。
// Implements callback methods for GATT events that the app cares about. For example, // connection change and services discovered. private final BluetoothGattCallback mGattCallback = new BluetoothGattCallback() { @Override public void onConnectionStateChange(BluetoothGatt gatt, int status, int newState) { String intentAction; Log.i(TAG, "oldStatus=" + status + " NewStates=" + newState); if(status == BluetoothGatt.GATT_SUCCESS) { if (newState == BluetoothProfile.STATE_CONNECTED) { intentAction = ACTION_GATT_CONNECTED; broadcastUpdate(intentAction); Log.i(TAG, "Connected to GATT server."); // Attempts to discover services after successful connection. Log.i(TAG, "Attempting to start service discovery:" + mBluetoothGatt.discoverServices()); } else if (newState == BluetoothProfile.STATE_DISCONNECTED) { intentAction = ACTION_GATT_DISCONNECTED; mBluetoothGatt.close(); mBluetoothGatt = null; Log.i(TAG, "Disconnected from GATT server."); broadcastUpdate(intentAction); } } } @Override public void onServicesDiscovered(BluetoothGatt gatt, int status) { if (status == BluetoothGatt.GATT_SUCCESS) { Log.w(TAG, "onServicesDiscovered received: " + status); findService(gatt.getServices()); } else { if(mBluetoothGatt.getDevice().getUuids() == null) Log.w(TAG, "onServicesDiscovered received: " + status); } } @Override public void onCharacteristicRead(BluetoothGatt gatt, BluetoothGattCharacteristic characteristic, int status) { Log.i(TAG, "onCharacteristicRead: "); if (status == BluetoothGatt.GATT_SUCCESS) { broadcastUpdate(ACTION_DATA_AVAILABLE, characteristic); Log.i(TAG, "onCharacteristicRead: "); } } @Override public void onCharacteristicChanged(BluetoothGatt gatt, BluetoothGattCharacteristic characteristic) { Log.e(TAG, "OnCharacteristicChanged"); broadcastUpdate(ACTION_DATA_AVAILABLE, characteristic); Log.e(TAG, "OnCharacteristicChanged"); } @Override public void onCharacteristicWrite(BluetoothGatt gatt, BluetoothGattCharacteristic characteristic, int status) { Log.e(TAG, "OnCharacteristicWrite"); } @Override public void onDescriptorRead(BluetoothGatt gatt, BluetoothGattDescriptor bd, int status) { Log.e(TAG, "onDescriptorRead"); } @Override public void onDescriptorWrite(BluetoothGatt gatt, BluetoothGattDescriptor bd, int status) { Log.e(TAG, "onDescriptorWrite"); } @Override public void onReadRemoteRssi(BluetoothGatt gatt, int a, int b) { Log.e(TAG, "onReadRemoteRssi"); } @Override public void onReliableWriteCompleted(BluetoothGatt gatt, int a) { Log.e(TAG, "onReliableWriteCompleted"); } };上面的代码中,主要看4个方法:
onConnectionStateChange(BluetoothGatt gatt, int status, int newState){...};onServicesDiscovered(BluetoothGatt gatt, int status){...}; onCharacteristicRead(BluetoothGatt gatt, BluetoothGattCharacteristic characteristic, int status){...};onCharacteristicWrite(BluetoothGatt gatt, BluetoothGattCharacteristic characteristic,int status){...}我们的GATT客户端连接到GATT服务端后,由于连接状态的改变,首先触发onConnectionStateChange() 方法,我们看到在这里有一个判断,如果状态为BluetoothProfile.STATE_CONNECTED,说明连接成功。接下来有两个动作:broadcastUpdate()
与BluetoothGatt.discoverServices()。broadcastUpdate(),这个是自己封装的方法,因为要一直保持连接状态并接收数据,所以把上面这些写到一个Service里,Activity与用户交互,这样就避免了APP处于后台时断开连接了。broadcastUpdate() 负责在连接状态改变或收到数据时,将信息发送给Activity,改变界面状态通知用户。
private void broadcastUpdate(final String action) { final Intent intent = new Intent(action); sendBroadcast(intent); } private void broadcastUpdate(final String action, final BluetoothGattCharacteristic characteristic) { final Intent intent = new Intent(action); // This is special handling for the Heart Rate Measurement profile. Data parsing is // carried out as per profile specifications: // http://developer.bluetooth.org/gatt/characteristics/Pages/CharacteristicViewer.aspx? u=org.bluetooth.characteristic.heart_rate_measurement.xml // For all other profiles, writes the data formatted in HEX. final byte[] data = characteristic.getValue(); Log.i(TAG, "broadcastUpdate: "+ characteristic.getValue()); if (data != null && data.length > 0) { //final StringBuilder stringBuilder = new StringBuilder(data.length); //for(byte byteChar : data) //stringBuilder.append(String.format("%02X ", byteChar)); //intent.putExtra(EXTRA_DATA, new String(data) + "\n" + stringBuilder.toString()); intent.putExtra(EXTRA_DATA, new String(data)); Log.i(TAG, "broadcastsend: "); } sendBroadcast(intent); }BluetoothGatt.discoverServices() 搜索GATT服务端发送过来的service,找到后触发onServicesDiscovered() ,我们看到里面有一个自己封装的findService() 方法,这个方法会遍历搜索到的所有service,根据UUID找到需要的service,接着遍历里面的所有Characteristic,根据UUID找到需要的Characteristic,读取数据的话,主要靠BluetoothGatt.setCharacteristicNotification这个方法,在Characteristic状态发生变化时,会触发onCharacteristicChanged() 这个方法,我们可以在里面再次调用broadcastUpdate() 通知用户。
注意:在调用完BluetoothGatt.setCharacteristicNotification,要加上这么一段:
//属性时一定要写的,否则会收不到通知 List<BluetoothGattDescriptor> descriptors = characteristic.getDescriptors(); for (BluetoothGattDescriptor bgp : descriptors) { Log.i(TAG, "setCharacteristicNotification: " + bgp); bgp.setValue(BluetoothGattDescriptor.ENABLE_NOTIFICATION_VALUE); mBluetoothGatt.writeDescriptor(bgp); }不然会收不到通知,在这里坑了很久…..
那有人就问了,onCharacteristicRead() 是做什么的?在我们调用BluetoothGatt.readCharacteristic(mNotifyCharacteristic); 的时候,会触发onCharacteristicRead(),但是一般用不上。因为我们没法知道数据什么时候传过来,所以大部分情况下还是用BluetoothGatt.setCharacteristicNotification 多一点。
写数据的话,要用 Characteristic.setValue(strValue.getBytes()); BluetoothGatt.writeCharacteristic(mNotifyCharacteristic);
然后会触发onCharacteristicWrite() ,我们可以再次调用broadcastUpdate() 通知用户。
关闭BLE
public void close() { if (mBluetoothGatt == null) { return; } mBluetoothGatt.close(); mBluetoothGatt = null;}就先说这么多吧,发现遗漏再往上加。
参考文章:
http://blog.csdn.net/hellogv/article/details/24267685
http://www.cnblogs.com/savagemorgan/p/3722657.html
http://my.oschina.net/tingzi/blog/215008
http://blog.csdn.net/chaoyue0071/article/details/43450091/
- 低功耗蓝牙(BLE)在 Android APP 中的应用
- android蓝牙4.0 BLE低功耗应用
- 低功耗蓝牙(BLE)
- 低功耗蓝牙(BLE)
- 低功耗蓝牙(BLE)
- 低功耗蓝牙(BLE)
- 【Android应用开发】Android 蓝牙低功耗 (BLE) ( 第一篇 . 概述 . 蓝牙低功耗文档 翻译)
- 蓝牙低功耗BLE在智产品的应用
- 开发android蓝牙4.0 BLE低功耗应用的感受
- 【android 蓝牙开发——BLE(低功耗)蓝牙】
- android 蓝牙4.0 ble 低功耗蓝牙
- 低功耗蓝牙BLE
- 蓝牙低功耗(BLE)
- 蓝牙低功耗(BLE)
- Android 低功耗蓝牙(BLE)开发(1)-- 基本概念
- Android 低功耗蓝牙(BLE)开发(2)-- BluetoothAdapter详解
- Android 低功耗蓝牙(BLE)开发(3)-- BluetoothDevice详解
- Android-低功耗蓝牙BLE(Bluetooth Low Energy)开发
- 正则表达式用成这样也算是没sei了
- 不完全node实践教程-第三发
- 关于搜索二叉树的各种操作(插入,删除,输出,查找,递归非递归排序)
- 互联网时代广告计费方式太原网络营销师提供你参考
- ettercap的使用帮助文档 官方man page的个人理解
- 低功耗蓝牙(BLE)在 Android APP 中的应用
- nrf51822微信--MD5
- 嵌入式linux下usb驱动开发方法--看完少走弯路
- [从头学数学] 第192节 导数及其应用
- MJTypeEncoding.M中报错 unknown type name nsstring
- ubuntu14.04 安装MariaDB10.0并允许远程访问
- BaseAdapter中的getview以及convertView的回收机制
- 《MVC》--用Razor给DropDownListFor绑定最近半年的时间
- Java类初始化一些事


