视频处理
来源:互联网 发布:java转apk 编辑:程序博客网 时间:2024/05/09 22:07
参考资料:
- 《OpenCV 2 Computer Vision Application Programming Cookbook》
- 《The OpenCV Reference Manual》
读取视频
使用 CV::VideoCapture 来读取视频序列。
12345678910111213141516171819202122232425262728293031323334353637
#include <stdio.h>#include <string>#include <opencv2/imgproc/imgproc.hpp>#include <opencv2/core/core.hpp>#include <opencv2/highgui/highgui.hpp>int main(){// Open the video filecv::VideoCapture capture("../stomp.avi");// check if video successfully openedif (!capture.isOpened())return 1;// Get the frame ratedouble rate = capture.get(CV_CAP_PROP_FPS);bool stop(false);cv::Mat frame; // current video framecv::namedWindow("Extracted Frame");// Delay between each frame in ms// corresponds to video frame rateint delay = 1000 / rate;// for all frames in videowhile (!stop){// read next frame if anyif (!capture.read(frame))break;cv::imshow("Extracted Frame", frame);// introduce a delay// or press key to stopif (cv::waitKey(delay) >= 0)stop = true;}// Close the video file// Not required since called by destructorcapture.release();}
也可以通过类似的方法读入摄像头捕捉的视频,要改动的地方仅仅是将上面的视频文件名改为摄像头的 ID,默认的摄像头 ID 为 0。
写入视频
使用 CV::VideoWriter 来写入视频。
123456789101112131415161718192021222324252627282930313233343536373839404142
#include <iostream>#include <iomanip>#include <sstream>#include <string>#include <vector>#include <dbg.h>#include <opencv2/core/core.hpp>#include <opencv2/highgui/highgui.hpp>using namespace cv;using namespace std;int main(){VideoCapture cap;cap.open(0);namedWindow("MyVideo", 1);double dWidth = cap.get(CV_CAP_PROP_FRAME_WIDTH);double dHeight = cap.get(CV_CAP_PROP_FRAME_HEIGHT);Size frameSize(static_cast<int>(dWidth), static_cast<int>(dHeight));VideoWriter oVideoWriter("MyVideo.avi", CV_FOURCC('P','I','M','1'), 20, frameSize, true);// initialize the VideoWriter objetctwhile (1) {Mat frame;bool bSuccess = cap.read(frame);if (!bSuccess){ // if not success, break loopcout << "ERROR: cannot read a frame from video file" << endl;break;}oVideoWriter.write(frame);imshow("MyVideo", frame); // show the frame in "MyVideo" windowif(waitKey(10) == 27) {// wait for ESC keycout << "ESC key is pressed by user" << endl;break;}}return 0;}
目标检测
mean-shift 和 camshift
均值漂移(mean-shift)
mean-shift 算法是一种在一组数据的密度分布中寻找局部极值的稳定 [1] 的方法。若分布是连续的,处理过程就比较容易,这种情况下本质上只需要对数据的密度直方图应用爬山算法即可。然而,对于离散的数据集,这个问题在某种程度上是比较麻烦的。
mean-shift 算法的步骤如下:
- 选择搜索窗口。
- 计算窗口(可能是带权重的)的重心。
- 将窗口的中心设置在计算出的重心处。
- 返回第 2 步,直到窗口的位置不再变化(通常会)。
OpenCV 提供 cv::meanshift() 函数来进行 mean-shift 算法跟踪。
1
int cv::meanShift(InputArray probImage, Rect& window, TermCriteria criteria)
其中,
probImage- 图像直方图反投影后的结果;window- 初始的查找窗口,即要跟踪的区域;criteria- 迭代搜索算法的终止条件,主要由 mean-shift 移动的最大迭代次数和可视为窗口位置收敛的最小移动距离组成。- 返回的是收敛时算法的迭代次数。
对于第一个参数 probImage ,可以直接使用 cv::calcBackProject() 得到的结果。但《OpenCV 2 Computer Vision Application Programming Cookbook》建议先把图像转换到 HSV 颜色空间,然后使用 Hue 单通道的直方图的反投影变换结果作为 probImage ;
获取彩色图像的 Hue 通道的直方图算法实现如下:
1234567891011121314151617181920212223242526272829303132333435363738394041
// Computes the 1D Hue histogram with a mask.// BGR source image is converted to HSVcv::MatND getHueHistogram(const cv::Mat &image,int minSaturation = 0) {cv::MatND hist;// Convert to HSV color spacecv::Mat hsv;cv::cvtColor(image, hsv, CV_BGR2HSV);// Mask to be used (or not)cv::Mat mask;if (minSaturation > 0) {// Spliting the 3 channels into 3 imagesstd::vector<cv::Mat> v;cv::split(hsv, v);// Mask out the low saturated pixelscv::threshold(v[1], mask, minSaturation,255, cv::THRESH_BINARY);}// Prepare arguments for a 1D hue histogramhranges[0]= 0.0;hranges[1]= 180.0;channels[0]= 0; // the hue channel// Compute histogramcv::calcHist(&hsv,1,// histogram of 1 image onlychannels,// the channel usedmask,// no mask is usedhist,// the resulting histogram1,// it is a 1D histogramhistSize,// number of binsranges// pixel value range);return hist;}
使用 cv::meanshift() 函数在两幅图像间跟踪某一物体的步骤如下:
- 读入第一张图像,定义好目标跟踪窗口,即感兴趣区域 ROI 。
- 计算这个 ROI 的 Hue 通道的直方图;
- 读入第二张图像,转换到 HSV 颜色空间,并对其 Hue 分量进行阈值处理
cv::threshold(),去掉低饱和度的像素,以保证较高的饱和度; - 应用 ROI 的 直方图信息对第 3 步得到的图像进行反投影变换;
- 对反投影变换的结果在进行一次按位与操作
cv::bitwise_and(),去除结果中低饱和度的像素; - 最后,对第 5 步得到的结果进行 meanshift 操作
cv::meanShift(),得到新的跟踪窗口。
实现如下:
1234567891011121314151617181920212223242526272829303132333435363738394041424344454647484950515253545556575859606162636465666768697071
int main(){// Read reference imagecv::Mat image= cv::imread("../baboon1.jpg");if (!image.data)return 0;// Define ROIcv::Mat imageROI= image(cv::Rect(110,260,35,40));cv::rectangle(image, cv::Rect(110,260,35,40), cv::Scalar(0,0,255));// Display imagecv::namedWindow("Image 1");cv::imshow("Image 1",image);// Get the Hue histogramint minSat=65;ColorHistogram hc;cv::MatND colorhist= hc.getHueHistogram(imageROI, minSat);ObjectFinder finder;finder.setHistogram(colorhist);finder.setThreshold(0.2f);// Second imageimage= cv::imread("../baboon3.jpg");// Display imagecv::namedWindow("Image 2");cv::imshow("Image 2",image);// Convert to HSV spacecv::Mat hsv;cv::cvtColor(image, hsv, CV_BGR2HSV);// Split the imagevector<cv::Mat> v;cv::split(hsv,v);// Eliminate pixels with low saturationcv::threshold(v[1],v[1],minSat,255,cv::THRESH_BINARY);cv::namedWindow("Saturation");cv::imshow("Saturation",v[1]);// Get back-projection of hue histogramint ch[1]={0};cv::Mat result= finder.find(hsv,0.0f,180.0f,ch,1);cv::namedWindow("Result Hue");cv::imshow("Result Hue",result);// Eliminate low stauration pixelscv::bitwise_and(result,v[1],result);cv::namedWindow("Result Hue and raw");cv::imshow("Result Hue and raw",result);cv::Rect rect(110,260,35,40);cv::rectangle(image, rect, cv::Scalar(0,0,255));cv::TermCriteria criteria(cv::TermCriteria::MAX_ITER,10,0.01);cout << "meanshift= " << cv::meanShift(result,rect,criteria) << endl;cv::rectangle(image, rect, cv::Scalar(0,255,0));// Display imagecv::namedWindow("Image 2 result");cv::imshow("Image 2 result",image);cv::waitKey();return 0;}
《The OpenCV Reference Manual》里还建议再对反投影的结果进行降噪处理。例如,可以先使用 cv::findContours() 检索到一些闭合的轮廓边,使用 cv::contourArea() 去掉一些面积较小的轮廓边,再使用 cv::drawContours() 填充剩下的轮廓边。
camshift
camshift 是“continuously adaptive mean-shift”的缩写,顾名思义就是 mean-shift 的一个改进版本,它的实现基于 meanshift ,而与 meanshift 的最大区别在于窗口的大小和朝向是可变的。如果有一个易于分割的分布(例如保持紧密的人脸特征),此算法可以根据人在走近或远离摄像机时脸的尺寸而自动调整窗口的尺寸。
OpenCV 提供 cv::Camshift() 函数来进行 mean-shift 算法跟踪。
1
RotatedRect CamShift(InputArray probImage, Rect& window, TermCriteria criteria)
该函数将返回一个经过旋转的矩形结构体 RotatedRect ,该结构体包含了目标的位置、大小和朝向信息。可以通过 RotatedRect::boundingRect() 函数获得查找窗口的下一个位置。
OpenCV 自带的示例程序中包含一个应用 camshift 捕捉彩色物体的示例 camshiftdemo.c 。
特征匹配
Harris 角点
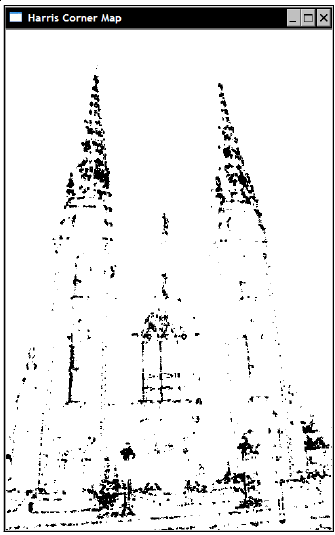
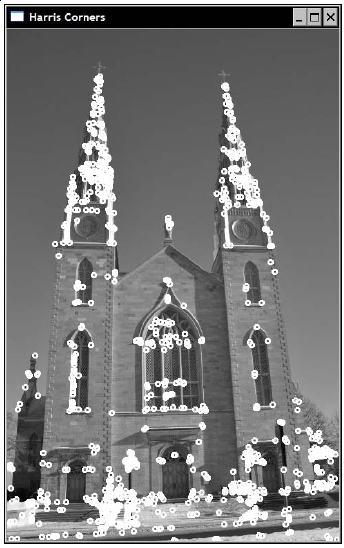
经典版本
123456
void cornerHarris(InputArray src,// inputOutputArray dst,// outputint blockSize,// neighborhood sizeint ksize,// aperture sizedouble k,// Harris parameterint borderType=BORDER_DEFAULT )
示例:
1234567891011
// Detect Harris Cornerscv::Mat cornerStrength;cv::cornerHarris(image,cornerStrength,3,// neighborhood size3,// aperture size0.01); // Harris parameter// threshold the corner strengthscv::Mat harrisCorners;double threshold= 0.0001;cv::threshold(cornerStrength,harrisCorners,threshold,255,cv::THRESH_BINARY_INV);
原图:
结果图:
与原图结合:
改进版本
用上面的方法得到的 Harris 角点在图像中的分布不是很均匀,一个改进的方法是使用 cv::goodFeaturesToTrack() 方法(听名字就很彪悍),用它可以获得更加 strong 的角点:
12345678910
void goodFeaturesToTrack(InputArray image,// input 8-bit or floating-point 32-bit, single-channel imageOutputArray corners,// output vector of detected corners.int maxCorners,// maximum number of corners to returndouble qualityLevel,// quality leveldouble minDistance,// minimum allowed distance between pointsInputArray mask=noArray(),// optional region of interestint blockSize=3,// size of an average blockbool useHarrisDetector=false, // whether to use a classical Harris detectordouble k=0.04 )// free parameter of the Harris detector
示例:
123456
// Compute good features to trackstd::vector<cv::Point2f> corners;cv::goodFeaturesToTrack(imaeg, corners,500,// maximum number of corners to return0.01,// quality level10);// minimum allowed distance between points
结果:
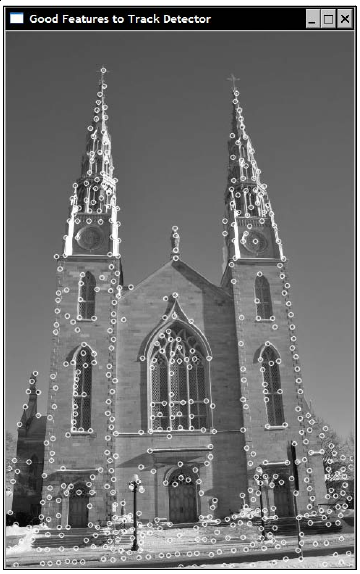
这种方法得到的 Harris 角点在分布均匀程度上得到了很明显的改进。不过,这种改进的方案计算复杂度也更高,因为它需要对检测到的特征点按照 Harris 得分进行排序。另外,如果把第 8 个参数 useHarrisDetector 的值设为 true,则用的将是经典的 Harris 检测器。
通用接口
为了方便使用这些特征检测算法,OpenCV 2 提供了特征点检测的通用接口,封装在抽象类 cv::FeatureDetector 里:
123456789101112131415
class CV_EXPORTS FeatureDetector{public:virtual ~FeatureDetector();void detect( const Mat& image, vector<KeyPoint>& keypoints,const Mat& mask=Mat() ) const;void detect( const vector<Mat>& images,vector<vector<KeyPoint> >& keypoints,const vector<Mat>& masks=vector<Mat>() ) const;virtual void read(const FileNode&);virtual void write(FileStorage&) const;static Ptr<FeatureDetector> create( const string& detectorType );protected:...};
其中:
create()函数用于创建一个特征检测器,其参数detectorType可以是以下几种:- “FAST” – FastFeatureDetector
- “STAR” – StarFeatureDetector
- “SIFT” – SIFT (nonfree module)
- “SURF” – SURF (nonfree module)
- “ORB” – ORB
- “BRISK” – BRISK
- “MSER” – MSER
- “GFTT” – GoodFeaturesToTrackDetector
- “HARRIS” – GoodFeaturesToTrackDetector with Harris detector enabled
- “Dense” – DenseFeatureDetector
- “SimpleBlob” – SimpleBlobDetector
- 两个
detect()函数用于进行特征点检测; read()和write()函数用于将检测到的特征点进行文件读/写。
为了方便存储不同的特征点的信息,OpenCV 还为这个接口还定义了一个 Keypoint 类,用于存储特征点的所有相关属性。例如,对于 Harris 角点,该类的实例将会用来储存检测得到的特征点的位置。
另外,OpenCV 为每种特征点提供了从 cv::FeatureDetector 继承而来的子类。例如,改进的 Harris 角点对应子类 cv::GoodFeatureToTrackDetector 。使用方法如下:
123456789
// vector of keypointsstd::vector<cv::KeyPoint> keypoints;// Construction of the Good Feature to Track detectorcv::GoodFeatureToTrackDetector gftt (500,// maximum number of corners to be returned0.01,// quality level10);// minimum allowed distance between points// point detection using FeatureDetector methodgftt.detect(image, keypoints);
OpenCV 还提供了一个通用方法 cv::drawKeyPoints 用于在图像上绘制得到的特征点:
12345
cv::drawKeyPoints(image,// original imagekeypoints,// vector of keypointsimage,// the output imagecv::Scalar(255, 255, 255), // keypoint colorcv::DrawMatchesFlags::DRAW_OVER_OUTIMG); // drawing flag
这些类的使用方法大同小异。
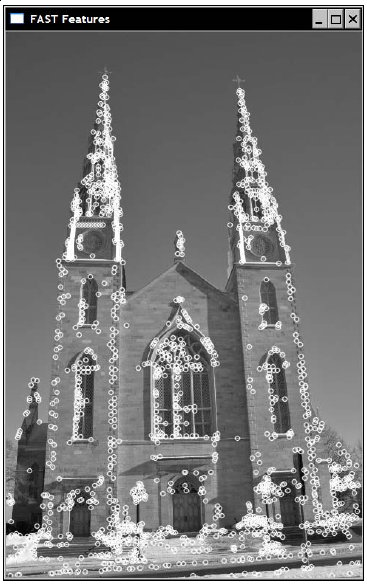
FAST 特征点
FAST 特征点是为了提高检测速度而设计的。使用示例:
12345678910111213
// vector of keypointsstd::vector<cv::KeyPoint> keypoints;// Construction of the Fast feature detector objectcv::FastFeatureDetector fast(40);// threshold for detection// feature point detectionfast.detect(image, keypoints);// Draw key pointscv::drawKeyPoints(image,// original imagekeypoints,// vector of keypointsimage,// the output imagecv::Scalar(255, 255, 255), // keypoint colorcv::DrawMatchesFlags::DRAW_OVER_OUTIMG); // drawing flag
SURF 特征点
SURF(Speeded Up Robust Features) 特征点是一种尺度不变,且运算效率快的特征点。
示例:
12345678910111213
// vector of keypointsstd::vector<cv::KeyPoint> keypoints;// Construct the SURF feature detector objectcv::SurfFeatureDetector surf(2500.);// threshold// Detect the SURF featuressurf.detect(image, keypoints);// Draw the keypoints with scale and orientation informationcv::drawKeypoints(image,// original imagekeypoints, // vector of keypointsfeatureImage, // the resulting imagecv::Scalar(255,255,255), // color of the pointscv::DrawMatchesFlags::DRAW_RICH_KEYPOINTS); //flag
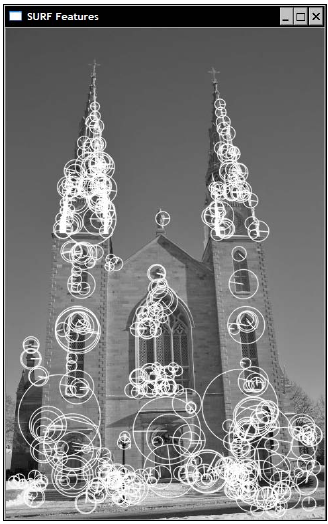
对另一幅尺度不同的图使用 SURF 特征检测,得到结果如下:
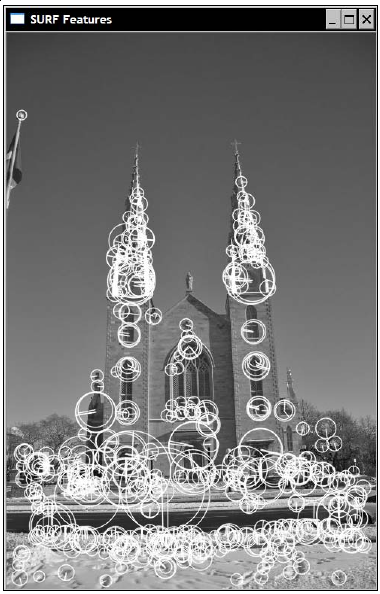
仔细对比两幅图,可以发现当图像的尺度发生变化后,两幅图像存在对应的圆圈也会跟着改变大小。尽管不是全部特征点都有对应,但通常存在对应的特征点的数量已经足够用在两幅图像间的比配。
SIFT 特征点
SURF 的一个发展是另一个著名的特征点 —— SIFT (Scale-Invariant Feature Transform) 。
使用示例:
12345678910
// vector of keypointsstd::vector<cv::KeyPoint> keypoints;// Construct the SURF feature detector objectcv::SiftFeatureDetector sift{0.03,// feature threshold10.);// threshold to reduce// sensitivity to lines// Detect the SURF featuressift.detect(image, keypoints);}
结果和 SURF 提取的结果很相似:

SIFT 特征点比 SURF 更精确,不过速度上也慢一些。
特征匹配
特征点的一大用处是用来进行特征匹配,例如寻找同个场景在两个不同角度的照片的对应关系。
在特征匹配中,特征描述子(feature descriptors)通常是一个用于描述一个特征点的 N 维向量,且在理想情况下该向量可以对光照的变化和小幅度的形变具有不变性。另外,描述子的好坏还可以通过一个距离方程(例如欧氏距离)来比较和度量。因此,特征描述子是特征匹配算法中的一个强有力的工具。
同样,OpenCV 2 提供了一个通用的接口类 cv::DescriptorExtractor 用于构造特征描述子:
12345678910111213141516
class CV_EXPORTS DescriptorExtractor{public:virtual ~DescriptorExtractor();void compute( const Mat& image, vector<KeyPoint>& keypoints,Mat& descriptors ) const;void compute( const vector<Mat>& images, vector<vector<KeyPoint> >& keypoints,vector<Mat>& descriptors ) const;virtual void read( const FileNode& );virtual void write( FileStorage& ) const;virtual int descriptorSize() const = 0;virtual int descriptorType() const = 0;static Ptr<DescriptorExtractor> create( const string& descriptorExtractorType );protected:...};
其中:
create()函数用于创建一个特征描述子,其参数detectorType可以是以下几种:- “SIFT” – SIFT
- “SURF” – SURF
- “ORB” – ORB
- “BRISK” – BRISK
- “BRIEF” – BriefDescriptorExtractor
- 两个
compute()函数用于从一组检测得到的特征点计算特征描述子; read()和write()函数用于将检测到的特征点进行文件读/写;
示例:
12345
// Construction of the SURF descriptor extractorcv::SurfDescriptorExtractor surfDesc;// Extraction of the SURF descriptorscv::Mat descriptors1;surfDesc.compute(image1,keypoints1,descriptors1);
结果是一个行数和特征点数量相同的矩阵,每一行都是一个 N 维 的描述子的 vector (以 SURF 描述子为例,N 默认为 64) 。每个 vector 可以很好的描述一个特征点周围的色值信息。两个特征点越相似,则它们的特征描述子越接近。
特征描述子在图像匹配中尤其有用。OpenCV 提供了一个最基本的匹配算法 cv::BruteForceMatcher() ,用法如下:
12345
// Construction of the matchercv::BruteForceMatcher<cv::L2<float>> matcher;// Match the two image descriptorsstd::vector<cv::DMatch> matches;matcher.match(descriptors1,descriptors2, matches);
同样,OpenCV 也提供了一个通用接口类 cv::DescriptorMatcher ,封装了多种匹配方法。
得到的匹配结果是一个 cv::DMatch 类型的数据结构,这个结构体是一种 pair 类型 ,每一个 pair 分别包含第一个 vector 和第二个 vector 的匹配到的元素的序号。
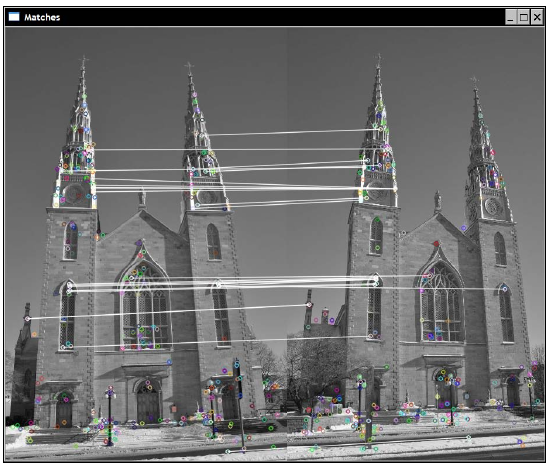
OpenCV 也提供了函数用于绘制匹配结果 cv::drawMatches ,下面示例将上面的代码得到的结果的前 25 个配对给绘制出来:
12345678910111213
std::nth_element(matches.begin(),// initial positionmatches.begin()+24, // position of the sorted elementmatches.end());// end position// remove all elements after the 25thmatches.erase(matches.begin()+25, matches.end());// Visualize matchescv::Mat imageMatches;cv::drawMatches(image1,keypoints1,// 1st image and its keypointsimage2,keypoints2,// 2nd image and its keypointsmatches,// the matchesimageMatches,// the image producedcv::Scalar(255,255,255)); // color of the lines
结果如下:
相机校正
畸变的由来
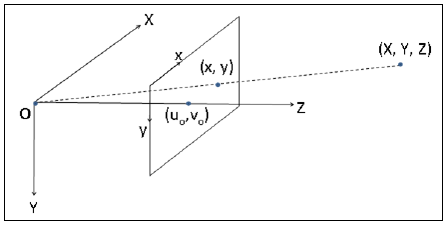
计算机视觉领域使用的相机模型称为针孔相机模型(pin-hole camera):
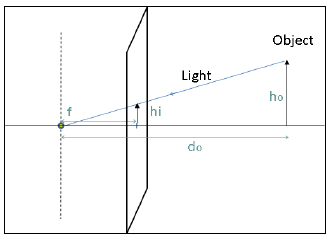
基本的投影方程如下:
其中,图像的大小 (
根据前面所提的背景知识,我们可以清楚地认识到在针孔相机模型里的关键参数就是相机的焦距和它的成像大小。另外,因为我们要处理的是数字图像,相机的像素数量也是一个相机的另一个重要参数。最后,为了计算场景中的一点在像素坐标中的位置,我们还需要一个额外的信息:考虑那条从焦点引出的与成像平面垂直的直线,我们需要知道这条线穿入成像平面的哪个像素点,这个点称为 主要点 (principal point)。逻辑上,这个主要点应该设在成像平面的中心,但实际上这个点往往会由于机械原因,难免会偏移一些像素,这就是畸变的由来。
校正方法
检测棋盘角点
对相机进行畸变校正的主要思想是给相机展示一些三维空间间位置已知的点,之后寻找这些点在图像上的相应投影位置,最后根据这些对应关系计算相机的相关信息。OpenCV 建议通过从不同角度获取一个棋盘模板图像来校正相机。在这个情况下,可以利用每张棋盘图像上的角点来获取实际位置和投影位置的对应关系,从而计算相机的相关信息。一个示例棋盘模板:
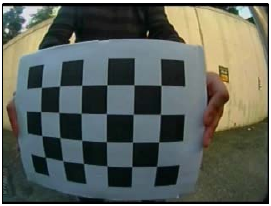
从上面这张图也可以很明显的看出相机存在较严重的径向畸变(radial distortion),这种畸变现象在鱼眼镜头中非常普遍。
OpenCV 提供了一个自动检测棋盘模板中的角点的函数 cv::findChessboardCorners():
12345
bool findChessboardCorners(InputArray image,// source chessboard viewSize patternSize,// number of inner corners per a chessboard row and columnOutputArray corners,// output array of detected cornersint flags=CALIB_CB_ADAPTIVE_THRESH+CALIB_CB_NORMALIZE_IMAGE)
调用它通常只需要提供一幅图像以及棋盘的大小信息(水平和竖直的内角点的数量,如上图中分别是 6 和 4),该方法会返回这些棋盘角点在图像中的位置:
12345678
// output vectors of image pointsstd::vector<cv::Point2f> imageCorners;// number of corners on the chessboardcv::Size boardSize(6, 4);// Get the chessboard cornersbool found = cv::findChessboardCorners(image,boardSize,imageCorners);
绘制检测得到的结点
OpenCV 也提供了一个函数用于将检测到的结点画到棋盘图像上:
1234
// Draw the cornerscv::drawChessboardCorners(image,boardSize, imageCorners,found);// corners have been found
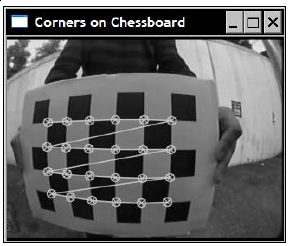
这些角点间的线条可以表示这些角点在 vector 中的顺序。
校正相机
当检测足够多不同角度的棋盘图像后(大概 10 ~ 20 张),就可以对相机进行校正了,OpenCV 提供了一个函数 cv::calibrateCamera() 进行校正:
123456789101112
double calibrateCamera(InputArrayOfArrays objectPoints,// a vector of vectors of calibration pattern pointsInputArrayOfArrays imagePoints,// a vector of vectors of the projections of calibration pattern points.Size imageSize,// size of the imageInputOutputArray cameraMatrix,// output 3x3 floating-point camera matrixInputOutputArray distCoeffs,// output vector of distortion coefficientsOutputArrayOfArrays rvecs,// output vector of rotation vectorsOutputArrayOfArrays tvecs,// output vector of translation vectors eint flags=0,// flagsTermCriteria criteria=TermCriteria( // termination criteriaTermCriteria::COUNT+TermCriteria::EPS,30, DBL_EPSILON) )
调用该函数将可以得到两个重要的输出:相机矩阵 cameraMatrix 和畸变系数 distCoeffs 。
为了方便,可以将上面的所有步骤封装成一个类 CameraCalibrator :
1234567891011121314151617181920212223242526272829303132
class CameraCalibrator {// input pointsstd::vector<std::vector<cv::Point3f>> objectPoints;std::vector<std::vector<cv::Point2f>> imagePoints;// output Matricescv::Mat cameraMatrix;cv::Mat distCoeffs;// flag to specify how calibration is doneint flag;// used in image undistortioncv::Mat map1,map2;bool mustInitUndistort;public:CameraCalibrator() : flag(0), mustInitUndistort(true) {};// Open the chessboard images and extract corner pointsint addChessboardPoints(const std::vector<std::string>& filelist, cv::Size & boardSize);// Add scene points and corresponding image pointsvoid addPoints(const std::vector<cv::Point2f>& imageCorners, const std::vector<cv::Point3f>& objectCorners);// Calibrate the cameradouble calibrate(cv::Size &imageSize);// Set the calibration flagvoid setCalibrationFlag(bool radial8CoeffEnabled=false, bool tangentialParamEnabled=false);// Remove distortion in an image (after calibration)cv::Mat remap(const cv::Mat &image);// Getterscv::Mat getCameraMatrix() { return cameraMatrix; }cv::Mat getDistCoeffs() { return distCoeffs; }};
其中:
addChessboardPoints()函数 - 用于读入一系列的棋盘图像并检测角点;calibrate()函数 - 用于进行相机校正,得到相机的参数矩阵和畸变系数;remap()函数 - 用于根据相机校正结果修复图像的畸变;addPoints()函数 -addChessboardPoints()在检测完角点后会调用这个函数。也可自己手动调用这个函数添加已知的角点位置和对应的空间坐标点。
使用示例:
12345678910111213141516171819202122232425262728293031323334353637383940414243444546474849
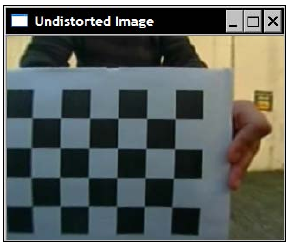
int main(){cv::namedWindow("Image");cv::Mat image;std::vector<std::string> filelist;// generate list of chessboard image filenamefor (int i=1; i<=20; i++) {std::stringstream str;str << "../chessboards/chessboard" << std::setw(2) << std::setfill('0') << i << ".jpg";std::cout << str.str() << std::endl;filelist.push_back(str.str());image= cv::imread(str.str(),0);cv::imshow("Image",image);cv::waitKey(100);}// Create calibrator objectCameraCalibrator cameraCalibrator;// add the corners from the chessboardcv::Size boardSize(6,4);cameraCalibrator.addChessboardPoints(filelist,// filenames of chessboard imageboardSize);// size of chessboard// calibrate the camera//cameraCalibrator.setCalibrationFlag(true,true);cameraCalibrator.calibrate(image.size());// Image Undistortionimage = cv::imread(filelist[6]);cv::Mat uImage= cameraCalibrator.remap(image);// display camera matrixcv::Mat cameraMatrix= cameraCalibrator.getCameraMatrix();std::cout << " Camera intrinsic: " << cameraMatrix.rows << "x" << cameraMatrix.cols << std::endl;std::cout << cameraMatrix.at<double>(0,0) << " " << cameraMatrix.at<double>(0,1) << " " << cameraMatrix.at<double>(0,2) << std::endl;std::cout << cameraMatrix.at<double>(1,0) << " " << cameraMatrix.at<double>(1,1) << " " << cameraMatrix.at<double>(1,2) << std::endl;std::cout << cameraMatrix.at<double>(2,0) << " " << cameraMatrix.at<double>(2,1) << " " << cameraMatrix.at<double>(2,2) << std::endl;imshow("Original Image", image);imshow("Undistorted Image", uImage);cv::waitKey();return 0;}
结果:
双目视觉
基本矩阵
背景知识
通过两个摄像头在不同的角度同时捕获同个场景,可以获得场景的空间信息,这个技术称为双目视觉。
考虑两个相机观察同一个场景点:
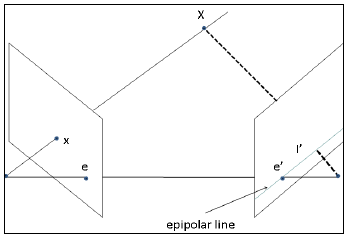
由图可以看出,我们可以通过直接连接一个三维空间点 X 和左侧相机的中心点来找到其在左侧相机的成像中的位置 x 。反过来考虑,一个成像点 x 所对应的实际三维空间点的位置一定在这条直线上。这意味着,如果我们需要找到点 x 在第二台相机的成像位置 I’,我们需要找到第一条线在第二个相机的投影位置,这条线称为点 x 的 核线 (epipolar line)。核线的角度取决于两个相机的相对位置。实际上,核线的位置与整个双目视觉系统的几何形状有关。
另一个可以观察得到的是所有核线都会经过一点 (图中的 e 或 e’),这个点是一个相机中心点在另一个相机的投影位置,这个特殊的点称为核点 (epipole)。
从数学角度上看,一个成像点和其对应的核线可以使用如下的 3x3 的矩阵来表示:
$$\begin{bmatrix} l’{1} \ l’{2} \ l’_{3} \end{bmatrix} = F
上面的公式表示一组 2D 点
计算方法
计算基本矩阵将是构建双目视觉系统的基础,方法是从两幅图像之间的若干已知配对点来计算一系列的方程。这些配对点可以使用特征匹配一节得到的配对结果。配对的最小数量是 7 。
OpenCV 提供了一个函数 cv::findFundamentalMat() 来计算基本矩阵:
123456
Mat findFundamentalMat(InputArray points1,// array of N points from the first imageInputArray points2,// array of N points from the second image.int method=FM_RANSAC,// method for computing a fundamental matrixdouble param1=3.,// parameter used for RANSACdouble param2=0.99,// parameter used for RANSAC or LMedS methods onlyOutputArray mask=noArray() )// output array of N elements
要使用这个函数,需要注意特征点的类型。cv::findFundamentalMat 接收的点的类型是 cv::Point2F ,因此对于通过特征匹配得到的cv::Keypoint 类型的特征点,我们需要将它们转换成 cv::Point2f 类型:
1234
// Convert keypoints into Point2fstd::vector<cv::Point2f> selPoints1, selPoints2;cv::KeyPoint::convert(keypoints1, selPoints1, pointIndexes1);cv::KeyPoint::convert(keypoints2, selPoints2, pointIndexes1);
两个 vector (selPoints1 和 selPoints2) 包含了两张图像中的配对点。之后调用 cv::findFundamentalMat() 函数如下:
12345
// Compute F matrix from 7 matchescv::Mat fundamental = cv::findFundamentalMat(cv::Mat (selPoints1),// points in first imagecv::Mat (selPoints2),// points in second image);
可以将核线画出来,以验证基本矩阵的正确性。 OpenCV 提供了一个函数 cv::computeCorrespondEpilines() 来根据一些输入点和基本矩阵得到核线,之后就可以使用 cv::line() 函数将这些核线画出。示例:
1234567891011121314151617181920
// draw the left points corresponding epipolar// lines in right imagestd::vector<cv::Vec3f> lines1;cv::computeCorrespondEpilines(cv::Mat(selPoints1), // image points1,// in image 1 (can also be 2)fundemental, // F matrixlines1);// vector of epipolar lines// for all epipolar linesfor (vector<cv::Vec3f>::const_iterator it= lines1.begin();it!=lines1.end(); ++it) {// draw the line between first and last columncv::line(image2,cv::Point(0,-(*it)[2]/(*it)[1]),cv::Point(image2.cols,-((*it)[2]+(*it)[0]*image2.cols)/(*it)[1]),cv::Scalar(255,255,255));}
结果:
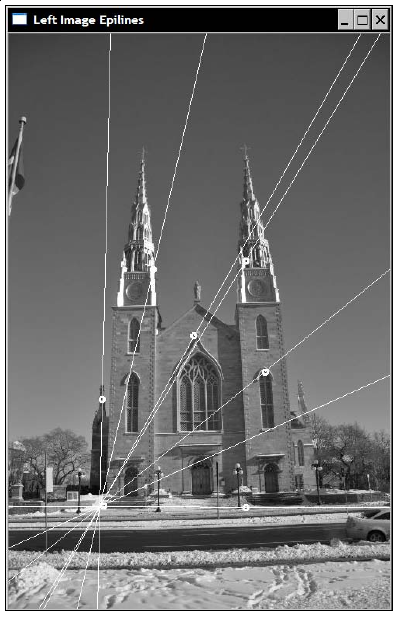
图像中,所有的核线都会经过一点,这个点如前面所述就是核点,它是另一个相机中心点的投影。有时候,核点会落在图像的外面。
双目图像匹配
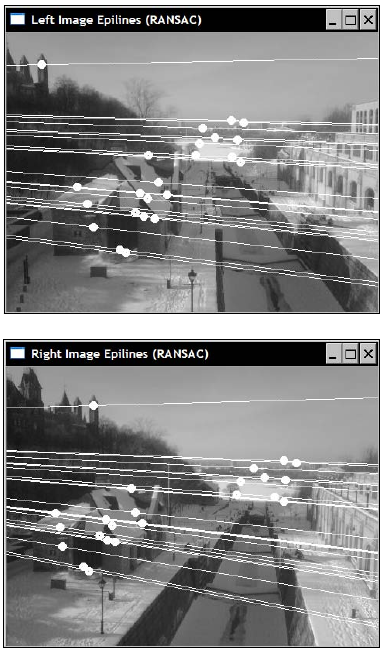
要进行图像匹配,之前已经给出了若干基于特征匹配的方法。但对于双目系统,存在可靠的特征匹配方法:当在两幅图像间进行特征匹配时,只接受落在对应的核线中的配对点。不过,要进行这个条件判断,先得计算基本矩阵,而基本矩阵又是根据配对点估算出来的。这看起来是一个先有鸡还是先有蛋的问题。下面介绍一种基于 RANSAC(RANdom SAmpling Consensus) 算法的配对算法,可以一边计算基本矩阵,一边寻找一组较优的配对点:
- 检测特征点,并提取特征描述子;
- 使用K近邻算法配对特征点,先找出其第一幅图中每个特征点在第二幅图中最佳的两个配对,然后找出第二幅图中每个特征点在第一幅图中最佳的两个配对;
- NN 率测试:对于每个特征点,如果其两个最佳配对点的描述子和该特征点的描述子非常接近,则这选择任何一个配对都可能导致错误,两组都不够优,因此将两组配对都移除;
- 对称性测试:对于每个特征点,如果它的描述子和第一个配对点的描述子距离很小,而和第二个配对点的描述子距离很大,那么可以判定第一个配对点更优,因此将第二个配对移除;
- RANSAC测试:使用 RANSAC 算法来移除没有落在核线的特征点。RANSAC 是一种用来从一组包含 outliers 的数据中估算参数的迭代算法。在这里,我们每次随机采样 8 对配对点,计算其对应的基本矩阵并测试是否处于核线上,测试剩下的配对点构成了基本矩阵的支撑集。可想而知,如果一次随机取样的配对点包含错误,那么被删除的配对点就比较多,那么最后该支撑集就会比较小。迭代一定的次数后,我们从结果中挑出剩余配对点最多的,即最大的一个支撑集。
可以使用一个封装好的 RobustMatcher 类。其中:
match()函数 - 核心匹配函数。返回匹配点、检测到的特征点和求得的基本矩阵;ratioTest()函数 - 用于 NN 率测试;symmetryTest()函数 - 用于对称性测试;ransacTest()函数 - 用于 RANSAC 测试。
示例:
12345678910111213
// Prepare the matcherRobustMatcher rmatcher;rmatcher.setConfidenceLevel(0.98);rmatcher.setMinDistanceToEpipolar(1.0);rmatcher.setRatio(0.65f);cv::Ptr<cv::FeatureDetector> pfd=new cv::SurfFeatureDetector(10);rmatcher.setFeatureDetector(pfd);// Match the two imagesstd::vector<cv::DMatch> matches;std::vector<cv::KeyPoint> keypoints1, keypoints2;cv::Mat fundemental= rmatcher.match(image1,image2,matches, keypoints1, keypoints2);
对示例图片使用该算法后产生了 23 组配对,且这些都落在了核线上:
值得注意的是,该类默认使用 SURF 特征点,也可以很容易的通过 setFeatureDetector() 函数和 setDescriptorExtractor() 函数扩展其他类型的特征点:
12345678910
// Set the feature detectorvoid setFeatureDetector(cv::Ptr<cv::FeatureDetector>& detect) {detector= detect;}// Set the descriptor extractorvoid setDescriptorExtractor(cv::Ptr<cv::DescriptorExtractor>& desc) {extractor= desc;}
单应矩阵
基本知识
如果一个视点只是另一个视点的旋转,那么此时基本矩阵是无定义的,取而代之的,可以使用单应(Homography)矩阵来进行图像配对。和基本矩阵类似,单应矩阵也是一种可以从一对图像计算得到的矩阵,其大小也是 3x3 。单应矩阵揭示了一个视点的成像中的一点与另一个视点成像中的一点满足如下线性关系:
其中,
计算方法
OpenCV 提供了 cv::findHomography() 函数用来计算单应矩阵:
12345
Mat findHomography(InputArray srcPoints,InputArray dstPoints,int method=0,double ransacReprojThreshold=3,OutputArray mask=noArray() )
在一个视点是另一个视点的旋转的情况下,同样可以使用前面提及的 RobustMatcher 类来进行图像配对,唯一的不同是在 RANSAC 测试中,计算基本矩阵改成了计算单应矩阵:
12345678
// Find the homography between image 1 and image 2std::vector<uchar> inliers(points1.size(),0);cv::Mat homography= cv::findHomography(cv::Mat(points1),// correspondingcv::Mat(points2),// pointsinliers,// outputted inliers matchesCV_RANSAC,// RANSAC method1.);// max distance to reprojection point
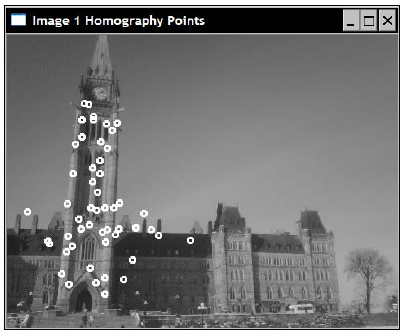
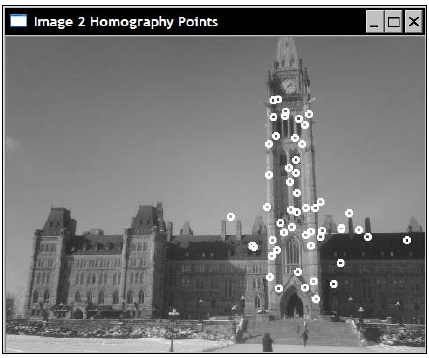
得到的匹配点:
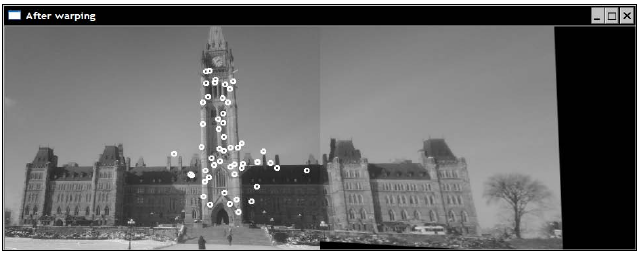
一旦得到了单应矩阵,我们可以很容易的确定图像中的一点在另一张图像中的位置。根据这个对应关系,我们可以把一张图从原来的视角变形到另一张图的视角:
1234567
// Warp image 1 to image 2cv::Mat result;cv::warpPerspective(image1,// input imageresult,// output imagehomography, // homographycv::Size(2*image1.cols,image1.rows));// size of output image
值得注意的是,默认得到的单应矩阵如果用来将第一张图的视角变到第二张图的视角,应该使用这个单应矩阵的逆矩阵。因此,cv::warpPerspective() 函数默认会先计算传入的单应矩阵的逆矩阵,然后用这个逆矩阵来变形。如果传入的矩阵已经是单应矩阵的逆矩阵,则可以在调用时指定 flag 参数为 cv::WARP_INVERSE_MAP 。
之后,可以把另一张图和这张已经处在同一视点的图拼接在一起:
123
// Copy image 1 on the first half of full imagecv::Mat half(result, cv::Rect(0, 0, image2.cols, image2.rows));image2.copyTo(half);// copy image2 to image1 roi
结果:
这里用“稳定”这个形容词是指统计意义上的稳定,因为 mean-shift 忽略了数据中的 outliers ,即忽略远离数据峰值的点。mean-shift仅对数据局部窗口中的点进行处理,处理完成后再移动窗口。 ↩
- 视频处理
- 视频处理
- 视频处理
- 视频处理
- 视频处理
- 视频处理
- opencv视频处理范例
- 实用视频处理方法
- 请问怎样处理视频
- java 视频处理 mencoder
- 视频音频处理!
- OpenCv视频处理函数
- 视频处理基础
- CPCI 视频处理卡
- V4L linux视频处理
- DM36x视频前端处理
- 视频处理相关---vfw
- java 视频处理 mencoder
- Nginx:一致性哈希(第三方模块ngx_http_consistent_hash)
- spring容器的懒加载
- SET FOREIGN_KEY_CHECKS=0;在Mysql中取消外键约束。
- spring mvc 搭建二 ,返回json格式
- Spring MVC之@RequestBody, @ResponseBody 详解
- 视频处理
- 在不知道数组数量的时候你可以用List
- ssh 免密码登录
- 好文章:jq定义插件
- WebApi接口传参不再困惑:传参详解
- Android小程序-Walker侧滑菜单页面(五)
- 搭建本地server,响应Android客户端HTTP请求
- linux系统,显示当前时间日期和之前一段时间的日期
- 页面上加时间显示