volley学习笔记
来源:互联网 发布:mac如何查看后台程序 编辑:程序博客网 时间:2024/05/17 09:06
前言
这个是第一次写源码分析的文章(仅仅是给自己做个也给自己两天对volley学习的一个交代吧)。以前的老大经常强调一种代码阅读能力(如何通过源码的阅读了解框架、流程、及使用注意细节呢)网上查找了很多相关资料,如何培养源码阅读能力,但也是零零闪闪不全面。这可能与源码阅读设计到多方面,经验+知识面宽度等等。(这里不总结,个人修道还不深,求大神带飞),但是个人觉得思路还是一样的,源码阅读也罢新技术学习也罢。重点在于 核心概念+流程+关键点这里写上个人理解。
核心概念:每一个框架都有自己的核心概念(如:struct2 中的过滤器、action;spring中的Ioc,Aop、Android系统中的Activity、Intent 等等,这个是框架特有的)
流程:指的是框架的数据流、时序调度等。按照框架使用的方法入口,顺藤摸瓜先摸出个大体脉路也就完成了60%(这部分不要局限于细节本身,最后画出 类图+ 关键时序图即可)
已 volley 为例子,这里个人觉得需要本流程重点在于,一个http 请求是如何发起的?发起过程中经过了哪些步骤?使用缓存步骤是怎样的?如何响应回调?【根据自己的使用多问几个why 、how】
关键点(细节):每种框架的实现总会面临具体要解决的问题(如何缓存(磁盘、内存)? 如何实现调度?如何实现面对并发?用了什么数据结构和算法?为什么?)的实现细节与技术。
已 volley 为例子,如 DiskBasedCache 是如何实现磁盘缓存的?PoolingByteArrayOutputStream 是如何实现内存池的?等 【带着具体问题看代码】带着别人的问题看代码
啰嗦了很久,最后再啰嗦一点,关于借鉴与学习,网上的关于volley源码分析的文字很多很多(可能是volley小巧,设计优雅、代码易懂吧)那我们有没有必要再造轮子呢?(这里指的是重新从源码一步步阅读,分析流程)个人觉得还是有必要的,毕竟通过别人的文章博客吸收的都是二手的或者是自己觉得不真是的,只有自己阅读代码中的出来的心得那才是自己的(软件工程是一门技术活、工科嘛),照片再没,也没有自己来一场旅行来的实在(知行合一)。所以个人觉得学习的最佳实践就是 站在前人的肩膀上,跟随前人的脚步行走,看自己该看的风景((⊙o⊙)…我也不知道说了什么),简单的话就是对照别人的分析框架流程,看源代码!!!(个人不喜欢跟着博客中的源码学习,第一是看着累,第二是对子源码阅读能力提升不够,但是跟着流程走还是挺有用的省时)
好吧:本次自己的volley 之旅,是跟随CodeKK上【Volley源码解析】学习得来,感谢,后面的记录是一些细节的补充,个人觉得有必要掌握的。
volley基本框架、工作流程及重要类介绍
关于框架该文参考的博客已写得很清新,CodeKK上【Volley源码解析】跟着学习即可,这里只是剪短写下自己的的理解和类图
- 借鉴一张架构蓝图:
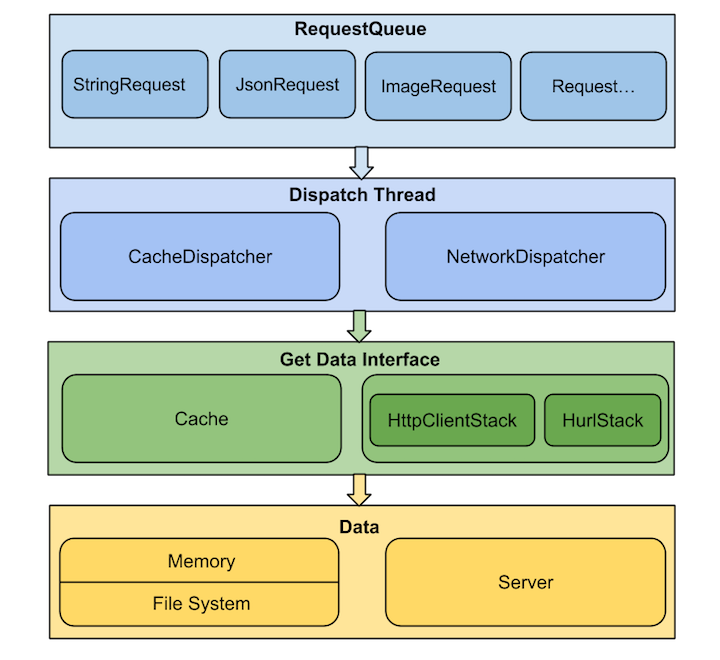
从上图可以看出,volley 采用了分层架构上层次调用下层次服务,下层为上层提供接口
- 借鉴一张流程图:
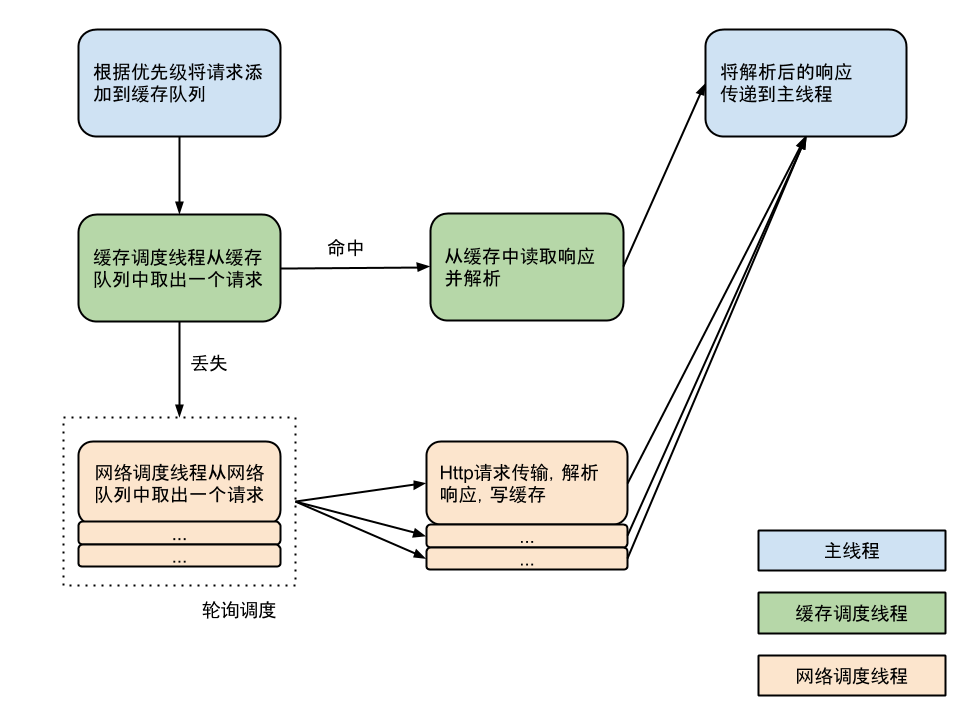
解释:主要是通过两种Dispatch Thread不断从RequestQueue中取出请求,根据是否允许且已缓存调用Cache或Network这两类数据获取接口之一,从内存缓存或是服务器取得请求的数据,然后交由ResponseDelivery去做结果分发及回调处理【注意:ResponseDelivery分发结果通过Hander在主线程中调用】
核心时序图:【一次请求到相应的全部过程】

一些细节和理解
volley 入口类中 HttpURLConnection 的选择问题
注意Http请求库的选择问题
HttpURLConnection 和 AndroidHttpClient(HttpClient 的封装)如何选择及原因
在 Froyo(2.2) 之前,HttpURLConnection 有个重大 Bug,调用 close() 函数会影响连接池,导致连接复用失效,所以在 Froyo 之前使用 HttpURLConnection 需要关闭 keepAlive。另外在 Gingerbread(2.3) HttpURLConnection 默认开启了 gzip 压缩,提高了 HTTPS 的性能,Ice Cream Sandwich(4.0) HttpURLConnection 支持了请求结果缓存。 再加上 HttpURLConnection 本身 API 相对简单,所以对 Android 来说,在 2.3 之后建议使用 HttpURLConnection,之前建议使用 AndroidHttpClient。
这个类是一个入口,工具类,默认了提供了一个RequestQueue的组装(如默认代码中使用DiskBasedCache处理具体缓存,BasicNetwork 作为网络处理、根据版本选择HurlStack、或者AndroidHttpClient)。 由于Volley的所有流程控制框架搭建全部都是面向接口(抽象)且依赖于初始化RequestQueue具体实现参数,是的系统具有高度的可扩展性【面向接口编程、对扩展开发修改关闭】
Request.java 请求抽象类中抽象方法调用过程
应为在实际应用中具体实现这个接口扩展自己的Request应用较多所以分析下两个abstract的方法的执行流程
子类必须重写的两个方法:
abstract protected Response<T> parseNetworkResponse(NetworkResponse response);这个方法可以看到是在 CacheDispatcher、 NetworkDispatcher【两个用于分发请求的线程 run 】得到的request请求结果NetworkResponse对象,并调用此方法转换具体类的请求的Response。代码如下:
子类重写此方法,将网络返回的原生字节内容,转换成合适的类型。此方法会在工作线程中被调用。
CacheDispatcher、NetworkDispatcher中调用
Response<?> response = request.parseNetworkResponse( new NetworkResponse(entry.data, entry.responseHeaders));如:StringRequest中真,将返回泛型类型类 Sting 的响应。
@Override protected Response<String> parseNetworkResponse(NetworkResponse response) { String parsed; try { parsed = new String(response.data, HttpHeaderParser.parseCharset(response.headers)); } catch (UnsupportedEncodingException e) { parsed = new String(response.data); } return Response.success(parsed, HttpHeaderParser.parseCacheHeaders(response)); }而在JsonObjectRequest返回的数据转化为JSONObject对象。
@Override protected Response<JSONObject> parseNetworkResponse(NetworkResponse response) { try { String jsonString = new String(response.data, HttpHeaderParser.parseCharset(response.headers, PROTOCOL_CHARSET)); return Response.success(new JSONObject(jsonString), HttpHeaderParser.parseCacheHeaders(response)); } catch (UnsupportedEncodingException e) { return Response.error(new ParseError(e)); } catch (JSONException je) { return Response.error(new ParseError(je)); } }response传递接口:
abstract protected void deliverResponse(T response);Request 的deliveryResponse 函数调用在ExecutorDelivery 这个具体类中。(该实现ResponseDelivery接口),并在postResponse 接口中新建一个线程提交到主线程运行并在线程内部调用 mRequest.deliverResponse(mResponse.result); 的方法进行response传递。(注意:如果响应错误会mRequest.deliverError() 方法)具体代码如下:
@Override public void postResponse(Request<?> request, Response<?> response, Runnable runnable) { request.markDelivered(); request.addMarker("post-response"); mResponsePoster.execute(new ResponseDeliveryRunnable(request, response, runnable)); }重上面代码可以看出,首先是标记该request一被传递。之后执mResponsePoster.execute()mResponsePoster是什么呢?
跟踪代码发现:赋值的地方有两处都是在构造函数中
public ExecutorDelivery(Executor executor) { mResponsePoster = executor; }public ExecutorDelivery(final Handler handler) { // Make an Executor that just wraps the handler. mResponsePoster = new Executor() { @Override public void execute(Runnable command) { handler.post(command); } }; }而我们应用中可以看到RequestQueue 中创建的代码如下:
public RequestQueue(Cache cache, Network network, int threadPoolSize) { this(cache, network, threadPoolSize, new ExecutorDelivery(new Handler(Looper.getMainLooper()))); }结合可以看出,postResponse函数中的 execute 方法,其实就是在通过Hander post一个 Runable(线程)到主线程的消息队列里面调度。主要可以知道reques.的response传递是在主线程中调度的那么ResponseDeliveryRunnable 是什么呢?
ResponseDeliveryRunnable 是一个内部类 implement Runable 接口,在run中函数代码如下
public void run() { // If this request has canceled, finish it and don't deliver. if (mRequest.isCanceled()) { mRequest.finish("canceled-at-delivery"); return; } // Deliver a normal response or error, depending. if (mResponse.isSuccess()) { mRequest.deliverResponse(mResponse.result); } else { mRequest.deliverError(mResponse.error); } // If this is an intermediate response, add a marker, otherwise we're done // and the request can be finished. if (mResponse.intermediate) { mRequest.addMarker("intermediate-response"); } else { mRequest.finish("done"); } // If we have been provided a post-delivery runnable, run it. if (mRunnable != null) { mRunnable.run(); } }在上面可以看到,当mResponse.isSuccess() 时候。会调用 mRequest.deliverResponse(mResponse.result);进行传递response 给上层。这个流程调用分析完成。
附带 那么上面注意到有在run 中有代码
if (mRunnable != null) { mRunnable.run(); }那什么时候在进行Response传递之后还需要run 一个线程呢?而且是在主线程中。我们留意到,在CacheDispatcher 的 run 中有如下一段代码:
// 判断缓存时间是否过期,如果过期需要重新刷新数据 if (!entry.refreshNeeded()) { // Completely unexpired cache hit. Just deliver the response. mDelivery.postResponse(request, response); } else { // Soft-expired cache hit. We can deliver the cached response, // but we need to also send the request to the network for // refreshing. request.addMarker("cache-hit-refresh-needed"); request.setCacheEntry(entry); // Mark the response as intermediate. response.intermediate = true; // Post the intermediate response back to the user and have // the delivery then forward the request along to the network. mDelivery.postResponse(request, response, new Runnable() { @Override public void run() { try { mNetworkQueue.put(request); } catch (InterruptedException e) { // Not much we can do about this. } } }); }上面代码可以看出,在缓存过期后。会在run新建一个新的 Runable并 在 run 中将这个 request 添加到 mNetworkQueue 队列中,供NetWorkDispatch分发起网络请求。
RetryPolicy 的流程和策略
为什么谈到这个呢?因为个人觉得这个实现有点巧妙,虽然使用的也是循环加重复操作计算控制 Retry 策略,但是循环利用了一个while(true) 死循环中。使用吞掉异常的机制
控制循环。代码控制如下:正常直接退出 直接调用 return跳出循环
首先我们看:RetryPolicy 接口的具体实现类 DefaultRetryPolicy (每个request 中默认的 RetryPolicy )retry 函数:
@Override public void retry(VolleyError error) throws VolleyError { mCurrentRetryCount++; mCurrentTimeoutMs += (mCurrentTimeoutMs * mBackoffMultiplier); if (!hasAttemptRemaining()) { throw error; } }上面的代码可以看出每次 retry 后 mCurrentRetryCount ++ 当 hasAttemptRemaining 函数不通过时候知己抛出异常。
看看hasAttemptRemaining 其实就是简单的重复次数判断
/** * Returns true if this policy has attempts remaining, false otherwise. */ protected boolean hasAttemptRemaining() { return mCurrentRetryCount <= mMaxNumRetries; }那么在哪里会调用 retry 函数呢?跟踪代码可以发现在BasicNetwork 中有如下函数 attemptRetryOnException 函数。
/** * Attempts to prepare the request for a retry. If there are no more attempts remaining in the * request's retry policy, a timeout exception is thrown. * @param request The request to use. */ private static void attemptRetryOnException(String logPrefix, Request<?> request, VolleyError exception) throws VolleyError { RetryPolicy retryPolicy = request.getRetryPolicy(); int oldTimeout = request.getTimeoutMs(); try { retryPolicy.retry(exception); } catch (VolleyError e) { request.addMarker( String.format("%s-timeout-giveup [timeout=%s]", logPrefix, oldTimeout)); throw e; } request.addMarker(String.format("%s-retry [timeout=%s]", logPrefix, oldTimeout)); }从代码中可以发现,如果retryPolicy.retry(exception); 抛出异常。那么会 throw e 向上抛出异常。接着继续看在哪 调用 attemptRetryOnException 函数呢? 注意到该类的
performRequest
public NetworkResponse performRequest(Request<?> request) throws VolleyError { long requestStart = SystemClock.elapsedRealtime(); while (true) { HttpResponse httpResponse = null; byte[] responseContents = null; Map<String, String> responseHeaders = Collections.emptyMap(); try { // Gather headers. Map<String, String> headers = new HashMap<String, String>(); addCacheHeaders(headers, request.getCacheEntry()); // call HurlStack performRequest function ... httpResponse = mHttpStack.performRequest(request, headers); StatusLine statusLine = httpResponse.getStatusLine(); int statusCode = statusLine.getStatusCode(); responseHeaders = convertHeaders(httpResponse.getAllHeaders()); // Handle cache validation. if (statusCode == HttpStatus.SC_NOT_MODIFIED) {// 如果返回304 Entry entry = request.getCacheEntry(); if (entry == null) { return new NetworkResponse(HttpStatus.SC_NOT_MODIFIED, null, responseHeaders, true, SystemClock.elapsedRealtime() - requestStart); } // A HTTP 304 response does not have all header fields. We // have to use the header fields from the cache entry plus // the new ones from the response. // http://www.w3.org/Protocols/rfc2616/rfc2616-sec10.html#sec10.3.5 entry.responseHeaders.putAll(responseHeaders); return new NetworkResponse(HttpStatus.SC_NOT_MODIFIED, entry.data, entry.responseHeaders, true, SystemClock.elapsedRealtime() - requestStart); } // Some responses such as 204s do not have content. We must check. // note by zhourj: if (httpResponse.getEntity() != null) { responseContents = entityToBytes(httpResponse.getEntity()); } else { // Add 0 byte response as a way of honestly representing a // no-content request. responseContents = new byte[0]; } // if the request is slow, log it. long requestLifetime = SystemClock.elapsedRealtime() - requestStart; logSlowRequests(requestLifetime, request, responseContents, statusLine); if (statusCode < 200 || statusCode > 299) { throw new IOException(); } return new NetworkResponse(statusCode, responseContents, responseHeaders, false, SystemClock.elapsedRealtime() - requestStart); } catch (SocketTimeoutException e) { attemptRetryOnException("socket", request, new TimeoutError()); } catch (ConnectTimeoutException e) { attemptRetryOnException("connection", request, new TimeoutError()); } catch (MalformedURLException e) { throw new RuntimeException("Bad URL " + request.getUrl(), e); } catch (IOException e) { int statusCode; if (httpResponse != null) { statusCode = httpResponse.getStatusLine().getStatusCode(); } else { throw new NoConnectionError(e); } VolleyLog.e("Unexpected response code %d for %s", statusCode, request.getUrl()); NetworkResponse networkResponse; if (responseContents != null) { networkResponse = new NetworkResponse(statusCode, responseContents, responseHeaders, false, SystemClock.elapsedRealtime() - requestStart); if (statusCode == HttpStatus.SC_UNAUTHORIZED || statusCode == HttpStatus.SC_FORBIDDEN) { attemptRetryOnException("auth", request, new AuthFailureError(networkResponse)); } else if (statusCode >= 400 && statusCode <= 499) { // Don't retry other client errors. throw new ClientError(networkResponse); } else if (statusCode >= 500 && statusCode <= 599) { if (request.shouldRetryServerErrors()) { attemptRetryOnException("server", request, new ServerError(networkResponse)); } else { throw new ServerError(networkResponse); } } else { // 3xx? No reason to retry. throw new ServerError(networkResponse); } } else { attemptRetryOnException("network", request, new NetworkError()); } } } }代码很长,关注重点(里面包含了很多Http 状态码的异常处理),最外层使用的while(true)死循环,那么什么时候跳出循环呢?(跳出循环意味着对 Request 不再处理)return 和 throw excepthion 的时候。当出现网络超时等问题时候都会调用 attemptRetryOnException 函数,而上面的分析可以知道,当还有 retry 次数的时会选择将异常吞掉。这样while 不会退出。所以进入下一次 retry .
DiskBasedCache 的缓存实现细节和对服务端304的处理、缓存过期的细节控制
DiskBasedCache具体依赖文件进行存储,已URL为key 具体细节不分析了。但是备忘两个问题。
1、个人觉得要理解缓存需要理解HTTP 的一些响应头和请求头,并理解304 状态码的机制。
在Volley 中使用了 If-None-Match If-Modified-Since 请求头。
详细的可以看BasicNetwork addCacheHeaders 函数。这个函数执行 performRequest 时候会进行调用。而他的作用主要是添加请求头的 协商缓存函数(具体需可以了解浏览器的协商缓存)
private void addCacheHeaders(Map<String, String> headers, Cache.Entry entry) { // If there's no cache entry, we're done. if (entry == null) { return; } if (entry.etag != null) { /** * If-None-Match,它和ETags(HTTP协议规格说明定义ETag为“被请求变量的实体值”,或者是一个可以与Web资源关联的记号)常用来判断当前请求资源是否改变。类似于Last-Modified和HTTP-IF-MODIFIED-SINCE。但是有所不同的是Last-Modified和HTTP-IF-MODIFIED-SINCE只判断资源的最后修改时间,而ETags和If-None-Match可以是资源任何的任何属性,不如资源的MD5等。 ETags和If-None-Match的工作原理是在HTTP Response中添加ETags信息。当客户端再次请求该资源时,将在HTTP Request中加入If-None-Match信息(ETags的值)。如果服务器验证资源的ETags没有改变(该资源没有改变),将返回一个304状态;否则,服务器将返回200状态,并返回该资源和新的ETags。 ETag如何帮助提升性能? 聪明的服务器开发者会把ETags和GET请求的“If-None-Match”头一起使用,这样可利用客户端(例如浏览器)的缓存。因为服务器首先产生ETag,服务器可在稍后使用它来判断页面是否已经被修改。本质上,客户端通过将该记号传回服务器要求服务器验证其(客户端)缓存。 其过程如下: 1.客户端请求一个页面(A)。 2.服务器返回页面A,并在给A加上一个ETag。 3.客户端展现该页面,并将页面连同ETag一起缓存。 4.客户再次请求页面A,并将上次请求时服务器返回的ETag一起传递给服务器。 5.服务器检查该ETag,并判断出该页面自上次客户端请求之后还未被修改,直接返回响应304(未修改——Not Modified)和一个空的响应体。 http://www.cnblogs.com/czh-liyu/archive/2011/06/22/2087113.html */ headers.put("If-None-Match", entry.etag); } if (entry.lastModified > 0) { Date refTime = new Date(entry.lastModified); /** * If-Modified-Since是标准的HTTP请求头标签,在发送HTTP请求时,把浏览器端缓存页面的最后修改时间一起发到服务器去,服务器会把这个时间与服务器上实际文件的最后修改时间进行比较。 * 如果时间一致,那么返回HTTP状态码304(不返回文件内容),客户端接到之后,就直接把本地缓存文件显示到浏览器中。 * 如果时间不一致,就返回HTTP状态码200和新的文件内容,客户端接到之后,会丢弃旧文件,把新文件缓存起来,并显示到浏览器中。 **/ headers.put("If-Modified-Since", DateUtils.formatDate(refTime)); } }第二个是问题是关于:为什么DiskBasedCache 的writeInt Long 函数需要计算?
/** * 为什么写入的时候需要进行运算呢? * http://a.codekk.com/detail/Android/grumoon/Volley%20源码解析 * note: 只是按照字节顺序写入而已,没有涉及到大小端问题 */ static void writeInt(OutputStream os, int n) throws IOException { os.write((n >> 0) & 0xff); os.write((n >> 8) & 0xff); os.write((n >> 16) & 0xff); os.write((n >> 24) & 0xff); }有人说,这个是处理大小端的问题【不明大小端的可以谷歌,这个大小端名字的起源还很有意思,:-D】?确实网络传输存在大小端问题。网络传输一般用的是大端,而不同的操作系统使用的不同的端,但是个人觉得上面的代码,只是将int按照字节顺序写入文件而已,不涉及什么大小端。
服务端消息体数据读取使用的 PoolingByteArrayOutputStream 实现及细节
PoolingByteArrayOutputStream 继承自 ByteArrayOutputStream。并且内部使用了一个 ByteArrayPool mPool; (字节缓存池)。这个很有意思。将 ByteArrayOutputStream 中的buff 对象引用到 ByteArrayPool 中实现 byte[] 数组的循环利用。而这里详细说说ByteArrayPool ,很精短的代码实现了一个LRU 算法。
代码很多直接拷贝:
public class ByteArrayPool { /** The buffer pool, arranged both by last use and by buffer size */ private List<byte[]> mBuffersByLastUse = new LinkedList<byte[]>();// 最近最上使用的队列 private List<byte[]> mBuffersBySize = new ArrayList<byte[]>(64);// order by buffer size /** The total size of the buffers in the pool */ private int mCurrentSize = 0; /** * The maximum aggregate size of the buffers in the pool. Old buffers are discarded to stay * under this limit. */ private final int mSizeLimit; /** Compares buffers by size */ protected static final Comparator<byte[]> BUF_COMPARATOR = new Comparator<byte[]>() { @Override public int compare(byte[] lhs, byte[] rhs) { return lhs.length - rhs.length; } }; /** * @param sizeLimit the maximum size of the pool, in bytes */ public ByteArrayPool(int sizeLimit) { mSizeLimit = sizeLimit; } /** * Returns a buffer from the pool if one is available in the requested size, or allocates a new * one if a pooled one is not available. * * @param len the minimum size, in bytes, of the requested buffer. The returned buffer may be * larger. * @return a byte[] buffer is always returned. */ public synchronized byte[] getBuf(int len) { for (int i = 0; i < mBuffersBySize.size(); i++) { byte[] buf = mBuffersBySize.get(i); if (buf.length >= len) { mCurrentSize -= buf.length; mBuffersBySize.remove(i); mBuffersByLastUse.remove(buf); return buf; } } return new byte[len]; } /** * Returns a buffer to the pool, throwing away old buffers if the pool would exceed its allotted * size. * * @param buf the buffer to return to the pool. */ public synchronized void returnBuf(byte[] buf) { if (buf == null || buf.length > mSizeLimit) { return; } mBuffersByLastUse.add(buf); int pos = Collections.binarySearch(mBuffersBySize, buf, BUF_COMPARATOR); if (pos < 0) { pos = -pos - 1; } mBuffersBySize.add(pos, buf); mCurrentSize += buf.length; trim(); } /** * Removes buffers from the pool until it is under its size limit. */ private synchronized void trim() { while (mCurrentSize > mSizeLimit) { byte[] buf = mBuffersByLastUse.remove(0); mBuffersBySize.remove(buf); mCurrentSize -= buf.length; } }}我们来逐步分析:
数据连个数据结构:
private List<byte[]> mBuffersByLastUse = new LinkedList<byte[]>();// 最近最上使用的队列 private List<byte[]> mBuffersBySize = new ArrayList<byte[]>(64);// order by buffer sizemBuffersByLastUse 使用 LinkedList链表记录最近使用的byte[] ,最近使用的放在链表尾部,(在returnBuf 函数中, byte[] 回收后会放在链表尾部,这个也是最新使用的内存。
mBuffersBySize byte[] 是一个有序数据,按照byte[] 的大小从小到大存放。(怎么知道是从小到大?为什么是从小到大?)
第一:怎么知道我们可以看 returnBuf 函数中有如下代码:
int pos = Collections.binarySearch(mBuffersBySize, buf, BUF_COMPARATOR); if (pos < 0) { pos = -pos - 1; } mBuffersBySize.add(pos, buf);上面代码是根据二分搜索找打 buf 的合适位置,并插入其中。根据BUF_COMPARATOR 函数可以知道mBuffersBySize 是从小到大排列的。
第二为什么要从小到大呢?可以看getBuff() 函数。
public synchronized byte[] getBuf(int len) { for (int i = 0; i < mBuffersBySize.size(); i++) { byte[] buf = mBuffersBySize.get(i); if (buf.length >= len) { mCurrentSize -= buf.length; mBuffersBySize.remove(i); mBuffersByLastUse.remove(buf); return buf; } } return new byte[len]; }这个要从缓存池中拿到 大于 len 的且长度最短(提高空间利用率)所有如果从小到大排列,一次遍历即可。
为什么说是LRU能算法呢?可以看到在每次内存使用超过 最大限制时候回调用 trim 函数。将前面最早使用 byte[]数组 remove 掉,直到空间不超过限制。
- Volley学习笔记
- volley学习笔记
- volley学习笔记
- Volley学习笔记
- volley框架学习笔记
- Volley的学习笔记
- volley学习笔记
- Volley学习笔记
- Volley学习笔记
- Volley学习笔记二
- volley学习笔记三
- volley学习笔记四
- Volley学习笔记
- Android Volley 学习笔记 1
- Volley源码学习笔记1
- Android Volley框架学习笔记
- Android-volley框架学习笔记
- 【Android开发】Volley学习笔记
- (4.1.23.5)自定义控件三部曲之动画篇(三)—— 代码生成alpha、scale、translate、rotate、set及插值器动画
- Spring MVC中一个input file上传多个问题件
- iOS中的正则表达式运用
- 请求 ajax 基础配置
- seaJS 使用随笔
- volley学习笔记
- DP 1002
- Linux字符设备与块设备的区别与比较
- 第五次作业
- (4.1.23.6)自定义控件三部曲之动画篇(四)——ValueAnimator基本使用
- Leetcode Everyday: 346. Moving Average from Data Stream
- 【CodeForces 626C】Block Towers
- POJ1064
- NFS挂载网络文件系统