【源代码】UITextView使用自定义微博表情键盘
来源:互联网 发布:淘宝天堂伞假货 编辑:程序博客网 时间:2024/05/02 06:09
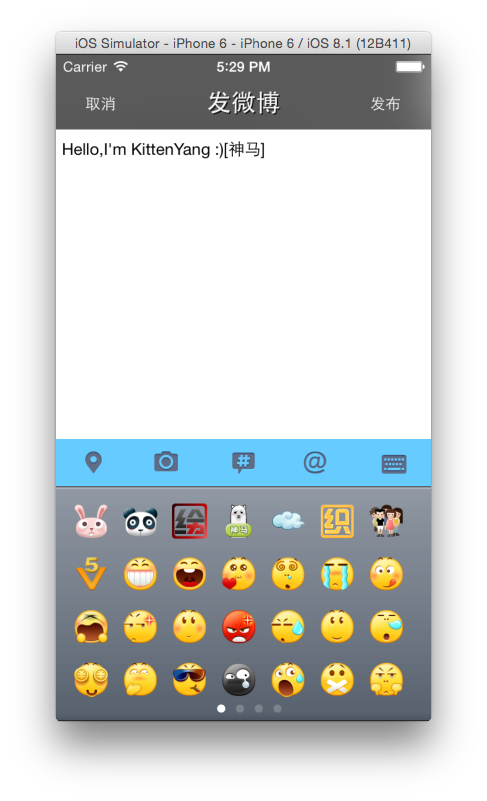
今天我要说的是,怎么在你的键盘中集成微博的表情键盘。 效果像这样:
考虑到复用,我们最好把这个表情键盘封装成一个类,方便以后凡是用到表情键盘的地方都可以快速调用。下面我来仔细介绍一下设计思路。
*准备工作
新建EmotionView : UIView. 首先,我们需要一些准备工作,你可以到这里 下载到我开源的代码。里面有一个face/emoticons.plist 文件,这个文件是一个字典,大概就长这样:
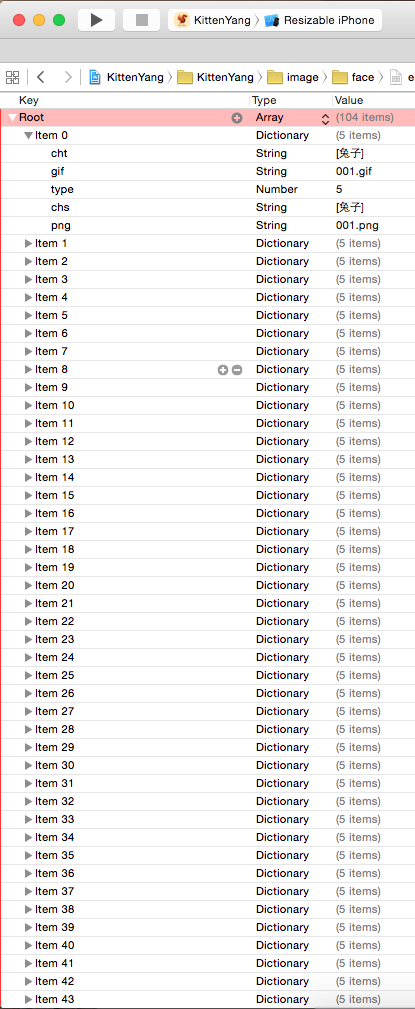
解读一下这个plist文件,这一整个是一个数组,分别是[item0,item1,item2,item3,item4.....item104]。然后这每一个元素,比如item0,是一个字典。里面有5个key,对应5个value,正如上图你看到的那样。
然后创建一个可变数组 items 用来保存【页数】,如本例中有4页,如下这样的结构:
/* *items = [ [表情1,表情2,表情3,.....,表情28]; // 第一页 [表情1,表情2,表情3,.....,表情28]; // 第二页 ... ]; */代码:
items = [[NSMutableArray alloc]init]; 1.第一步
把没有分页的104个表情保存到一个数组 fileArray.你可以理解为:
/* *fileArray = [表情1,表情2,表情3,.....,表情50,表情51,.....表情104]; */代码:
NSString *filePath = [[NSBundle mainBundle]pathForResource:@"emoticons" ofType:@"plist"]; //"emoticons.plist" NSArray *fileArray = [NSArray arrayWithContentsOfFile:filePath];2.第二步
开始分页,每28个存为1页:
NSMutableArray *item2D = nil; for (int i=0; i < fileArray.count; i++) { NSDictionary *item = [fileArray objectAtIndex:i]; if (i % 28 == 0) { item2D = [NSMutableArray arrayWithCapacity:28]; [items addObject:item2D]; } [item2D addObject:item]; }每页存为的数组都叫item2D,虽然名字相同,但是由于每次都是重新创建的item2D = [NSMutableArray arrayWithCapacity:28];所以这是四个名字相同的不同变量。
目前为止,我们已经把表情都分类好了,然后就可以开始画这些表情了。
3.第三步
把表情画上去:
- (void)drawRect:(CGRect)rect { int row = 0,colum = 0; //定义行、列 for (int i = 0; i < items.count; i++) { NSArray *items2D = [items objectAtIndex:i]; for (int j = 0; j < items2D.count; j++) { NSDictionary *item = [items2D objectAtIndex:j]; NSString *emotionName = [item objectForKey:@"png"]; UIImage *emotionImage = [UIImage imageNamed:emotionName]; CGRect emotionFrame = CGRectMake(colum*item_width + 15, row*item_height +15, 30, 30); //考虑页数,需要加上前面一页的宽度 float x = (i*ScreenWidth) + emotionFrame.origin.x; emotionFrame.origin.x = x; [emotionImage drawInRect:emotionFrame]; //更新列、行 colum ++; if (colum % 7 == 0) { row ++; colum = 0; } if (row % 4 == 0) { row = 0; } } }}4.第四步
现在我们已经把那个长长的表情视图画好了,接下去就是放到一个可滑动的视图里面。在此之前,我画了一张图,方便大家对图层关系有一个直观的理解:

新建一个EmotionScrollView : UIView。
定义一个方法initViews,初始化scrollView以及emotionView:
- (void)initViews{ emotionView = [[EmotionView alloc]initWithFrame:CGRectZero]; scrollView = [[UIScrollView alloc]initWithFrame:CGRectMake(0, 0, ScreenWidth, emotionView.height)]; scrollView.contentSize = CGSizeMake(emotionView.width, 0); scrollView.pagingEnabled = YES; [scrollView addSubview:emotionView]; [self addSubview:scrollView]; self.height = scrollView.height; self.width = scrollView.width;}5.第五步
现在我们已经封装好了,接下去就可以复用了。以后要用到表情视图的视图都可以这样子:
if (emotionScrollView == nil) { emotionScrollView = [[EmotionScrollView alloc]initWithFrame:CGRectZero]; emotionScrollView.bottom = ScreenHeight; [self.view addSubview:emotionScrollView];}注意:
iOS7在Conttoller中新增了这个属性:automaticallyAdjustsScrollViewInsets,当设置为YES时(默认YES),如果视图里面存在唯一一个UIScrollView或其子类View,那么它会自动设置相应的内边距。这回导致你的表情视图发生偏移,如果你在一个ViewController里面使用我们封装的这个表情类,那么你需要添加这么一句:
self.automaticallyAdjustsScrollViewInsets = NO;最后,我优化了这整个类,添加了PageControl、点击表情放大镜显示、点击表情添加到文本框等,详细代码你可以到这里 下载。
- 【源代码】UITextView使用自定义微博表情键盘
- UITextView使用自定义表情键盘
- Swift-自定义表情键盘
- 自定义表情键盘
- iOS 自定义表情键盘
- 自定义表情输入键盘
- UITextView自定义键盘和系统键盘
- iOS自定义的表情键盘
- iOS 自定义emoji表情键盘
- iOS自定义的表情键盘
- 新浪微博-表情键盘的显示
- 使用UITextView的问题及自定义UITextView
- UITextView编辑时插入自定义表情-简单的图文混编
- UITextView编辑时插入自定义表情-简单的图文混编
- UITextView编辑时插入自定义表情-简单的图文混编
- UITextView编辑时插入自定义表情-简单的图文混编
- iOS自定义的emoji表情键盘
- iOS 自定义键盘+表情布局实现
- 分库分表
- 写出这个数
- copy项目后修改项目的部署名称
- (最新)iOS后台运行时间
- 沉浸式状态栏(一)
- 【源代码】UITextView使用自定义微博表情键盘
- final 与 static 关键字
- ttk.treeview增加标题单击排序功能
- 使用Genism进行词向量训练:实践版
- PS笔记
- MyBatis Oracle 自增序列
- SpringMVC 使用poi导出excel简单小例子
- C#之String学习一
- Android屏幕适配(二)多分辨率布局适配策略