Android之ListView自带的布局simple_list_item
来源:互联网 发布:淘宝美工大师级 编辑:程序博客网 时间:2024/05/24 16:13
在使用ListView的时候,常常用到Android自带的list布局,即simple_list_item_1、simple_list_item_2、simple_list_item_checked等。初次用起来,难免有点云里雾里。下面,就这几种list布局,做一些简单介绍:
注:适配器选用SimpleAdapter
main.xml 如下:
- <span style="font-size:18px;"><?xml version="1.0" encoding="utf-8"?>
- <LinearLayout xmlns:android="http://schemas.android.com/apk/res/android"
- android:layout_width="fill_parent"
- android:layout_height="fill_parent"
- android:orientation="vertical" >
- <ListView
- android:id="@+id/android:list"
- android:layout_width="fill_parent"
- android:layout_height="wrap_content"/>
- <TextView
- android:id="@+id/android:empty"
- android:layout_width="wrap_content"
- android:layout_height="wrap_content"
- android:text="对不起,没有数据显示"/>
- </LinearLayout></span>
包含一个id="@+id/android:list"的ListView和id="@+id/android:empty"的TextView,当ListView没有数据显示时,TextView显示出来,同时ListView会被影藏(貌似在ListActivity中才有此效果,在Activity中必须自行设置);
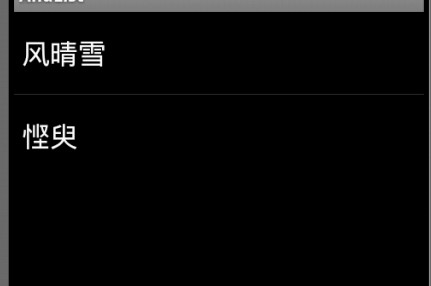
一、simple_list_item_1(单行显示)
此布局显示最为简单,其中只有一个TextView,id为:android.R.id.text1,直接上代码:
- <span style="font-size:18px;">public class ListViewDemo extends ListActivity {
- private List<Map<String, String>> data = new ArrayList<Map<String,String>>();
- @Override
- public void onCreate(Bundle savedInstanceState) {
- super.onCreate(savedInstanceState);
- setContentView(R.layout.main);
- Map<String, String> map1 = new HashMap<String, String>();
- map1.put("姓名", "风晴雪");
- data.add(map1);
- Map<String, String> map2 = new HashMap<String, String>();
- map2.put("姓名", "悭臾");
- data.add(map2);
- setListAdapter(new SimpleAdapter(this,data,android.R.layout.simple_list_item_1,
- new String[]{"姓名"}, //每行显示一个姓名
- new int[]{android.R.id.text1} //名字在text1上显示
- ));
- }</span>
上图:
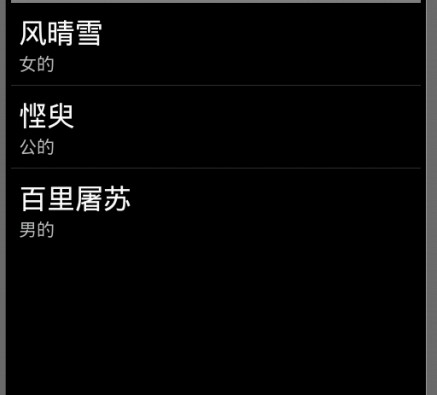
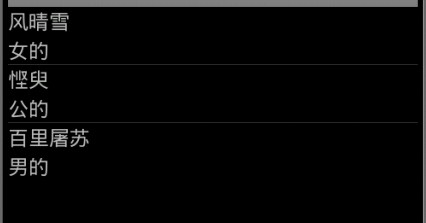
二、simple_list_item_2、two_line_list_item(双行显示)
两种布局很相似,都有两个TextView:android.R.id.text1和android.R.id.text2,不同之处在于,前者两行字是不一样大小的,而后者
中两行字体一样大小,这里使用前者作为示例,两者的用法一样。先看 simple_list_item_2.xml 布局文件:
- <TwoLineListItem xmlns:android="http://schemas.android.com/apk/res/android"
- android:paddingTop="2dip"
- android:paddingBottom="2dip"
- android:layout_width="match_parent"
- android:layout_height="wrap_content"
- android:minHeight="?android:attr/listPreferredItemHeight"
- android:mode="twoLine"
- >
- <TextView android:id="@android:id/text1"
- android:layout_width="match_parent"
- android:layout_height="wrap_content"
- android:layout_marginLeft="6dip"
- android:layout_marginTop="6dip"
- android:textAppearance="?android:attr/textAppearanceLarge"
- />
- <TextView android:id="@android:id/text2"
- android:layout_width="match_parent"
- android:layout_height="wrap_content"
- android:layout_below="@android:id/text1"
- android:layout_alignLeft="@android:id/text1"
- android:textAppearance="?android:attr/textAppearanceSmall"
- />
- </TwoLineListItem>
simple_list_item_2用法跟simple_list_item_1相同,看代码:
- public class ListViewDemo extends ListActivity {
- private List<Map<String, String>> data = new ArrayList<Map<String,String>>();
- @Override
- public void onCreate(Bundle savedInstanceState) {
- super.onCreate(savedInstanceState);
- setContentView(R.layout.main);
- Map<String, String> map1 = new HashMap<String, String>();
- map1.put("姓名", "风晴雪");
- map1.put("性别", "女的");
- data.add(map1);
- Map<String, String> map2 = new HashMap<String, String>();
- map2.put("姓名", "悭臾");
- map2.put("性别", "公的");
- data.add(map2);
- Map<String, String> map3 = new HashMap<String, String>();
- map3.put("姓名", "百里屠苏");
- map3.put("性别", "男的");
- data.add(map3);
- setListAdapter(new SimpleAdapter(this,data,android.R.layout.simple_list_item_2,
- new String[]{"姓名","性别"}, //每行显示一组姓名和性别
- new int[]{android.R.id.text1,android.R.id.text2} //名字在text1上显示,性别在text2上显示
- ));
- }
- }
上图:simple_list_item_2
two_line_list_item
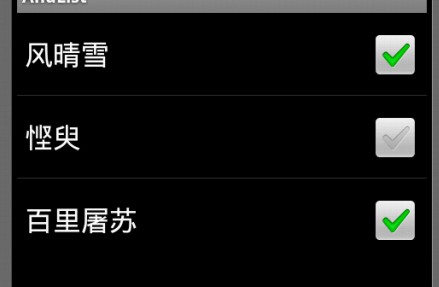
三、simple_list_item_single_choice、simple_list_item_multiple_choice、simple_list_item_checked(不同的呈现方式)
这三种布局增加了选项,有单选和多选模式。常用方法为setChoiceMode(),getCheckedItemPositions(),getCheckedItemIds();
- setListAdapter(new SimpleAdapter(this,data,android.R.layout.simple_list_item_multiple_choice,
- new String[]{"姓名"}, //每行显示一组姓名
- new int[]{android.R.id.text1} //名字在text1上显示
- ));
- /*表明有选项,若不设置,缺省为none,则点击后没有反应
- * 选项模式有:CHOICE_MODE_SINGLE 单选--ListView中只能有一个item被选中
- * CHOICE_MODE_MULTIPLE 多选--允许选中多个item
- * CHOICE_MODE_NONE 缺省
- */
- getListView().setChoiceMode(ListView.CHOICE_MODE_MULTIPLE);
上图:依次为simple_list_item_multiple_choice、simple_list_item_single_choice、simple_list_item_checked格式


转自http://blog.csdn.net/ma12an/article/details/7762961感谢感恩
- Android之ListView自带的布局simple_list_item
- Android自带加载画面的ListView
- Android中自带的list布局
- 带布局的ListView
- android自带的各种ListView的展现
- Android ListView如何去掉自带的白色分割线
- Android 去掉listview自带的蓝色背景
- android之ListView布局
- android之ListView布局
- android布局之listview
- android之ListView布局
- android之ListView布局
- Android布局之ListView
- SwipeRefreshLayout Android 自带的下拉刷新布局
- 使用Android-sdk自带的工具查看布局
- Android Studio 自带的侧滑布局设置
- Android自带抽屉布局中NavigationView的动态生成
- android系统自带的适配布局activity_list_item
- Effective cpp 读书笔记9
- jni里报05-20 11:56:40.106: A/libc(6175): Fatal signal 7 (SIGBUS) at 0x00000000 (code=128)错误-jni数组报错
- MySQL入门--AUTO_INCREMENT自增约束
- 1.从Jquery 到 Reactjs 转变 遇到的十大神坑
- POJ 3659 Cell Phone Network【最小支配集 dp && 贪心】
- Android之ListView自带的布局simple_list_item
- 读取excel文件的Java处理
- iOS开发-SVN管理代码
- 与接口相关的设计模式(2):代理模式、标识类型模式及常量接口模式
- http://www.cnblogs.com/ycjing/p/5281384.html
- JAVA Socket 实现 UDP 编程
- 差分隐私若干基本知识点介绍(一)
- qwt模版例程学习设置相位曲线波形
- Maven初步搭建 (一)