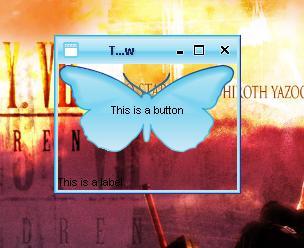
用java打造任意形状窗口和透明窗口
来源:互联网 发布:科目三考试模拟软件 编辑:程序博客网 时间:2024/06/11 22:57
文章①
原文地址:http://www.blogjava.net/dyerac/archive/2006/04/03/38984.html
图形界面开发对于Java来说并非它的长项,开发者经常会碰到各种各样的限制,比如,如何打造一款任意形状的窗口?如何可以透过窗口显示它覆盖下的内容?
考虑到Java并没有被设计成支持以上的功能,所以,你能得到的永远是方方正正的窗口,毫无新意,当然,我们可以通过JNI调用本地代码来完成,但是这就失去了java可移植性的意义,那么,用纯粹的java代码如何实现以上两种功能呢?
下文提供了一个实现的参考
预备知识:
1.java.awt.Robot,这个类是一个功能非常强大的类,通过它我们可以控制鼠标和键盘的响应,不过这里,我们只需要用到它的一个功能--截屏,也就是得到当前屏幕的快照(screenshot)
2.我们可以通过调用一个swing组件的paintComponent(Graphics g)方法用特定的Graphics为其定制特殊的外观
首先声明的一点是,本文中的实现方法只是一个欺骗的手法,因为要想实现前文中的功能,我们几乎的重写一套Swing出来,这里,简便的做法是,我们通过robot类来获得当前屏幕的快照,然后贴在我们需要的窗口上,这样,不就实现了透明的功能了吗?顺便提一下,几年前日本发明的隐形衣也是依靠这种机制,这种衣服在身后附带一套摄像机,然后即时的将拍下的内容显示在衣服的正面,因此,当别人看过来时,仿佛就通过人和衣服看到了身后的场景^_^
另外,还要感谢Joshua Chris leniz的Swing Hack一书,以上充满创新的方法正来自他的书中
好咯,让我们具体看一下细节的处理:
第一,我们要得到当前屏幕的快照,保存到一个Image对象 background 中:
public void updateBackground() {
try {
Robot rbt = new Robot();
Toolkit tk = Toolkit.getDefaultToolkit();
Dimension dim = tk.getScreenSize();
[color=Red]background [/color]= rbt.createScreenCapture(new Rectangle(0, 0, (int) dim
.getWidth(), (int) dim.getHeight()));
} catch (Exception ex) {
}
}
第二,我们需要让窗口显示这个图像,也就是说,让窗口的背景图像是这副图像,以达到透明的欺骗效果:
public void paintComponent(Graphics g) {
Point pos = this.getLocationOnScreen();
Point offset = new Point(-pos.x, -pos.y);
g.drawImage([color=Red]background[/color], offset.x, offset.y, null);
}
在swing hack一书中,作者也给出了他的实现,然而,运行结果表明该实现存在很大的问题:窗口经常无法即时更新,往往背景变了,窗口里显示的却还是以前的背景。仔细研究了他的代码,我发现了问题的根结,同时也是这种实现技术的关键要素--如何让窗口在正确的时机里更新显示,下面,我们会讨论这一点
第三,更新窗口外观
前两步的操作,只能得到一副当前屏幕的快照,一旦背景变化了,或者窗口移动了,变化大小了,那么我们制作的窗口将永远无法和和屏幕背景联合成整体,也就失去了透明的效果;同时,我们也不可能每时每刻都调用
updateBackground() 方法获得最新的背景,可行的方法是,通过对事件的监听来选择适当的时间来更新外观
我们应该可以达到这三点共识:
1。窗口移动或改变大小时,背景图像一般是不会发生变化的,我们不需要得到新的屏幕快照,只用将以前得到的背景中适当的部分贴到窗口上,调用repaint()方法就足已
2。要获得最新的屏幕快照,必须先将窗口隐藏起来,调用updateBackground() 得到图像后再把窗口显示,我们可以用refresh方法来表示
refresh(){
frame.hide();
updateBackground() ;
frame.show();
}
3。如果背景改变了,那么一定是别的windows程序获得了或失去了事件焦点,也就是说我们关注的窗口将触发焦点得失事件,这个时候需要调用refresh() 得到最新的屏幕快照
看到这里,你或许认为已经没有技术难点了,然而,此时才是 我们最需要关注的地方 :
参看第三点,我们需要在窗口得失焦点时调用refresh() 方法;参看第一点,我们调用refresh() 方法时需要先将窗口隐藏,然后再显示。于是问题来了,在隐藏和显示窗口时,同样会触发得失焦点事件,得失焦点事件又将触发新的隐藏和显示窗口事件(为了得到新的屏幕快照),这就使程序陷入了死循环中,我们必须加以控制,使得第二次触发焦点得失事件时不调用refresh()方法
作者的办法是加一个线程来控制,通过判断时间间隔长短来决定是否调用refresh()方法,可是,这个条件是程序非常的不稳定,因为往往调用时间会根据系统繁忙度而改变,使得需要更新时不能更新,不需要更新的时候反而更新了
因此,我决定采取新的解决方案,能不能隐藏/显示窗口时不触发得失焦点事件呢?
解决方法很简单,我抛开了传统的setVisible()或者show(),hide()方法,而是使用setLocation()方法,因为调用setLocation()方法时窗口不会失去焦点,同时,只要用类似setLocation(-2000,-2000)方法也同样可以轻松的让窗口在屏幕中消失
下面是我的全部代码:
import java.awt.BorderLayout;
import java.awt.Dimension;
import java.awt.Graphics;
import java.awt.Image;
import java.awt.Point;
import java.awt.Rectangle;
import java.awt.Robot;
import java.awt.Toolkit;
import java.awt.event.ComponentEvent;
import java.awt.event.ComponentListener;
import java.awt.event.WindowEvent;
import java.awt.event.WindowFocusListener;
import javax.swing.JButton;
import javax.swing.JComponent;
import javax.swing.JFrame;
import javax.swing.JLabel;
import javax.swing.UIManager;
import org.jvnet.substance.SubstanceLookAndFeel;
import org.jvnet.substance.theme.SubstanceLightAquaTheme;
import ch.randelshofer.quaqua.QuaquaLookAndFeel;
public class TestEvent extends JComponent implements ComponentListener,
WindowFocusListener {
private JFrame frame;
private Boolean isHiding = false, isShowing = false, start = false;
private Image background;
private Point p;
//获得当前屏幕快照
public void updateBackground() {
try {
Robot rbt = new Robot();
Toolkit tk = Toolkit.getDefaultToolkit();
Dimension dim = tk.getScreenSize();
background = rbt.createScreenCapture(new Rectangle(0, 0, (int) dim
.getWidth(), (int) dim.getHeight()));
} catch (Exception ex) {
// p(ex.toString());
// 此方法没有申明过 ,因为无法得知上下文 。因为不影响执行效果 ,先注释掉它 ex.printStackTrace();
}
}
//将窗口掉离出屏幕以获得纯粹的背景图象
public void refresh() {
if (start == true) {
this.updateBackground();
frame.setLocation(p);
if (p.x < 0 || p.y < 0)
frame.setLocation(0, 0);
this.repaint();
}
}
public void componentHidden(ComponentEvent e) {
// TODO Auto-generated method stub
System.out.println("Hidden");
}
//窗口移动时
public void componentMoved(ComponentEvent e) {
// TODO Auto-generated method stub
System.out.println("moved");
this.repaint();
}
//窗口改变大小时
public void componentResized(ComponentEvent e) {
// TODO Auto-generated method stub
System.out.println("resized");
this.repaint();
}
public void componentShown(ComponentEvent e) {
// TODO Auto-generated method stub
System.out.println("shown");
}
//窗口得到焦点后,用refresh()方法更新界面
public void windowGainedFocus(WindowEvent e) {
// TODO Auto-generated method stub
System.out.println("gainedFocus");
refresh();
start = false;
}
//窗口失去焦点后,将其移出屏幕
public void windowLostFocus(WindowEvent e) {
// TODO Auto-generated method stub
System.out.println("lostFocus");
if (frame.isShowing() == true) {
System.out.println("visible");
} else {
System.out.println("invisible");
}
start = true;
p = frame.getLocation();
frame.setLocation(-2000, -2000);
}
public TestEvent(JFrame frame) {
super();
this.frame = frame;
updateBackground();
this.setSize(200, 120);
this.setVisible(true);
frame.addComponentListener(this);
frame.addWindowFocusListener(this);
// TODO Auto-generated constructor stub
}
//绘制外观,注意,其中 pos,offset 是为了将特定部分的图象贴到窗口上
public void paintComponent(Graphics g) {
Point pos = this.getLocationOnScreen();
Point offset = new Point(-pos.x, -pos.y);
g.drawImage(background, offset.x, offset.y, null);
}
/**
* @param args
*/
public static void main(String[] args) {
// TODO Auto-generated method stub
try {
// UIManager.setLookAndFeel("org.fife.plaf.Office2003.Office2003LookAndFeel");
// UIManager.setLookAndFeel("org.fife.plaf.OfficeXP.OfficeXPLookAndFeel");
// UIManager.setLookAndFeel("org.fife.plaf.OfficeXP.OfficeXPLookAndFeel");
UIManager.setLookAndFeel(new SubstanceLookAndFeel());
//UIManager.setLookAndFeel(new SmoothLookAndFeel());
//UIManager.setLookAndFeel(new QuaquaLookAndFeel());
UIManager.put("swing.boldMetal", false);
if (System.getProperty("substancelaf.useDecorations") == null) {
JFrame.setDefaultLookAndFeelDecorated(true);
//JDialog.setDefaultLookAndFeelDecorated(true);
}
System.setProperty("sun.awt.noerasebackground", "true");
SubstanceLookAndFeel.setCurrentTheme(new SubstanceLightAquaTheme());
// UIManager.setLookAndFeel("org.fife.plaf.VisualStudio2005.VisualStudio2005LookAndFeel");
} catch (Exception e) {
System.err.println("Oops! Something went wrong!");
}
JFrame frame = new JFrame("Transparent Window");
TestEvent t = new TestEvent(frame);
t.setLayout(new BorderLayout());
JButton button = new JButton("This is a button");
t.add("North", button);
JLabel label = new JLabel("This is a label");
t.add("South", label);
frame.getContentPane().add("Center", t);
frame.pack();
frame.setSize(150, 100);
frame.show();
frame.setDefaultCloseOperation(JFrame.EXIT_ON_CLOSE);
// t.start=true;
}
}
当然,以上代码还存在许多不足,比如在移动窗口时性能会有影响,应该可以通过线程来控制其更新的频率来提升效率,希望大家能一起研究一下,改好了记得通知我哦
ps:你也许还会说,e?怎么没讲任意形状窗口如何打造?
呵呵,其实只要把窗口按上述方法设置成透明,再去掉边框,再换上自己的边框,不就完成了马?
相信聪明的各位一定很容易就办到咯
另外,我还在下面附带了作者的大论,想了解更多的同学也可以去看看
http://www.matrix.org.cn/resource/article/44/44186_Swing.html
文章②
原文位置:http://java.chinaitlab.com/Swing/350375.html
要生成一个半透明的成形窗口,而又要避免使用本地的编码,唯有灵活地应用screenshot(屏幕快照).
半透明窗口是大众对Swing最为渴求的特性之一. 也可以称之为定形窗口,这种窗口有一部分是透明的,可以透过它看到桌面背景和其它的程序.如果不通过JNI(Java Native Interface 本地接口)Java是无法为我们生成一个半透明的窗口的(即使我们可以那样做,还得本地操作平台好支持半透明窗口才行).然而这些现状无法阻止我们对半透明窗口的渴求,通过一个我最喜欢的手段screenshot,我们可以欺骗性地实现这个目的.
仿造这样一个的半透明窗口的过程,主要的通过以下几点:
1.在窗口显示之前,先获得一个screenshot;
2.把上一步获取的屏幕快照,作为窗口的背景图
3.调整位置,以便于我们捕获的screenshot和实际当前的屏幕完美结合,制造出一种半透明的假象.
刚刚说到的部分只是小儿科,重头戏在于,如何在移动或变化半透明窗口时,及时地更新screenshot,也就是及时更新半透明窗口的背景.
在开始我们的旅行之前,先生成一个类,让它继承 JPanel,我们用这个继承类来捕获屏幕,并把捕获的照片作为背景. 类的具体代码如下例6-1
例 6-1 。 半透明背景组件
public class TransparentBackground extends Jcomponent {
private JFrame frame;
private Image background;
public TransparentBackground(JFrame frame) {
this.frame = frame;
updateBackground( );
}
/**
* @todo 获取屏幕快照后立即更新窗口背景
*/
public void updateBackground( ) {
try {
Robot rbt = new Robot( );
Toolkit tk = Toolkit.getDefaultToolkit( );
Dimension dim = tk.getScreenSize( );
background = rbt.createScreenCapture(
new Rectangle(0,0,(int)dim.getWidth( ),
(int)dim.getHeight( )));
} catch (Exception ex) {
//p(ex.toString( ));
// 此方法没有申明过,因为无法得知上下文。因为不影响执行效果,先注释掉它
ex.printStackTrace( );
}
}
public void paintComponent(Graphics g) {
Point pos = this.getLocationOnScreen( );
Point offset = new Point(-pos.x,-pos.y);
g.drawImage(background,offset.x,offset.y,null);
}
}
首先,构造方法把一个reference保存到父的JFrame,然后调用updateBackground()方法,在这个方法中,我们可以利用java.awt.Robot类捕获到整个屏幕,并把捕获到的图像保存到一个定义了的放置背景的变量中. paintComponent()方法可以帮助我们获得窗口在屏幕上的绝对位置,并用刚刚得到的背景作为panel的背景图,同时这个背景图会因为panel位置的不同而作对应的移动,以使panel的背景和panel覆盖的那部分屏幕图像无缝重叠在一起,同时也就使panel和周围的屏幕关联起来.
我们可以通过下面这个main方法简单的运行一下,随便放置一些组件到panel上,再把panel放置到frame中显示.
public static void main(String[] args) {
JFrame frame = new JFrame("Transparent Window");
TransparentBackground bg = new TransparentBackground(frame);
bg.setLayout(new BorderLayout( ));
JButton button = new JButton("This is a button");
bg.add("North",button);
JLabel label = new JLabel("This is a label");
bg.add("South",label);
frame.getContentPane( ).add("Center",bg);
frame.pack( );
frame.setSize(150,100);
frame.show( );
}
通过这段代码,运行出的效果如下图6-1所示:
图6-1 展示中的半透明窗口
这段代码相当简单,却带有两个不足之处。首先,如果移动窗口,panel中的背景无法自动的更新,而paintComponent()只在改变窗口大小时被调用;其次,如果屏幕曾经发生过变化,那么我们制作的窗口将永远无法和和屏幕背景联合成整体。
谁也不想时不时地跑去更新screenshot,想想看,要找到隐藏于窗口后的东西,要获得一份新的screenshot,还要时不时的用这些screenshot来更新我们的半透明窗口,这些事情足以让用户无法安心工作。事实上,想要获取窗口之外的屏幕的变化几乎是不太可能的事,但多数变动都是发生在foreground窗口发生焦点变化或被移动之时。如果你接受这的观点(至少我接受这个观点),那么你可以只监控下面提到的几个事件,并只需在这几个事件被触发时,去更新screenshot。
public class TransparentBackground extends JComponent
implements ComponentListener, WindowFocusListener,
Runnable {
private JFrame frame;
private Image background;
private long lastupdate = 0;
public boolean refreshRequested = true;
public TransparentBackground(JFrame frame) {
this.frame = frame;
updateBackground( );
frame.addComponentListener(this);
frame.addWindowFocusListener(this);
new Thread(this).start( );
}
public void componentShown(ComponentEvent evt) { repaint( ); }
public void componentResized(ComponentEvent evt) { repaint( ); }
public void componentMoved(ComponentEvent evt) { repaint( ); }
public void componentHidden(ComponentEvent evt) { }
public void windowGainedFocus(WindowEvent evt) { refresh( ); }
public void windowLostFocus(WindowEvent evt) { refresh( ); }
首先,让我们的半透明窗口即panel实现ComponentListener接口,
WindowFocusListener接口和Runnable接口。Listener接口可以帮助我们捕获到窗口的移动,大小变化,和焦点变化。实现Runnable接口可以使得panel生成一个线程去控制定制的repaint()方法。
ComponentListener接口带有四个component开头的方法。它们都可以很方便地调用repaint()方法,所以窗口的背景也就可以随着窗口的移动,大小的变化而相应地更新。还有两个是焦点处理的,它们只调用refresh(),如下示意:
public void refresh( ) {
if(frame.isVisible( )) {
repaint( );
refreshRequested = true;
lastupdate = new Date( ).getTime( );
}
}
public void run( ) {
try {
while(true) {
Thread.sleep(250);
long now = new Date( ).getTime( );
if(refreshRequested &&
((now - lastupdate) > 1000)) {
if(frame.isVisible( )) {
Point location = frame.getLocation( );
frame.hide( );
updateBackground( );
frame.show( );
frame.setLocation(location);
refresh( );
}
lastupdate = now;
refreshRequested = false;
}
}
} catch (Exception ex) {
p(ex.toString( ));
ex.printStackTrace( );
}
}
refresh()可以保证frame可见,并适时得调用repaint()。它也会对refreshRequest变量置真(true),同时保存当前时间值,现在所做的这些对接下来要做的事是非常重要的铺垫。
除了每四分之一秒被唤醒一次,用来检测是否有新的刷新的要求或者是否离上次刷新时间超过了一秒,方法run()一般地处于休眠状态。如果离上次刷新超过了一秒并且frame是可见的,那么run()将保存frame的位置,隐藏frame,获取一个screenshot,更新frame背景,再根据隐藏frame时保存的位置信息,重新显示已经更新了背景的frame,接着调用refresh()方法。通过这样的控制,使得背景更新不至于比需要的多太多。
那么我们为什么要对用一个线程控制刷新如此长篇大论呢?一个词:递归。事件处理可以直接轻松地调用repaint(),但是隐藏和显示窗口已便于获取screenshot 却交替了很多“得焦”和“失焦”事件。所有这些都会触发一个新的背景更新,导致窗口再次被隐藏,如此往返,将导致永无止境的循环。一个新的“得焦”事件,将在执行refresh()几毫秒之后被调用,所以简单地检测isRecursing标志是无法阻止循环的继续。
另外,用户任意一个改变屏幕的动作,将会随之引出一堆的事件来,而不仅仅是简单一个。应该是最后一个事件去触发updateBackground(),而不是第一个。为了全面解决这些问题,代码产生一个线程,然后用这个线程去监控重画(repaint)要求,并保证当前的执行动作是发生在过去的1000毫秒内没有发生过此动作。如果一个客户每五秒不间断地产生事件(比如,寻找丢失的浏览窗口),那么只有在其它所有工作在一秒内完成才执行更新。这样就避免了,用户不至于在移动东西时,窗口却消失不见了的尴尬。
另一件烦恼的事就是,我们的窗口仍旧有边框,这条边框使得我们无法完美和背景融为一体。更为痛苦的是使用setUndecorated(true)移除边框时,我们的标题栏和窗口控制栏也跟着移除了。可是这也算不上是什么大问题,因为那类使用定形窗口的应用程序一般都具有可拖动的背景【Hack#34】
接下来,我们在下面这个简单的测试程序中把所讲的东西落实进去:
public static void main(String[] args) {
JFrame frame = new JFrame("Transparent Window");
frame.setUndecorated(true);
TransparentBackground bg = new TransparentBackground(frame);
bg.snapBackground( );
bg.setLayout(new BorderLayout( ));
JPanel panel = new JPanel( ) {
public void paintComponent(Graphics g) {
g.setColor(Color.blue);
Image img = new ImageIcon("mp3.png").getImage( );
g.drawImage(img,0,0,null);
}
};
panel.setOpaque(false);
bg.add("Center",panel);
frame.getContentPane( ).add("Center",bg);
frame.pack( );
frame.setSize(200,200);
frame.setLocation(500,500);
frame.show( );
}
这段代码通过继承JPanel,加上一个透明的PNG格式图片,人工生成一个mp3播放器界面。注意使用了setUndecorated()来隐藏边框和标题栏。调用setOpaque(false),将隐藏默认的背景(一般为灰色),这样screenshot的背景就可以和图片中透明的部分合成一个整体,去配合程序窗口周围的屏幕背景。(如图6-2)通过一系列的努力,就可以看到图6-3的效果。是不是很让人惊诧?会不会感叹Java的新版本腾空出世?
图 6-2. mp3 播放器外观模板
图 6-3. 运行中的mp3播放器
- 用java打造任意形状窗口和透明窗口
- [转]用java打造任意形状窗口和透明窗口
- java打造任意形状窗口和透明窗口
- Java创建透明与任意形状窗口
- Java创建透明与任意形状窗口
- JAVA打造透明效果的窗口
- 建立任意图片形状窗口的方法
- 透明窗口和窗口阴影
- Java 透明和不规则 Swing 窗口
- Java 透明和不规则 Swing 窗口
- java实现窗口透明
- Swing不规则窗口和窗口透明
- vc 实现透明窗口和不规则窗口
- 从位图文件生成任意形状的窗口
- 透明和不规则 Swing 窗口
- 透明和不规则 Swing 窗口
- 透明和不规则 Swing 窗口
- 透明和不规则 Swing 窗口
- sipX简介
- C#——Marshal.StructureToPtr方法简介
- Android Say Hello 3
- PHP入门笔试题
- JDBC操作DB2 Clob、Blob字段的Bug探究
- 用java打造任意形状窗口和透明窗口
- IMP 数据库版本不对引起的错误
- 正则表达示收藏
- dbcc
- 如何在运行时确定对象类型(RTTI)
- JAVA Logging API 学习笔记
- C#重点知识详细解说(一)
- Materpage嵌套
- 死亡


