Picasso入门教程(九)回调,remoteViews,通知
来源:互联网 发布:社交网络 肖恩帕克 编辑:程序博客网 时间:2024/06/15 07:22
关于Picasso的知识你已经学习了很多了。尽管如此,直到现在你也是只做了往ImageView中加载图片。你可能需要加载一张图片,但是这张图片不需要从ImageView中显示出来,或者你想学习关于cache的一些东西。
如果你对这些话题感兴趣,请继续阅读下去。
Callbacks and Targets
在我们研究回调之前,指出不同的加载图片的方式是非常有意义的。Picasso通常提供了同步加载和不同步加载。
Difference between fetch(), get() and Target
.fetch() 将会在后台线程异步加载图片,但是它既不会在ImageView中显示出来,也不会返回bitmap。这个方法知识会将图片保存到硬盘或者内存上。如果你不久之后就用这个图片,或者想要减少加载时间,你可以提前就将图片缓存起来。
.get() 方法同步加载图片并返回Bitmap 对象。请确保你没有在Ui线程里面使用.get() 方法。这将会阻塞UI!
除了使用.into() 这个方法,还有另一种方法:回调(callbacks)。 在Picasso中,这叫目标(Target)。
Use Target as Callback Mechanism
到目前为止,我们使用ImageView当做.into() 的参数。这并不是.into() 方法的所有功能。我们也可以通过实现Target interface来使用.into() 。
Picasso会像之前那样加载图片,但不是从ImageView中显示出来,而是返回Bitmap或者error。
让我们来看一个例子。
Picasso .with(context) .load(UsageExampleListViewAdapter.eatFoodyImages[0]) .into(target);有趣的事情是这里将会实现一个Target:
private Target target = new Target() { @Override public void onBitmapLoaded(Bitmap bitmap, Picasso.LoadedFrom from) { // loading of the bitmap was a success // TODO do some action with the bitmap } @Override public void onBitmapFailed(Drawable errorDrawable) { // loading of the bitmap failed // TODO do some action/warning/error message } @Override public void onPrepareLoad(Drawable placeHolderDrawable) { }};如果请求成功,回调将会拿到一个Bitmap和一个Picasso.LoadedFrom对象。这个时候,你可以使用Bitmap来做你想做的事情。
总之,无论你何时想要得到一个Bitmap,使用.get() 方法或者实现一个Target 。
Important: always declare the target implementation as a field, not anonymously! The garbage collector could otherwise destroy your target object and you’ll never get the bitmap.
Load Images to Custom Notifications with RemoteViews
另一个新的特性是将图片加载到RemoteViews上面。RemoteViews 是用来自定义通知布局或者widgets。
让我们来看一下使用RemoteViews自定义通知的例子。如果你对自定义通知很感兴趣,你可能知道如何创建一个通知。希望下面的代码对你来说并不陌生。
// create RemoteViewsfinal RemoteViews remoteViews = new RemoteViews(getPackageName(), R.layout.remoteview_notification);remoteViews.setImageViewResource(R.id.remoteview_notification_icon, R.mipmap.future_studio_launcher);remoteViews.setTextViewText(R.id.remoteview_notification_headline, "Headline");remoteViews.setTextViewText(R.id.remoteview_notification_short_message, "Short Message");remoteViews.setTextColor(R.id.remoteview_notification_headline, getResources().getColor(android.R.color.black));remoteViews.setTextColor(R.id.remoteview_notification_short_message, getResources().getColor(android.R.color.black));// build notificationNotificationCompat.Builder mBuilder = new NotificationCompat.Builder(UsageExampleTargetsAndRemoteViews.this) .setSmallIcon(R.mipmap.future_studio_launcher) .setContentTitle("Content Title") .setContentText("Content Text") .setContent(remoteViews) .setPriority(NotificationCompat.PRIORITY_MIN);final Notification notification = mBuilder.build();// set big content view for newer androidsif (android.os.Build.VERSION.SDK_INT >= 16) { notification.bigContentView = remoteViews;}NotificationManager mNotificationManager = (NotificationManager) this.getSystemService(Context.NOTIFICATION_SERVICE);mNotificationManager.notify(NOTIFICATION_ID, notification);上面的代码是自定义了一个通知。我们不需要详细解释他因为这不是我们教程的主要内容。真正有趣的是下面的:将image加载到ImageView中。
再一次声明,Picasso调用非常简单。和ImageView 相似,我们使用into() 这个方法传入RemoteViews 。然而,参数是不一样的:.into(android.widget.RemoteViews remoteViews, int viewId, int notificationId, android.app.Notification notification).
具体代码如下:
Picasso .with(UsageExampleTargetsAndRemoteViews.this) .load(UsageExampleListViewAdapter.eatFoodyImages[0]) .into(remoteViews, R.id.remoteview_notification_icon, NOTIFICATION_ID, notification);或许你不知道上面的参数都是什么意思。请再看一下之前写的代码,你就会中的参数都是代表什么意思。我们的运行结果如下: 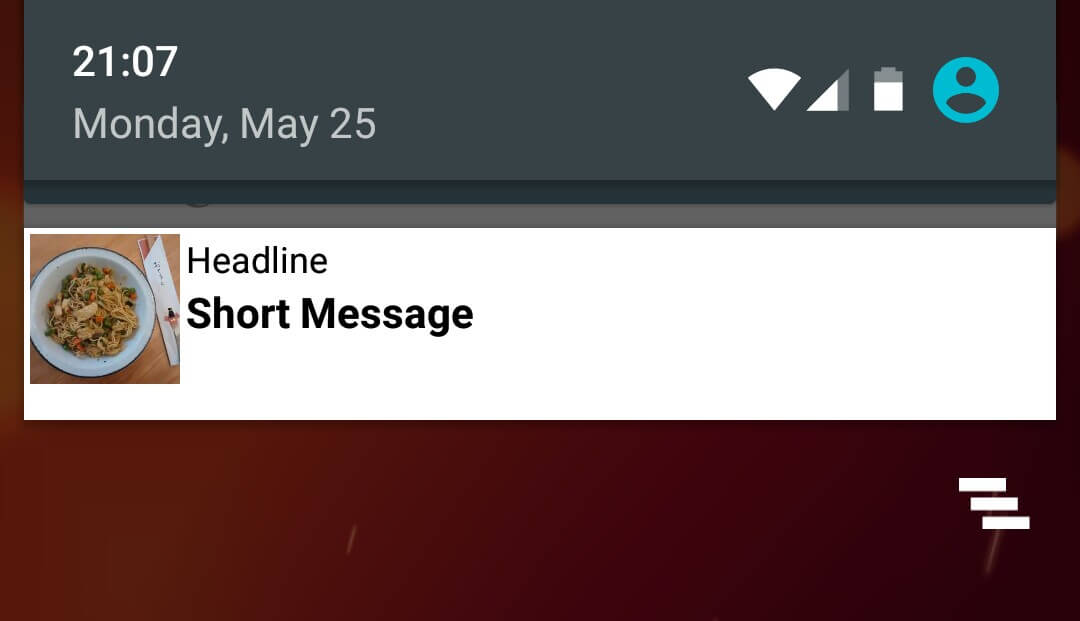
如果你想讲图片加载到一个Widgets中,使用.into()这个方法。具体参数如下:
into(android.widget.RemoteViews remoteViews, int viewId, int[] appWidgetIds).总结
在这篇博客中,你学习了下面几种加载图片的方法:
- 使用
.get()方法同步加载。 - 使用
.fetch()方法异步加载。 - 加载到
ImageView中。 - 加载到
Targets中 - 加载到
RemoteViews中。
在下一篇博客中,我们将会介绍两种重要的components:图片旋转和图片变化。
- Picasso入门教程(九)回调,remoteViews,通知
- 通知与 RemoteViews
- RemoteViews自定义通知栏
- 自定义通知Remoteviews踩坑
- Picasso入门教程(一)
- Picasso入门教程(二)
- Picasso入门教程(三)
- RemoteViews 实现简单自定义通知栏
- 使用RemoteViews自定义通知栏样式
- 使用RemoteViews自定义通知栏样式 Notification
- RemoteViews
- RemoteViews
- RemoteViews
- RemoteViews
- RemoteViews在桌面小部件和通知栏的使用
- RemoteViews在通知栏和小组件中的应用
- RemoteViews实现自定义通知栏结合BroadCastReceiver实现动态交互
- 通过remoteViews自定义Notification通知栏的布局
- 进程处理例子
- HIVE入门
- picasso的简单用法
- 为什么在项目中使用Using namespace CocosDenshion;会提示出错expected namespace namespace
- 背景建模--高斯混合模型
- Picasso入门教程(九)回调,remoteViews,通知
- 第十五周项目—阅读程序(3)
- Oracle ADF 11g后台常用方法(2)
- POJ3187——Backward Digit Sums
- SASS语法学习
- debian7 修改系统时间
- xml解析方式
- 手机软件项目管理7—三方应用导入流程
- (Math)矩阵求导