探索Android ConstraintLayout布局
来源:互联网 发布:网络语吊打是什么意思? 编辑:程序博客网 时间:2024/04/30 14:05
原文链接:https://medium.com/exploring-android/exploring-the-new-android-constraintlayout-eed37fe8d8f1#.r4tmej1ut
上周的Google I/O中,介绍了许多出色的Android相关的新闻。虽然我喜欢坐在这讨论所有发布的东西,但我们打算快速的浏览新的令人激动的Android ConstraintLayout。
为了更好地理解ConstraintLayout,我使用我的一个已存在的项目(Bourbon),并手工使用心得ConstraintLayout转化每个布局。可随时从github上检出项目!
配置
再开始之前,如果想试试新的ConstraintLayout,需要做一些事。
- 首先,需要从这里下载Android Studio 2.2预览版。
- 还需要从支持库添加ConstraintLayout的依赖。
compile 'com.android.support.constraint:constraint-layout:1.0.0-alpha1'齐活,你现在应该都准备好了!
那么,什么是ConstraintLayout呢?
Constraintlayout是功能强大的新类,可以想象一个在类固醇上的Relativelayout——对,这就是Constraintlayout。它允许我们使用‘约束’放置子视图来定义基于布局中不同视图之间的相对关系的位置。
ConstraintLayout的目标是帮助减少嵌套视图的数量,这样可以改善布局文件的性能。布局类还使得我们更加轻松的定义布局,相比使用RelativeLayout时,因为我们现在可以固定一个视图的任意一边与另一的视图的任何边,而不必将整个视图防止到另一个的任何边。
例如,相对布局的属性允许我们放置视图:
- layout_toRightOf
- ayout_toLeftOf
- layout_toTopOf
- layout_toBottomOf
然而,ConstraintLayout用于更多的特性:
- layout_constraintTop_toTopOf — 期望视图的上边对齐另一个视图的上边。
- layout_constraintTop_toBottomOf — 期望视图的上边对齐另一个视图的底边。
- layout_constraintTop_toLeftOf — 期望视图的上边对齐另一个视图的左边。
- layout_constraintTop_toRightOf — 期望视图的上边对齐另一个视图的右边。
- layout_constraintBottom_toTopOf — 期望视图的下边对齐另一个视图的上边。
- layout_constraintBottom_toBottomOf — 期望视图的底边对齐另一个视图的底边。
- layout_constraintBottom_toLeftOf — 期望视图的底边对齐另一个视图的左边。
- layout_constraintBottom_toRightOf — 期望视图的底边对齐另一个视图的右边。
- layout_constraintLeft_toTopOf — 期望视图的左边对齐另一个视图的上边。
- layout_constraintLeft_toBottomOf — 期望视图的左边对齐另一个视图的底边。
- layout_constraintLeft_toLeftOf — 期望视图的左边对齐另一个视图的左边。
- layout_constraintLeft_toRightOf — 期望视图的左边对齐另一个视图的右边。
- layout_constraintRight_toTopOf — 期望视图的右边对齐另一个视图的上边。
- layout_constraintRight_toBottomOf — 期望视图的右边对齐另一个视图的底边。
- layout_constraintRight_toLeftOf — 期望视图的右边对齐另一个视图的左边。
- layout_constraintRight_toRightOf — 期望视图的右边对齐另一个视图的右边。
- 如果需要,属性支持开始和结尾也可用在左和右对齐。
唷,很多属性,对吧?这些属性对于ConstraintLayout内视图的位置,提供了巨大的控制力。
注意:ConstraintLayout也向下兼容到API 9��
约束处理
约束本质上对视图定义的规则,规则声明视图的位置和屏幕上对齐方式。
调整大小处理
通过使用布局编辑器中的调整大小功能,我们可以改变选中视图的大小,调整视图大小并对新尺寸设置约束。 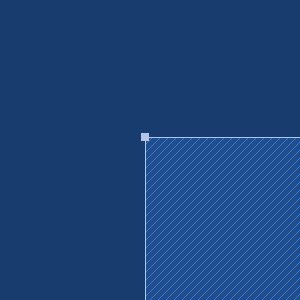
调整视图尺寸使用布局编辑器中的调整锚点将自动重算之前设置在视图上的约束。 
边约束处理
边界约束处理可用于指定布局内视图的位置。例如,通过预设定边界dp值,这些锚点可用于定义选择的视图总是显示在另一个视图的左边。 
可以在布局编辑器中,通过拖拽视图的锚点到另一个视图的边界来设置。 
或者在XML布局中设置期望的视图属性:
app:layout_constraintRight_toRightOf="@+id/text_like_count"基线约束处理
基线限制允许用在多textview的基线对齐,无论它们的文字大小。 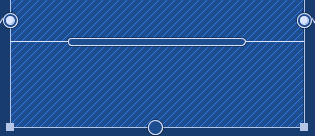
在布局编辑器中,通过托拖拽期望TextView的基线锚点到另一个TextView的基线来设置。 
或者在XML布局文件中设置期望的视图属性:
app:layout_constraintBaseline_toBaselineOf="@+id/text_title"注意:基线约束处理只能约束到另一个基线。
垂直偏移
这允许我们使用偏移量沿着垂直方向放置视图,这是相对于它的约束位置。 
我们可以使用布局编辑器(见下图)中的滑块或XML中的属性设置:
app:layout_constraintVertical_bias="0.5"水平偏移
这允许我们使用偏移量在水平方向放置视图,当然是相对于它的约束位置。 
我们可以使用布局编辑器(见下图)中的滑块或XML中的属性设置:
app:layout_constraintHorizontal_bias ="0.5"视图缩放
布局编辑器中的属性部分,你注意到有一部分显示了选择的视图实际的尺寸约束。
任意尺寸

这个方块区域里,你可以看到那些波浪线实际代表视图在布局中如何缩放。上面的线表明视图尺寸将遵守约束,意味着它将match_parent和使用可用的空间。
适配内容
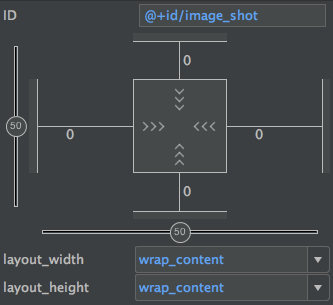
这些线现在表示视图的高和宽将适应视图的内容,也就是它只按需扩大。
固定尺寸
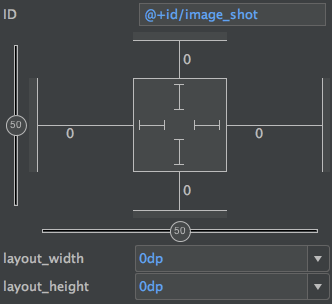
最后,这些线表示视图的宽和高是一个固定的尺寸,单位是dp。
自动连接
自动连接允许你把视图放置在布局编辑器中,并自动计算和设置视图的约束 —— 多么方便啊! 
使用自动连接: 
手动约束
如果你希望手动在布局编辑器中设置约束,可能会禁用自动连接。就个人而言,这使约束更加可控,并节省了删除约束的时间。 
为了使用手动约束,你需要禁用自动连接: 
推理
与自动连接的行为类似,推理可用于自动(且魔术的)创建布局中多个视图间的约束。区别于自动连接,推理计算设置布局文件中所有视图的约束,而不仅仅是选择的视图。 
删除约束
在布局编辑器中,你可以轻松的删除视图的约束。有两种方式。
单独限制
简单地点击希望被删除的约束的锚点,就可以去掉单独的限制了。 
所有约束
当选中视图时,一个小图标在左下角显示 - 点击这个图标将去掉视图被设置的所有约束。 
例子
来看看我的约束样例项目中的一个布局。这使Dribbble射击项目的布局,布局编辑器展示如下: 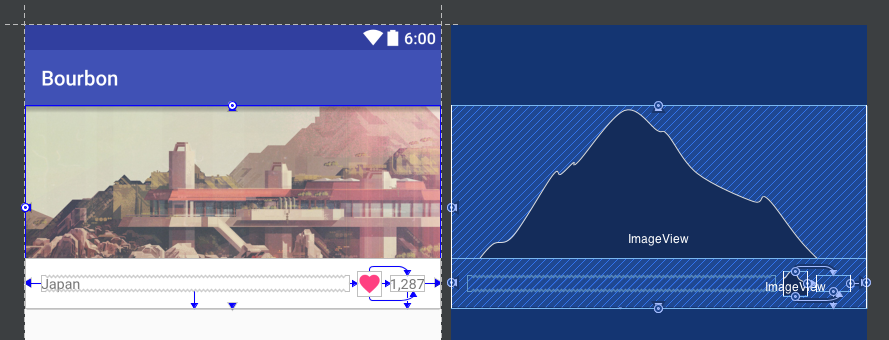
你可以看到已设置的约束,它们是:
- 视图顶部显示的图片有约束,它对其它的父容器的上下左右边。这样视图就放置在父容器的正中。
app:layout_constraintBottom_toBottomOf=”@+id/constraintLayout”app:layout_constraintEnd_toEndOf=”@+id/constraintLayout” app:layout_constraintStart_toStartOf=”@+id/constraintLayout” app:layout_constraintTop_toTopOf=”@+id/constraintLayout”- ‘Japan’文本视图与它容器的左边底边对齐,同时也与心形图片的左边对齐 - 这样保证它们不会重叠。
app:layout_constraintBottom_toBottomOf=”@+id/constraintLayout” app:layout_constraintEnd_toStartOf=”@+id/imageView” app:layout_constraintStart_toStartOf=”@+id/constraintLayout”- 心形计数文本视图对齐它容器的右边和底边,基本上与‘Japan’文本视图相反。
app:layout_constraintBottom_toBottomOf=”@+id/constraintLayout” app:layout_constraintEnd_toEndOf=”@+id/constraintLayout”- 最后,心形图片对齐心形计数文本视图的上边/底边,心形图片视图的右边对齐心形计数文本视图的左边。
app:layout_constraintBottom_toBottomOf=”@+id/text_like_count” app:layout_constraintEnd_toStartOf=”@+id/text_like_count” app:layout_constraintTop_toTopOf=”@+id/text_like_count”布局文件中,带约束的视图是这样的:
<?xml version="1.0" encoding="utf-8"?><android.support.constraint.ConstraintLayout xmlns:android="http://schemas.android.com/apk/res/android" xmlns:app="http://schemas.android.com/apk/res-auto" xmlns:tools="http://schemas.android.com/tools" android:id="@+id/constraintLayout" <!-- Other attributes --> > <ImageView android:id="@+id/image_shot" app:layout_constraintBottom_toBottomOf="@+id/constraintLayout" app:layout_constraintEnd_toEndOf="@+id/constraintLayout" app:layout_constraintStart_toStartOf="@+id/constraintLayout" app:layout_constraintTop_toTopOf="@+id/constraintLayout" <!-- Other attributes --> /> <View android:layout_width="match_parent" android:layout_height="50dp" android:background="@color/white" app:layout_constraintBottom_toBottomOf="@+id/constraintLayout" app:layout_constraintEnd_toEndOf="@+id/constraintLayout" app:layout_constraintStart_toStartOf="@+id/constraintLayout" <!-- Other attributes --> /> <TextView android:id="@+id/text_title" android:layout_width="0dp" android:layout_height="wrap_content" app:layout_constraintBottom_toBottomOf="@+id/constraintLayout" app:layout_constraintEnd_toStartOf="@+id/imageView" app:layout_constraintStart_toStartOf="@+id/constraintLayout" tools:text="Japan" <!-- Other attributes --> /> <TextView android:id="@+id/text_like_count" app:layout_constraintBottom_toBottomOf="@+id/constraintLayout" app:layout_constraintEnd_toEndOf="@+id/constraintLayout" tools:text="1,287" <!-- Other attributes --> /> <ImageView android:id="@+id/imageView" android:src="@drawable/ic_heart_accent_accent_24dp" app:layout_constraintBottom_toBottomOf="@+id/text_like_count" app:layout_constraintEnd_toStartOf="@+id/text_like_count" app:layout_constraintTop_toTopOf="@+id/text_like_count" <!-- Other attributes --> /></android.support.constraint.ConstraintLayout>从这个简单的例子,我们可以看到ConstraintLayout提供的可能性。你可以在这些布局文件中看到更多约束的使用,Browse Fragment Layout, Shot Fragment Layout, Comment Item Layout和Shot Item Layout。
为什么不使用ConstraintLayout重新实现一些已存在的布局呢?
结束
文中,我们快速浏览了新的ConstraintLayout布局,它的能力和如何在我们的应用中使用它创建更高效的布局。记住,这个布局还处于alpha阶段,我不确信可在生产环境中使用它 - 但是,请务必试试它,当它还处在野生状态!这仅仅是一个简短的帖子,所以请一定要开始自己尝试一下:)
我很乐意看到,如果/在哪使用了ConstraintLayout布局,请给我来一推或有什么分享的(或者问题)也来个回复。
- 探索Android ConstraintLayout布局
- Android ConstraintLayout 约束布局
- Android ConstraintLayout约束布局
- Android中ConstraintLayout布局
- Android ConstraintLayout 约束布局
- Android约束布局ConstraintLayout
- Android ConstraintLayout布局详解
- Android ConstraintLayout布局详解
- Android ConstraintLayout 约束布局
- Android新布局-ConstraintLayout详解
- Android基础布局之ConstraintLayout
- Android ConstraintLayout布局的使用
- Android studio约束布局 ConstraintLayout
- Android ConstraintLayout 约束布局详解
- Android新布局-ConstraintLayout详解
- android ConstraintLayout约束布局详解
- Android开发之ConstraintLayout布局
- 【Android布局】ConstraintLayout 完全解析
- 一个老鸟发的公司内部整理的 Android 学习路线图
- Storm的体系结构介绍以及Storm入门案例
- Android app性能优化解决卡慢顿之布局优化
- 微信开发中访问微信接口限制次数的问题
- ScrollView、viewPage滑动冲突
- 探索Android ConstraintLayout布局
- Linux配置估计ip
- 采用commons-configuration包实现属性文件读取的工具类
- 105. Construct Binary Tree from Preorder and Ignorer Traversal【M】【35】【再来一遍】
- PC端移动端兼容响应式布局页面的制作
- 去掉web显示页的广告
- 【Linux】eclipse+jdk+tomcat---安装说明文档
- ps cc下载地址及破解教程
- 唯品会大规模 Redis Cluster 的生产实践