【Android】直播必备之YUV使用总结 —— 常用的几种格式:NV21/NV12/YV12/YUV420P的区别
来源:互联网 发布:8051单片机引脚图 编辑:程序博客网 时间:2024/05/17 22:41
因工作方面接触到图像处理这一块,需要对手机摄像头采集的原始帧做Rotate或者Scale,但无奈对此的了解少之又少,于是网上搜了一顿,完事后将最近所学总结一下,以方便之后的人别踩太多坑。
首先想要了解YUV为何物:请猛戳我
上面的链接中微软已经写的很详细了,国内大部分文章都是翻译这篇文章的,如果还有疑问的同学可以参考下面这些大神的博客:
- 最简单的基于FFmpeg的libswscale的示例(YUV转RGB)
- 图文详解YUV420数据格式
- ANDROID 高性能图形处理
- Android摄像头开发:实时摄像头视频预览帧的编码问题(二)
看完上面的文章应该都会有所了解和认识了,因为在Android SDK <= 20(Android5.0)中Google支持的Camera Preview Callback的YUV常用格式有两种:NV21 / YV12,在此针对这两种格式做分析。
NV21:
引用一段微软的叙述:
4:2:0 Formats, 12 Bits per Pixel
Four 4:2:0 12-bpp formats are recommended, with the following FOURCC codes:
- IMC2
- IMC4
- YV12
- NV12
In all of these formats, the chroma channels are subsampled by a factor of two in both the horizontal and vertical dimensions.
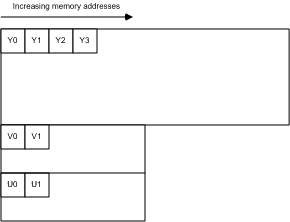
YV12
All of the Y samples appear first in memory as an array of unsigned char values.This array is followed immediately by all of the V (Cr) samples. The stride of the V plane is half the stride of the Y plane, and the V plane contains half as many lines as the Y plane. The V plane is followed immediately by all of the U (Cb) samples, with the same stride and number of lines as the V plane (Figure 12).
Figure 12:
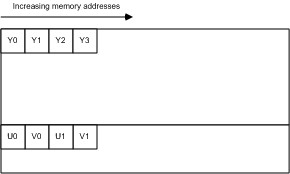
NV12
All of the Y samples are found first in memory as an array of unsigned char values with an even number of lines.The Y plane is followed immediately by an array of unsigned char values that contains packed U (Cb) and V (Cr) samples, as shown in Figure 13. When the combined U-V array is addressed as an array of little-endian WORD values, the LSBs contain the U values, and the MSBs contain the V values. NV12 is the preferred 4:2:0 pixel format for DirectX VA. It is expected to be an intermediate-term requirement for DirectX VA accelerators supporting 4:2:0 video.
Figure 13:
从上可知YV12和NV12所占内存是12bits/Pixel,因为每个Y就是一个像素点,注意着色加粗的叙述,YUV值在内存中是按照数组的形式存放的,而由于YV12和NV21都是属于planar格式,也就是Y值和UV值是独立采样的:
In a planar format, the Y, U, and V components are stored as three separate planes.
既然Y、U、V值都是独立的,那就意味着我们可以分别处理相应的值,比如在YV12中,排列方式是这样的,每4个Y共用一对UV值,而U、V值又是按照如下格式排列
下面是YV12格式中宽为16,高为4像素的排列
既然知道了YUV值的结构,我们就可以任性的对此图像做Rotate,scale等等。这里我以480x270 (16:9)的一张原始帧图像举例,贴出部分代码示例:
任意设定的一个带有onPreviewFrame的类,CameraPreviewFrame.java:
/** * 获取preview的原始帧: * * 这里有个前提,因为Android camera preview默认格式为NV21的,所以需要 * 调用setPreviewFormat()方法设置为我们需要的格式 * */@Overridepublic void onPreviewFrame(byte[] data, Camera camera) {// 假设这里的data为480x270原始帧 String SRC_FRAME_WIDTH = 480; String SRC_FRAME_HEIGHT = 270; String DES_FRAME_WIDTH = 480; String DES_FRAME_HEIGHT = 270; // 此处将data数组保存在了指定的路径,保存类型为jpeg格式,但是普通的图片浏 // 览器是无法打开的,需要使用RawView等专业的工具打开。 saveImageData(data); // 定义与原始帧大小一样的outputData,因为YUV420所占内存是12Bits/Pixel, // 每个Y为一个像素8bit=1Byte,U=2bit=1/4(Byte),V=2bit=1/4(Byte), // Y值数量为480*270,则U=V=480*270*(1/4) byte[] outputData = new byte[DES_FRAME_WIDTH * DES_FRAME_HEIGHT * 3 / 2]; // call the JNI method to rotate frame data clockwise 90 degrees YuvUtil.DealYV12(data, outputData, SRC_FRAME_WIDTH, SRC_FRAME_HEIGHT, 90); saveImageData(outputData); }} // save image to sdcard path: Pictures/MyTestImage/public void saveImageData(byte[] imageData) { File imageFile = getOutputMediaFile(MEDIA_TYPE_IMAGE); if (imageFile == null) { return; } try { FileOutputStream fos = new FileOutputStream(imageFile); fos.write(imageData); fos.close(); } catch (FileNotFoundException e) { e.printStackTrace(); Log.e(TAG, "File not found: " + e.getMessage()); } catch (IOException e) { e.printStackTrace(); Log.e(TAG, "Error accessing file: " + e.getMessage()); } }public static File getOutputMediaFile(int type) { File imageFileDir = new File(Environment.getExternalStoragePublicDirectory(Environment.DIRECTORY_PICTURES), "MyTestImage"); if (!imageFileDir.exists()) { if (!imageFileDir.mkdirs()) { Log.e(TAG, "can't makedir for imagefile"); return null; } } // Create a media file name String timeStamp = new SimpleDateFormat("yyyyMMdd_HHmmss").format(new Date()); File imageFile; if (type == MEDIA_TYPE_IMAGE) { imageFile = new File(imageFileDir.getPath() + File.separator + "IMG_" + timeStamp + ".jpg"); } else if (type == MEDIA_TYPE_VIDEO) { imageFile = new File(imageFileDir.getPath() + File.separator + "VID_" + timeStamp + ".mp4"); } else { return null; } return imageFile;}上面的代码中可以看到调用了JNI的方法:YuvUtil.RotateYV12()
public class YuvUtil { // 初始化,为data分配相应大小的内存 public static native void initYV12(int length, int scale_length); public static native void DealYV12(byte[] src_data, byte[] dst_data, int width, int height, int rotation);}com_example_jni_YuvUtil.h
/* DO NOT EDIT THIS FILE - it is machine generated */ #include <jni.h>/* Header for class _Included_com_example_jni_YuvUtil */ #ifndef _Included_com_example_jni_YuvUtil #define _Included_com_example_jni_YuvUtil #ifdef __cplusplusextern "C" { #endif/* * Class: com_example_jni_YuvUtil * Method: initYV12 * Signature: (II)V */JNIEXPORT void JNICALL Java_com_example_jni_YuvUtil_initYV12 (JNIEnv *, jclass, jint, jint);/* * Class: com_example_jni_YuvUtil * Method: DealYV12 * Signature: ([B[BIIIII)V */JNIEXPORT void JNICALL Java_com_example_jni_YuvUtil_DealYV12 (JNIEnv *, jclass, jbyteArray, jbyteArray, jint, jint, jint, jint, jint); #ifdef __cplusplus} #endif #endifcom_example_jni_YuvUtil.c
#include "com_example_jni_YuvUtil.h" #include <android/log.h> #include <string.h> #include <jni.h> #include <stdlib.h> #define TAG "jni-log-jni" // 这个是自定义的LOG的标识 #define LOGD(...) __android_log_print(ANDROID_LOG_DEBUG,TAG ,__VA_ARGS__) // 定义LOGD类型 #define LOGI(...) __android_log_print(ANDROID_LOG_INFO,TAG ,__VA_ARGS__) // 定义LOGI类型 #define LOGW(...) __android_log_print(ANDROID_LOG_WARN,TAG ,__VA_ARGS__) // 定义LOGW类型 #define LOGE(...) __android_log_print(ANDROID_LOG_ERROR,TAG ,__VA_ARGS__) // 定义LOGE类型 #define LOGF(...) __android_log_print(ANDROID_LOG_FATAL,TAG ,__VA_ARGS__) // 定义LOGF类型char *input_src_data, *output_src_data, *src_y_data, *src_u_data, *src_v_data, *dst_y_data, *dst_v_data;int src_data_width, src_data_height, len_src;/* * Class: com_example_jni_YuvUtil */JNIEXPORT void JNICALL Java_com_example_jni_YuvUtil_initYV12(JNIEnv *env, jclass jcls, jint length, jint scaleDataLength) {len_src = length;len_scale = scaleDataLength;LOGD("########## len_src = %d, len_scale = %d \n", len_src, len_scale);input_src_data = malloc(sizeof(char) * len_src);LOGD("########## input_src_data = %d \n", input_src_data);src_y_data = malloc(sizeof(char) * (len_src * 2 / 3));src_u_data = malloc(sizeof(char) * (len_src / 6));src_v_data = malloc(sizeof(char) * (len_src / 6));dst_y_data = malloc(sizeof(char) * (len_src * 2 / 3));dst_u_data = malloc(sizeof(char) * (len_src / 6));dst_v_data = malloc(sizeof(char) * (len_src / 6));}JNIEXPORT void JNICALL Java_com_example_jni_YuvUtil_DealYV12(JNIEnv *env, jclass jcls, jbyteArray src_data, jbyteArray dst_data, jint width, jint height, jint rotation, jint dst_width, jint dst_height) {src_data_width = width;src_data_height = height;// 将src_data的数据传给input_src_data(*env)->GetByteArrayRegion (env, src_data, 0, len_src, (jbyte*)(input_src_data));/*以下三个memcpy分别将Y、U、V值从src_data中提取出来,将YUV值分别scale或者rotate,则可得到对应格式的图像数据*/// get y planememcpy(src_y_data, input_src_data , (len_src * 2 /3));// get u planememcpy(src_u_data, input_src_data + (len_src * 2 / 3), len_src / 6);// get v planememcpy(src_v_data, input_src_data + (len_src * 5 / 6 ), len_src / 6);/*获取yuv三个值的数据可以做相应操作*/// ......... // .........// 例:将Y值置为0,则得到没有灰度的图像;memset(input_src_data + src_data_width * src_data_height, 0, src_data_width * src_data_height);// 将input_src_data的数据返回给dst_data输出// output to the dst_data(*env)->SetByteArrayRegion (env, dst_data, 0, len_src, (jbyte*)(input_src_data));}/** * free memory */JNIEXPORT void JNICALL Java_com_example_jni_YuvUtil_ReleaseYV12(JNIEnv *env , jclass jcls) {free(output_src_data);free(input_src_data);}注意:以上代码不是完全的,只是用于说明而已,如果需要更多的操作还请各位朋友自己完善,因为没怎么写过这类博客代码很乱,如有表述的不清楚和有问题的地方,大家可以给我留言。
- 【Android】直播必备之YUV使用总结 —— 常用的几种格式:NV21/NV12/YV12/YUV420P的区别
- Android直播必备之YUV使用总结 —— Android常用的几种格式:NV21/NV12/YV12/YUV420P的区别
- 【Android】YUV使用总结 —— Android常用的几种格式:NV21/NV12/YV12/YUV420P的区别
- YUV使用总结 —— Android常用的几种格式:NV21/NV12/YV12/YUV420P的区别
- Android YUV使用总结之Android常用的几种格式:NV21/NV12/YV12/YUV420P的区别
- Android libyuv应用系列(一)Android常用的几种格式:NV21/NV12/YV12/YUV420P的区别
- YUV格式学习:YUV420P、YV12、NV12、NV21格式转换成RGB24
- YUV格式学习:YUV420P、YV12、NV12、NV21格式转换成RGB24
- NV12与YV12,YUV的主要格式
- NV12 和 NV21的区别
- yuv中yv12与nv12的转换
- YV12,I420,YUV420P的区别
- YV12,I420,YUV420P的区别 .
- YV12,I420,YUV420P的区别
- YV12、I420、YUV420P的区别
- YV12,I420,YUV420P的区别
- YV12,I420,YUV420P的区别
- YV12,I420,YUV420P的区别
- memcpy的用法总结
- C++面向对象基础知识详解二
- Add Two Numbers
- Range Sum Query - Javacript
- 一念永恒 > 第三十章 来吧!
- 【Android】直播必备之YUV使用总结 —— 常用的几种格式:NV21/NV12/YV12/YUV420P的区别
- 一念永恒 > 第二十八章 压力才是动力
- 十六周阅读程序
- 哈夫曼算法原理
- 用两个栈实现一个队列
- Java线程之join()
- JPEG压缩原理
- android studio 中好用的插件————你值的拥有
- 剑指offer(29)-把数组排成最小的数