rsync+inotify-tools实时同步模式
来源:互联网 发布:开源 php客服系统源码 编辑:程序博客网 时间:2024/05/05 11:39
关于rsync+inotify-tools实时同步模式
介绍同步模式
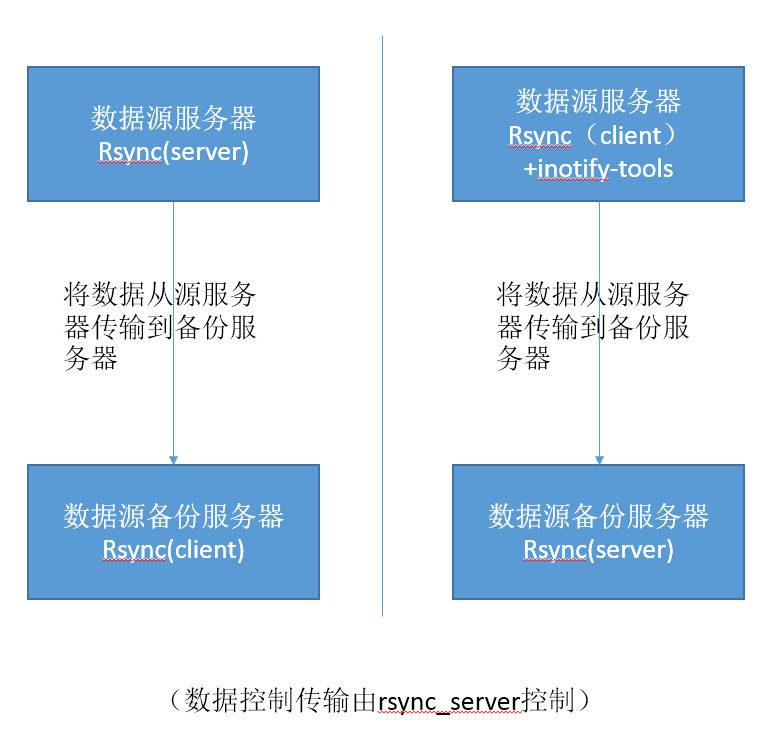
- 左边是原来的,一般的rsync的cs架构(client & server)同步模式,数据源服务器上安装rsync server,由server统一控制可以传输的数据的内容,例如权限,目录,文件数等,发起传输的是rsync client,即看起来就是将数据从源服务器拉取到备份服务器。
- 右边的是加上inotify-tools的同步模式,在数据源服务器上安装rsync client,在备份源服务器上安装rsync server,也是由server统一控制传输的数据内容,但是这里是数据源服务器作为了client端,因为发起传输的是rsync client,所以这里看起来就是将数据从源服务器推送到备份服务器。
- 从逻辑上cs的架构 c 和 s 变成了相反位置,但是传输的模式依然是从 s 传输到 c 。
- 数据源服务器ip暂定为10.111.111.112 ,数据备份服务器ip暂定为10.111.111.111。
- 我需要做同步的目录是/app/www/uploads,源服务器和备份服务器都存在,并且路径相同,权限也一致(权限一致是非常重要的,因为同步数据涉及到权限,而因为我不是使用root进行同步,所以要确保传输双方的权限是可写或者可读才行)
- 操作系统是centos 6.5 x64
开始配置
在数据源服务器上安装rsync client 和inotify-tools
yum -y install rsync inotify-tools
Loaded plugins: securitySetting up Install ProcessResolving Dependencies--> Running transaction check---> Package inotify-tools.i686 0:3.14-1.el6 will be installed---> Package rsync.i686 0:3.0.6-9.el6_4.1 will be updated---> Package rsync.i686 0:3.0.6-12.el6 will be an update--> Finished Dependency ResolutionDependencies Resolved============================================================================================================================================================================================================================================= Package Arch Version RepositorySize=============================================================================================================================================================================================================================================Installing: inotify-tools i686 3.14-1.el6epel 45 kUpdating: rsync i686 3.0.6-12.el6 base 329 kTransaction Summary=============================================================================================================================================================================================================================================Install 1 Package(s)Upgrade 1 Package(s)Total download size: 375 kDownloading Packages:(1/2): inotify-tools-3.14-1.el6.i686.rpm | 45 kB 00:00 (2/2): rsync-3.0.6-12.el6.i686.rpm| 329 kB 00:00 ---------------------------------------------------------------------------------------------------------------------------------------------------------------------------------------------------------------------------------------------Total509 kB/s | 375 kB 00:00 Running rpm_check_debugRunning Transaction TestTransaction Test SucceededRunning Transaction Updating : rsync-3.0.6-12.el6.i686 1/3 Installing : inotify-tools-3.14-1.el6.i686 2/3 Cleanup: rsync-3.0.6-9.el6_4.1.i6863/3 Verifying : inotify-tools-3.14-1.el6.i686 1/3 Verifying : rsync-3.0.6-12.el6.i686 2/3 Verifying : rsync-3.0.6-9.el6_4.1.i6863/3 Installed: inotify-tools.i686 0:3.14-1.el6Updated: rsync.i686 0:3.0.6-12.el6 Complete!rsync client和server是同一个软件,而inotify是linux 内核2.6以上才有的特性。
创建rsync client 和inotify 合体脚本
mkdir /app/rsync
vi /app/rsync/rsync_do.sh
#!/bin/bashsrc='/app/www/Uploads/'passwordfile='/app/rsync/rsync.passwd'user='www'host='10.111.111.111'rsync_module='uploads'/usr/bin/inotifywait -mrq --timefmt '%d/%m/%y %H:%M' --format '%T %w %f' -e modify,delete,create,attrib ${src} | while read DATE TIME DIR filedo/usr/bin/rsync -vzrtopg --delete --progress ${src} ${user}@${host}::${rsync_module} --password-file=${passwordfile}echo "${file} was rsynced at ${DATE}_${TIME} in ${DIR}" >> /var/log/rsync.log 2>&1done1.inotifywait 是inotify的命令工具
2.rsync的src目录需要注意,源目录也跟rsync一样,对于文件夹是区分有/和没有/的
3.需要注意rsync的同步的模块名字要匹配
4.inotifywait命令可以监听操作,输出信息,并且是一直输出,所以跟read 搭配起来,将inotifywait的输出通过read捕获到变量
强制记录了同步日志输出到/var/log/rsync.log5.--delete参数需要注意,这个会删除源目录没有的东西,所以在没有确定和测试好脚本之前可以先暂时不加这个参数
6.脚本中的rsync解析出来就是/usr/bin/rsync -vzrtopg --delete --progress /app/www/uploads/ www@10.111.111.111::uploads --password-file=/app/rsync/rsync.passwd, 同步的目录是/app/www/uploads/,使用www这个用户进行同步,目标服务器是10.111.111.111,rsync的模块是uploads,这样就可以将源服务器的/app/www/uploads/下的所有数据(uploads目录本身)同步到备份服务器的/app/www/uploads/上,有delete参数,保持源和备份一致。
需要创建/app/rsync/rsync.passwd
echo "123456" > /app/rsync/rsync.passwd这里只需要写密码就好了,因为账号已经在命令行指明了。
nohup运行作为监听服务
nohup /app/rsync/rsync_do.sh & 使用nohup + & 运行是为了将程序放置在后台运行,主要是为了忽略系统发出的hangup信号而导致关闭
在数据备份服务器上安装rsync服务端
yum install rsync默认安装后,在/etc目录下,并不存在rsyncd目录,需要手动创建配置文件目录
mkdir /etc/rsyncd
但是因为我想将所有配置文件放在特定的目录,所以我创建了自己的目录和rsync server的配置文件rsync.conf
mkdir /app/rsync
vi /app/rsync/rsync.conf
uid = rootgid = rootuse chroot = nomax connections = 3timeout = 800pid file = /var/run/rsyncd.pidlockfile = /var/run/rsyncd.locklog file = /var/log/rsyncd.log[uploads]path = /app/www/Uploadsignore errors = yeshosts allow = 10.111.111.112hosts deny = *read only = nowrite only = nolist = yesuid = wwwgid = wwwauth users = wwwsecrets file = /app/rsync/rsync.passwd创建secrets file验证文件,并且设置权限为600
echo "www:123456" > /app/rsync/rsync.passwdchmod 600 /app/rsync/rsync.passwd这个验证文件需要账号和密码,用冒号分隔开,用来给客户端client验证使用的。
运行demon模式
rsync --daemon --config=/app/rsync/rsync.confdaemon 模式可以保持进程一直运行而不被系统强制关闭,可能会有系统信号hangup影响。
科普时间:
1.rsync
与传统的 cp、tar 备份方式相比,rsync 具有安全性高、备份迅速、支持增量备份等优点,通过 rsync 可以解决对实时性要求不高的数据备份需求,例如定期的备份文件服务器数据到远端服务器,对本地磁盘定期做数据镜像等,随着应用系统规模的不断扩大,对数据的安全性和可靠性也提出的更好的要求,rsync 在高端业务系统中也逐渐暴露出了很多不足,首先,rsync 同步数据时,需要扫描所有文件后进行比对,进行差量传输。如果文件数量达到了百万甚至千万量级,扫描所有文件将是非常耗时的。而且正在发生变化的往往是其中很少的一部分,这是非常低效的方式。其次,rsync 不能实时的去监测、同步数据,虽然它可以通过 linux 守护进程的方式进行触发同步,但是两次触发动作一定会有时间差,这样就导致了服务端和客户端数据可能出现不一致,无法在应用故障时完全的恢复数据。基于以上原因,rsync+inotify 组合出现了!
2.inotify
Inotify 是一种强大的、细粒度的、异步的文件系统事件监控机制,linux 内核从 2.6.13 起,加入了 Inotify支持,通过 Inotify 可以监控文件系统中添加、删除,修改、移动等各种细微事件,利用这个内核接口,第三方软件就可以监控文件系统下文件的各种变化情况,而 inotify-tools 就是这样的一个第三方软件。 在上面章节中,我们讲到,rsync 可以实现触发式的文件同步,但是通过 crontab 守护进程方式进行触发,同步的数据和实际数据会有差异,而 inotify 可以监控文件系统的各种变化,当文件有任何变动时,就触发rsync 同步,这样刚好解决了同步数据的实时性问题。
3.rsync.conf的配置解释
uid = root # rsync server 的进程运行用户gid = root # rsync server 的进程运行用户组use chroot = no #不打开chrootmax connections = 3 #最大rsync连接数timeout = 800 #超时时间pid file = /var/run/rsyncd.pid #进程号会写进去lockfile = /var/run/rsyncd.lock log file = /var/log/rsyncd.log #同步日志[uploads] #rsync同步模块名字,在同步的时候会使用模块名字而不是具体目录名字,名字可自定义path = /app/www/Uploads #同步目录的路径ignore errors = yes #是否忽略错误hosts allow = 10.111.111.112 #只允许某ip同步,多个ip用逗号分隔hosts deny = * #不允许其他ip同步read only = no #不只读write only = no #不只写list = yes #允许列出模块里的内容uid = www #同步目录的所属用户gid = www #同步目录的所属组auth users = www #同步验证的账号secrets file = /app/rsync/rsync.passwd #同步验证的验证配置文件4.rsync命令
a) rsync -av --progress <src-dir>/ <dst-dir> *** 注意(/) ***b) rsync -av --progress <src-dir> <dst-dir>c) rsync -avu --progress --delete <src-dir>/ <dst-dir>d) rsync -av --progress --temp-dir=/tmp <src-dir>/ <dst-dir>命令说明---------a) 同步src-dir目录下所有文件到dst-dir目录下b) 同步src-dir目录下所有文件到dst-dir/src-dir目录下c) 对src-dir目录内容向dst-dir目录下进行差异更新,有增加/更新则添加替换,有减少则对其删减d) 比a)多了--temp-dir=/tmp,即指定/tmp为临时交换区,这样可以避免因目标目录空间不够引起的无法同步文件的错误。 对应于以上六种命令格式,rsync有六种不同的工作模式: 1)拷贝本地文件。当SRC和DES路径信息都不包含有单个冒号":"分隔符时就启动这种工作模式。如:rsync -a /data /backup 2)使用一个远程shell程序(如rsh、ssh)来实现将本地机器的内容拷贝到远程机器。当DST路径地址包含单个冒号":"分隔符时启动该模式。如:rsync -avz *.c foo:src 3)使用一个远程shell程序(如rsh、ssh)来实现将远程机器的内容拷贝到本地机器。当SRC地址路径包含单个冒号":"分隔符时启动该模式。如:rsync -avz foo:src/bar /data 4)从远程rsync服务器中拷贝文件到本地机。当SRC路径信息包含"::"分隔符时启动该模式。如:rsync -av root@172.16.78.192::www /databack 5)从本地机器拷贝文件到远程rsync服务器中。当DST路径信息包含"::"分隔符时启动该模式。如:rsync -av /databack root@172.16.78.192::www6)列远程机的文件列表。这类似于rsync传输,不过只要在命令中省略掉本地机信息即可。如:rsync -v rsync://172.16.78.192/www参数
--progress 显示备份过程--delete 删除那些DST中SRC没有的文件-z, --compress 对备份的文件在传输时进行压缩处理-v, ––verbose 详细输出模式-r, ––recursive 对子目录以递归模式处理-t, ––times 保持文件时间信息-o, ––owner 保持文件属主信息-g, ––group 保持文件属组信息-p 保持权限信息5.inotifywait
-m, --monitor 监视模式,保持一直监视状态,不退出,可以保持一直输出数据-r, --recursive 目录递归-e <event>, --event <event> 事件,事件内容可以是创建,修改等等,参看官网Listen for specific event(s) only. The events which can be listened for are listed in the EVENTS section. This option can be specified more than once. If omitted, all events are listened for.-q, --quiet 安静模式,减少不必要的输出If specified once, the program will be less verbose. Specifically, it will not state when it has completed establishing all inotify watches.--timefmt <fmt> 时间格式Set a time format string as accepted by strftime(3) for use with the '%T' conversion in the --format option.--format <fmt> 日志格式Output in a user-specified format, using printf-like syntax. The event strings output are limited to around 4000 characters and will be truncated to this length. The following conversions are supported:%wThis will be replaced with the name of the Watched file on which an event occurred.%fWhen an event occurs within a directory, this will be replaced with the name of the File which caused the event to occur. Otherwise, this will be replaced with an empty string.%eReplaced with the Event(s) which occurred, comma-separated.%XeReplaced with the Event(s) which occurred, separated by whichever character is in the place of 'X'.%TReplaced with the current Time in the format specified by the --timefmt option, which should be a format string suitable for passing to strftime(3).troubleshooting
问题一:@ERROR: chroot failedrsync error: error starting client-server protocol (code 5) at main.c(1522) [receiver=3.0.3]原因:服务器端的目录不存在或无权限。创建目录并修正权限可解决问题。问题二:@ERROR: auth failed on module teersync error: error starting client-server protocol (code 5) at main.c(1522) [receiver=3.0.3]原因:服务器端该模块(tee)需要验证用户名密码,但客户端没有提供正确的用户名密码,认证失败。提供正确的用户名密码解决此问题。问题三:@ERROR: Unknown module ‘tee_nonexists’rsync error: error starting client-server protocol (code 5) at main.c(1522) [receiver=3.0.3]原因:服务器不存在指定模块。提供正确的模块名或在服务器端修改成你要的模块以解决问题。问题四:password file must not be other-accessiblecontinuing without password filePassword:原因:这是因为rsyncd.pwd rsyncd.secrets的权限不对,应该设置为600。如:chmod 600 rsyncd.pwd问题五:rsync: failed to connect to 218.107.243.2: No route to host (113)rsync error: error in socket IO (code 10) at clientserver.c(104) [receiver=2.6.9]原因:对方没开机、防火墙阻挡、通过的网络上有防火墙阻挡,都有可能。关闭防火墙,其实就是把tcp udp的873端口打开。问题六:rsync error: error starting client-server protocol (code 5) at main.c(1524) [Receiver=3.0.7]原因:/etc/rsyncd.conf配置文件内容有错误。请正确核对配置文件。问题七:rsync: chown "" failed: Invalid argument (22)原因:权限无法复制。去掉同步权限的参数即可。(这种情况多见于Linux向Windows的时候) 问题八:@ERROR: daemon security issue -- contact adminrsync error: error starting client-server protocol (code 5) at main.c(1530) [sender=3.0.6]原因:同步的目录里面有软连接文件,需要服务器端的/etc/rsyncd.conf打开use chroot = yes。掠过软连接文件。参考:
1.http://linux.die.net/man/1/inotifywait
2.http://www.ibm.com/developerworks/cn/linux/l-ubuntu-inotify/index.html
3.http://loveyan.blog.51cto.com/829079/713816
- rsync+inotify-tools实时同步模式
- rsync实时同步(搭配inotify-tools)
- rsync inotify 实时同步
- rsync+inotify实时同步
- rsync+ inotify实时同步
- Rsync+Inotify实时同步
- rsync+inotify实时同步
- rsync+inotify实时同步
- Rsync+inotify 实时同步
- Linux下Rsync+Inotify-tools实现数据实时同步
- Linux下Rsync+Inotify-tools实现数据实时同步
- Linux下Rsync+Inotify-tools实现数据实时同步
- Linux下Rsync+Inotify-tools实现数据实时同步
- Linux下Rsync+Inotify-tools实现数据实时同步
- 【实时文件同步】rsync+inotify-tools的安装与配置
- Linux下Rsync+Inotify-tools实现数据实时同步
- 使用rsync+inotify-tools+ssh实现文件实时同步
- 使用rsync+inotify-tools+ssh实现文件实时同步
- 使用Glide模仿微信图片加载策略
- 装饰器模式
- hadoop 用MR实现join操作
- ORACLE-数据抽取及备份
- C语言函数调用过程
- rsync+inotify-tools实时同步模式
- LaTex 符号
- js form对象的三种获取方式
- 给Qt生成的exe执行程序添加版本信息
- DirectX 因素:了解 XAudio2 中的筛选器
- ViewPager的使用(实现微信左右切换页卡功能)
- 华为OJ 初级:合并表记录
- 2016.7.8模拟赛总结
- android studio adb 端口被占用http://blog.csdn.net/u012005313/article/details/46964167