从钢铁侠看Decorator 装饰者模式
来源:互联网 发布:咋样激活免费网络通信 编辑:程序博客网 时间:2024/04/29 05:35
整理自上周组内分享
注:发布之后发现竟然标点符号会自动没了 !!! 什么鬼~~
1、装饰模式
设计模式大家都有了解,网上有很多系列教程,比如 JS设计模式等等。
这里只分享 装饰者模式 以及在 如何使用 ES7 的 decorator 概念
1.1、装饰模式 v.s. 适配器模式
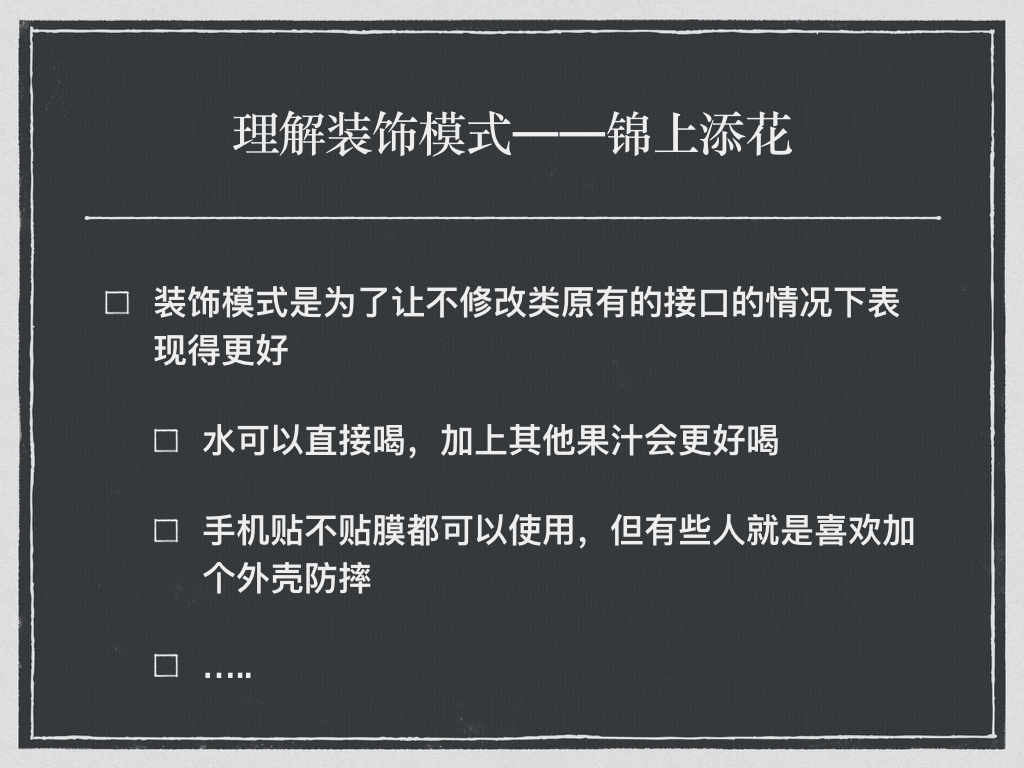
装饰模式和适配器模式都是 包装模式 (Wrapper Pattern),它们都是通过封装其他对象达到设计的目的的,但是它们的形态有很大区别。
适配器模式我们使用的场景比较多,比如连接不同数据库的情况,你需要包装现有的模块接口,从而使之适配数据库 —— 好比你手机使用转接口来适配插座那样;
装饰模式不一样,仅仅包装现有的模块,使之 “更加华丽” ,并不会影响原有接口的功能 —— 好比你给手机添加一个外壳罢了,并不影响手机原有的通话、充电等功能;
更多区别参见:设计模式——装饰模式(Decorator)
1.2、装饰模式场景 —— 面向AOP编程
装饰模式经典的应用是AOP编程,比如“日志系统”,日志系统的作用是记录系统的行为操作,它在不影响原有系统的功能的基础上增加记录环节 —— 好比你佩戴了一个智能手环,并不影响你日常的作息起居,但你现在却有了自己每天的行为记录。
更加抽象的理解,可以理解为给数据流做一层filter,因此AOP 的典型应用包括 安全检查、缓存、调试、持久化等等。可参考Spring aop 原理及各种应用场景。
2、使用ES7的decorator
ES7中增加了一个 decorator 属性,它借鉴自Python,请参考文章Decorators in ES7。
下面我们以 钢铁侠 为例讲解如何使用 ES7的decorator。
以钢铁侠为例,钢铁侠本质是一个人,只是“装饰”了很多武器方才变得那么NB,不过再怎么装饰他还是一个人。
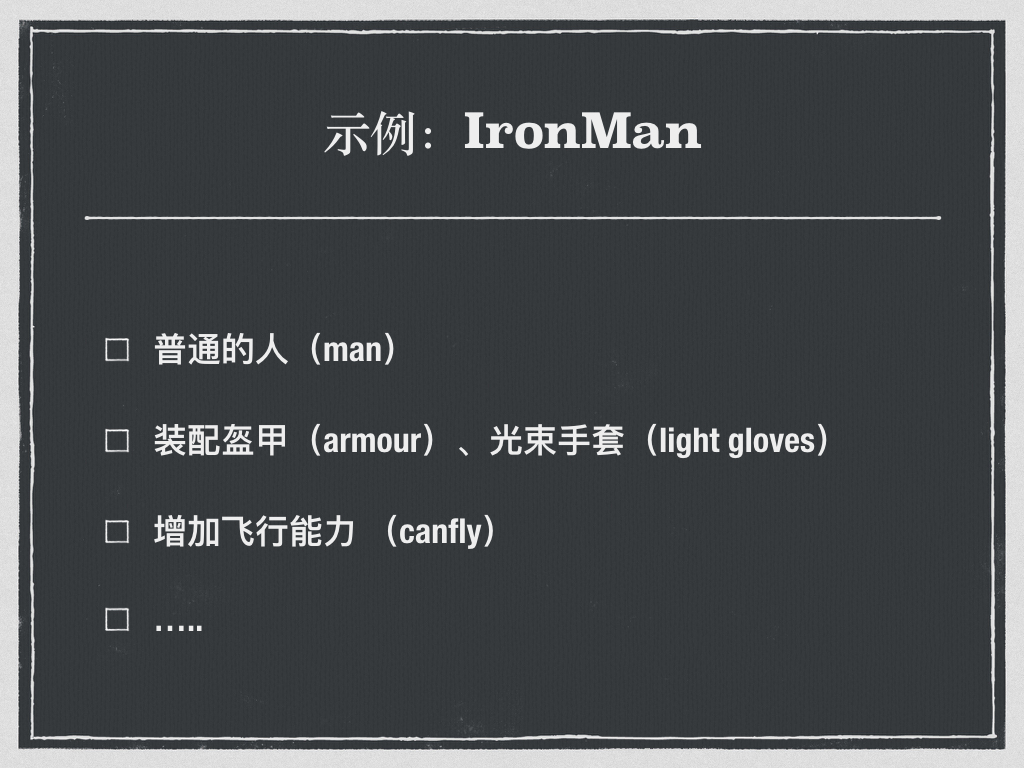
我们的示例场景是这样的
- 首先创建一个普通的
Man类,它的抵御值2,攻击力为3,血量为3; - 然后我们让其带上钢铁侠的盔甲,这样他的抵御力增加100,变成102;
- 让其带上光束手套,攻击力增加50,变成53;
- 最后让他增加“飞行”能力
2.1、【Demo 1】对方法的装饰:装备盔甲
创建Man类:
class Man{ constructor(def = 2,atk = 3,hp = 3){ this.init(def,atk,hp); } init(def,atk,hp){ this.def = def; // 防御值 this.atk = atk; // 攻击力 this.hp = hp; // 血量 } toString(){ return `防御力:${this.def},攻击力:${this.atk},血量:${this.hp}`; }}var tony = new Man();console.log(`当前状态 ===> ${tony}`); // 输出:当前状态 ===> 防御力:2,攻击力:3,血量:3代码直接放在 http://babeljs.io/repl/ 中运行查看结果,记得勾选
Experimental选项和Evaluate选项
创建 decorateArmour 方法,为钢铁侠装配盔甲——注意 decorateArmour 是装饰在方法init上的。
function decorateArmour(target, key, descriptor) { const method = descriptor.value; let moreDef = 100; let ret; descriptor.value = (...args)=>{ args[0] += moreDef; ret = method.apply(target, args); return ret; } return descriptor;}class Man{ constructor(def = 2,atk = 3,hp = 3){ this.init(def,atk,hp); } @decorateArmour init(def,atk,hp){ this.def = def; // 防御值 this.atk = atk; // 攻击力 this.hp = hp; // 血量 } toString(){ return `防御力:${this.def},攻击力:${this.atk},血量:${this.hp}`; }}var tony = new Man();console.log(`当前状态 ===> ${tony}`);// 输出:当前状态 ===> 防御力:102,攻击力:3,血量:3我们先看输出结果,防御力的确增加了 100,看来盔甲起作用了。
初学者这里会有两个疑问:
- 1.
decorateArmour方法的参数为啥是这三个?可以更换么? - 2.
decorateArmour方法为什么返回的是descriptor
这里给出个人的解答作为参考:
- Decorators 的本质是利用了ES5的 Object.defineProperty 属性,这三个参数其实是和 Object.defineProperty参数一致的,因此不能更改,详细分析请见 细说ES7 JavaScript Decorators
- 可以看看 bable转换后 的代码,其中有一句是
descriptor = decorator(target, key, descriptor) || descriptor;,点到为止,这里不详细展开了,可自行看看这行代码的上下文(参考文献中也涉及到这句代码的解释)。
2.2、【Demo 2】装饰器叠加:增加光束手套
在上面的示例中,我们成功为 普通人 增加 “盔甲” 这个装饰;现在我想再给他增加 “光束手套”,希望额外增加 50 点防御值。
Step 1:拷贝一份decorateArmour方法,改名为decorateLight,同时修改防御值的属性:
function decorateLight(target, key, descriptor) { const method = descriptor.value; let moreAtk = 50; let ret; descriptor.value = (...args)=>{ args[1] += moreAtk; ret = method.apply(target, args); return ret; } return descriptor;}Step 2:直接在init方法上添加装饰语法:
.... @decorateArmour @decorateLight init(def,atk,hp){ this.def = def; // 防御值 this.atk = atk; // 攻击力 this.hp = hp; // 血量 } ...最后的代码如下:
...function decorateLight(target, key, descriptor) { const method = descriptor.value; let moreAtk = 50; let ret; descriptor.value = (...args)=>{ args[1] += moreAtk; ret = method.apply(target, args); return ret; } return descriptor;}class Man{ constructor(def = 2,atk = 3,hp = 3){ this.init(def,atk,hp); } @decorateArmour @decorateLight init(def,atk,hp){ this.def = def; // 防御值 this.atk = atk; // 攻击力 this.hp = hp; // 血量 }...}var tony = new Man();console.log(`当前状态 ===> ${tony}`);//输出:当前状态 ===> 防御力:102,攻击力:53,血量:3在这里你就能看出装饰模式的优势了,它可以对某个方法进行叠加使用,对原类的侵入性非常小,只是增加一行@decorateLight而已,可以方便地增删;(同时还可以复用)
2.3、【Demo 3】对类的装饰:增加飞行能力
按文章 装饰模式所言,装饰模式有两种:**纯粹的装饰模式** 和 半透明的装饰模式。
上述的两个demo中所使用的应该是 纯粹的装饰模式,它并不增加对原有类的接口;下面要讲demo是给普通人增加“飞行”能力,相当于给类新增一个方法,属于 半透明的装饰模式,有点儿像适配器模式的样子。
Step 1:增加一个方法:
function addFly(canFly){ return function(target){ target.canFly = canFly; let extra = canFly ? '(技能加成:飞行能力)' : ''; let method = target.prototype.toString; target.prototype.toString = (...args)=>{ return method.apply(target.prototype,args) + extra; } return target; }}Step 2:这个方法将直接去装饰类:
...// 3function addFly(canFly){ return function(target){ target.canFly = canFly; let extra = canFly ? '(技能加成:飞行能力)' : ''; let method = target.prototype.toString; target.prototype.toString = (...args)=>{ return method.apply(target.prototype,args) + extra; } return target; }}@addFly(true)class Man{ constructor(def = 2,atk = 3,hp = 3){ this.init(def,atk,hp); } @decorateArmour @decorateLight init(def,atk,hp){ this.def = def; // 防御值 this.atk = atk; // 攻击力 this.hp = hp; // 血量 } ...}...console.log(`当前状态 ===> ${tony}`);// 输出:当前状态 ===> 防御力:102,攻击力:53,血量:3(技能加成:飞行能力)作用在方法上的 decorator 接收的第一个参数(**target** )是类的 prototype;如果把一个 decorator 作用到类上,则它的第一个参数 target 是 类本身。(参考 Decorators in ES7 )
3、使用原生JS实现装饰器模式
关于如何用现有标准的原生JS实现的装饰模式,可参考译文
JavaScript设计模式:装饰者模式,这是一篇值得一读的文章,深入浅出。
这里用ES5重写一下上面的 Demo 1的场景,简略说一下关键点:
- Man是具体的类,**Decorator** 是针对 Man 的装饰器基类
- 具体的装饰类 DecorateArmour 典型地使用 prototype 继承方式 继承自 Decorator 基类;
- 基于 IOC(控制反转)思想 ,**Decorator** 是接受 Man 类,而不是自己创建 Man 类;
最后代码是:
// 首先我们要创建一个基类function Man(){ this.def = 2; this.atk = 3; this.hp = 3;}// 装饰者也需要实现这些方法,遵守Man的接口Man.prototype={ toString:function(){ return `防御力:${this.def},攻击力:${this.atk},血量:${this.hp}`; }}// 创建装饰器,接收Man对象作为参数。var Decorator = function(man){ this.man = man;}// 装饰者要实现这些相同的方法Decorator.prototype.toString = function(){ return this.man.toString();}// 继承自装饰器对象// 创建具体的装饰器,也是接收Man作对参数var DecorateArmour = function(man){ var moreDef = 100; man.def += moreDef; Decorator.call(this,man);}DecorateArmour.prototype = new Decorator();// 接下来我们要为每一个功能创建一个装饰者对象,重写父级方法,添加我们想要的功能。DecorateArmour.prototype.toString = function(){ return this.man.toString();} // 注意这里的调用方式// 构造器相当于“过滤器”,面向切面的var tony = new Man();tony = new DecorateArmour(tony);console.log(`当前状态 ===> ${tony}`);// 输出:当前状态 ===> 防御力:102,攻击力:3,血量:34、经典实现:Logger
AOP的经典应用就是 日志系统 了,那么我们也用ES7的语法给钢铁侠打造一个日志系统吧。

下面是最终的代码:
/** * Created by jscon on 15/10/16. */let log = (type) => { return (target, name, descriptor) => { const method = descriptor.value; descriptor.value = (...args) => { console.info(`(${type}) 正在执行: ${name}(${args}) = ?`); let ret; try { ret = method.apply(target, args); console.info(`(${type}) 成功 : ${name}(${args}) => ${ret}`); } catch (error) { console.error(`(${type}) 失败: ${name}(${args}) => ${error}`); } return ret; } }}class IronMan { @log('IronMan 自检阶段') check(){ return '检查完毕'; } @log('IronMan 攻击阶段') attack(){ return '击倒敌人'; } @log('IronMan 机体报错') error(){ throw 'Something is wrong!'; }}var tony = new IronMan();tony.check();tony.attack();tony.error();// 输出:// (IronMan 自检阶段) 正在执行: check() = ?// (IronMan 自检阶段) 成功 : check() => 检查完毕// (IronMan 攻击阶段) 正在执行: attack() = ?// (IronMan 攻击阶段) 成功 : attack() => 击倒敌人// (IronMan 机体报错) 正在执行: error() = ?// (IronMan 机体报错) 失败: error() => Something is wrong!Logger方法的关键在于:
- 首先使用
const method = descriptor.value;将原有方法提取出来,保障原有方法的纯净; - 在 try..catch 语句是 调用
ret = method.apply(target, args);在调用之前之后分别进行日志汇报; - 最后返回
return ret;原始的调用结果
相信这套思路会给后续我们实现AOP模式提供良好的借鉴。
5、扩展:基于工厂模式
当你想要一个有3种功能的钢铁侠,就得用 new操作符 创建4个对象。这么做单调乏味又烦人,所以我们打算只调用一个方法就能创建出一部拥有所有功能的钢铁侠。
这就需要 工厂模式 了,工厂模式的官方定义是:在子类中对一个类的成员对象进行实例化。比如定义decorateIronMan(person,feature) 方法,里面接受一个 Person 对象(而不是自己初始化),相当于流水线生产了。

如何 结合装饰模式和工厂模式 提高代码效能,这篇优秀的译文 JavaScript设计模式:工厂模式 给出了详细的方法,这里不再赘述 ,强烈推荐阅读此文。
6、现在就想用?
decorator 目前还只是一个提议,但是感谢 Babel ,我们现在就可以体验它了。首先,安装 babel:
npm install babel -g然后,开启 decorator:
babel --optional es7.decorators foo.js > foo.es5.jsbabel 也提供了一个在线的 REPL ,勾选 experimental 选项,就可以了。
在webstorm中设置babel
Step 1 :首先全局安装babel组件模块
npm install -g babelStep 2 :设置scope (这一步可以省略)
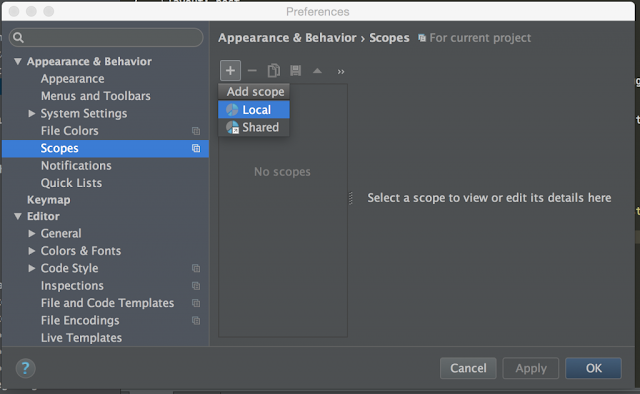
命名scope:
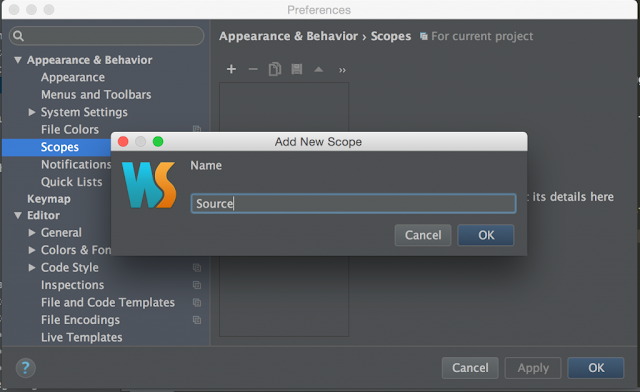
将文件添加到当前scope: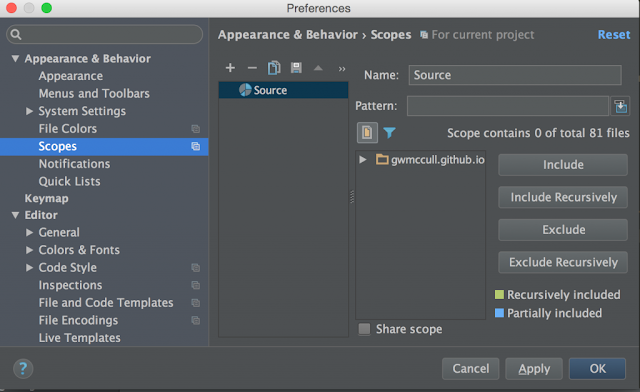
Step 3 :设置ES版本

Step 4 :添加watcher
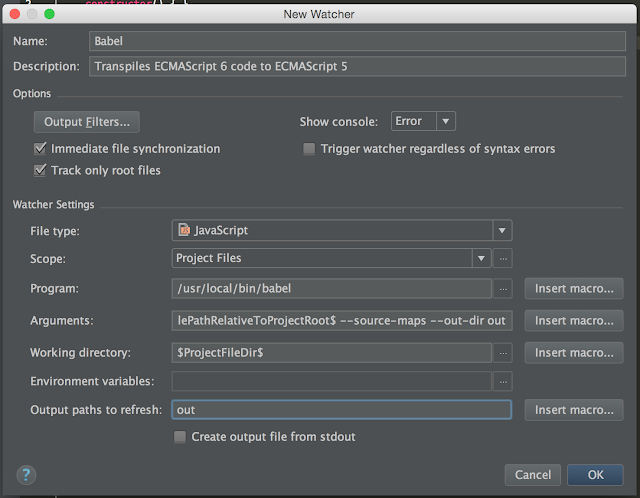
arguments内可以填写:
$FilePathRelativeToProjectRoot$ --stage --out-file $FileNameWithoutExtension$-es5.js $FilePath$
.
如果需要source-map,需要添加
--source-map选项,同时在Output paths to refresh中填写$FileNameWithoutExtension$-es5.js:$FileNameWithoutExtension$-es5.js.map
更多设置参考babel cli
7、总结
虽然它是ES7的特性,但在Babel大势流行的今天,我们可以利用Babel来使用它。我们可以利用Babel命令行工具,或者grunt、gulp、webpack的babel插件来使用Decorators。
上述的代码都可以直接放在 http://babeljs.io/repl/ 中运行查看结果;
关于ES7 Decorators的更有意思的玩法,你可以参见牛人实现的常用的 Decorators:core-decorators。以及raganwald的 如何用Decorators来实现Mixin。
参考文献
- Decorators in ES7:装饰者模式让你包装已有的方法,从而扩展已有函数。
- JavaScript设计模式:装饰者模式:严重推荐,这一系列让你比较透彻明白设计模式在JS中的应用。
- ES7之Decorators实现AOP示例:如何实现一个简单的AOP。
- 细说ES7 JavaScript Decorators:讲解ES7 Decorator的背后原理,就是使用了Object.defineProperty方法;
- How To Set Up the Babel Plugin in WebStorm:图文并茂,教你如何设置babel.
- Rest 参数和参数默认值:ES6 为我们提供一种新的方式来创建可变参数的函数,Rest 参数和参数默认值
- Exploring ES2016 Decorators:很完整的一个教程,里面涉及比较全面。
- Traits with ES7 Decorators:相当于是介绍
traits-decorator模块;
- 从钢铁侠看Decorator 装饰者模式
- Decorator 装饰者模式
- 装饰者模式(Decorator)
- Decorator 装饰者模式
- 装饰者模式(Decorator)
- decorator装饰者模式
- 装饰者模式(Decorator)
- Decorator 装饰者模式
- 装饰者模式--Decorator
- 装饰者模式(Decorator)
- 装饰者(Decorator)模式
- 装饰者模式decorator
- Decorator 装饰者模式
- 装饰者模式-Decorator
- 装饰者模式Decorator
- 装饰者模式Decorator
- 装饰者模式Decorator
- 装饰者模式(Decorator):
- opencv常见错误
- 知识总结
- 学生学籍管理系统_需求分析
- sed 文件查找,替换
- UILabel简单使用
- 从钢铁侠看Decorator 装饰者模式
- 指针,野指针
- Think in Java 学习
- Linux学习笔记--认识Linux下路径概念
- mpi学习日志(11):mpi4py与Spawn(没法用MSMPI实现)
- opencv博客记录
- yum remove 卡在Running Transaction Test
- aidl小结
- 实现chmod命令


