[转载]Windows部署Caffe-Backup Best Guidence
来源:互联网 发布:淘宝上代购dw手表600 编辑:程序博客网 时间:2024/06/09 23:03
Caffe + vs2013 + OpenCV in Windows Tutorial (I) – Setup
The purpose of this series it to get caffe working in windows in the most quick and dirty way: I’ll provide 1) the modified file that can be compiled in windows right away; 2) the vs2013 project that I’m currently using. In short:
- Install CUDA, Boost, OpenCV.
- Download caffe code with vs2013 from GitHub.
- Download 3ryparty.zip and unzip to ‘3rdparty’ folder.
- Edit ‘Caffe-vs2013 – Debug.props’ and ‘Caffe-vs2013 – Release.props’ files so that the path of CUDA, Boost and OpenCV make sense for you. Also, the given ‘compute_50,sm_50’ is for Maxwell GPU. Change 50 to 20 for Fermiand 30 for Kepler.
- Open caffe-vs2013.sln.
- Set platform to Release, x64 and change ‘caffe’ project’s ‘Configuration Type’ to ‘Application (.exe)’.
- Right click on ‘caffe’ project and ‘compile’.
- Run test on MNIST.
- For caffe.exe, please use Release|x64 mode. Debug version of caffe.exe makes no sense and is slow.
- 32 bit version should work but lacking support for lmdb and hdf5 because I didn’t compile them. lol
Setup:
- CUDA 6.5
- You have to have a Nvidia GPU on your PC to enable GPU version of Caffe. My impression was that you get maybe 10x speed-up using GPU over CPU, and another 10x speed-up by enable CuDNN library.
- The installation will create system variable for you, e.g. CUDA_PATH_V6_5.
- If you are using a GPU with the architecture of Fermi or Kepler: CUDA 6.5
- If you are using a GeForce GTX9xx GPU with the architecture of Maxwell: CUDA 6.5 for Maxwell
- Newer version of CUDA should be fine also.
- Boost
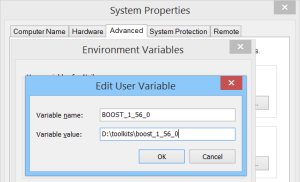
- Pre-built version of boost are available. I’m using boost 1.56.0 myself. Get pre-built boost and install.
- Add boost’s path to system’s path. I added BOOST_1_56_0:
- OpenCV
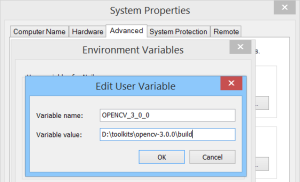
- Since we are not using GPU supported OpenCV here, e.g. GpuMat, etc. Pre-built version of OpenCV are good enough for a quick start.
- I use OpenCV 3.0 here as example. Add system path variable for OpenCV also:
- System variable need ‘log off’ or ‘restart’ your system to take effect
- Download the code for caffe from my GitHub
- The original code was forded from 7e465f2. Then I manually added the changes from #1416 to support “vector<Mat>”.
- Download the 3rdparty.zip and unzip its content to 3rdpary folder
- 3rdparty.zip (Version 2015.7.18) [Google Drive] [360 YunPan (code: 6147)]
3rdparty.zip (Version 2015.7.15)- Included is the support for gflags, glog, google/protobuf, hdf5, leveldb, liblmdb, openblas, cudnn, etc.
Before compile (skip if you’re familiar with vs2013 already):
- When it comes to a big project, many errors can happen. Let’s get things a bit clear first.
- In a project, usually functions are declared in .h/.hpp files and implemented in .c/.cpp files. Missing .hpp file is usually shown in the editor and missing .cpp file usually gives linking error.
- All .cpp files added to the vs project will be compiled to .obj files which can be linked later. While no .hpp files will be compiled. Adding .hpp files to the vs project or not makes no difference to the compiling.
- If you want to include .hpp file from another project, e.g. OpenCV. You need to add the path of the header files to ‘AdditionalIncludeDirectories’.
- Adding header files to the vs project does NOT add the path automatically.
- Adding the path of .cpp files to ‘AdditionalIncludeDirectories’ is NOT needed and has NO effect.
- For example if the file path is “D:\toolkits\opencv-3.0.0\build\include\opencv2\opencv.hpp”, you can either:
- 1) add “D:\toolkits\opencv-3.0.0\build\include” to ‘AdditionalIncludeDirectories’ and write #include “opencv2/opencv.hpp”; or
- 2) add “D:\toolkits\opencv-3.0.0\build\include\opencv2” to ‘AdditionalIncludeDirectories’ and write #include “opencv.hpp”;
- After the .hpp file is included, the compiler knows that these functions exist so ‘unknown namespace cv’ kind of error will not happen any more.
- After all .cpp files in your project are compiled, here comes the linking. The implementation of functions have to be either in .cpp files of your project or .lib files generated by other projects.
- Enabling lib files requires 1) path to be added to ‘AdditionalLibraryDirectories’; and 2) file names to be added to ‘AdditionalDependencies’.
- For example, you might add “D:\toolkits\opencv-3.0.0\build\x86\vc12\lib” to ‘AdditionalLibraryDirectories’ and add “opencv_ts300.lib; opencv_world300.lib;” to ‘AdditionalDependencies’.
- Usually the path of lib files changes according to the ‘PlatformTarget’, i.e. ‘x86’, and the ‘Configuration’, i.e. ‘Debug’. I usually let Visual Studio handle the difference, e.g. I add “$(OPENCV_3_0_0)\$(PlatformTarget)\vc12\lib” for OpenCV in later sections.
- If you solve compile error by having proper .hpp files and solve linking error by have proper .lib files, you program will run. Yet it might have missing .dll error.
- Some library are compiled in the static way to generate .lib files only, like gflags, protobuf, etc.
- Some library are compiled in the dynamic way to generate both .lib and .dll files. In this case your program will require .dll files on run-time.
- Personally I like to copy required .dll files to the same folder of the .exe file for simplicity.
0 0
- [转载]Windows部署Caffe-Backup Best Guidence
- Windows Server Backup
- windows rman backup
- caffe-windows
- caffe-windows
- caffe windows
- Windows Server Backup与NtBackup
- [网络管理]windows server backup
- Top 10 Backup and Recovery Best Practices (文档 ID 388422.1)
- 树莓派部署caffe模型
- [转载]caffe学习日记
- Best Windows Software
- backup
- BACKUP
- backup
- backup
- backup
- backup
- gdb打印字符串
- instanceof关键字
- 计算正整数各位数的和---345
- SPOJ - DISUBSTR Distinct Substrings
- Android Studio常用快捷键、Android Studio快捷键大全
- [转载]Windows部署Caffe-Backup Best Guidence
- Android 应用事件分发
- POJ-1062-昂贵的聘礼
- 求一个正整数的阶乘 3=3*2*1
- 【Dongle】【ASP.NET】Web总结(一)
- 求s=a+aa+aaa+aaaa+aa...a的值,其中a是一个数字
- 面试之路---进程的互斥和同步
- 运动目标的背景建模-混合高斯背景建模和KNN模型建模的OpenCV代码实现
- 有一分数序列:2/1,3/2,5/3,8/5,13/8,21/13...求出这个数列的前20项之和