QuantLib Installation in VC++ 2010
来源:互联网 发布:剑三成男捏脸数据 编辑:程序博客网 时间:2024/06/07 01:35
转载自:http://quantlib.org/install/vc10.shtml
QuantLib Installation in VC++ 2010
Dominik Holenstein
Based on the VC++ 2008 instructions by Dimitri Reiswich
These are step-by-step instructions to install QuantLib and Boost on the Microsoft Visual C++ 2010 IDE (you can download the free Express edition at http://www.microsoft.com/express/vc/.) I tried to include almost every step in the installation procedure. Something that is obvious to one person might not be obvious to someone else. The only thing that I assume you have on your computer is the Visual C++ 2010 IDE (VC10).
These instructions are for MS Visual C++ 2010 and later. If you have earlier versions of this IDE (2008, 2005...) then have a look at this page.
Before using QuantLib you need to install the Boost library on your computer. Detailed instructions follow in the next section.
Boost Installation
We use the binary installer provided by the Boost project, that can be downloaded at http://sourceforge.net/projects/boost/files/boost-binaries/.
You'll have to enter the folder corresponding to the release you want to download (at the time of this writing, the latest version is Boost 1.55.0) and then choose the installer corresponding to your compiler and platform; for instance, boost_1_55_0-msvc-10.0-64.exe for Visual C++ 10 on a 64-bit system. Download and run the installer. The rest of this tutorial was written a while ago and assumes that you installed Boost 1.47 into the C:\Program Files\Boost\boost_1_47 folder; replace that with whatever folder the installer creates for your newer version (for instance, C:\Boost\boost_1_55_0).
Boost and QuantLib Installation
If you go to the Tools/Options page in VC10 to set the necessary VC++ directories, you get this confusing screen:

VC++ Directories are no longer supported in VC10 through the Tools/Options page. Instead, VC10 introduces the user settings file Microsoft.cpp.<Platform>.users.props to control global settings including the global search path. These files are located in the $(USERPROFILE)\appdata\local\microsoft\msbuild\v4.0 directory.
These changes require a different workflow regarding the installation of QuantLib in connection with Boost compared to VC9 and older.
Here are the steps to change the settings file accordingly:
1. Open VC10 and make sure you have activated the expert settings. Go to Tools/Settings and make sure "Expert Settings" is checked.
2. If you haven't downloaded QuantLib yet, go to its download page on SourceForge, located at http://sourceforge.net/projects/quantlib/files/QuantLib
3. Open the QuantLib tree, find the latest version (at the time of this writing the current version is 1.1, but this might have changed when you read this) and download the zip archive to your local drive. This is illustrated in the screenshot below. Unzip the file wherever you want; in the following, we'll assume that the QuantLib directory is C:\Program Files\QuantLib.

4. Open the QuantLib folder, then open the Visual Studio solution called QuantLib_vc10.sln by double clicking. Choose Release from the configuration menu in the toolbar.
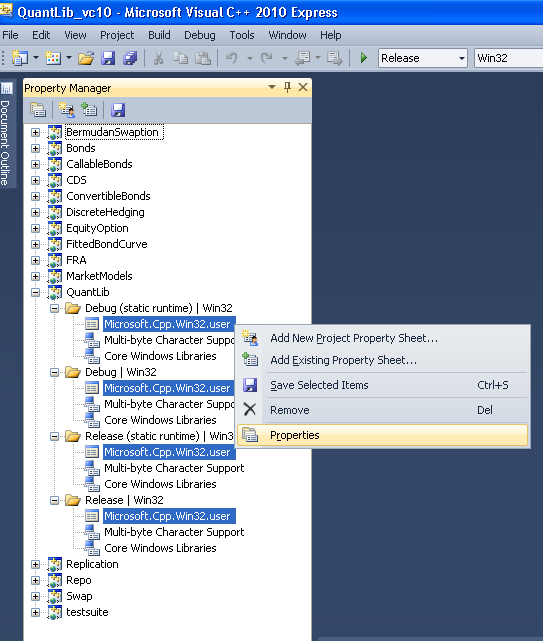
5. Open the Property Manager by clicking on View/Property Manager and activate it. Expand the project node of QuantLib in the Property Manager and then the Configuration/Platform nodes (see screenshot below). You will see a Microsoft.cpp.<Platform>.users file for each Configuration/Platform folder. These are the files for the global settings, similar to the old Tools/Options/VC++ Directories settings. Select any of them (or multi-select them all), right-click, and select Properties to bring up the property page window.
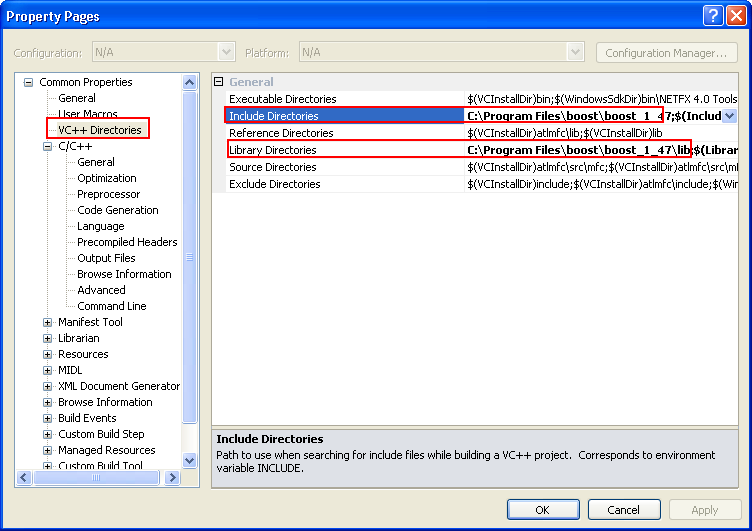
6. In the property page window, click on VC++ Directories on the left pane and add the paths for the Boost directories in Include Directories and Library Directories in the right pane. If you installed Boost inC:\Program Files\boost\boost_1_47, you'll have to add C:\Program Files\boost\boost_1_47 to the include directories and C:\Program Files\boost\boost_1_47\lib to the library directories. Click the OK button to set your changes.
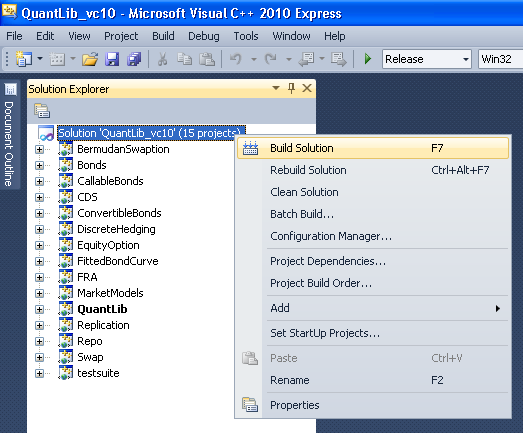
7. Switch back to the Solutions Explorer, right-click on the solution icon and choose Build Solution to build all projects. Besides QuantLib, this will build the examples and run the test suite. The process takes a while (it took 1h and 7 minutes to build QuantLib and run the tests on a three-years old WinXP notebook with 3 GB RAM and a 2 GHz Intel dual core processor).
After finishing, the output should show no errors:
14> Test suite "Master Test Suite" passed with:14> 1703 assertions out of 1703 passed14> 460 test cases out of 460 passed14> 14> 14> Tests completed in 29 m 8 s14> ========== Build: 15 succeeded, 0 failed, 0 up-to-date, 0 skipped ==========
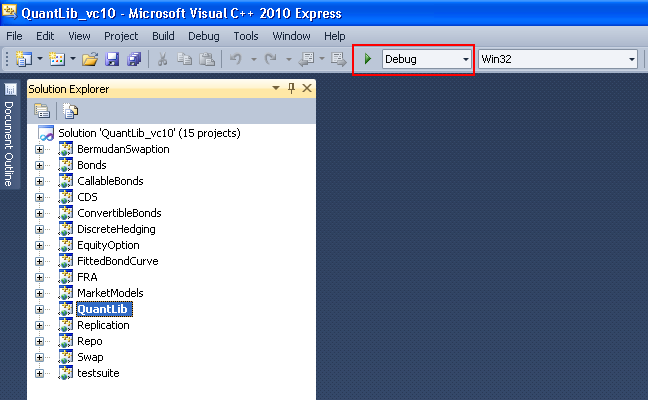
You are done with building QuantLib. If you want, you can build the Debug version in the same way by choosing Debug from the configuration menu as shown below. This will allow you to debug your application later.
Quantlib Usage
As an example of QuantLib usage, I create a QuantLibTest folder in the C:\Program Files\QuantLib folder and set up a Win32 Console Application in Visual Studio by clicking File/New Project/Win32 Console Application.
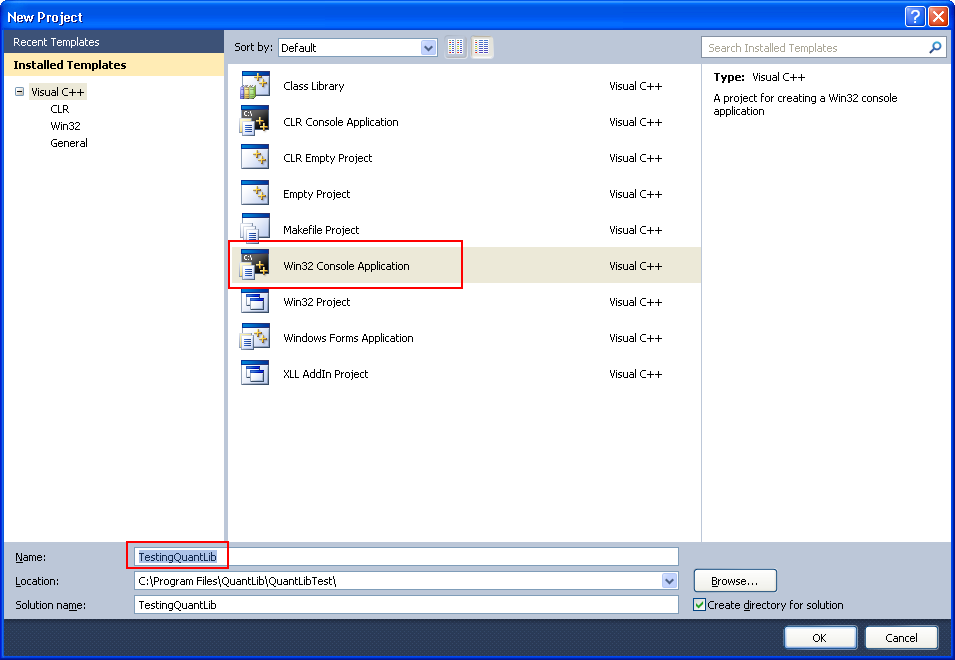
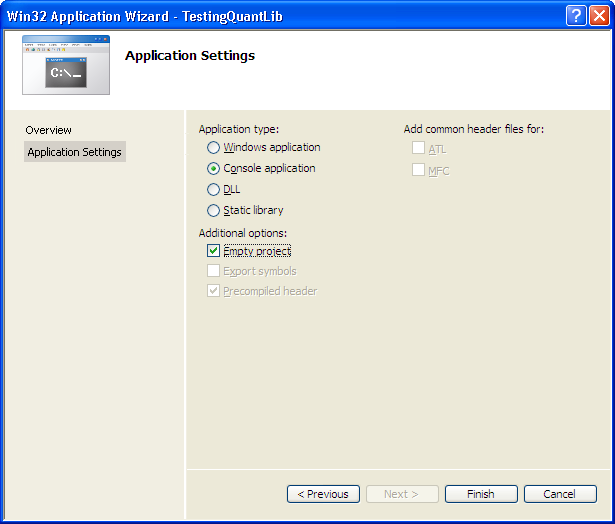
I've chosen the project name TestingQuantLib, then I clicked on OK. Click on the Next button on the Win32 Application Wizard. Choose "Console application" as application type and check "Empty project" in the additional options. Click on Finish.
Choose, for example, the Release mode for that project. Note that very often, users don't setup a project correctly since they build QuantLib in one mode and try to call it from a test program which runs in some other mode. If you built QuantLib in release mode, you should build your project in release mode. If you build your project in debug mode without ever building QuantLib in debug mode, you'll have link errors.
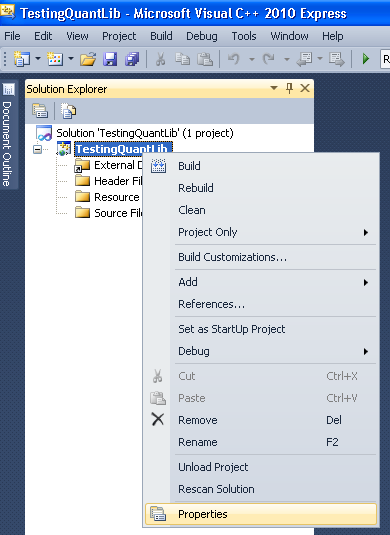
To tell your project where to find QuantLib, open the project properties by right-clicking on the project icon in the IDE.
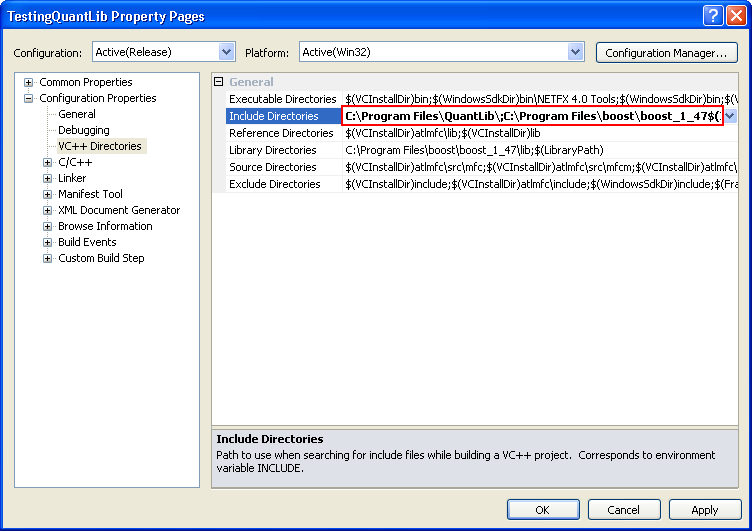
Go to VC++ Directories. You can see that the Boost folders are already there, so you don't have to do anything to configure them.
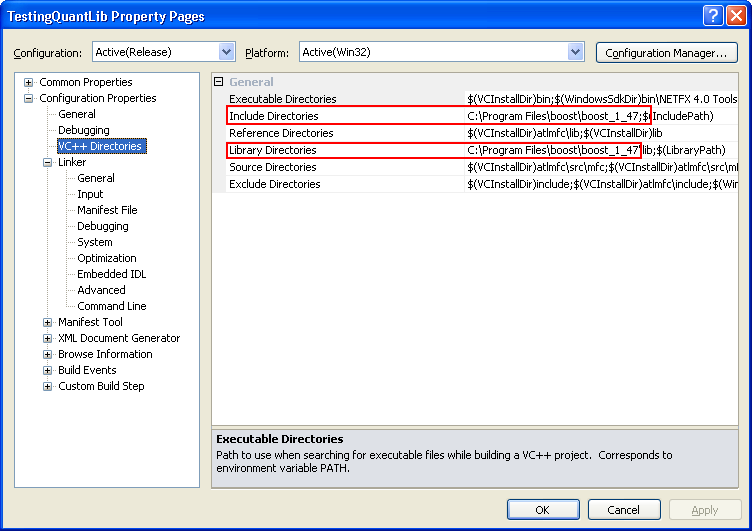
Add the QuantLib path (C:\Program Files\QuantLib in this example) to the include directories. The result should be as shown below.
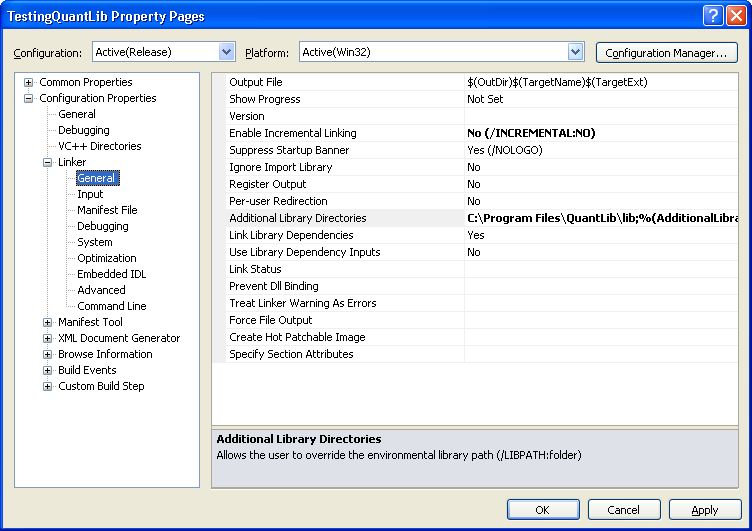
Finally, you can add the QuantLib library path C:\QuantLib\QuantLib-0.9.7\lib to the library directories, or you can go to Configuration Properties/Linker/General and add it to Additional Library Directories. Click OK.
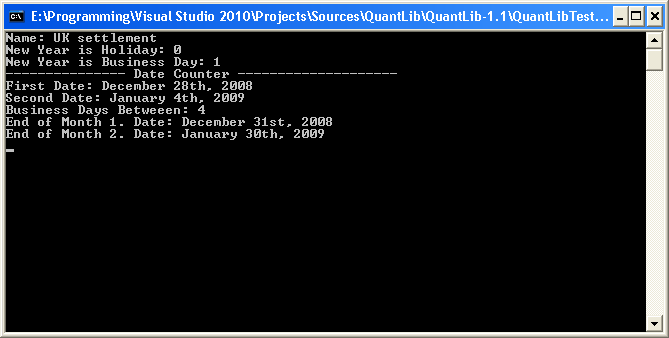
To test if the setup works, add the following program to the TestingQuantLib project. The program tests some Date and Calendar classes.
#include <ql/quantlib.hpp>#include <iostream>int main(){ QuantLib::Calendar myCal=QuantLib::UnitedKingdom(); QuantLib::Date newYearsEve(31,QuantLib::Dec,2008); std::cout << "Name: " << myCal.name()<< std::endl; std::cout << "New Year is Holiday: " << myCal.isHoliday(newYearsEve)<< std::endl; std::cout << "New Year is Business Day: " << myCal.isBusinessDay(newYearsEve)<< std::endl; std::cout << "--------------- Date Counter --------------------" << std::endl; QuantLib::Date date1(28,QuantLib::Dec,2008); QuantLib::Date date2(04,QuantLib::Jan,2009); std::cout << "First Date: " << date1 << std::endl; std::cout << "Second Date: " << date2 << std::endl; std::cout << "Business Days Betweeen: "<< myCal.businessDaysBetween(date1,date2) << std::endl; std::cout << "End of Month 1. Date: " << myCal.endOfMonth(date1) << std::endl; std::cout << "End of Month 2. Date: " << myCal.endOfMonth(date2) << std::endl; double tmp; std::cin >> tmp; return 0;}Hit F5 to run the program. The output of the program should be:
One last thing: If you see some warnings after building, to get rid of them open the project properties again, go to Configuration Properties/C/C++/Preprocessor/Preprocessor Definitions and add_SCL_SECURE_NO_DEPRECATE and _CRT_SECURE_NO_DEPRECATE to the definitions, as shown here:
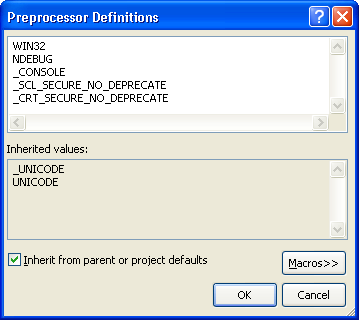
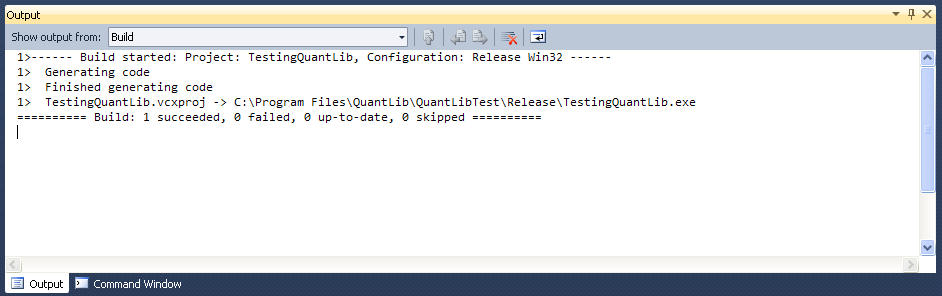
Now, building the TestingQuantLib project again shouldn't show you any warnings anymore, just as in the Output window below.
We're done!
- QuantLib Installation in VC++ 2010
- QuantLib 概述
- SDCV installation in CYGWIN
- openvswitch installation in Ubuntu
- openvswitch installation in Ubuntu
- Openssl Installation in Window
- plugin installation in eclipse
- cudnn Installation in Linux
- QuantLib教程(一)QuantLib的时间
- Slackware installation in VMWare Howto
- xdirectfb installation in FC6/FC7
- Brif Nagios installation in Centos
- Another installation is in progress
- kaa in Single node installation
- QuantLib 以及 python 相关
- PPTP Server Installation in CentOS 5
- Unix/Linux installation in disk, without cdrom.
- ImageMagick? & RMagick Installation Guide in VM
- Java基础知识之方法
- HttpClient(GET、POST)请求网络数据
- JS作用域的问题
- Codeforce Gym 100819L : 2015-2016 ACM-ICPC Pacific Northwest Regional Contest - L 这是一道阅读理解(微笑)
- 开始标记
- QuantLib Installation in VC++ 2010
- 2016.8.12GDOI组模拟赛总结
- 最大值 (Standard IO)
- Jenkins On Mesos---Jenkins上Mesos Plugin的使用
- animation-list clip在6.0无效的问题
- 2016.08.11【初中部 NOIP提高组 一试】模拟赛B
- 数据结构实验之排序三:bucket sort
- 子类重写父类方法注意
- 多线程实现四个窗口共同售10张票(java)