等待/通知机制:
来源:互联网 发布:维稳大数据 编辑:程序博客网 时间:2024/06/18 14:08
不使用等待/通知机制实现线程间通信:
通过sleep()结合while(true)死循环法来实现多个线程 间通信,创建如下代码:
public class MyList { private List list = new ArrayList(); public void add(){ list.add("abc"); } public int size(){ return list.size(); }}public class ThreadA extends Thread{ private MyList list; public ThreadA(MyList list) { this.list = list; } @Override public void run() { for(int i=0;i<10;i++){ list.add(); System.out.println("添加了"+(i+1)+"个元素"); try { Thread.sleep(1000); } catch (InterruptedException e) { e.printStackTrace(); } } }}public class ThreadB extends Thread { private MyList list; public ThreadB(MyList list) { this.list = list; } @Override public void run() { try { while (true) { if (list.size() >= 5) { System.out.println("==5了,B线程要退出"); throw new InterruptedException(); } } } catch (Exception e) { e.printStackTrace(); } }}public class Test{ public static void main(String[] args){ MyList service = new MyList(); ThreadA a = new ThreadA(); a.setName("A"); a.start(); ThreadB b = new ThreadB(); b.setName("B"); b.start(); }}执行结果如下: 
虽然两个线程实现了通信,但是有一个弊端就是,线程B不停的通过while(true)语句进行轮询机制来监测某一个条件。这样会浪费CPU的资源。
如果轮询的间隔更短,更浪费CPU的资源。如果间隔很大则有可能取不到想要的资源。所有需要有一种机制来实现减少CPU的资源浪费,而且还可以实现线程间通信,它就是“wait/notify”机制。
什么是等待/通知机制:
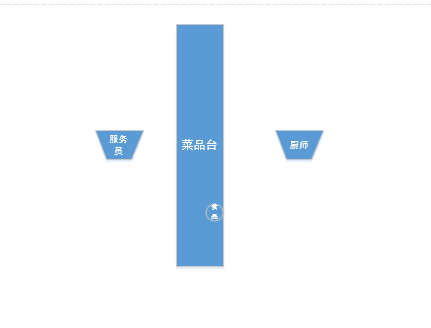
等待/通知机制在生活中比比皆是,比如就餐时就会出现,流程如下图:
厨师和服务员之间的交互要在“菜品传递台”上,在这期间会有如下几个问题:
- 厨师师做完一道菜的时间不确定,所以厨师将菜品放到“菜品传递台”上的时间也不确定。
- 服务员取到菜的时间取决于厨师,所以服务员就有“等待”的状态。
- 服务员如何能取到菜呢?这又得取决于厨师,厨师将菜放在“菜品传递台”上,其实就相当于一种通知,这时候服务员才可以拿到菜并交给就餐者。
这个过程中出现了“等待/通知”机制。
其实在前面的示例中多线程之间也可以实现通信,原因就是多个线程共同访问同一个变量,但是那种同步机制不是“等待/通知”,两个线程完全是主动的读取一个共享变量,在花费读取时间的基础上,读到的值是不是想要的,并不能完全确定。所以需要一种“等待/通知”的机制来满足上面的要求。等待/通知机制的实现:
方法wait()的作用是使当前执行代码的线程等待,wait()方法是Object类的方法,该方法用来将当前线程置入“预执行队列”中,并且在wait()所在的代码行处停止执行,直到接到通知或被终止为止。在调用wait()之前,线程必须获得该对象的对象级别锁,即只能在同步方法或同步代码块中调用wait()方法。在执行wait()方法后,当前线程释放锁。在从wait()返回前,线程与其他线程竞争重新获得锁。如果调用wait()时没有持有适当的锁,则抛出IllegaMonitorStateException,它是一个RuntimeException的一个子类,因此,不需要try-catch语句进行捕捉异常。
方法notify()也要在同步方法或同步块中调用,即在调用前,线程也必须获得该对象的对象级别锁。如果调用notify()时没有持有适当的锁,也会抛出IllegaMonitorStateException。该方法用来通知那些可能等待该对象的对象锁的其他线程,如果有多个线程等待,则由线程规划器随机挑选出其中一个呈wait状态的线程,对其发出通知notify,并使它等待获取该对象的对象锁。需要说明的是,在执行notify()方法后,当前线程不会马上释放该对象锁,呈wait状态的线程也不能马上获取该对象锁,要等到执行notify()方法的线程将程序执行完,也就是退出synchronized代码块后,当前线程才会释放锁,而呈wait状态所在的线程才可以获取该对象的锁。当第一个获得了该对象锁的wait线程运行完毕以后,它会释放掉该对象锁,此时如果该对象没有再次使用notify语句,则即便该对象已经空闲,其他wait状态等待的线程由于没有得到该对象的通知,还会继续阻塞wait状态,直到这个对象发出一个notify或notifyAll。
用一句话来总结一下wait和notify:wait使线程停止运行,而notify使停止的线程继续运行。
public class Test1 { public static void main(String[] args) { String newString = new String(""); try { newString.wait(); } catch (InterruptedException e) { e.printStackTrace(); } }}执行结果如下: 
出现异常的原因是没有“对象监视器”,也就是没有同步加锁。
继续创建如下代码:
public class Test2 { public static void main(String[] args) { String lock = new String(); System.out.println("syn上面代码"); synchronized(lock){ System.out.println("syn第一行"); try { lock.wait(); } catch (InterruptedException e) { e.printStackTrace(); } System.out.println("wait下面的代码"); } System.out.println("syn下面代码"); }}执行结果如下: 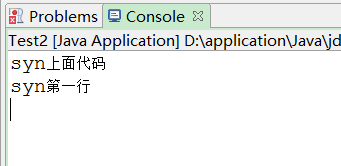
但线程永远不能等待下去,那样程序就停不下来,不能继续向下运行了。这里需要使用notify()方法。创建如下代码:
public class Thread1 extends Thread{ private Object lock; public Thread1(Object lock) { this.lock = lock; } @Override public void run() { synchronized(lock){ System.out.println("开始 wait time="+System.currentTimeMillis()); try { lock.wait(); } catch (InterruptedException e) { e.printStackTrace(); } System.out.println("结束 wait time="+System.currentTimeMillis()); } }}public class Thread2 extends Thread{ private Object lock; public Thread2(Object lock) { this.lock = lock; } @Override public void run() { synchronized(lock){ System.out.println("开始 notify time="+System.currentTimeMillis()); try { lock.notify(); } catch (Exception e) { e.printStackTrace(); } System.out.println("结束 notify time="+System.currentTimeMillis()); } }}public class Test { public static void main(String[] args) throws InterruptedException { Object lock = new Object(); Thread1 t1 = new Thread1(lock); t1.start(); Thread.sleep(3000); Thread2 t2 = new Thread2(lock); t2.start(); }}执行结果如下: 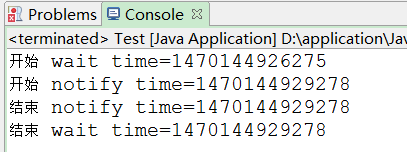
从结果可以看出,3秒后线程被notif通知唤醒。再创建如下代码:
public class MyList { private static List list = new ArrayList(); public static void add(){ list.add("string"); } public static int size(){ return list.size(); }}public class ThreadA extends Thread{ private Object lock; public ThreadA(Object lock){ this.lock = lock; } @Override public void run() { synchronized(lock){ if(MyList.size()!=5){ System.out.println("wait begin "+System.currentTimeMillis()); try { lock.wait(); } catch (InterruptedException e) { e.printStackTrace(); } System.out.println("wait end "+System.currentTimeMillis()); } } }}public class ThreadB extends Thread{ private Object lock; public ThreadB(Object lock){ this.lock = lock; } public void run() { synchronized(lock){ for(int i=0;i<10;i++){ MyList.add(); if(MyList.size()==5){ lock.notify(); System.out.println("已发出通知!"); } System.out.println("添加了"+(i+1)+"个元素"); try { Thread.sleep(1000); } catch (InterruptedException e) { e.printStackTrace(); } } } }}public class Run { public static void main(String[] args) throws InterruptedException { Object lock = new Object(); ThreadA threadA = new ThreadA(lock); threadA.start(); Thread.sleep(50); ThreadB threadB = new ThreadB(lock); threadB.start(); }}执行结果如下: 
通过输出日志可以看出wait end是最后输出的,这也说明notify()方法执行后并不立即释放锁。
关键字synchronized可以将任何一个Object对象作为同步对象来看待,而,而Java为每个Object对象都实现了wait()和notify()方法,它们必须用在被synchronized同步的Object的临界区内。通过调用wait()方法可以使处于临界区内的线程进入等待状态,同时释放被同步对象的锁。而notify操作可以唤醒一个因调用了wait操作而处于阻塞状态中的线程,使其进入就绪状态。被重新唤醒的线程会试图重新获得临界区的控制权,也就是锁,并继续执行临界区内的wait后的代码。如果发出notify操作时没有处于阻塞的线程,那么该命令会忽视。
wait方法可以使调用该方法的线程释放共享资源的锁,然后从运行状态退出,进入等待队列,直到被再次唤醒。
notify方法可以随机唤醒等待队列中等待同一共享资源的“一个”线程,并使该线程退出等待队列,进入可运行队列,也就是notify方法仅通知一个线程。
notifyAll方法可以使所有正在等待的队列中等待同一共享资源的“全部”线程从等待状态,进入可运行状态。此时,优先级最高的那个线程最先执行,但也有可能随机执行,因为这取决于JVM虚拟机的实现。
通过线程的方法改变线程的状态具体如下: 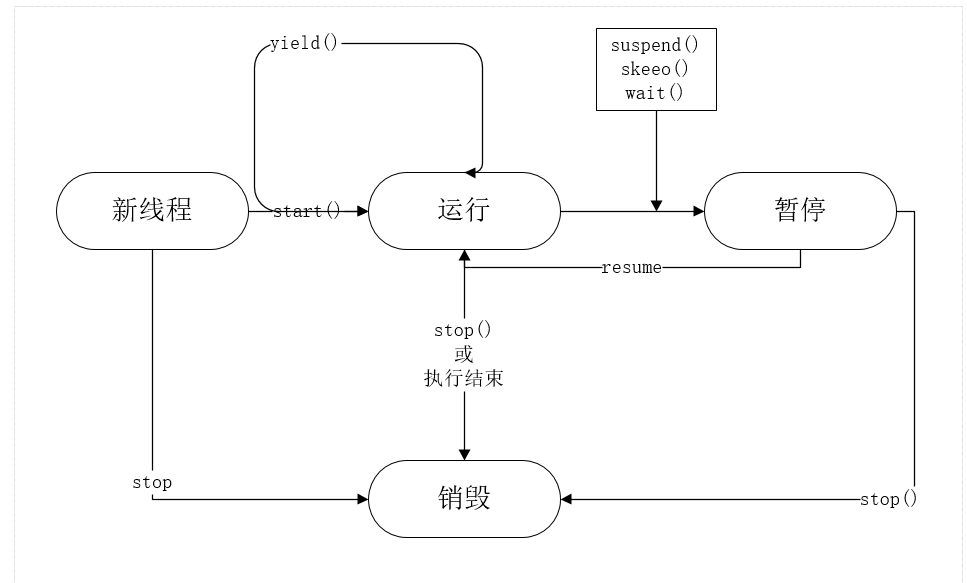
- 新建一个新的线程对象后,再调用它的start()方法,系统会为此线程分配CPU资源,使其处于Runnable(可运行)状态,这是一个准备运行阶段。如果线程抢占到CPU资源,此线程就处于Running(运行)状态。
Runnable和Running状态可相互切换,因为有可能线程运行一段时间后,有其他高优先级的线程抢占了CPU资源,这个时候线程就从Running状态变为Runnable状态。
线程进入Runnable状态大体分为如下5种情况:调用sleep()方法后经过的时间超过了指定的休眠时间。
- 线程调用的阻塞IO已经返回,阻塞方法执行完毕。
- 线程成功获得了试图同步的监视器。
- 线程正在等待某个通知,其他线程发出了通知。
- 处于挂起状态的线程调用了resume恢复方法。
3.Blocked是阻塞的意思,例如遇到一个IO操作,此时CPU处于空闲状态,可能会转而把CPU时间片分配给其他线程,这时也可以称为“暂停”状态。Blocked状态结束后进入Runnable状态,等待系统重新分配资源。
出现阻塞的情况大体分为如下5中:
1、 线程调用sleep方法,主动放弃占用的处理器资源。
2、 线程调用了阻塞式IO方法,在该方法返回前,该线程被阻塞。
3、 线程试图获得一个同步监视器,但该监视器正在被其他线程所持有。
4、 线程等待某个通知。
5、 线程调用了suspend方法将该线程挂起。此方法容易导致死锁,尽量避免使用该方法。
4.run()方法运行结束后进入销毁阶段,整个线程执行完毕。
每个锁对象都有两个队列,一个是就绪队列,一个是阻塞队列。就绪队列中存储了将要获得锁的线程。阻塞对象中存储了被阻塞的线程。一个线程唤醒后才会进入就绪队列,等待CPU的执行。反之,一个线程调用wait()方法后,就会进入阻塞队列,等待下一次被唤醒。
方法wait()锁释放与notify()锁不释放:
当方法wait()被执行后,锁被自动释放,但执行完notify()方法,锁却不自动释放。创建如下代码:
public class Service { public void testMethod(Object lock){ synchronized(lock){ System.out.println("begin wait()"); try { lock.wait(); } catch (InterruptedException e) { e.printStackTrace(); } System.out.println("end wait()"); } }}public class ThreadA extends Thread{ private Object lock; public ThreadA(Object lock){ this.lock = lock; } @Override public void run() { Service service = new Service(); service.testMethod(lock); }}public class ThreadB extends Thread{ private Object lock; public ThreadB(Object lock){ this.lock = lock; } @Override public void run() { Service service = new Service(); service.testMethod(lock); }}public class Test { public static void main(String[] args) { Object lock = new Object(); ThreadA threadA = new ThreadA(lock); threadA.start(); ThreadB threadB = new ThreadB(lock); threadB.start(); }}执行结果如下: 
如果将wait()方法改为sleep()方法,就成了同步的效果。如下图: 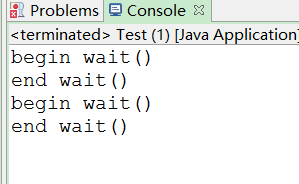
还需要验证方法notify()执行后不释放锁。创建如下代码:
public class Service { public void testMethod(Object lock){ synchronized(lock){ System.out.println("begin wait() ThreadName="+Thread.currentThread().getName()); try { lock.wait(); } catch (InterruptedException e) { e.printStackTrace(); } System.out.println("end wait()ThreadName="+Thread.currentThread().getName()); } } public void synNotifyMethod(Object lock){ synchronized(lock){ System.out.println("begin notify()"+Thread.currentThread().getName()+" time"+System.currentTimeMillis()); lock.notify(); try { Thread.sleep(5000); } catch (InterruptedException e) { e.printStackTrace(); } System.out.println("end notify()"+Thread.currentThread().getName()+" time"+System.currentTimeMillis()); } }}public class ThreadA extends Thread{ private Object lock; public ThreadA(Object lock){ this.lock = lock; } @Override public void run() { Service service = new Service(); service.testMethod(lock); }}public class NotifyThread extends Thread{ private Object lock; public NotifyThread(Object lock){ this.lock = lock; } @Override public void run() { Service service = new Service(); service.synNotifyMethod(lock); }}public class SynNotifyMethodThread extends Thread{ private Object lock; public SynNotifyMethodThread(Object lock){ this.lock = lock; } @Override public void run() { Service service = new Service(); service.synNotifyMethod(lock); }}public class Test { public static void main(String[] args) { Object lock = new Object(); ThreadA threadA = new ThreadA(lock); threadA.start(); NotifyThread notifyThread = new NotifyThread(lock); notifyThread.start(); SynNotifyMethodThread methodThread = new SynNotifyMethodThread(lock); methodThread.start(); }}执行结果如下:
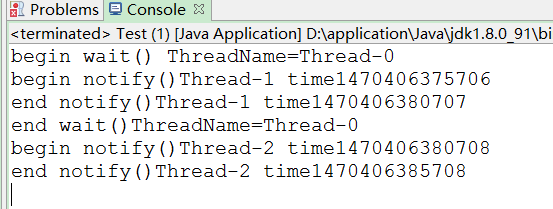
说明必须执行完notify()方法所在的同步synchronized代码块后才释放锁。
当interrupt方法遇到wait方法:
当线程呈wait()状态时,调用对象的interrupt()方法会出现InterruptedException异常。创建如下代码:
public class Service { public void testMethod(Object lock){ synchronized(lock){ System.out.println("begin wait"); try { lock.wait(); } catch (InterruptedException e) { e.printStackTrace(); System.out.println("出现异常了,因为呈wait状态的线程被interrupt"); } System.out.println("end wait"); } }}public class ThreadA extends Thread{ private Object lock; public ThreadA(Object lock){ this.lock = lock; } @Override public void run() { Service service = new Service(); service.testMethod(lock); }}public class Test { public static void main(String[] args) throws InterruptedException { Object lock = new Object(); ThreadA threadA = new ThreadA(lock); threadA.start(); Thread.sleep(5000); threadA.interrupt(); }}执行结果如下: 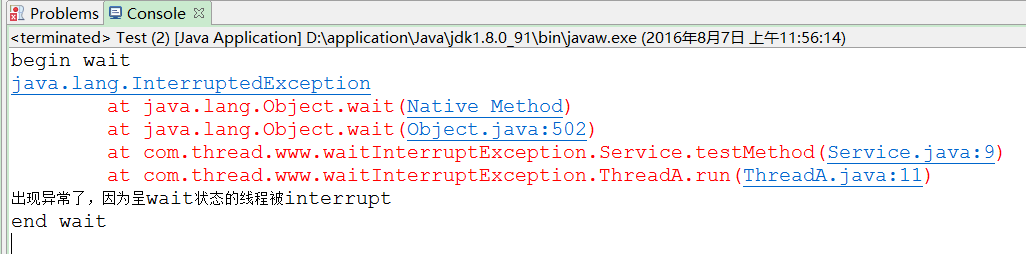
通过上面的代码可以总结如下结论:
- 执行完同步代码块就会释放对象的锁。
- 在执行同步代码块的过程中,遇到异常而导致线程终止,锁也会被释放。
- 在执行同步代码块的过程中,执行了锁所属对象的wait()方法,这个线程会释放对象锁,而此对象会进入线程等待池中等待被唤醒。
### 只通知一个线程:
调用notify()一次只随机通知一个线程进行唤醒。创建如下代码:
public class Service { public void testMethod(Object lock) { synchronized (lock) { System.out.println("begin wait() ThreadName=" + Thread.currentThread().getName()); try { lock.wait(); } catch (InterruptedException e) { e.printStackTrace(); } System.out.println("end wait() ThreadName=" + Thread.currentThread().getName()); } }}public class ThreadA extends Thread{ private Object lock; public ThreadA(Object lock){ this.lock = lock; } @Override public void run() { Service service = new Service(); service.testMethod(lock); }}public class ThreadB extends Thread{ private Object lock; public ThreadB(Object lock){ this.lock = lock; } @Override public void run() { Service service = new Service(); service.testMethod(lock); }}public class ThreadC extends Thread{ private Object lock; public ThreadC(Object lock){ this.lock = lock; } @Override public void run() { Service service = new Service(); service.testMethod(lock); }}public class NotifyThread extends Thread{ private Object lock; public NotifyThread(Object lock){ this.lock = lock; } @Override public void run() { synchronized(lock){ lock.notify(); } }}public class Test { public static void main(String[] args) throws InterruptedException { Object lock = new Object(); ThreadA threadA = new ThreadA(lock); threadA.start(); ThreadB threadB = new ThreadB(lock); threadB.start(); ThreadC threadC = new ThreadC(lock); threadC.start(); Thread.sleep(1000); NotifyThread notifyThread = new NotifyThread(lock); notifyThread.start(); }}执行结果如下: 
方法notify()方法只能唤醒一个线程。如果多次调用notify()方法,会随机将等待wait状态的线程进行唤醒。更改NotifyThread类的代码如下:
public class NotifyThread extends Thread{ private Object lock; public NotifyThread(Object lock){ this.lock = lock; } @Override public void run() { synchronized(lock){ lock.notify(); lock.notify(); lock.notify(); lock.notify(); } }}执行结果如下: 
多次调用notify()方法唤醒全部waiting中的线程。
唤醒所有线程:
前面示例中通过多次调用notify()方法来实现唤醒3个线程,但并不能保证系统中仅有3个线程,也就是若notify()方法的调用次数小于线程对象的数量,会出现有部分线程对象无法唤醒的情况。为了唤醒全部线程,可以使用notifyAll()方法。
创建如下代码,将上面项目中NotifyThread.java类使用的方法改为notifyAll()即可。运行结果如下: 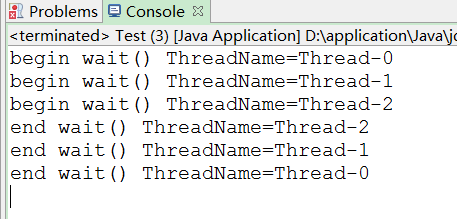
方法wait(long)的使用:
带一个参数的wait(long)方法的功能是等待某一时间内是否有线程对锁进行唤醒,如果超过这个时间则自动唤醒。创建如下代码:
public class MyRunnable { static private Object lock = new Object(); static private Runnable runnable = new Runnable(){ public void run() { synchronized(lock){ System.out.println("wait begin time="+System.currentTimeMillis()); try { lock.wait(5000); } catch (InterruptedException e) { e.printStackTrace(); } System.out.println("wait end time="+System.currentTimeMillis()); } } }; public static void main(String[] args) { Thread t1 = new Thread(runnable); t1.start(); }}执行结果如下: 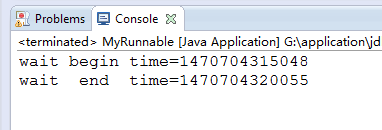
当然也可以在5秒内有其他线程唤醒,修改代码如下:
public class MyRunnable { static private Object lock = new Object(); static private Runnable runnable = new Runnable(){ public void run() { synchronized(lock){ System.out.println("wait begin time="+System.currentTimeMillis()); try { lock.wait(5000); } catch (InterruptedException e) { e.printStackTrace(); } System.out.println("wait end time="+System.currentTimeMillis()); } } }; static private Runnable runnable1 = new Runnable(){ public void run() { synchronized(lock){ System.out.println("notify start="+System.currentTimeMillis()); lock.notify(); System.out.println("notify end="+System.currentTimeMillis()); } } }; public static void main(String[] args) throws InterruptedException { Thread t1 = new Thread(runnable); t1.start(); Thread.sleep(3000); Thread t2 = new Thread(runnable1); t2.start(); }}执行结果如下: 
通过打印结果可以看出是线程t1被提前唤醒。
通知过早:
如果通知过早,则会打乱程序的正常运行逻辑.创建如下代码:
public class MyRun { private String lock = new String(""); private Runnable runnableA = new Runnable(){ @Override public void run() { synchronized(lock){ System.out.println("begin wait"); try { lock.wait(); } catch (InterruptedException e) { e.printStackTrace(); } System.out.println("end wait"); } } }; private Runnable runnableB = new Runnable(){ @Override public void run() { synchronized(lock){ System.out.println("begin notify"); lock.notify(); System.out.println("end notify"); } } }; public static void main(String[] args) { MyRun myRun = new MyRun(); Thread t1 = new Thread(myRun.runnableA); t1.start(); Thread t2 = new Thread(myRun.runnableB); t2.start(); }}执行结果如下: 
修改main的代码如下:
public static void main(String[] args) throws InterruptedException { MyRun myRun = new MyRun(); Thread t2 = new Thread(myRun.runnableB); t2.start(); Thread.sleep(100); Thread t1 = new Thread(myRun.runnableA); t1.start(); }执行结果如下: 
如果先通知了,则wait方法也必要执行了。在修改MyRun代码如下:
public class MyRun { private String lock = new String(""); private boolean isFitstRunB = false; private Runnable runnableA = new Runnable() { @Override public void run() { synchronized (lock) { while (isFitstRunB == false) { System.out.println("begin wait"); try { lock.wait(); } catch (InterruptedException e) { e.printStackTrace(); } System.out.println("end wait"); } } } }; private Runnable runnableB = new Runnable() { @Override public void run() { synchronized (lock) { System.out.println("begin notify"); lock.notify(); System.out.println("end notify"); isFitstRunB = true; } } }; public static void main(String[] args) throws InterruptedException { MyRun myRun = new MyRun(); Thread t2 = new Thread(myRun.runnableB); t2.start(); Thread.sleep(100); Thread t1 = new Thread(myRun.runnableA); t1.start(); }}执行结果如下: 
继续修改main方法代码,如下:
public static void main(String[] args) throws InterruptedException { MyRun myRun = new MyRun(); Thread t1 = new Thread(myRun.runnableA); t1.start(); Thread.sleep(100); Thread t2 = new Thread(myRun.runnableB); t2.start(); }执行结果如下: 
等待wait的条件发生变化:
在使用wait/notify模式时,还需要注意另外一种情况,也就是wait等待的条件发生了变化,也容易造成程序逻辑的混乱个。创建如下代码:
public class ValueObject { public static List<String> list = new ArrayList<String>();}public class Add { private String lock; public Add(String lock){ this.lock = lock; } public void add(){ synchronized(lock){ ValueObject.list.add("anyString"); lock.notifyAll(); } }}public class Subtract { private String lock; public Subtract(String lock){ this.lock = lock; } public void subtract(){ synchronized(lock){ if(ValueObject.list.size()==0){ System.out.println("wait begin ThreadName="+Thread.currentThread().getName()); try { lock.wait(); } catch (InterruptedException e) { e.printStackTrace(); } System.out.println("wait end ThreadName="+Thread.currentThread().getName()); } ValueObject.list.remove(0); System.out.println("list size=" + ValueObject.list.size()); } }}public class ThreadAdd extends Thread{ private Add add; public ThreadAdd(Add add){ this.add = add; } @Override public void run() { add.add(); }}public class ThreadSubtract extends Thread{ private Subtract subtract; public ThreadSubtract(Subtract subtract){ this.subtract = subtract; } @Override public void run() { subtract.subtract(); }}public class Run { public static void main(String[] args) throws InterruptedException { String lock = new String(""); Subtract s = new Subtract(lock); ThreadSubtract threadSubtract1 = new ThreadSubtract(s); threadSubtract1.setName("threadSubtract1"); threadSubtract1.start(); ThreadSubtract threadSubtract2 = new ThreadSubtract(s); threadSubtract2.setName("threadSubtract2"); threadSubtract2.start(); Thread.sleep(1000); Add add = new Add(lock); ThreadAdd threadAdd = new ThreadAdd(add); threadAdd.setName("addThread"); threadAdd.start(); }}出现异常的原因是因为有两个实现remove()操作的线程,他们在Thread.sleep(1000);之前都执行了wait()方法,呈等待状态,当操作的线程在1秒后被运行时,通知了所有呈wait等待状态的减操作的线程,那么第一个实现减操作的线程能正确删除list中索引为0的数据。但第二个线程实现减操作的线程会出现索引溢出的异常,因为list中仅仅添加了一个数据,也只能删除一个数据。解决这个问题,修改代码如下:
public class Subtract { private String lock; public Subtract(String lock){ this.lock = lock; } public void subtract(){ synchronized(lock){ while(ValueObject.list.size()==0){ System.out.println("wait begin ThreadName="+Thread.currentThread().getName()); try { lock.wait(); } catch (InterruptedException e) { e.printStackTrace(); } System.out.println("wait end ThreadName="+Thread.currentThread().getName()); } ValueObject.list.remove(0); System.out.println("list size=" + ValueObject.list.size()); } }}执行结果如下: 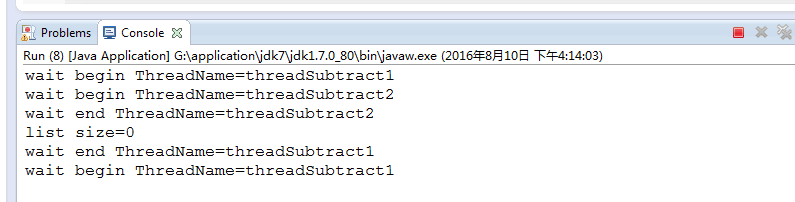
生产者/消费者模式实现:
等待/通知模式最经典的案例就是”生产/消费者”模式。但此模式在使用上有几种“变形”,但是原理都是基于wait/notify的。
- 一生产与一消费,创建如下代码:
public class ValueObject { public static String value="";}/** * 生产者 */public class P { private String lock; public P(String lock){ this.lock = lock; } public void setValue(){ synchronized(lock){ if(!ValueObject.value.equals("")){ try { lock.wait(); } catch (InterruptedException e) { e.printStackTrace(); } } String value = System.currentTimeMillis()+"_"+System.nanoTime(); System.out.println("set的值是 "+value); ValueObject.value = value; lock.notify(); } }}/** *消费者 */public class C { private String lock; public C(String lock){ this.lock = lock; } public void getValue(){ synchronized(lock){ if(ValueObject.value.equals("")){ try { lock.wait(); } catch (InterruptedException e) { e.printStackTrace(); } } System.out.println("get的值是"+ValueObject.value); ValueObject.value = ""; lock.notify(); } }}public class ThreadP extends Thread{ private P p; public ThreadP(P p){ this.p = p; } @Override public void run() { while(true){ p.setValue(); } }}public class ThreadC extends Thread { private C c; public ThreadC(C c) { this.c = c; } @Override public void run() { while (true) { c.getValue(); } }}public class Run { public static void main(String[] args) { String lock = new String(""); P p = new P(lock); C c = new C(lock); ThreadP threadP = new ThreadP(p); ThreadC threadC = new ThreadC(c); threadP.start(); threadC.start(); }}执行结果如下: 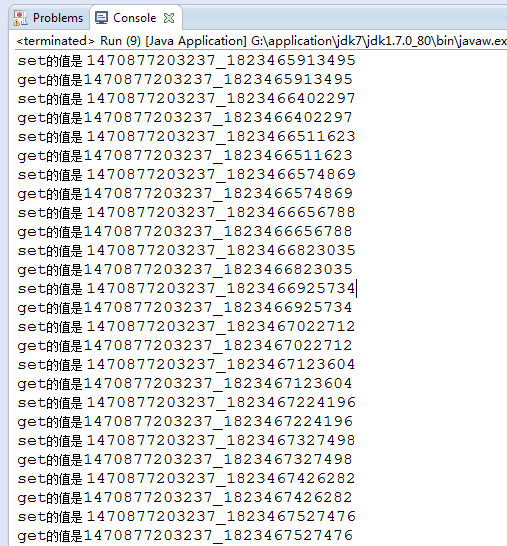
2.多生产与多消费:操作值-假死:
“假死”的现象其实就是线程进入WAITING等待状态。如果全部线程进入WAITING状态,则程序就不再执行任何业务功能了,整个项目呈停止状态。这在生产者与消费者模式中经常遇到。创建如下代码:
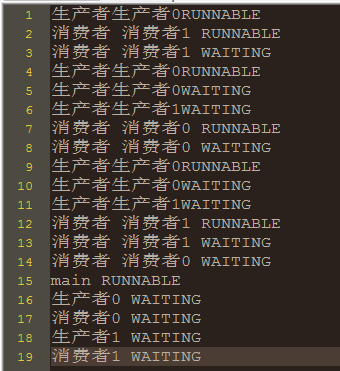
public class C { private String lock; public C(String lock){ this.lock = lock; } public void getValue(){ synchronized(lock){ while(ValueObject.value.equals("")){ System.out.println("消费者 "+Thread.currentThread().getName()+" WAITING"); try { lock.wait(); } catch (InterruptedException e) { e.printStackTrace(); } } System.out.println("消费者 "+Thread.currentThread().getName()+" RUNNABLE"); ValueObject.value = ""; lock.notify(); } }}public class P { private String lock; public P(String lock){ this.lock = lock; } public void setValue(){ synchronized(lock){ while(!ValueObject.value.equals("")){ try { System.out.println("生产者"+Thread.currentThread().getName()+"WAITING"); lock.wait(); } catch (InterruptedException e) { e.printStackTrace(); } } System.out.println("生产者"+Thread.currentThread().getName()+"RUNNABLE"); ValueObject.value = System.currentTimeMillis()+" - "+System.nanoTime(); lock.notify(); } }}public class ThreadC extends Thread{ private C c; public ThreadC(C c){ this.c = c; } @Override public void run() { while(true){ c.getValue(); } }}public class ThreadP extends Thread{ private P p; public ThreadP(P p){ this.p = p; } @Override public void run() { while(true){ p.setValue(); } }}public class ValueObject { public static String value = "";}public class Run { public static void main(String[] args) throws InterruptedException { String lock = new String(""); P p = new P(lock); C c = new C(lock); ThreadP[] threadPs = new ThreadP[2]; ThreadC[] threadCs = new ThreadC[2]; for(int i=0;i<2;i++){ threadPs[i] = new ThreadP(p); threadPs[i].setName("生产者"+i); threadCs[i] = new ThreadC(c); threadCs[i].setName("消费者"+i); threadPs[i].start(); threadCs[i].start(); } Thread.sleep(10000); Thread[] threadArray = new Thread[Thread.currentThread().getThreadGroup().activeCount()]; Thread.currentThread().getThreadGroup().enumerate(threadArray); for(int i=0;i<threadArray.length;i++){ System.out.println(threadArray[i].getName()+" "+threadArray[i].getState()); } }执行结果如下: 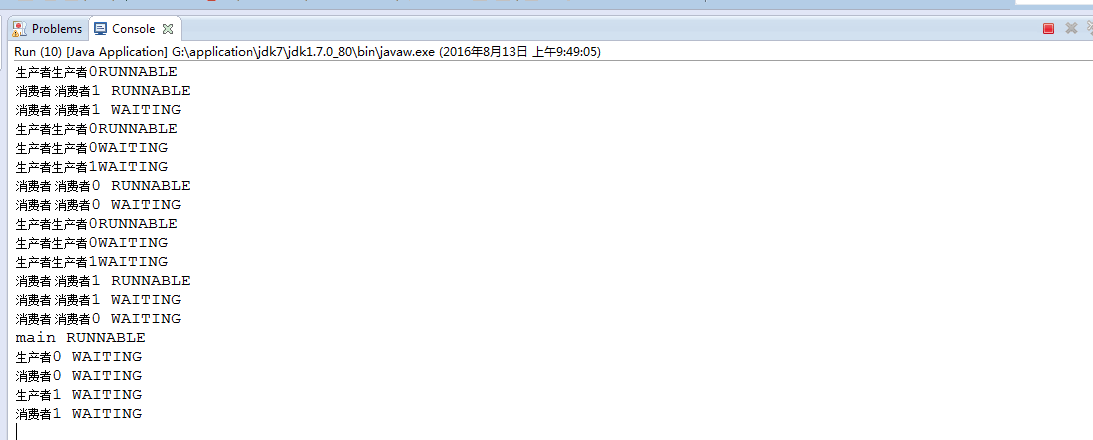
程序运行后很有可能出现假死状态.
从打印信息来看,呈假死状态的进程中所有线程都呈WAITING状态。为什么会出现这种情况,代码中已经使用了notify/wait了?
在代码中确实已经使用了notify/wait进行通信了,但不保证唤醒的就是异类,也许是同类。例如“生产者”唤醒“生产者”,或“消费者”唤醒“消费者”这样的情况。如果经常这样,就会导致线程不能继续执行下去,所有线程都成WAITING状态,程序最后也呈“假死”状态,不能继续运行下去。
通过打印结果分析线程怎么进入“假死”状态的,这是将打印结果放到了
该程序导致假死的原因就如下图: 
3.多生产与多消费:操作值:
解决“假死”的情况很简单,只需将notify()方法改为notifyAll()方法就行,因为notifyAll()不止通知一个线程。
4.一生产与一消费:操作栈:
通过代码实现生产者向堆栈List对象放入数据,使消费者从List堆栈中取出数据。List最大容量是1,实验只有一个生产者与一个消费者。创建如下代码:
public class MyStack { private List list = new ArrayList(); synchronized public void push(){ if(list.size()==1){ try { this.wait(); } catch (InterruptedException e) { e.printStackTrace(); } } list.add("anyString= "+Math.random()); this.notify(); System.out.println("push="+list.size()); } synchronized public String pop(){ String returnValue = ""; if(list.size()==0){ try { this.wait(); } catch (InterruptedException e) { e.printStackTrace(); } } returnValue = ""+list.get(0); list.remove(0); this.notify(); System.out.println("pop="+list.size()); return returnValue; }}public class P { private MyStack myStack; public P(MyStack myStack){ this.myStack = myStack; } public void pushService(){ myStack.push(); }}public class C { private MyStack myStack; public C(MyStack myStack){ this.myStack = myStack; } public void popService(){ System.out.println("pop= "+myStack.pop()); }}public class PThread extends Thread{ private P p; public PThread(P p){ this.p = p; } @Override public void run() { while(true){ p.pushService(); } }}public class CThread extends Thread{ private C c; public CThread(C c){ this.c = c; } @Override public void run() { while(true){ c.popService(); } }}public class Run { public static void main(String[] args) { MyStack myStack = new MyStack(); P p = new P(myStack); C c = new C(myStack); PThread pThread = new PThread(p); CThread cThread = new CThread(c); pThread.start(); cThread.start(); }}执行结果如下: 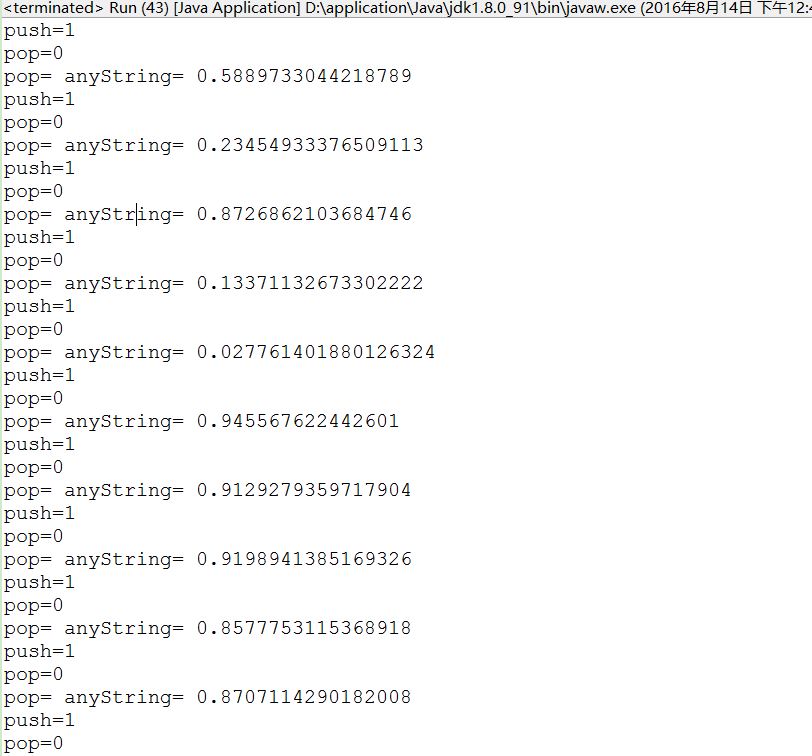
程序运行结果size()不会大于1.
通过使用生产者/消费者模式,容器的size()的值不会大于1,这也是本例想要实现的效果,值在0和1之间切换,也就是生成和消费这两个过程在交替执行。
5.一生成与多消费—操作栈:解决wait条件改变和假死
使用一个生产者向堆栈list对象中放入数据,而多个消费者从list堆栈中取出数据,list的最大容量还是1。创建如下代码:
修改上面代码的Run类代码,其他不变:
public class Run { public static void main(String[] args) { MyStack myStack = new MyStack(); P p = new P(myStack); C c1 = new C(myStack); C c2 = new C(myStack); C c3 = new C(myStack); C c4 = new C(myStack); C c5 = new C(myStack); PThread pThread = new PThread(p); CThread cThread1 = new CThread(c1); CThread cThread2 = new CThread(c2); CThread cThread3 = new CThread(c3); CThread cThread4 = new CThread(c4); CThread cThread5 = new CThread(c5); pThread.start(); cThread1.start(); cThread2.start(); cThread3.start(); cThread4.start(); cThread5.start(); }}执行结果如下: 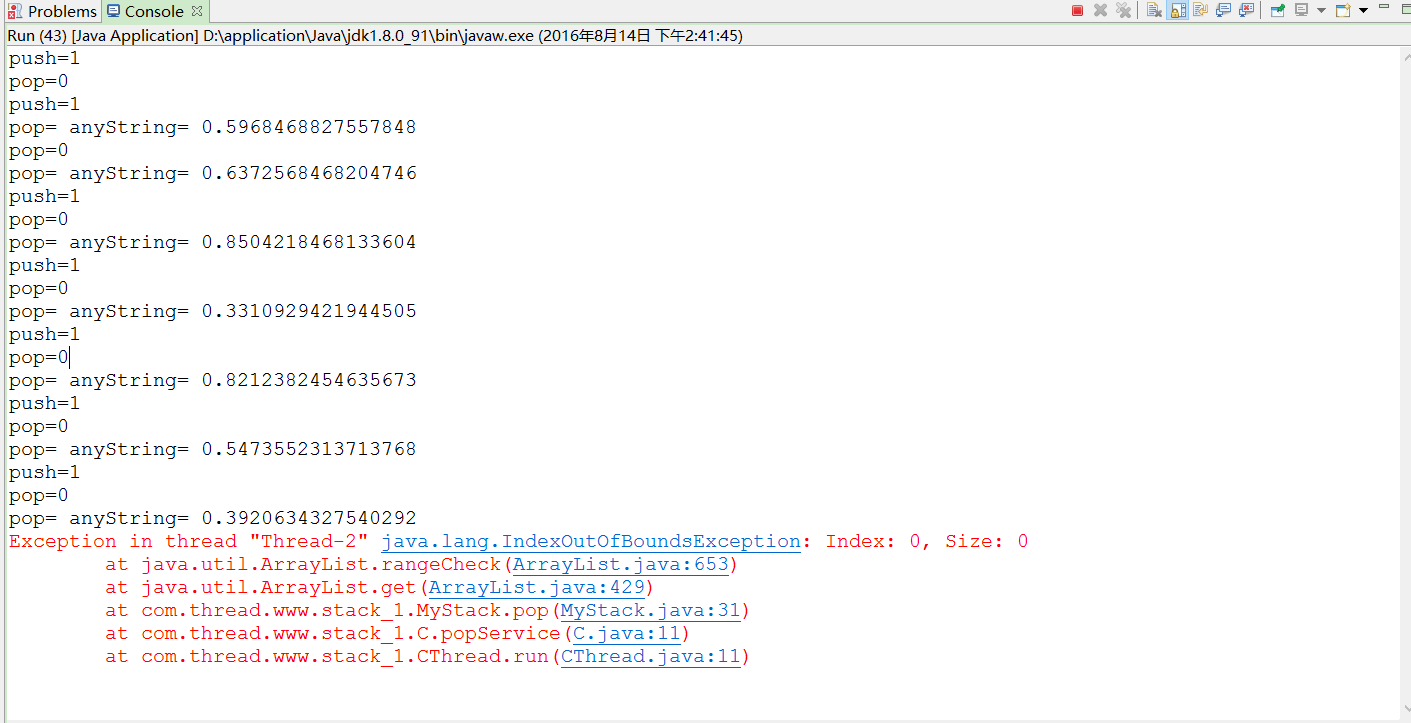
出现异常,出现这个问题的原因是:
在MyStack.java类中使用了if作为条件判断,代码如下:
synchronized public String pop() { String returnValue = ""; if (list.size() == 0) { try { this.wait(); } catch (InterruptedException e) { e.printStackTrace(); } } returnValue = "" + list.get(0); list.remove(0); this.notify(); System.out.println("pop=" + list.size()); return returnValue; }因为条件改变时并没有得到及时的响应,所以多个呈wait状态的线程被唤醒,继而执行list.remove(0)代码而出现异常。解决这个问题的方法是,将if改为while语句即可。修改代码如下:
synchronized public void push(){ while(list.size()==1){ try { this.wait(); } catch (InterruptedException e) { e.printStackTrace(); } } list.add("anyString= "+Math.random()); this.notifyAll(); System.out.println("push="+list.size()); } synchronized public String pop() { String returnValue = ""; while (list.size() == 0) { try { this.wait(); } catch (InterruptedException e) { e.printStackTrace(); } } returnValue = "" + list.get(0); list.remove(0); this.notify(); System.out.println("pop=" + list.size()); return returnValue; }执行结果如下: 
执行结果没有异常,但是却出现了死锁。解决办法还是使用notifyAll()方法。代码两处使用了notify都改为notifyAll即可。
6.多生产与一消费
修改Run类的代码如下:
public class Run { public static void main(String[] args) { MyStack myStack = new MyStack(); P p1 = new P(myStack); P p2 = new P(myStack); P p3 = new P(myStack); P p4 = new P(myStack); P p5 = new P(myStack); C c = new C(myStack); PThread pThread1 = new PThread(p1); PThread pThread2 = new PThread(p2); PThread pThread3 = new PThread(p3); PThread pThread4 = new PThread(p4); PThread pThread5 = new PThread(p5); pThread1.start(); pThread2.start(); pThread3.start(); pThread4.start(); pThread5.start(); CThread cThread = new CThread(c); cThread.start(); }}7.多生产与多消费:操作栈
示例还是基于上面的代码,修改Run的代码如下:
public class Run { public static void main(String[] args) { MyStack myStack = new MyStack(); P p1 = new P(myStack); P p2 = new P(myStack); P p3 = new P(myStack); P p4 = new P(myStack); P p5 = new P(myStack); C c1 = new C(myStack); C c2 = new C(myStack); C c3 = new C(myStack); C c4 = new C(myStack); C c5 = new C(myStack); PThread pThread1 = new PThread(p1); PThread pThread2 = new PThread(p2); PThread pThread3 = new PThread(p3); PThread pThread4 = new PThread(p4); PThread pThread5 = new PThread(p5); pThread1.start(); pThread2.start(); pThread3.start(); pThread4.start(); pThread5.start(); CThread cThread1 = new CThread(c1); CThread cThread2 = new CThread(c2); CThread cThread3 = new CThread(c3); CThread cThread4 = new CThread(c4); CThread cThread5 = new CThread(c5); cThread1.start(); cThread2.start(); cThread3.start(); cThread4.start(); cThread5.start(); }}执行结果如下: 
从程序运行结果看,list对象的size()并没有超过1.
通过管道进行线程间通信:字节流
在Java语言中提供了各种各样的输入/输出流Stream,使我们能够很方便地对数据进行操作,其中管道流(pipeStream)是一种特殊的流,用于不同线程间直接传送数据。一个线程发送数据到输出管道,另一个线程从输入管道中读数据。通过使用管道,实现不同线程间的通信,而无须借助类似临时文件之类的东西。
在JDK中提供了4个类来使线程间可以进行通信:
1)、PipedInputStream和PipedOutputStream。
2)、PipedReader和PipedWriter。
创建如下代码:
public class ReadData { public void readMethod(PipedInputStream inputStream){ try{ System.out.println("read:"); byte[] byteArray = new byte[20]; int readLength = inputStream.read(byteArray); while(readLength!=-1){ String newData = new String(byteArray,0,readLength); System.out.println("read:"+newData); readLength = inputStream.read(byteArray); } System.out.println(); inputStream.close(); }catch(Exception e){ } }}public class WriteData { public void writeMethod(PipedOutputStream outputStream){ try{ System.out.println("write:"); for(int i=0;i<300;i++){ String outData = ""+(i+1); outputStream.write(outData.getBytes()); System.out.println("write:"+outData); } outputStream.close(); }catch(Exception e){ e.printStackTrace(); } }}public class ThreadRead extends Thread{ private ReadData readData; private PipedInputStream inputStream; public ThreadRead(ReadData readData,PipedInputStream inputStream){ this.readData = readData; this.inputStream = inputStream; } @Override public void run() { readData.readMethod(inputStream); }}public class ThreadWrite extends Thread{ private WriteData writeData; private PipedOutputStream outputStream; public ThreadWrite(WriteData writeData,PipedOutputStream outputStream){ this.writeData = writeData; this.outputStream = outputStream; } @Override public void run() { writeData.writeMethod(outputStream); }}public class Run { public static void main(String[] args) throws IOException, InterruptedException { PipedInputStream inputStream = new PipedInputStream(); PipedOutputStream outputStream = new PipedOutputStream(); WriteData writeData = new WriteData(); ReadData readData = new ReadData(); ThreadWrite threadWrite = new ThreadWrite(writeData, outputStream); ThreadRead threadRead = new ThreadRead(readData, inputStream); //使两个线程之间通信 outputStream.connect(inputStream); threadRead.start(); Thread.sleep(2000); threadWrite.start(); }}执行结果如下: 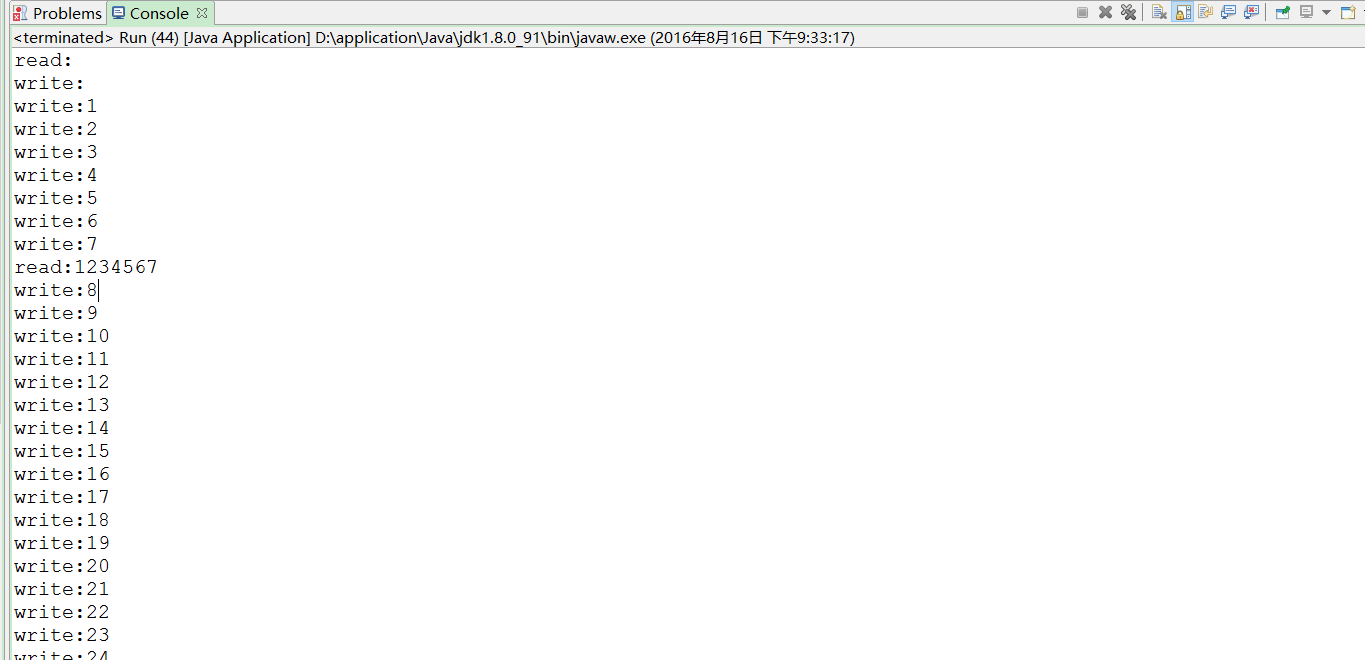

使用代码outputStream.connect(inputStream)或inputStream.connect(outputStream)使两个线程产生通信链接。这样可以将数据进行输出输入。
从输出结果来看,两个线程通过管道流成功进行数据的传输。
通过管道进行线程间通信:字符流
在管道中还可以传递字符流。创建如下代码:
public class ReadData { public void readMethod(PipedReader reader){ try{ System.out.println("read:"); char[] charArray = new char[20]; int readLength = reader.read(charArray); while(readLength!=-1){ String newData = new String(charArray,0,readLength); System.out.println("read:"+newData); readLength = reader.read(charArray); } System.out.println(); reader.close(); }catch(Exception e){ } }}public class WriteData { public void writeMethod(PipedWriter writer){ try{ System.out.println("write:"); for(int i=0;i<300;i++){ String outData = ""+(i+1); writer.write(outData); System.out.println("write:"+outData); } writer.close(); }catch(Exception e){ e.printStackTrace(); } }}public class ThreadRead extends Thread{ private ReadData readData; private PipedReader reader; public ThreadRead(ReadData readData,PipedReader reader){ this.readData = readData; this.reader = reader; } @Override public void run() { readData.readMethod(reader); }}public class ThreadWrite extends Thread{ private WriteData writeData; private PipedWriter writer; public ThreadWrite(WriteData writeData,PipedWriter writer){ this.writeData = writeData; this.writer = writer; } @Override public void run() { writeData.writeMethod(writer); }}public class Run { public static void main(String[] args) throws IOException, InterruptedException { PipedReader reader = new PipedReader(); PipedWriter writer = new PipedWriter(); WriteData writeData = new WriteData(); ReadData readData = new ReadData(); ThreadWrite threadWrite = new ThreadWrite(writeData, writer); ThreadRead threadRead = new ThreadRead(readData, reader); //使两个线程之间通信 writer.connect(reader); threadRead.start(); Thread.sleep(2000); threadWrite.start(); }}执行结果如下: 
和上面的执行结果差别不大。
实战:等待/通知之交换备份
本例创建20个线程,其中10个线程是将数据备份到A数据库中,另外10个线程将数据备份到B数据库中,并且备份A数据库和B数据库是交叉进行的。创建如下代码:
public class DBTools { volatile private boolean preVIsA = false; synchronized public void backupA() { try { while (preVIsA == true) { this.wait(); } for(int i=0;i<5;i++){ System.out.println("★★★★★"); } preVIsA = true; notifyAll(); } catch (Exception e) { e.printStackTrace(); } } synchronized public void backupB(){ try{ while(preVIsA==false){ this.wait(); } for( int i=0;i<5;i++){ System.out.println("☆☆☆☆☆"); } preVIsA = false; notifyAll(); }catch(Exception e){ e.printStackTrace(); } }}public class BackupA extends Thread{ private DBTools dbTools; public BackupA(DBTools dbTools){ this.dbTools = dbTools; } @Override public void run() { dbTools.backupA(); }}public class BackupB extends Thread{ private DBTools dbTools; public BackupB(DBTools dbTools){ this.dbTools = dbTools; } @Override public void run() { dbTools.backupB(); }}public class Run { public static void main(String[] args) { DBTools dbTools = new DBTools(); for(int i=0;i<20;i++){ BackupB backupB = new BackupB(dbTools); backupB.start(); BackupA backupA = new BackupA(dbTools); backupA.start(); } }}执行结果如下: 
执行的结果是交替运行的。
交替打印的原理是使用下面的代码作为标记:
volatile private boolean preVIsA = false;实现A和B线程交替执行的效果。
- 多线程 等待/通知机制
- 等待/通知机制:
- 通知等待机制
- Java的等待通知机制
- 等待/通知机制wait(),notify()
- 多线程的等待/通知机制
- 等待/通知机制:wait/notify
- 多线程之等待通知机制
- Java等待/通知机制:生产者-消费者问题
- java多线程的等待和通知机制
- 3.1等待/通知机制(wait/notify)
- java并发(等待/通知机制)
- 等待通知机制 wait,notify,notifyAll
- java线程同步的等待通知机制
- java线程等待/通知机制及中断
- java多线程系列(三)---等待通知机制
- java多线程系列(三)---等待通知机制
- 多线程 等待/通知机制的实现
- Android杂谈(11)更换Androidstudio缓存配置目录,减少c盘压力
- Oracle共通操作
- Java四种线程池的使用
- Activity 启动流程
- Ultraedit去除带有关键字的一行
- 等待/通知机制:
- ListView+网络下载+xml解析
- Android Studio 环境搭建以及入门详细介绍(装载)
- linux先安装svn server
- 系统架构师要点总结(一) —— 软件架构设计
- 关闭windows 2003 开机事件报错
- android Conversion to Dalvik format failed with error 1
- 关于VS2013序列号
- Vasiliy's Multiset