Spring常用配置示例
来源:互联网 发布:数据库的作用是什么 编辑:程序博客网 时间:2024/05/01 18:37
Spring框架是一个分层架构,由不同的模块组成,构成spring的每个组件或模块都可以单独使用或者多个模块配合使用,以实现不同的功能需求。Spring框架的模块结构如下图所示: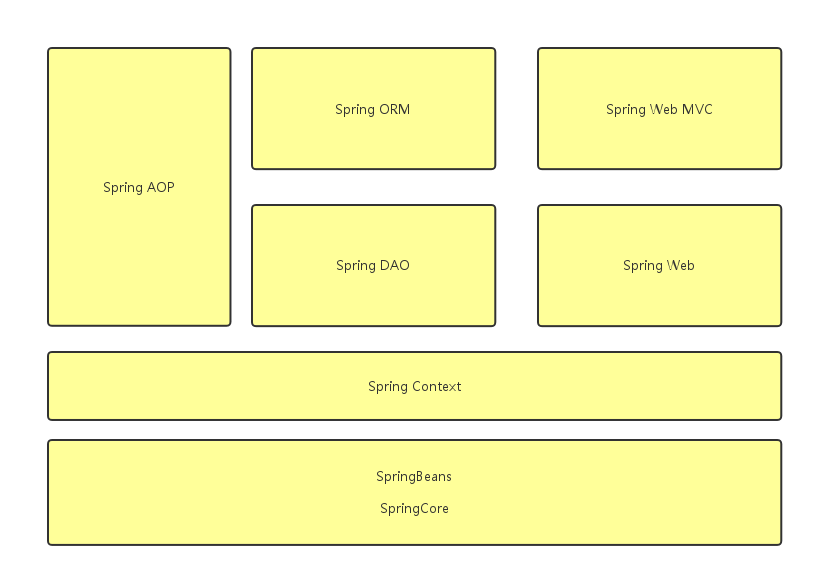
SpringCore是Spring框架的核心模块,提供spring框架的基本功能,使用工厂模式BeanFactory通过控制反转(IoC)、依赖注入(DI)等实现对beans的管理功能,将对象间的耦合关系通过配置文件进行管理,实现了“低耦合”的程序设计原则。
SpringContext通过配置文件的方式向spring提供上下文服务,如JNDI、国际化、校验等
SpringDAO是spring框架对数据访问的抽象,封装了对JDBC的操作,统一了异常结构用于管理不同数据库厂商产品抛出的错误信息,简化了对异常信息的处理。
SpringORM负责spring与ORM框架的集成,如Hibernate、MyBatis等。
SpringWeb是spring的Web模块,提供WebApplication的上下文信息,实现如文件上传、数据绑定、与其他框架(如Struts)的集成等。
SpringWebMVC是一个Web的MVC框架,提供了对Controller、Model、Service等组件的管理,视图层通过不同的视图解析器支持多种视图技术,如JSP、Velocity、FreeMarker等
SpringAOP是Spring对面向切面编程的支持,支持JDK和CGLib两种字节码操作方式,可以实现对Spring管理的任意对象的AOP支持。
Spring框架的配置文件是基于xml的,Spring强大的功能依赖于类型繁多的配置项,这些配置项纷繁复杂难以记忆,下面将常用的配置项示例记录下来,以备后续查看使用。
Spring配置------命名空间:
<?xml version="1.0" encoding="UTF-8"?><beans xmlns="http://www.springframework.org/schema/beans" <!-- 默认bean命名空间 -->xmlns:xsi="http://www.w3.org/2001/XMLSchema-instance" <!-- 固定格式 -->xmlns:aop="http://www.springframework.org/schema/aop"<!-- AOP命名空间的scheme约束 -->xmlns:context="http://www.springframework.org/schema/context"<!-- context命名空间的scheme约束 -->xsi:schemaLocation=" <!-- 上面各个scheme的location信息 --> http://www.springframework.org/schema/beans http://www.springframework.org/schema/beans/spring-beans-4.0.xsd http://www.springframework.org/schema/aop http://www.springframework.org/schema/aop/spring-aop-4.0.xsd http://www.springframework.org/schema/context http://www.springframework.org/schema/context/spring-context-4.0.xsd "></beans>
Spring Beans主要配置:
<bean     class="bean的完全限定名"          name/id="bean在容器内的唯一名称"            scope="bean的生命周期"            lazy-init="是否为延迟加载"            init-method="bean的setter被调用之后调用该方法进行初始化"            destroy-method="容器在销毁该Bean后的调用的方法"            abstract="是否为抽象Bean,spring对于抽象bean不产生实例,主要用于继承"            parent="父Bean的名称,会继承父Bean的属性,与Java的Class无任何关系"            factory-method="工厂方法的名字"            factory-bean="工厂Bean的名字"            depends-on ="依赖Bean的名字,保证初始化顺序。” >
            <!-- Constructor-arg给属性赋值写法一 -->            <constructor-arg type="int" value="10"/>            <!-- Constructor-arg给属性赋值写法二 -->            <constructor-arg name="age" value="10"/>            <!-- Constructor-arg给属性赋值写法三 -->            <constructor-arg index="0" value="10"/>            <!-- Properties给属性赋值写法一 -->            <property name="bean1">                 <ref bean="另外一个bean的id"/>            </property>            <!-- Properties给属性赋值写法二 -->            <property name="bean1" ref="另外一个bean的id"/>            <!-- Properties给属性赋值写法三 -->            <property name="age" value="10"/></bean>
Spring 配置------context:
自动扫描包(默认设置)
<context:component-scan base-package="com.xxx.test" />
自动扫描包(含过滤器)
<context:component-scan base-package="cn.xxx.test" > <!-- 根据注解(包含) --> <context:include-filter type="annotation" expression="org.springframework.stereotype.Component"/> <!-- 根据aspectJ语法,一般用于AOP --> <context:include-filter type="aspectj" expression=""/> <!-- 根据正则表达式(排除) --> <context:exclude-filter type="regex" expression=""/></context:component-scan>
<!-- 注解支持 -->
<context:annotation-config/>
激活Spring对class的注解检测,该配置会向Spring 容器注册一些BeanPostProcessor用于处理注解,
如:AutowiredAnnotationBeanPostProcessor、CommonAnnotationBeanPostProcessor、
PersistenceAnnotationBeanPostProcessor 和 RequiredAnnotationBeanPostProcessor
比如要使用@AutoWired注解,需要向Spring注册如下的bean :
<bean class="org.springframework.beans.factory.annotation. AutowiredAnnotationBeanPostProcessor "/>
如果要使用@Required的注解,就必须注册如下bean:
<bean class="org.springframework.beans.factory.annotation.RequiredAnnotationBeanPostProcessor"/>
而使用context:annotation-config相当于简化了操作。
另外如果配置了context:component-scan 则同样具备了注解检测的功能,此种情况下可以移除context:annotation-config
Spring 配置------AOP:
一些基本概念:
方面(Aspect):即切面,一个关注点的模块化,这个关注点实现可能另外横切多个对象。
连接点(Joinpoint):程序执行过程中明确的点,如方法的调用或特定的异常被抛出。
通知(Advice):在特定的连接点,AOP框架执行的动作。各种类型的通知包括“around”、“before”、“after”和“throws”通知。
切入点(Pointcut):指定一个通知将被引发的一系列连接点的集合。AOP框架必须允许开发者指定切入点,例如,使用正则表达式。
引入(Introduction):添加方法或字段到被通知的类。Spring允许引入新的接口到任何被通知的对象。
目标(Target):包含连接点的对象,也被称作被通知或被代理对象。
代理(Proxy):AOP框架创建的对象,包含通知。在Spring中,AOP代理可以是JDK动态代理或CGLIB代理。
编织(Weaving):组装方面来创建一个被通知对象。这可以在编译时完成(例如使用AspectJ编译器),也可以在运行时完成。Spring和其他纯Java AOP框架一样,在运行时完成织入。
AOP的xml配置项:
<bean id="myadvice" class="cn.test.MyAdvice" /><bean id="targetclass" class="cn.test.aop.TargetClass" /><aop:config> <aop:pointcut expression="execution(* cn.test.aop.*.*(..))" id="pt" /> <aop:aspect ref="myadvice"> <aop:before method="beforeAdvice" pointcut-ref="pt" /> <aop:after method="afterAdvice" pointcut-ref="pt" /> <aop:around method="aroundAdvice" pointcut-ref="pt"/> </aop:aspect></aop:config>
使用注解的方式实现AOP(示例):
@Component@Aspectpublic class MyAdvice2 {//拦截cn.test.spring.aop包下所有类的所有方法final String exp="execution(* cn.test.spring.aop.*.*(..))";@Before(exp)public void beforeAdvice(){ System.out.println("before advice2");}@After(exp)public void afterAdvice(){ System.out.println("after advice2");}@AfterReturning(exp)public void afterRetAdvice(){ System.out.println("after return advice2");}@Around(exp)public void aronudAdvice(ProceedingJoinPoint jp){ System.out.println("start arround advice2"); try { jp.proceed(); } catch (Throwable e) { e.printStackTrace(); } System.out.println("after arround advice2"); }}
Spring 配置------MVC:
对web.xml文件的配置项:
<servlet>
  <servlet-name>dispatcherServlet</servlet-name>
  <servlet-class>org.springframework.web.servlet.DispatcherServlet</servlet-class>    <init-param>
    <param-name>contextConfigLocation</param-name>
    <param-value>/WEB-INF/spring-servlet.xml</param-value>
  </init-param>
  <load-on-startup>1</load-on-startup></servlet>

<servlet-mapping>
   <servlet-name>dispatcherServlet</servlet-name>
   <url-pattern>/</url-pattern></servlet-mapping>
<!-- Spring Web配置 -->
<listener>
  <listenerclass>org.springframework.web.context.ContextLoaderListener </listener-class></listener>
<!-- 指定Spring Bean的配置文件所在目录。默认配置在WEB-INF目录下 --><context-param>
  <param-name>contextConfigLocation</param-name>
  <param-value>classpath:config/applicationContext.xml</param-value></context-param>
对spring配置文件的相关配置项:
<mvc:annotation-driven /><context:component-scan base-package="cn.spring.test" />
<!-- 如果当前请求为“/”时,则转发到“index”视图 --><mvc:view-controller path="/" view-name="forward:index" /><!-- 静态资源映射 --><mvc:resources mapping="/js/**" location="/WEB-INF/js/" /><mvc:resources mapping="/css/**" location="/WEB-INF/css/" /><mvc:resources mapping="/fonts/**" location="/WEB-INF/fonts/" /><mvc:resources mapping="images/**" location="/WEB-INF/images/" />
<!-- 当上面要访问的静态资源不存在与上面的配置中时,则根据此配置来访问 --><mvc:default-servlet-handler /><!-- 支持上传文件 --><bean id="multipartResolver" class="org.springframework.web.multipart.commons.CommonsMultipartResolver">  <property name="maxUploadSize"> <value>xxx</value></property>  <property name="defaultEncoding"> <value>UTF-8</value></property></bean><!-- jsp视图解析器 --><bean class="org.springframework.web.servlet.view.InternalResourceViewResolver"  >  <property name="prefix" value="/WEB-INF/jsps/" />  <property name="suffix" value=".jsp" /></bean>
文件上传示例代码:
@RequestMapping("/upload")@ResponseBodypublic String fileUpload(@RequestParam("formFile") MultipartFile formFile) throws IOException { String fileContent=new String(formFile.getBytes()); //write to local file return "code:0";}
- Spring常用配置示例
- spring事物配置示例
- Spring Bean配置示例
- spring spring scheduled配置示例
- Spring中Bean配置示例
- 【Spring】SpringMVC Servlet 配置示例
- spring mvc初级配置示例
- Spring配置JDBCTemplate连接数据库、JDBCTemplate和NamedParameterJdbcTemplate常用操作示例
- 【Spring】Spring常用配置-Profile
- Spring常用的配置
- ssh_1 常用spring配置
- 常用Spring配置项
- Spring 常用配置小结
- spring常用配置
- spring mvc常用配置
- Spring常用配置解析
- Spring常用配置
- Spring中常用配置
- 关系型数据库知识小结
- ZooKeeper简介
- 捕@获@数@据@包@_@百@度@文@库@
- React Native中的对象深拷贝
- Android的应用程序结构分析Activity
- Spring常用配置示例
- Java内存模型知识点小结---《深入理解Java内存模型》(程晓明)读书总结
- STK Component之CalculationContext(计算上下文环境)
- [置顶]【Spring源码分析系列】ApplicationContext 相关接口架构分析
- linux下memcached安装以及启动
- 进程池 线程池 内存池
- 用两个栈实现一个队列以及用两个队列实现一个栈
- 京东校招编程题目
- 【Github教程】史上最全github使用方法:github入门到精通之一