简单技巧写出侧滑菜单

来源:互联网 发布:canvas性能优化 编辑:程序博客网 时间:2024/04/28 08:57


先来看个侧滑菜单效果:


1.png (43.28 KB, 下载次数: 12)

下载附件  保存到相册

2015-1-26 10:19 上传


上面分别为:初始状态->滑动中->松开打开菜单
你造吗?看完本文章,写这种侧滑菜单,so easy for you!
你造吗?其实写这个侧滑菜单,只需要10行手写代码就能搞定!
你造吗?看完本文章,当你再听到产品说"我要这个效果"时,再也不会底气不足!
在Android开发中,自定义View效果是属于高级的部分。因为常用逻辑上的东西,经过1年开发后,你会的大家都会。而对于如何实现特殊效果的view的技能上,就可以分个高低了。所以说,无论是面子上的事儿(可以得到程序员妹纸的崇拜),还是职业技能的提高,我们都非常有必要去熟谙view特效之技巧。
接下来,我将用原理分析加代码示例的方式说明让view移动的一些常用技巧。
在实际开发中,我们一般会在2种情况下需要让view移动:
1.触摸过程中,随着手指拖动让view移动
2.手指抬起后,让view平滑缓慢移动到某个位置
View移动的本质是什么?
试想一下,view无论出现在屏幕中任何一个位置都是有其坐标点,假如没有坐标,那么view的出现就是不可控的,从而也无法进行绘制了。
所谓view移动,无非是让view从一个坐标点移动到另外一个坐标点。
View在什么坐标系里面移动?
先想想坐标系的概念:
屏幕坐标系:原点在屏幕左上角,x轴正方向朝右,y轴正方向朝下;
view坐标系:原点在view的左上角,同样x轴正方向朝右,y轴正方向朝下;
如图所示:
 
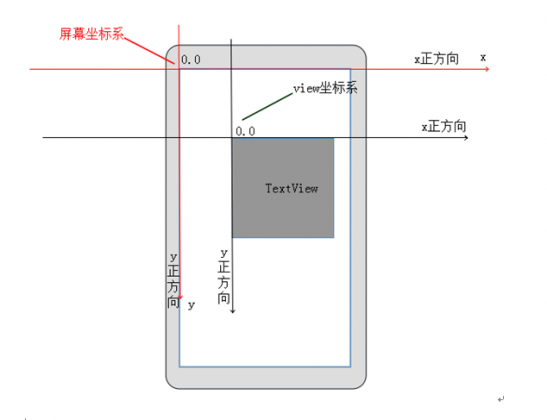
(如果对上面2种坐标系的说明有疑惑,可以在activity中放置一个简单的TextView,最好让TextView距离父view有些距离,对TextView进行触摸监听,然后在onTouchEvent中打印event.getX()和event.getRawX(),前者是触摸点相对于view左上角的坐标,后者是触摸点相对于屏幕左上角的坐标)
View移动可以细分为2类:
a.view本身在父view中移动,即整体移动,同时该分类也可看做是父view的内容在移动
b.view的内容在移动,即内部移动
View移动有哪些具体的API?
下面结合上面的分析来看移动view的具体方法:
1.通过更改view的left,top,right,bottom来移动view
    该方法只适用于在ViewGroup中移动子view,即移动分类中的a类。我们知道left,top,right,bottom4个值是在onLayout方法执行的时候初始化的。同时对4个参数的意思再做一次简单说明,只拿left和top为例:
left:表示当前view的左边距父view原点的距离
top:表示当前view的顶部距父view原点的距离
view提供了3个方法来更改这些值:
  1. layout(l,r,t,b);
  2. offsetLeftAndRight(offset);//同时对left和right进行偏移
  3. offsetTopAndBottom(offset);//同时对top和bottom进行偏移
复制代码

    那么假如我们对一个view添加触摸监听,在TouchMove的时候得到触摸移动的值,分别使用这3个方法就可以达到让view随我们手指移动而在父view中移动的目的.
代码示例:
  1. public boolean onTouch(View v, MotionEvent event) {
  2.          float x =  event.getX();
  3.          float y =  event.getY();
  4.          switch (event.getAction()) {
  5.          case MotionEvent.ACTION_DOWN:
  6.                  break;
  7.          case MotionEvent.ACTION_MOVE:
  8.                  float deltaX = x - lastX;
  9.                  float deltaY = y - lastY;
  10. //                text.layout(text.getLeft()+deltaX, text.getTop()+deltaY, text.getRight()+deltaX, text.getBottom()+deltaY);
  11.                  text.offsetLeftAndRight((int) deltaX);
  12.                  text.offsetTopAndBottom((int) deltaY);
  13.                  break;
  14.          }
  15.                  lastX = x;
  16.                  lastY = y;
  17.                  return true;
  18. }
复制代码

2.通过更改scrollX和scrollY来移动view,即scrollTo和scrollBy方法,该方法是用来移动view内容的,用官方的话说就是:internally scroll theircontent.
根据对view移动的分类,如果是在ViewGroup中使用,则可以让当前view的所有子view同时移动,如果是对单个view使用,则可以让view的内容移动。
注意:view的background不属于view的内容,
下面摘自一段view的draw方法中的注释,来看view绘制的步骤:
  1. /*
  2.          * Draw traversal performs several drawing steps which must be executed
  3.          * in the appropriate order:
  4.          *  1. Draw the background
  5.          *  2. If necessary, save the canvas' layers to prepare for fading
  6.          *  3. Draw view's content
  7.          *  4. Draw children
  8.          *  5. If necessary, draw the fading edges and restore layers
  9.          *  6. Draw decorations (scrollbars for instance)
  10.          */
复制代码

对于这里的view的content,对于TextView,content就是它的文本,对于ImageView,则是它的drawable对象。
下面解释scrollX和scrollY:
首先如果直接使用scrollTo和scrollBy这2个方法,你会发现当你scrollTo(10,0)的时候,view的内容却向左移动10,同样scrollBy(10,0),view的内容会继续向左移动10,竟然不是向右移动,这很让人迷惑。
先来看下官方对scrollX的解释:
  1. /**
  2.          * Return the scrolled left position of this view. This is the left edge of
  3.          * the displayed part of your view. You do not need to draw any pixels
  4.          * farther left, since those are outside of the frame of your view on screen.
  5.          * @return The left edge of the displayed part of your view, in pixels.
  6.          */
复制代码

首先Android绘制view的时候都有一个bounds,可通过view.getDrawingRect()获取,其实是个Rect对象,这个Rect的区域就是Canvas真正绘制的区域,超过这个bounds就不会再绘制。其实上边注释中的the left edge of the displayed part if yourview,就是指bounds的left。Rect的left,top,right,bottom值分别为scrollX,scrollY,scrollX+width,scrollY+height;显然Rect的left和top最初都是0,因为没有scroll,当scrollTo(10,0)后,Rect的left为10,即bounds向右移动了10,那么这时候再在移动后的bounds范围内绘制的时候,会看到是view的内容向左移动了,因为view的位置是不变的,bounds右移,会造成内容向左移动的视觉效果。这也是我们疑惑的地方。究其原因,就是scrollTo和scrollBy是指view的bounds移动,并不是直接指view内容的移动。同时scroll所在坐标系是当前view坐标系。
scrollTo和scrollBy方法移动view过程如图所示:

那么假如我们对一个view添加触摸监听,在TouchMove的时候得到触摸移动的值,分别使用scrollTo和scrollBy方法就可以达到让view的内容随我们手指移动而移动的目的。
代码示例:
  1. public boolean onTouch(View v, MotionEvent event) {
  2.          float x =  event.getX();
  3.          float y =  event.getY();
  4.          switch (event.getAction()) {
  5.          case MotionEvent.ACTION_DOWN:
  6.                  break;
  7.          case MotionEvent.ACTION_MOVE:
  8.                  float deltaX = x - lastX;
  9.                  float deltaY = y - lastY;
  10.                                            
  11.                  /*为什么是减去delatX:newScrollX:手指往右移动,deltaX会是正值,scrollX会更小,bounds的left更小,则bounds往左移动,view的内容会往右移动*/
  12.                  float newScrollX = text.getScrollX() - deltaX;
  13.                  float newScrollY = text.getScrollY() - deltaY;
  14.                  text.scrollTo((int)newScrollX, (int)newScrollY);
  15.                  //scrollBy传负值的原理同上text.scrollBy((int)-deltaX,(int)-deltaY);
  16.                  break;
  17.          }
  18.                  lastX = x;
  19.                  lastY = y;
  20.                  return true;
  21. }
复制代码


如何让View平滑移动?
上面2种方法一般用在对View进行TouchMove的时候让view移动的,而且layout和scroll都是瞬间移动过去,那么问题来了,当我们手指抬起后,想让View移动平滑移动到指定位置该怎么办?既然layout和scroll都能移动view,那我们在一段时间内循环调用这些方法,每次移动一点,不就能够平滑移动了吗。
对于这个需求,一般有2种做法:
1.Scroller实现
2.自定义动画实现
一.用Scroller实现View平滑移动
Scroller封装了对view移动的操作,但它是一个模拟移动,并不是真正去移动view。由于它模拟了view的整个移动过程,所以我们可以在模拟过程中,循环获取当前view真实移动的时候的scrollX,scrollY;那么拿到scrollX和scrollY后,再调用scrollTo就达到平滑移动的目的了。
使用Scroller一般有3个固定步骤:
a.初始化Scroller
  1. Scroller scroller =new Scroller(getContext());
复制代码
b.开启模拟过程
  1. scroller.startScroll(startX, startY, dx, dy,500);
  2. invalidate();
复制代码
c.在模拟过程中获取view真实移动时的值,并调用scrollTo去真正移动view
  1. public void computeScroll() {
  2.          super.computeScroll();
  3.          if(scroller.computeScrollOffset()){
  4.                   scrollTo(scroller.getCurrX(), scroller.getCurrY());
  5.                  invalidate();
  6.          }
  7. }
复制代码

说明:在b,c步骤中,需要说明的是必须调用invalidate()方法,因为我们只能在computeScroll方法中获取模拟过程中的scrollX和scrollY,但是computeScroll不会自动调用,而invalidate->draw->computeScroll;所以需要调用invalidate,从而间接调用computeScroll,达到循环获取scrollX和scrollY的目的。当模拟过程结束后,scroller.computeScrollOffset()会返回false,从而中断循环。
二.用自定义动画实现View平滑移动
   由于系统定义的TranslateAnimation只能移动view本身,而不能移动view的内容,所以需要自定义。系统定义好的4种动画,本质都是在一段时间内改变view的某个属性,所以我们也可以自定义动画,继承自Animation类,去在一段时间内改变我们想改变的属性,比如scrollX,scrollY。
    Animation同样是模拟了一个执行过程,它与Scroller很相似,不同的是Scroller为我们计算出了view真实移动情况下的scrollX和scrollY,而Animation没有。另外Scroller需要我们去主动调用computeScroll,而Animation不需要,它在执行过程中会循环调用applyTransformation方法,直到动画结束为止。所以我们需要在applyTransformation方法中计算当前的scrollX和scrollY,然后调用view.scrollTo(x,y);
    由于applyTransformation的第一个interpolatedTime为我们标识了动画执行的进度和百分比,所以我们可以根据这个参数获取执行过程中任意时刻的scrollX和scrollY。
下面写一个通用的让view在一段时间内缓慢scroll到指定位置的动画,代码如下:
  1. public class SmoothScrollAnimation extends Animation{
  2.          private View view;

  3.          private int originalScrollX;
  4.          private int totalScrollDistance;
  5.          public SmoothScrollAnimation(View view,int targetScrollX){
  6.                  super();
  7.                  this.view = view;

  8.                    originalScrollX = view.getScrollX();
  9.                    totalScrollDistance = targetScrollX - originalScrollX;

  10.                    setDuration(400);
  11.          }

  12.     @Override
  13.          protected void applyTransformation(float interpolatedTime, Transformation t){
  14.                  super.applyTransformation(interpolatedTime, t);
  15.                  int newScrollX =(int)(originalScrollX +
  16.                  totalScrollDistance*interpolatedTime);             
  17.                    view.scrollTo(newScrollX,0);
  18.          }
  19. }
复制代码
使用强大的ViewDragHelper
最后,介绍一个更强大的类ViewDragHelper,在上面的过程中我们需要监视触摸,计算手指移动距离,在去不断调用layout方法去移动view,在手指抬起时去自己缓慢移动view,有了这个类,你统统不需要做了。
    ViewDragHelper一般用于在ViewGroup中对子view的拖拽移动,不过它需要接收一个TouchEvent事件。
    它封装了对触摸位置(是否在边缘和当前触摸的是哪个子view),手指移动距离,移动速度,移动方向的检测,以及Scroller.只需要我们指定什么时候开始检测,具体移动多少。
    那么我们现在来做这个文章开头的侧滑菜单的效果,是真正的10行手写代码实现的,可见ViewDragHelper的强大。
方法的说明都在代码中,代码如下:
  1. public class SlideMenu extends FrameLayout{
  2.          public SlideMenu(Context context, AttributeSet attrs) {
  3.                  super(context, attrs);
  4.                  init();
  5.          }  
  6.          private View menuView,mainView;
  7.          private int menuWidth;//菜单宽度
  8.          private ViewDragHelper viewDragHelper;
  9.          private void init(){
  10.                  viewDragHelper = ViewDragHelper.create(this, callback);
  11.          }
  12.          @Override
  13.          protected void onFinishInflate() {
  14.                  super.onFinishInflate();
  15.                  if(getChildCount()!=2){
  16.                           throw new IllegalArgumentException("You layout must have only 2 children!");
  17.                  }
  18.                  menuView = getChildAt(0);
  19.                  mainView = getChildAt(1);
  20.          }
  21.          @Override
  22.          protected void onSizeChanged(int w, int h, int oldw, int oldh) {
  23.                  super.onSizeChanged(w, h, oldw, oldh);
  24.                  menuWidth = menuView.getMeasuredWidth();
  25.          }
  26.          @Override
  27.          public boolean onInterceptTouchEvent(MotionEvent ev) {
  28.                  return viewDragHelper.shouldInterceptTouchEvent(ev);
  29.          }
  30.          @Override
  31.          public boolean onTouchEvent(MotionEvent event) {
  32.                  //将触摸事件传递给ViewDragHelper,此操作必不可少
  33.                  viewDragHelper.processTouchEvent(event);
  34.                  return true;
  35.          }
  36.          //ViewDragHelper对触摸监听的回调
  37.          private ViewDragHelper.Callback callback = new Callback() {
  38.                  /**
  39.                   * 什么时候开始监测触摸
  40.                   */
  41.                  @Override
  42.                  public boolean tryCaptureView(View child, int pointerId) {
  43.                           return mainView==child;//如果当前触摸的child是mainView时开始检测
  44.                  }
  45.                  /**
  46.                   * 当触摸到childView时回调
  47.                   */
  48.                  @Override
  49.                  public void onViewCaptured(View capturedChild, int activePointerId) {
  50.                           super.onViewCaptured(capturedChild, activePointerId);
  51.                  }
  52.                  /**
  53.                   * 当拖拽状态改变,比如idle,dragging
  54.                   */
  55.                  @Override
  56.                  public void onViewDragStateChanged(int state) {
  57.                           super.onViewDragStateChanged(state);
  58.                  }
  59.                  /**
  60.                   * 在这里决定真正让view在垂直方向移动多少,默认实现则不会移动
  61.                   * 移动原理:最初top为0,当检测到手指向下拖动了10,则dy=10,top=child.getTop()+dy;
  62.                   * 如果返回0,则top一直为0,那么view就在垂直方向就不会移动
  63.                   * 如果返回top,则view会一直跟随手指拖动而移动
  64.                   * @param top  top为它认为你想移动到最新的top值
  65.                   * @param dy 垂直方向移动了多少
  66.                   */
  67.                  @Override
  68.                  public int clampViewPositionVertical(View child, int top, int dy) {
  69.                           return 0;
  70.                  }
  71.                  /**
  72.                   * 在这里决定真正让view在水平方向移动多少,默认实现则不会移动
  73.                   * 移动原理:最初left为0,当检测到手指向右拖动了10,则dx=10,left=child.getLeft()+dx;
  74.                   * 如果返回0,则left一直为0,那么view就在水平方向就不会移动
  75.                   * 如果返回left,则view会一直跟随手指拖动而移动
  76.                   * @param left  left为它认为你想移动到最新的left值
  77.                   * @param dx 水平方向移动了多少
  78.                   */
  79.                  @Override
  80.                  public int clampViewPositionHorizontal(View child, int left, int dx) {
  81.                           return left;
  82.                  }
  83.                  /**
  84.                   * view移动后的回调
  85.                   * @param left 移动后的view最新的left值
  86.                   * @param top 移动后的view最新的top值
  87.                   * @param dx x方向移动了多少
  88.                   * @param dy y方向移动了多少
  89.                   */
  90.                  @Override
  91.                  public void onViewPositionChanged(View changedView, int left, int top,
  92.                                    int dx, int dy) {
  93.                           super.onViewPositionChanged(changedView, left, top, dx, dy);
  94.                  }
  95.                  /**
  96.                   * 手指抬起回调
  97.                   * @param xvel x方向滑动的速度
  98.                   * @param yvel y方向滑动的速度
  99.                   */
  100.                  @Override
  101.                  public void onViewReleased(View releasedChild, float xvel, float yvel) {
  102.                          super.onViewReleased(releasedChild, xvel, yvel);
  103.                          //手指抬起后缓慢移动到指定位置
  104.                          if(mainView.getLeft()<menuWidth/2){
  105.                            //关闭菜单
  106.                            viewDragHelper.smoothSlideViewTo(mainView, 0,
  107.                            0);//相当于Scroller的startScroll方法
  108.                            ViewCompat.postInvalidateOnAnimation(SlideMenu.this);
  109.                          }else {
  110.                            //打开菜单
  111.                            viewDragHelper.smoothSlideViewTo(mainView, menuWidth, 0);
  112.                            ViewCompat.postInvalidateOnAnimation(SlideMenu.this);
  113.                          }
  114.                  }
  115.          };
  116.          /**
  117.           * 对Scroller的封装
  118.           */
  119.          public void computeScroll() {
  120.                  if(viewDragHelper.continueSettling(true)){
  121.                           ViewCompat.postInvalidateOnAnimation(this);
  122.                  }
  123.          }
  124. }
复制代码
View移动总结
综上所述,当你明白了移动view的原理和api后,不用再去在TouchMove的时候去自己手动移动view,如果对layout方法和scrollTo,scrollBy方法理解不深,就将上面对应代码复制到自己的demo中去感受下。
由于更多的移动veiw的情况是在ViewGroup中去移动子view,所以一般都用ViewDragHelper去做,这个类的介绍由于篇幅有限,可能对各个方法的理解还不够透彻,将代码运行起来并试着去改改效果,多感受一下就明白了。
0 0
原创粉丝点击