分布式定时任务框架-Elastic Job
来源:互联网 发布:深蓝知乎 编辑:程序博客网 时间:2024/05/16 10:25
Elastic-Job是ddframe中dd-job的作业模块中分离出来的分布式弹性作业框架。去掉了和dd-job中的监控和ddframe接入规范部分。该项目基于成熟的开源产品Quartz和Zookeeper及其客户端Curator进行二次开发。
项目开源地址:https://github.com/dangdangdotcom/elastic-job
ddframe其他模块也有可独立开源的部分,之前当当曾开源过dd-soa的基石模块DubboX。
elastic-job和ddframe关系见下图

Elastic-Job主要功能
定时任务: 基于成熟的定时任务作业框架Quartz cron表达式执行定时任务。
作业注册中心: 基于Zookeeper和其客户端Curator实现的全局作业注册控制中心。用于注册,控制和协调分布式作业执行。
作业分片: 将一个任务分片成为多个小任务项在多服务器上同时执行。
弹性扩容缩容: 运行中的作业服务器崩溃,或新增加n台作业服务器,作业框架将在下次作业执行前重新分片,不影响当前作业执行。
支持多种作业执行模式: 支持OneOff,Perpetual和SequencePerpetual三种作业模式。
失效转移: 运行中的作业服务器崩溃不会导致重新分片,只会在下次作业启动时分片。启用失效转移功能可以在本次作业执行过程中,监测其他作业服务器空闲,抓取未完成的孤儿分片项执行。
运行时状态收集: 监控作业运行时状态,统计最近一段时间处理的数据成功和失败数量,记录作业上次运行开始时间,结束时间和下次运行时间。
作业停止,恢复和禁用:用于操作作业启停,并可以禁止某作业运行(上线时常用)。
被错过执行的作业重触发:自动记录错过执行的作业,并在上次作业完成后自动触发。可参考Quartz的misfire。
多线程快速处理数据:使用多线程处理抓取到的数据,提升吞吐量。
幂等性:重复作业任务项判定,不重复执行已运行的作业任务项。由于开启幂等性需要监听作业运行状态,对瞬时反复运行的作业对性能有较大影响。
容错处理:作业服务器与Zookeeper服务器通信失败则立即停止作业运行,防止作业注册中心将失效的分片分项配给其他作业服务器,而当前作业服务器仍在执行任务,导致重复执行。
Spring支持:支持spring容器,自定义命名空间,支持占位符。
运维平台:提供运维界面,可以管理作业和注册中心。
目录结构说明
elastic-job-core
elastic-job核心模块,只通过Quartz和Curator就可执行分布式作业。
elastic-job-spring
elastic-job对spring支持的模块,包括命名空间,依赖注入,占位符等。
elastic-job-console
elastic-job web控制台,可将编译之后的war放入tomcat等servlet容器中使用。
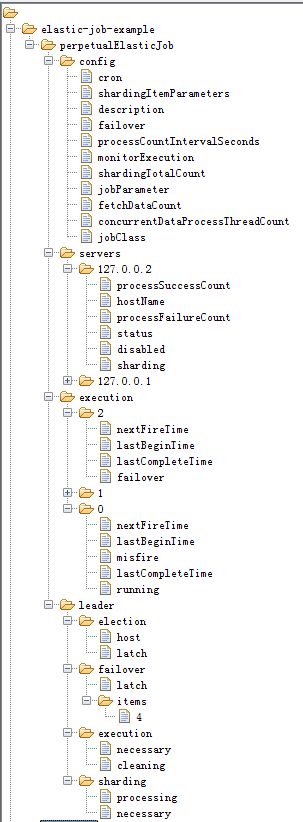
elastic-job-example
使用例子。
elastic-job-test
测试elastic-job使用的公用类,使用方无需关注。
引入maven依赖
- elastic-job已经发布到中央仓库,可以在pom.xml文件中直接引入maven坐标。
<!-- 引入elastic-job核心模块 --><dependency> <groupId>com.dangdang</groupId> <artifactId>elastic-job-core</artifactId> <version>1.0.1</version></dependency><!-- 使用springframework自定义命名空间时引入 --><dependency> <groupId>com.dangdang</groupId> <artifactId>elastic-job-spring</artifactId> <version>1.0.1</version></dependency>代码开发
提供3种作业类型,分别是OneOff, Perpetual和SequencePerpetual。需要继承相应的抽象类。
方法参数shardingContext包含作业配置,分片和运行时信息。可通过getShardingTotalCount(),getShardingItems()等方法分别获取分片总数,运行在本作业服务器的分片序列号集合等。
OneOff类型作业
OneOff作业类型比较简单,需要继承AbstractOneOffElasticJob,该类只提供了一个方法用于覆盖,此方法将被定时执行。用于执行普通的定时任务,与Quartz原生接口相似,只是增加了弹性扩缩容和分片等功能。
public class MyElasticJob extends AbstractOneOffElasticJob { @Override protected void process(JobExecutionMultipleShardingContext context) { // do something by sharding items }}Perpetual类型作业
Perpetual作业类型略为复杂,需要继承AbstractPerpetualElasticJob并可以指定返回值泛型,该类提供两个方法可覆盖,分别用于抓取和处理数据。可以获取数据处理成功失败次数等辅助监控信息。需要注意fetchData方法的返回值只有为null或长度为空时,作业才会停止执行,否则作业会一直运行下去。这点是参照TbSchedule的设计。Perpetual作业类型更适用于流式不间歇的数据处理。
作业执行时会将fetchData的数据传递给processData处理,其中processData得到的数据是通过多线程(线程池大小可配)拆分的。建议processData处理数据后,更新其状态,避免fetchData再次抓取到,从而使得作业永远不会停止。processData的返回值用于表示数据是否处理成功,抛出异常或者返回false将会在统计信息中归入失败次数,返回true则归入成功次数。
public class MyElasticJob extends AbstractPerpetualElasticJob<Foo> { @Override protected List<Foo> fetchData(JobExecutionMultipleShardingContext context) { List<Foo> result = // get data from database by sharding items return result; } @Override protected boolean processData(JobExecutionMultipleShardingContext context, Foo data) { // process data return true; }}SequencePerpetual类型作业
SequencePerpetual作业类型和Perpetual作业类型极为相似,所不同的是Perpetual作业类型可以将获取到的数据多线程处理,但不会保证多线程处理数据的顺序。如:从2个分片共获取到100条数据,第1个分片40条,第2个分片60条,配置为两个线程处理,则第1个线程处理前50条数据,第2个线程处理后50条数据,无视分片项;SequencePerpetual类型作业则根据当前服务器所分配的分片项数量进行多线程处理,每个分片项使用同一线程处理,防止了同一分片的数据被多线程处理,从而导致的顺序问题。如:从2个分片共获取到100条数据,第1个分片40条,第2个分片60条,则系统自动分配两个线程处理,第1个线程处理第1个分片的40条数据,第2个线程处理第2个分片的60条数据。由于Perpetual作业可以使用多余分片项的任意线程数处理,所以性能调优的可能会优于SequencePerpetual作业。
public class MyElasticJob extends AbstractSequencePerpetualElasticJob<Foo> { @Override protected List<Foo> fetchData(JobExecutionSingleShardingContext context) { List<Foo> result = // get data from database by sharding items return result; } @Override protected boolean processData(JobExecutionSingleShardingContext context, Foo data) { // process data return true; }}作业配置
与Spring容器配合使用作业,可以将作业Bean配置为Spring Bean, 可在作业中通过依赖注入使用Spring容器管理的数据源等对象。可用placeholder占位符从属性文件中取值。
Spring命名空间配置
<?xml version="1.0" encoding="UTF-8"?><beans xmlns="http://www.springframework.org/schema/beans" xmlns:xsi="http://www.w3.org/2001/XMLSchema-instance" xmlns:reg="http://www.dangdang.com/schema/ddframe/reg" xmlns:job="http://www.dangdang.com/schema/ddframe/job" xsi:schemaLocation="http://www.springframework.org/schema/beans http://www.springframework.org/schema/beans/spring-beans.xsd http://www.dangdang.com/schema/ddframe/reg http://www.dangdang.com/schema/ddframe/reg/reg.xsd http://www.dangdang.com/schema/ddframe/job http://www.dangdang.com/schema/ddframe/job/job.xsd "> <!--配置作业注册中心 --> <reg:zookeeper id="regCenter" serverLists=" yourhost:2181" namespace="dd-job" baseSleepTimeMilliseconds="1000" maxSleepTimeMilliseconds="3000" maxRetries="3" /> <!-- 配置作业A--> <job:bean id="oneOffElasticJob" class="xxx.MyOneOffElasticJob" regCenter="regCenter" cron="0/10 * * * * ?" shardingTotalCount="3" shardingItemParameters="0=A,1=B,2=C" /> <!-- 配置作业B--> <job:bean id="perpetualElasticJob" class="xxx.MyPerpetualElasticJob" regCenter="regCenter" cron="0/10 * * * * ?" shardingTotalCount="3" shardingItemParameters="0=A,1=B,2=C" processCountIntervalSeconds="10" concurrentDataProcessThreadCount="10" /></beans><job:bean />命名空间属性详细说明
<reg:zookeeper />命名空间属性详细说明
基于Spring但不使用命名空间
<!-- 配置作业注册中心 --> <bean id="regCenter" class="com.dangdang.ddframe.reg.zookeeper.ZookeeperRegistryCenter" init-method="init"> <constructor-arg> <bean class="com.dangdang.ddframe.reg.zookeeper.ZookeeperConfiguration"> <property name="serverLists" value="${xxx}" /> <property name="namespace" value="${xxx}" /> <property name="baseSleepTimeMilliseconds" value="${xxx}" /> <property name="maxSleepTimeMilliseconds" value="${xxx}" /> <property name="maxRetries" value="${xxx}" /> </bean> </constructor-arg> </bean> <!-- 配置作业--> <bean id="xxxJob" class="com.dangdang.ddframe.job.spring.schedule.SpringJobController" init-method="init"> <constructor-arg ref="regCenter" /> <constructor-arg> <bean class="com.dangdang.ddframe.job.api.JobConfiguration"> <constructor-arg name="jobName" value="xxxJob" /> <constructor-arg name="jobClass" value="xxxDemoJob" /> <constructor-arg name="shardingTotalCount" value="10" /> <constructor-arg name="cron" value="0/10 * * * * ?" /> <property name="shardingItemParameters" value="${xxx}" /> </bean> </constructor-arg> </bean>不使用Spring配置
如果不使用Spring框架,可以用如下方式启动作业。
import com.dangdang.ddframe.job.api.JobConfiguration;import com.dangdang.ddframe.job.schedule.JobInitializer;import com.dangdang.ddframe.job.schedule.JobScheduler;import com.dangdang.ddframe.reg.base.CoordinatorRegistryCenter;import com.dangdang.ddframe.reg.zookeeper.ZookeeperConfiguration;import com.dangdang.ddframe.reg.zookeeper.ZookeeperRegistryCenter;public class JobDemo { // 声明Zookeeper注册中心配置对象 private final ZookeeperConfiguration zkConfig = new ZookeeperConfiguration("yourhost:2181", "zkRegTestCenter", 1000, 3000, 3); // 定义Zookeeper注册中心 private final CoordinatorRegistryCenter regCenter = new ZookeeperRegistryCenter(zkConfig); // 声明作业配置对象 private final JobConfiguration jobConfig = new JobConfiguration("demoJob", DemoJob.class, 3, "0/1 * * * * ?"); public static void main(final String[] args) { new JobDemo().init(); } public void init() { // 连接注册中心 regCenter.init(); // 声明作业启动器 JobInitializer jobInitializer = new JobInitializer(regCenter, jobConfig); // 启动作业,主要是注册作业的信息 jobInitializer.init(); // 获取作业调度器实例 JobScheduler jobScheduler = JobScheduler.getInstance(); // 添加作业到调度器 jobScheduler.addJob("demoJob", jobInitializer); // 启动所有作业 jobScheduler.scheduleAllJobs(); }}使用限制
作业一旦启动成功后不能修改作业名称,如果修改名称则视为新的作业。
同一台作业服务器只能运行一个相同的作业实例,因为作业运行时是按照IP注册和管理的。
作业根据/etc/hosts文件获取IP地址,如果获取的IP地址是127.0.0.1而非真实IP地址,应正确配置此文件。
一旦有服务器波动,或者修改分片项,将会触发重新分片;触发重新分片将会导致运行中的Perpetual以及SequencePerpetual作业再执行完本次作业后不再继续执行,等待分片结束后再恢复正常。
开启monitorExecution才能实现分布式作业幂等性(即不会在多个作业服务器运行同一个分片)的功能,但monitorExecution对短时间内执行的作业(如每5秒一触发)性能影响较大,建议关闭并自行实现幂等性。
elastic-job没有自动删除作业服务器的功能,因为无法区分是服务器崩溃还是正常下线。所以如果要下线服务器,需要手工删除zookeeper中相关的服务器节点。由于直接删除服务器节点风险较大,暂时不考虑在运维平台增加此功能
实现原理
弹性分布式实现
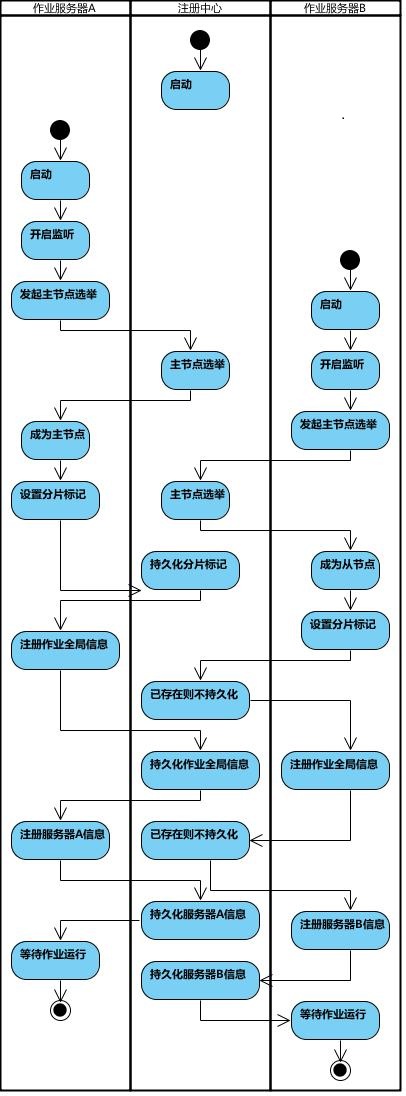
第一台服务器上线触发主服务器选举。主服务器一旦下线,则重新触发选举,选举过程中阻塞,只有主服务器选举完成,才会执行其他任务。
某作业服务器上线时会自动将服务器信息注册到注册中心,下线时会自动更新服务器状态。
主节点选举,服务器上下线,分片总数变更均更新重新分片标记。
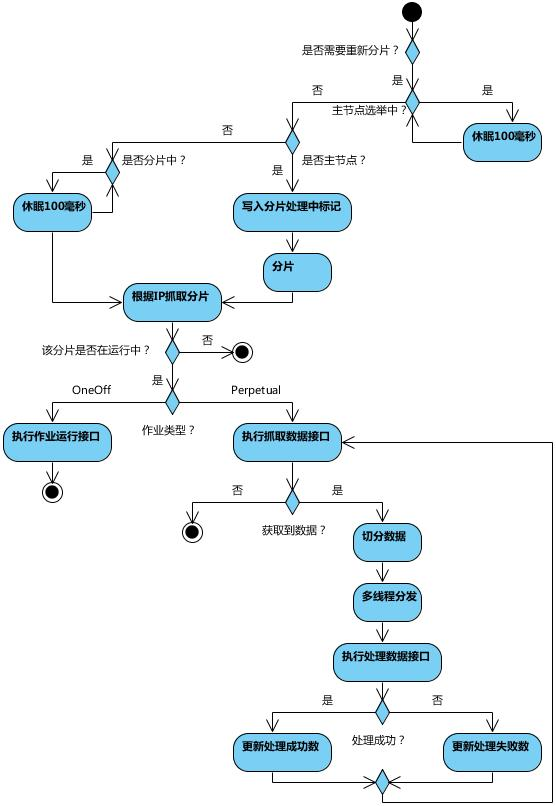
定时任务触发时,如需重新分片,则通过主服务器分片,分片过程中阻塞,分片结束后才可执行任务。如分片过程中主服务器下线,则先选举主服务器,再分片。
通过4可知,为了维持作业运行时的稳定性,运行过程中只会标记分片状态,不会重新分片。分片仅可能发生在下次任务触发前。
每次分片都会按服务器IP排序,保证分片结果不会产生较大波动。
实现失效转移功能,在某台服务器执行完毕后主动抓取未分配的分片,并且在某台服务器下线后主动寻找可用的服务器执行任务。
流程图
作业启动
作业执行
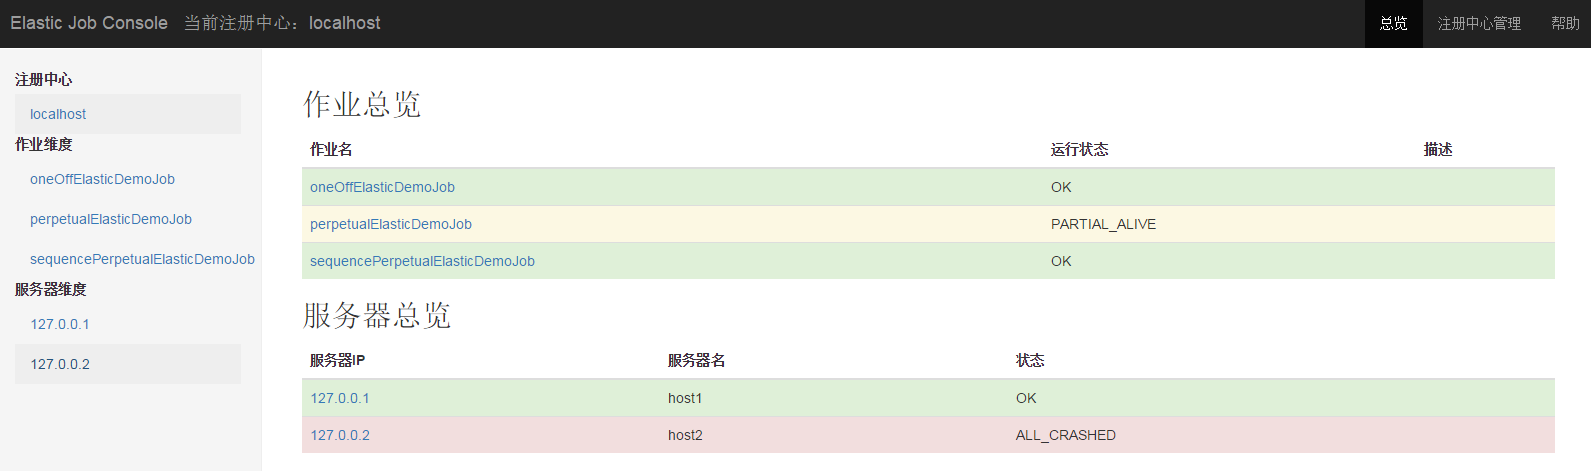
运维平台
elastic-job运维平台以war包形式提供,可自行部署到tomcat或jetty等支持servlet的web容器中。elastic-job-console.war可以通过编译源码或从maven中央仓库获取。
登录
默认用户名和密码是root/root,可以通过修改conf\auth.properties文件修改默认登录用户名和密码。
主要功能
登录安全控制
注册中心管理
作业维度状态查看
服务器维度状态查看
快捷修改作业设置
控制作业暂停和恢复运行
设计理念
运维平台和elastic-job并无直接关系,是通过读取作业注册中心数据展现作业状态,或更新注册中心数据修改全局配置。
控制台只能控制作业本身是否运行,但不能控制作业进程的启停,因为控制台和作业本身服务器是完全分布式的,控制台并不能控制作业服务器。
不支持项
添加作业。因为作业都是在首次运行时自动添加,使用运维平台添加作业并无必要。
停止作业。即使删除了Zookeeper信息也不能真正停止作业的运行,还会导致运行中的作业出问题。
删除作业服务器。由于直接删除服务器节点风险较大,暂时不考虑在运维平台增加此功能。
主要界面
总览页
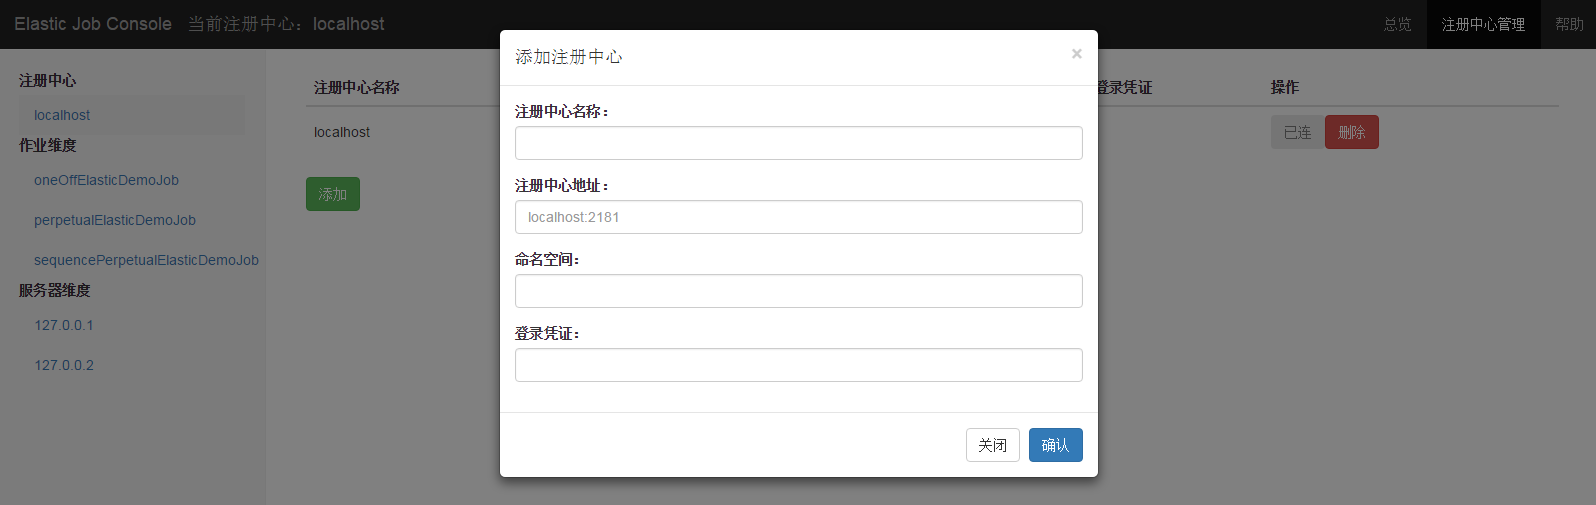
注册中心管理页
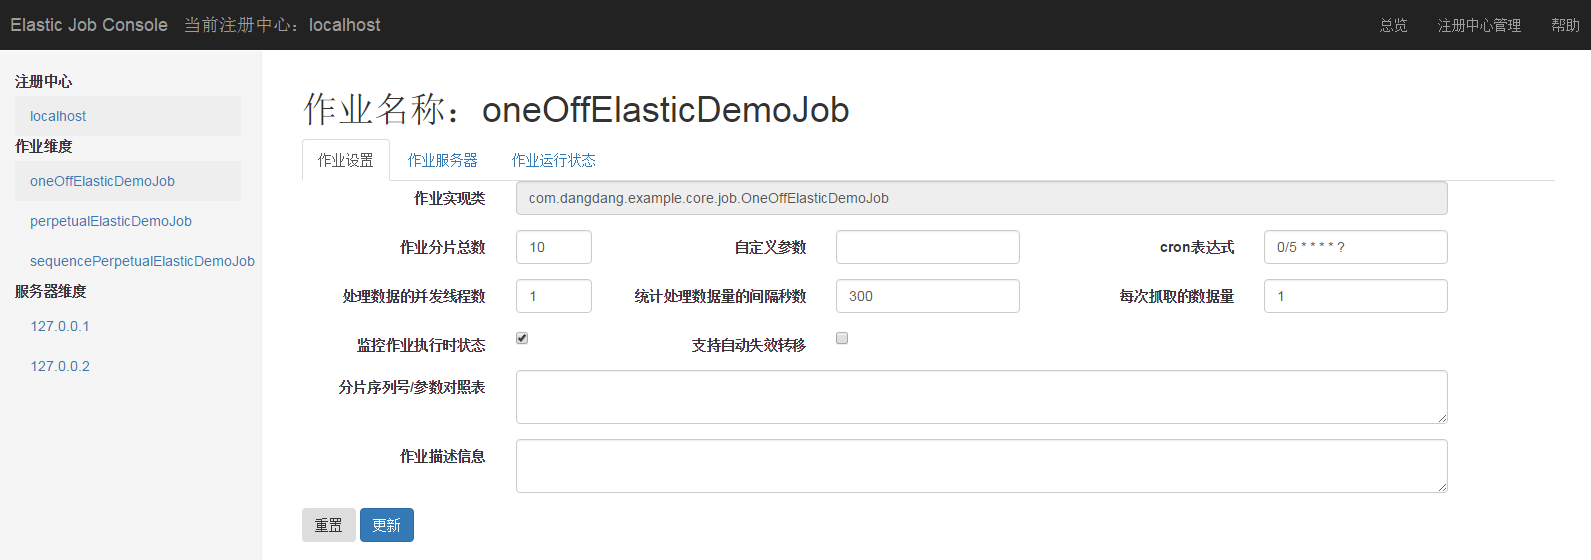
作业详细信息页
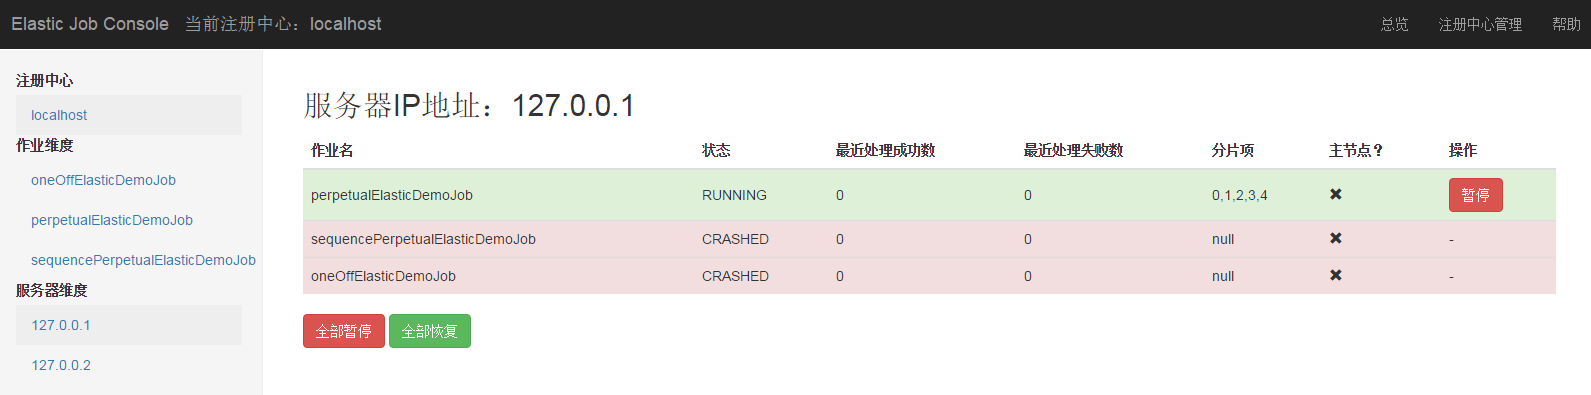
服务区详细信息页
- ----------------------------------
1、 何为分布式任务?
自己理解,就是一件事情让多台机器来完成。单机环境下,所有任务都是单个电脑独立完成,分布式任务就是把任务按一定逻辑进行切分(也就是所谓的分片),分成几个小的片段,然后分给不同的电脑,每台电脑执行其中的几个片段。
分片概念:
任务的分布式执行,需要将一个任务拆分为n个独立的任务项,然后由分布式的服务器分别执行某一个或几个分片项。
例如:有一个遍历数据库某张表的作业,现有2台服务器。为了快速的执行作业,那么每台服务器应执行作业的50%。 为满足此需求,可将作业分成2片,每台服务器执行1片。作业遍历数据的逻辑应为:服务器A遍历ID以奇数结尾的数据;服务器B遍历ID以偶数结尾的数据。 如果分成10片,则作业遍历数据的逻辑应为:每片分到的分片项应为ID%10,而服务器A被分配到分片项0,1,2,3,4;服务器B被分配到分片项5,6,7,8,9,直接的结果就是服务器A遍历ID以0-4结尾的数据;服务器B遍历ID以5-9结尾的数据。
2、 github源码
从github下载下来,maven导入eclipse后,分为5部分:
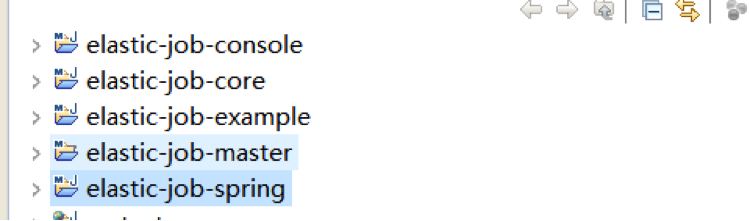
官方目录结构说明:
elastic-job-core //核心模块,只通过Quartz和Curator就可执行分布式作业。
elastic-job-spring //对spring支持的模块,包括命名空间,依赖注入,占位符等。
elastic-job-console // web控制台,可将编译之后的war放入tomcat等servlet容器中使用。
elastic-job-example //使用示例。
elastic-job-doc //使用markdown生成文档的项目,使用方无需关注。
需要说明一下,官方也提到了,需要一个lombok.jar。个人感觉这个确实很不错,有了这个jar包,可以省掉get set方法,在属性很多的时候特别方便。
*************************************************
lombok 的官方网址:http://projectlombok.org/
lombok 注解在线帮助文档:http://projectlombok.org/features/index.
下面介绍几个我常用的 lombok 注解:
@Data :注解在类上;提供类所有属性的 getting 和 setting 方法,此外还提供了equals、canEqual、hashCode、toString 方法
@Setter:注解在属性上;为属性提供 setting 方法
@Getter:注解在属性上;为属性提供 getting 方法
@Log4j :注解在类上;为类提供一个 属性名为log 的 log4j 日志对象
@NoArgsConstructor:注解在类上;为类提供一个无参的构造方法
@AllArgsConstructor:注解在类上;为类提供一个全参的构造方法*************************************************
3、 快速上手部署应用(单机跟集群)
快速上手可以参照官方文档: http://dangdangdotcom.github.io/elastic-job/post/quick_start/
这是个单机环境的例子。为加深理解,自己部署集群环境,步骤如下:
a、启动zookeeper(测试用,可单机可集群),步骤参见官方快速上手文档
b、修改官方example代码如下:
1)、在com.dangdang.example.elasticjob.spring包下新建myjob包,创建新类MySimpleJobTest.java,代码如下:
12345678910111213141516@ComponentpublicclassMySimpleJobTestextendsAbstractSimpleElasticJob {privatePrintContext printContext =newPrintContext(SimpleJobDemo.class);@ResourceprivateFooRepository fooRepository;privatestaticAtomicInteger count =newAtomicInteger(0);@Overridepublicvoidprocess(JobExecutionMultipleShardingContext shardingContext) {System.out.println("第"+count.addAndGet(1)+"次执行,当前分片号为:"+shardingContext.getShardingItemParameters());}}2)、修改resources/META-INF/withNamespace.xml为:
123456789101112131415161718192021222324252627<?xmlversion="1.0" encoding="UTF-8"?><beansxmlns="http://www.springframework.org/schema/beans"xmlns:xsi="http://www.w3.org/2001/XMLSchema-instance"xmlns:context="http://www.springframework.org/schema/context"xmlns:reg="http://www.dangdang.com/schema/ddframe/reg"xmlns:job="http://www.dangdang.com/schema/ddframe/job"xsi:schemaLocation="http://www.springframework.org/schema/beanshttp://www.springframework.org/schema/beans/spring-beans.xsdhttp://www.springframework.org/schema/contexthttp://www.springframework.org/schema/context/spring-context.xsdhttp://www.dangdang.com/schema/ddframe/reghttp://www.dangdang.com/schema/ddframe/reg/reg.xsdhttp://www.dangdang.com/schema/ddframe/jobhttp://www.dangdang.com/schema/ddframe/job/job.xsd"><context:component-scanbase-package="com.dangdang.example.elasticjob" /><context:property-placeholderlocation="classpath:conf/*.properties" /><reg:zookeeperid="regCenter" serverLists="${serverLists}" namespace="${namespace}" baseSleepTimeMilliseconds="${baseSleepTimeMilliseconds}" maxSleepTimeMilliseconds="${maxSleepTimeMilliseconds}" maxRetries="${maxRetries}" nestedPort="${nestedPort}" nestedDataDir="${nestedDataDir}" /><!-- <job:bean id="simpleElasticJob" class="com.dangdang.example.elasticjob.spring.job.SimpleJobDemo" regCenter="regCenter" shardingTotalCount="${simpleJob.shardingTotalCount}" cron="${simpleJob.cron}" shardingItemParameters="${simpleJob.shardingItemParameters}" monitorExecution="${simpleJob.monitorExecution}" monitorPort="${simpleJob.monitorPort}" failover="${simpleJob.failover}" description="${simpleJob.description}" disabled="${simpleJob.disabled}" overwrite="${simpleJob.overwrite}" /> --><!-- <job:bean id="throughputDataFlowJob" class="com.dangdang.example.elasticjob.spring.job.ThroughputDataFlowJobDemo" regCenter="regCenter" shardingTotalCount="${throughputDataFlowJob.shardingTotalCount}" cron="${throughputDataFlowJob.cron}" shardingItemParameters="${throughputDataFlowJob.shardingItemParameters}" monitorExecution="${throughputDataFlowJob.monitorExecution}" failover="${throughputDataFlowJob.failover}" processCountIntervalSeconds="${throughputDataFlowJob.processCountIntervalSeconds}" concurrentDataProcessThreadCount="${throughputDataFlowJob.concurrentDataProcessThreadCount}" description="${throughputDataFlowJob.description}" disabled="${throughputDataFlowJob.disabled}" overwrite="${throughputDataFlowJob.overwrite}" /> --><!-- <job:bean id="sequenceDataFlowJob3" class="com.dangdang.example.elasticjob.spring.job.SequenceDataFlowJobDemo" regCenter="regCenter" shardingTotalCount="${sequenceDataFlowJob.shardingTotalCount}" cron="${sequenceDataFlowJob.cron}" shardingItemParameters="${sequenceDataFlowJob.shardingItemParameters}" monitorExecution="${sequenceDataFlowJob.monitorExecution}" failover="${sequenceDataFlowJob.failover}" processCountIntervalSeconds="${sequenceDataFlowJob.processCountIntervalSeconds}" maxTimeDiffSeconds="${sequenceDataFlowJob.maxTimeDiffSeconds}" description="${sequenceDataFlowJob.description}" disabled="${sequenceDataFlowJob.disabled}" overwrite="${sequenceDataFlowJob.overwrite}" /> --><job:beanid="simpleElasticJob2" class="com.dangdang.example.elasticjob.spring.myjob.MySimpleJobTest" regCenter="regCenter" shardingTotalCount="${simpleJob.shardingTotalCount}" cron="${simpleJob.cron}" shardingItemParameters="${simpleJob.shardingItemParameters}" monitorExecution="${simpleJob.monitorExecution}" monitorPort="${simpleJob.monitorPort}" failover="${simpleJob.failover}" description="${simpleJob.description}" disabled="${simpleJob.disabled}" overwrite="${simpleJob.overwrite}" /></beans>c、建虚拟机(多台电脑的用另一电脑即可),配置环境变量。
此处本地采用ubuntu16.04的64位版本.
需配置的有:jdk,maven,为了让maven能在本地找到jar包,而不再浪费时间去网络maven库下载,可以线运行mvn install生成.m2目录(该目录隐藏,本地虚拟机是位于/home下),将win下的.m2/repository文件夹拷贝到虚拟机的.m2下.
d、将elastic-job-example拷贝到虚拟机,本地为/usr/mytest目录
修改虚拟机中example项目的配置文件/resources/conf/reg.properties
serverLists为zookeeper服务器地址
nestedPort设置为-1,不启动自带zookeeper(两台电脑都不启用默认zookeeper)
e、虚拟机切换到elastic-job-example目录(该目录下有pom文件)
运行:mvn compile ,运行完毕后
运行:mvn exec:java -Dexec.mainClass="com.dangdang.example.elasticjob.spring.main"
f、切回主机,com.dangdang.example.elasticjob.spring.main运行该文件的main方法
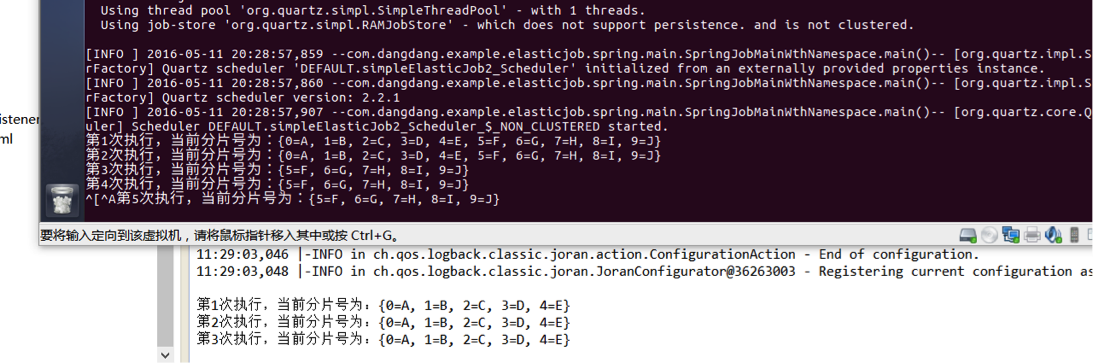
可明显看到:虚拟机开始单机运行时,处理分片为0-9,在主机开始运行后,变为5-9,两者确实进行了任务分配:
g、部署tomcat监控
虚拟机部署tomcat,将elastic-job-console在主机打war包,然后放入tomcat的webapp下,启动tomcat,访问http://ip:端口号/elastic-job-console,账号密码:root/root
填写zookeeper地址,作业名称等,可以看到控制页面:

我们刚刚部署的测试环境:

小结:
单纯开发使用的话,方式之一是:将elastic-job-core跟elastic-job-spring打jar包,然后按照官方的开发指南,重写相关方法即可。部署的话应该是按照上方集群部署的方式进行的。
- 分布式定时任务框架-Elastic Job
- Elastic-Job - 分布式定时任务框架
- Elastic-Job - 分布式定时任务框架
- Elastic-Job - 分布式定时任务框架
- Elastic-Job - 分布式定时任务框架
- Elastic-Job - 分布式定时任务框架
- 分布式定时任务框架-Elastic Job
- Elastic-Job - 分布式定时任务框架
- 分布式定时任务 -- elastic-job
- Quartz小记(一):Elastic-Job - 分布式定时任务框架
- Elastic-Job-分布式定时任务框架(张亮原著)
- Elastic-Job——分布式定时任务框架
- 分布式定时任务——elastic-job
- Elastic Job 定时任务实现
- Elastic-Job分布式作业框架
- 分布式作业框架elastic-job
- elastic-job动态添加定时任务
- elastic-job:分布式作业调度框架
- UVa OJ 1625 - Color Length
- 源码-JavaScript&jQuery交互式前端开发-第3章-函数、方法与对象-String对象
- Android开发架构规范
- 突破CND的一些方法
- 常用的实用工具jar包导入
- 分布式定时任务框架-Elastic Job
- DataCenter 数据中心
- 死锁
- 72. Edit Distance
- 226. Invert Binary Tree
- 你不知道的Java学习笔记15--StringBuffer类
- Lucene学习教程——Lucene索引创建
- android中ArrayList源码分析
- mysql5.5全备份的问题(- Warning: Skipping the data of table mysql.event. Specify the --events option expli)