Android Camera2 API Explained
来源:互联网 发布:网络监控主机 编辑:程序博客网 时间:2024/05/02 12:03
Compared with the old camera API, the Camera2 API introduced in the L is a lot more complex: more than ten classes are involved, calls (almost always) are asynchronized, plus lots of capture controls and meta data that you feel confused about.
No worries. Let me help you out. Whenever facing a complex system need a little bit effort to understand, I usually turns to the UML class diagram to capture the big picture.
So, here is the class diagram for Camera2 API.
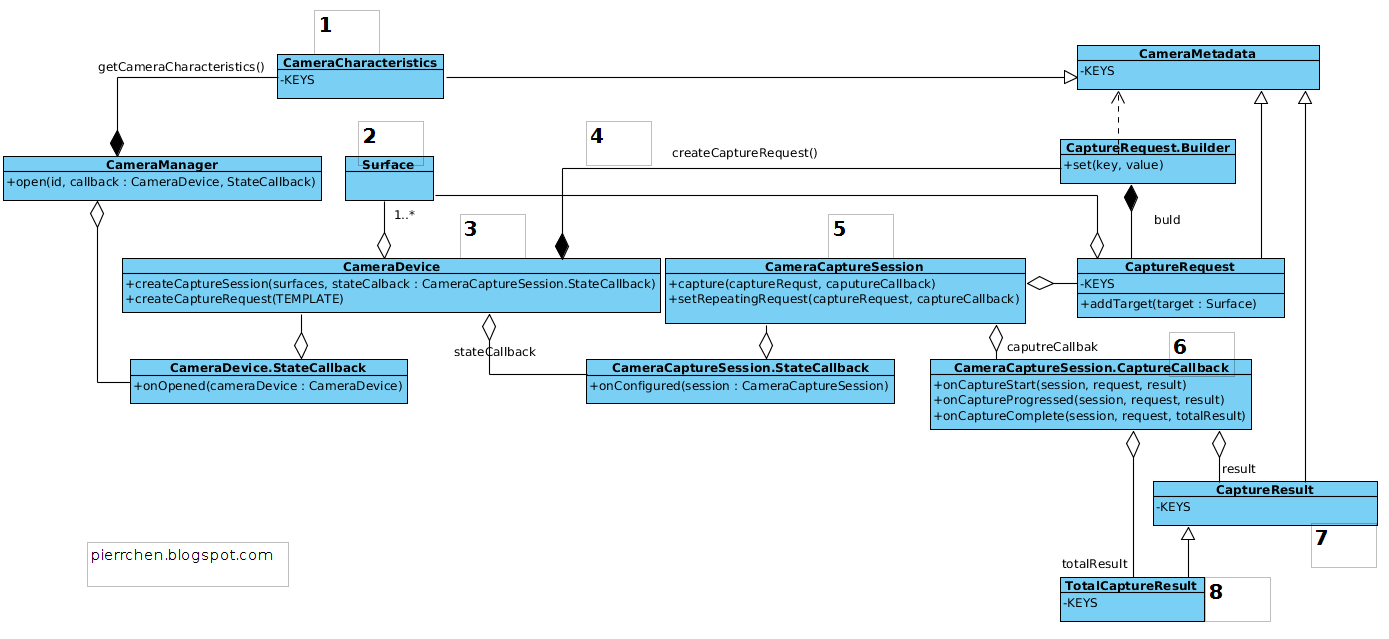 Android Camera2 Class Diagram
No worries. Let me help you out. Whenever facing a complex system need a little bit effort to understand, I usually turns to the UML class diagram to capture the big picture.
So, here is the class diagram for Camera2 API.
Android Camera2 Class DiagramYou are encouraged to read this Android document first and then come back to this article, with your questions. I'll expand what is said there, and list the typical steps of using camera2 API.
1. Start from CameraManager. We use it to iterate all the cameras that are available in the system, each with a designated cameraId. Using the cameraId, we can get the properties of the specified camera device. Those properties are represented by class CameraCharacteristics. Things like "is it front or back camera", "output resolutions supported" can be queried there.
2. Setup the output targets. The camera image data should always go to somewhere. Use SurfaceView or SurfaceTexture for preview, ImageReader for still picture or MediaRecoder for video recording. All those class have one common element hidden behind - a Surface. What I means is, for all those classes mentioned, you always can create or get a surface, and, pass that surface to camera, as a capture request target. We'll come back the concept target in the followings steps talking about create a capture session with a list of targets and add a target to capture request.
3. Get a CameraDevice. You call CameraManager.open(cameraId) to get a CameraDevice. Since the call is asynchronized, you will get the CameraDevice in the onOpened() callback.
4. Create a CaptureRequest from the CameraDevice. A CaptureRequest is a immutable package of settings and outputs needed to capture a single image from the camera device. We usually don't create a CaptureRequest directly since that would be error prone and tedious, given the settings for a typical user case, say preview, is almost similar. Builder pattern is applied here. As shown in the class diagram above, a CaptureReques.Builder is created from CameraDevice with a predefined template (createCaptureRequest(CameraDevice.TEMPLATE_PREVIEW)). Then , we use the builder to set up the stuffs that varies. For example, usually you need to call addTarget(Surface) to set up the output targets for this specific CaptureRequest.
5. Create a CaptureRequestSession from the CameraDevice. Consider a CaptureRequestSession as a context in which CaptureRequest will be submitted. To initialize a CaptureRequestSession, you have to provided the initialized Surface as the target surfaces, which were discussed at step 2. Also note that the creation of CaptureRequestSession is also asynchronized.
6. Submit a CaptureRequest to CaptureRequestSession. Now it is the time to issue the capture request. There are a couple of APIs to do that. Capture() is used to issue a one-time take picture command, while setRepeatingRequest() is used to issue a repeating request for the showing preview. Also, you may want to set various settings, such as the auto focus mode and white balance mode, before submitting the request to start the preview or take a picture.
7. Get the Capture Results. The capture result will get back to you asynchronously through CameraCaptureSession.CaptureCallback. It is the place you can play a sound when the capture starts, or finishes. The results will approach you piece by piece in CaptureResult on onCaptureProcessed, or you can wait and get them all in TotalCaptureResult on onCaptureComplete. That is the step 8 in the diagram. And, we're done.
But, wait. Where are the camera picture data?? No worries. They are all good and they are handled by the output target as discussed in step 2. In all cases, the camera is the producer and the targets are the consumer. The camera keeps enqueuing the picture data and once the data is available the consumer will be notified to process them. TextureView will turn the picture data into textures and draw them in the area taken by the TexureView. MediaRecoder will pass the image to codec to compress and then write them out. For ImageReader, it is up to you how to process the data.
原文地址: http://pierrchen.blogspot.se/2015/01/android-camera2-api-explained.html
0 0
- Android Camera2 API Explained
- Android.Camera2 API
- android camera2 API流程分析
- Android 笔记 camera2 新api
- android Camera2 API使用详解
- Android L Camera2 API sample ver1 - startPreview
- Android 用 camera2 API 自定义相机
- Android camera2官方API文档中文翻译
- android camera2
- Android camera2
- Android L Camera2 API sample ver2 - startPreview&takePicture
- Android使用Camera2 替代过时的Camera API
- Android Camera2 API的ISO和对焦设置
- Android使用Camera2 替代过时的Camera API
- 翻译Camera2 API
- 超实用!Android Camera2.0新API与Camera旧API使用对比总结
- Android Camera API/Camera2 API 相机预览及滤镜、贴纸等处理
- 超实用!Android Camera2.0新API与Camera旧API使用对比总结
- poj 1088 滑雪(记忆化搜索 || DP)
- 技术只是谋生手段,不是赚钱的终点,但是没有技术你连立身之处都没有
- BeanFactory not initialized or already closed - call 'refresh' before access
- Mysql里查询字段为Json格式的数据模糊查询方法
- Linux_Centos_rz(上传) /sz(下载) 指令安装
- Android Camera2 API Explained
- cookie和session的区别与联系
- 第八章 转圈圈
- HTTP协议详解
- android中的popupwindow进入和退出的动画
- JS中创建函数的三种方式及区别
- mac上面如何安装Homebrew
- 进程截杀器v1.1.1.5去插件正式版
- 走遍亚洲 —— 泰国