WebRTC1-原理探究
来源:互联网 发布:马踏棋盘深度优先算法 编辑:程序博客网 时间:2024/05/29 17:22
1.抛砖引玉
WebRTC (Web Real-Time Communications) 是一项实时通讯技术,它允许网络应用或者站点,在不借助中间媒介的情况下,建立浏览器之间点对点(Peer-to-Peer)的连接,实现视频流或/和音频流或者其他任意数据的传输
实时查看WebRTC在浏览器中的支持情况: http://caniuse.com/#search=webRTC
FirFox 45+,Chrome 29+,Oprea 36+,Edge 14+,Android Brower 50+支持,其余支持情况有问题。
备注:有的时候会使用adapter.js,这个js文件是为了提高兼容性,可以直接使用API 不用加前缀
使用:
- 下载
- 引用 <script src="adapter.js">
https://developer.mozilla.org/en-US/docs/Web/API/WebRTC_API/adapter.js
几个概念
- SDP(Session Description Protocol)
SDP是一种会话描述协议,用来描述双方的IP地址和端口号,通信所使用的带宽,会话的名称、标识符、激活时间,双方所要传输的媒体类型(视频、音频、文本)、媒体格式等等。该协议仅包含所要传递的媒体的描述信息,而不直接传递媒体内容。
- ICE(Interactive Connectivity Establishment)
ICE是一种以UDP为基础用于实现穿越NAT网管或者防火墙的协议。
- TURN&&STUN
两种协议都是用来明确自己的外网地址的,差别是如果要服务器辅助进行数据交换则设置TURN服务器,不需要则设置STUN服务。
核心API
- Navigator.getUserMedia
用来获取视频和音频,在浏览器装有摄像头和麦克风的情况下使用.navigator.getUserMedia(constraints, successCallback, errorCallback);constraints是用来控制视频和音频是否获取,一般设为{video:true,audio: true},即视频和音频都获取。
- RTCPeerConnection
RTCPeerConnection是一个表示两个浏览器端的连接的对象,其含有关于这个连接的所有信息和相关方法,是WebRTC的核心API,负责制作建立连接的SDP、ICE等报文,管理连接状态等等。
- RTCDataChannel
RTCDataChannel由RTCPeerConnection创建,需要传递视频、音频以外的数据时使用,它代表浏览器两端间的一个数据通道,和这个数据通道有关的属性和方法都记录在这个对象里。
2.按图索骥
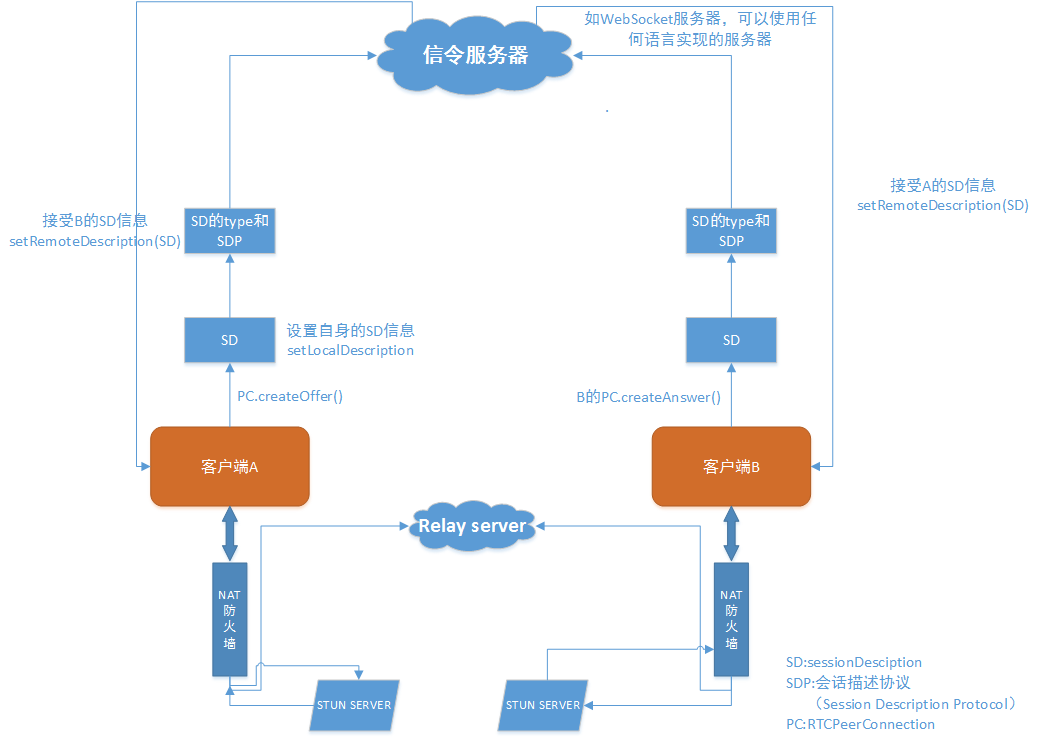
过程:
1. 首先双方都建立一个RTCPeerConnection的实例,其中一方(称为offer方)用RTCPeerConnection.createOffer()创建一个会话描述sessionDescription,该会话描述包含SDP报文信息和该sessionDescription的类型(type)
2. 接下来调用RTCPeerConnection.setLocalDescription()方法将本地的localDescription设置为刚才创建的sessionDescription。之后将创建的sessionDescription发送给对方(称为answer方),发送方式没有规定,可以通过服务器中转,可以通过IM软件发送(这里使用WebSocket信令服务器)。
3. answer端接收到sessionDescription后调用RTCPeerConnection. setRemoteDescription方法设置,然后调用RTCPeerConnection. createAnswer方法产生自己的sessionDescription。
4. 再将创建的sessionDescription发送给offfer方,同样发送方式没有规定。offer方接收到sessionDescrip后调用RTCPeerConnection. setRemoteDescription方法设置,这样双方的SDP信息就交换完成了。
5. 在完成SDP的交换后双方还要交换ICE candidate信息。双方首先设置RTCPeerConnection.onicecandidate回调函数,当candidate可用时,双方中的一方将所有icecandidate发送给对方,发送方式同样没有规定,接收方调用RTCPeerConnection.addIceCandidate方法接收candidate信息。经过这些步骤后双方连接就建立完成了。
3.纸上可谈兵
3.1.由简入繁
html文件
<!DOCTYPE html><html><head> <meta charset="UTF-8"> <meta name="keywords" content="JavaScript, WebRTC" /> <meta name="description" content="WebRTC" /> <meta name="viewport" content="width=device-width,initial-scale=1,minimum-scale=1,maximum-scale=1"> <title>获取本地视频</title> <link rel="stylesheet" href="simpleVideo.css"></head><body> <!-- <video /> --> <video></video> <p><br></p> <script src='../lib/adapter.js'></script> <script type="text/javascript" src="simpleVideo.js"></script></body></html>js文件:
var constraints = { video: true, audio:true};function successCallback(stream) { window.stream = stream; // stream available to console console.log(stream); console.log(stream.getVideoTracks()); console.log(stream.getAudioTracks()); var video = document.querySelector("video"); video.src = window.URL.createObjectURL(stream); video.play();}function errorCallback(error) { console.log("getUserMedia error: ", error);}getUserMedia(constraints, successCallback, errorCallback);3.2.顺藤摸瓜
这是个完整的例子,参照2.按图索骥部分理解
<!DOCTYPE html><html><head> <meta name="keywords" content="JavaScript, WebRTC" /> <meta name="description" content="WebRTC codelab" /> <meta name="viewport" content="width=device-width,initial-scale=1,minimum-scale=1,maximum-scale=1"> <title>WebRTC codelab: step 2</title> <link rel="stylesheet" href="css/index.css"> <!-- css可以使用一些滤镜效果 --> <style> </style> <script src='js/lib/adapter.js'></script></head><body> <video id="localVideo" autoplay muted></video> <video id="remoteVideo" autoplay muted></video> <div> <button id="startButton">Start</button> <button id="callButton">Call</button> <button id="hangupButton">Hang Up</button> </div> <script src="index.js"></body></html>index.js
<script> var localStream, localPeerConnection, remotePeerConnection; var localVideo = document.getElementById("localVideo"); var remoteVideo = document.getElementById("remoteVideo"); var startButton = document.getElementById("startButton"); var callButton = document.getElementById("callButton"); var hangupButton = document.getElementById("hangupButton"); startButton.disabled = false; callButton.disabled = true; hangupButton.disabled = true; startButton.onclick = start; callButton.onclick = call; hangupButton.onclick = hangup; function trace(text) { console.log((performance.now() / 1000).toFixed(3) + ": " + text); } function gotStream(stream) { trace("Received local stream"); localVideo.src = URL.createObjectURL(stream); localStream = stream; callButton.disabled = false; } function start() { trace("Requesting local stream"); startButton.disabled = true; getUserMedia({ audio: true, video: true }, gotStream, function(error) { trace("getUserMedia error: ", error); }); } function call() { callButton.disabled = true; hangupButton.disabled = false; trace("Starting call"); if (localStream.getVideoTracks().length > 0) { trace('Using video device: ' + localStream.getVideoTracks()[0].label); } if (localStream.getAudioTracks().length > 0) { trace('Using audio device: ' + localStream.getAudioTracks()[0].label); } var servers = null;//本机测试不用其他服务器 localPeerConnection = new RTCPeerConnection(servers);//offer方 trace("Created local peer connection object localPeerConnection"); localPeerConnection.onicecandidate = gotLocalIceCandidate;//offer方发送ICE remotePeerConnection = new RTCPeerConnection(servers);//answe方 trace("Created remote peer connection object remotePeerConnection"); remotePeerConnection.onicecandidate = gotRemoteIceCandidate;//answer方发送ICE remotePeerConnection.onaddstream = gotRemoteStream;//设置视频流 localPeerConnection.addStream(localStream); trace("Added localStream to localPeerConnection"); localPeerConnection.createOffer(gotLocalDescription, handleError);//作为offer,产生自己的SessionDescription【SD】信息 } function gotLocalDescription(description) {//description是offer方的SD localPeerConnection.setLocalDescription(description); trace("Offer from localPeerConnection: \n" + description.sdp); remotePeerConnection.setRemoteDescription(description);//answer方接收offer的SD remotePeerConnection.createAnswer(gotRemoteDescription, handleError);//answer方发送自己的SD } function gotRemoteDescription(description) { remotePeerConnection.setLocalDescription(description);//anwer方设置本身自己的SD trace("Answer from remotePeerConnection: \n" + description.sdp); localPeerConnection.setRemoteDescription(description);//offer接收answer方的SD } function hangup() { trace("Ending call"); localPeerConnection.close(); remotePeerConnection.close(); localPeerConnection = null; remotePeerConnection = null; hangupButton.disabled = true; callButton.disabled = false; } function gotRemoteStream(event) { remoteVideo.src = URL.createObjectURL(event.stream); trace("Received remote stream"); } function gotLocalIceCandidate(event) { if (event.candidate) { remotePeerConnection.addIceCandidate(new RTCIceCandidate(event.candidate));//answer方接收ICE trace("Local ICE candidate: \n" + event.candidate.candidate); } } function gotRemoteIceCandidate(event) { if (event.candidate) { localPeerConnection.addIceCandidate(new RTCIceCandidate(event.candidate));//offer方接收ICE trace("Remote ICE candidate: \n " + event.candidate.candidate); } } function handleError() {} </script>另外加一些CSS可以很容易实现滤镜效果
video { filter: hue-rotate(180deg) saturate(200%); -moz-filter: hue-rotate(180deg) saturate(200%); -webkit-filter: hue-rotate(180deg) saturate(200%);}运行这两段代码,就可以调出来本地视频窗口
参考资料
强烈推荐的WebRTC入门教程
google webRTC
WebRTC官网
WebRTC-W3School
MDN-WebRTC
WebRTC实践教程
使用WebRTC搭建前端视频聊天室——信令篇
可以用WebRTC来做视频直播吗?-知乎
实时猫–WebRTC服务商
- WebRTC1-原理探究
- jQuery 原理初步探究
- Spring 事务管理原理探究
- Yum原理探究
- struts2 工作原理探究
- memcache 原理探究
- solr replication原理探究
- MFC原理探究
- jQuery 原理初步探究
- KVO实现原理探究
- 浮点数原理探究
- RecyclerView绘制原理探究
- DispatcherServlet工作原理探究
- ThreadLocal 原理探究
- solr replication原理探究
- RPC原理探究
- Vue filter原理探究
- Android GC 原理探究
- ubuntu 双击打不开软件或者创建的快捷方式
- 针对eclipse安装spring插件安装失败或者后不显示spring文件或者的解决办法
- webpack项目实践
- android 之横屏模式产生的oncreate 两次调用解决方案
- 何为栈? Stack 基础理解
- WebRTC1-原理探究
- hexdump命令使用
- python,unicode转换中文,中文转换unicode
- 华为30
- salesforce 项目履历查询
- Android 知识点收藏
- java 8 新特性(5.Date-Time API)
- linux应用系统操作总结
- MySQL Clent 设置编码