AMS (1):System Server 启动 AMS
来源:互联网 发布:qq游戏端口是多少 编辑:程序博客网 时间:2024/04/30 23:24
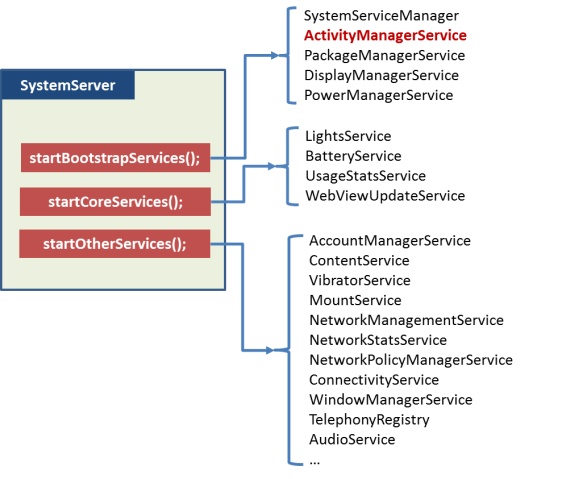
SystemServer是由系统启动的时候zygote启动的第一个java程序
Android中的很多使用java语言编写的service都是在SystemServer中启动的
AMS的是在SystemServer中的startBootstrapServices方法中启动的
frameworks/base/services/java/com/android/server$ tree.`-- SystemServer.java
startBootstrapServices(); startCoreServices(); startOtherServices();分别分解这个3个函数,就明白整个启动过程了。
把其中ActivityManagerService相关的部分,提取出来。
android系统中的很多核心关键服务都是在这个函数中启动的
这个方法中有这么一段代码:
startBootstrapServices@SystemServer.java:
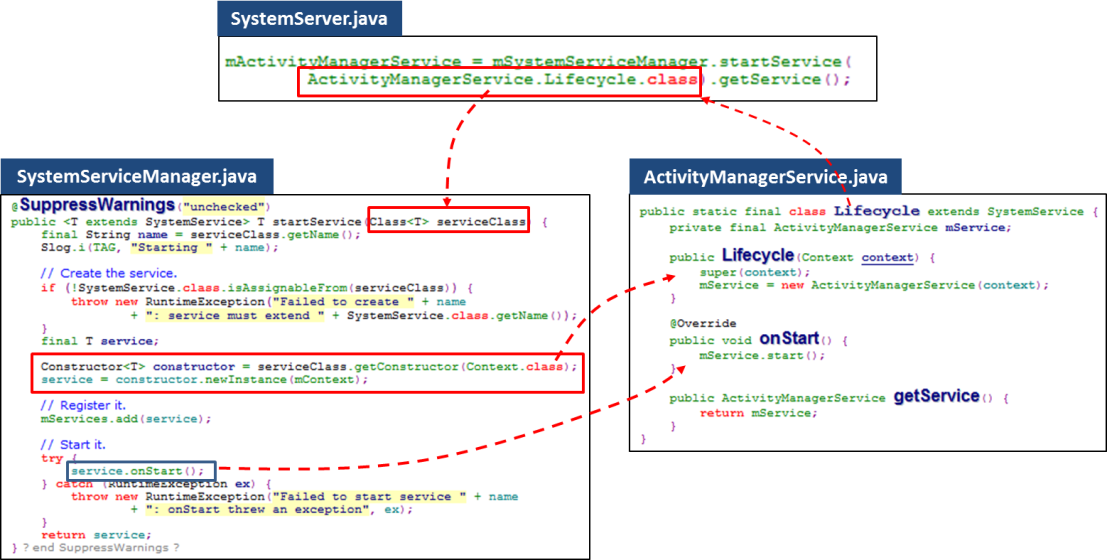
private void startBootstrapServices() { // Activity manager runs the show. mActivityManagerService = mSystemServiceManager.startService( ActivityManagerService.Lifecycle.class).getService(); mActivityManagerService.setSystemServiceManager(mSystemServiceManager); mActivityManagerService.setInstaller(installer);这里调用了mSystemServiceManager对象的startService启动了AMS,注意这里给出的参数是ActivityManagerService.Lifecycle.class,在进一步分析startService之前,我们需要看一下这个类:
Lifecycle@ActivityManagerService.java
frameworks/base/services/core/java/com/android/server/am$.|-- ActiveServices.java|-- ActivityManagerDebugConfig.java|-- ActivityManagerService.java|-- ActivityManagerShellCommand.java|-- ActivityMetricsLogger.java|-- ActivityRecord.java|-- ActivityResult.java|-- ActivityStack.java|-- ActivityStackSupervisor.java|-- ActivityStarter.java|-- ActivityStartInterceptor.java
public static final class Lifecycle extends SystemService { private final ActivityManagerService mService; public Lifecycle(Context context) { super(context); mService = new ActivityManagerService(context); } @Override public void onStart() { mService.start(); } public ActivityManagerService getService() { return mService; } }从这个类的名字就可以看出来,这是一个关于AMS的生命周期的内部类,构造器中实例化了一个AMS的对象。同时这个类继承自SystemService类(这是所有系统级别服务都应该继承的父类,主要定义了一些关于生命周期和上下文的接口),并且复写了onStart方法:onStart@SystemService.java
frameworks/base/services/core/java/com/android/server$ ls SystemService*SystemService.java SystemServiceManager.java
/** * Called when the dependencies listed in the @Service class-annotation are available * and after the chosen start phase. * When this method returns, the service should be published. */ public abstract void onStart();
可以看出来,这是当服务启动的时候回调的方法,具体再哪里调用,我们后面会分析。弄清楚了Lifecycle类之后,我们现在可以来分析mSystemServiceManager对象的startService方法,mSystemServiceManager是SystemServiceManager类的一个对象,下面是startService方法:
startService@SystemServiceManager.java
/** * Creates and starts a system service. The class must be a subclass of * {@link com.android.server.SystemService}. * * @param serviceClass A Java class that implements the SystemService interface. * @return The service instance, never null. * @throws RuntimeException if the service fails to start. */ @SuppressWarnings("unchecked") public <T extends SystemService> T startService(Class<T> serviceClass) { try { final String name = serviceClass.getName(); Slog.i(TAG, "Starting " + name); Trace.traceBegin(Trace.TRACE_TAG_SYSTEM_SERVER, "StartService " + name); // Create the service. if (!SystemService.class.isAssignableFrom(serviceClass)) { throw new RuntimeException("Failed to create " + name + ": service must extend " + SystemService.class.getName()); } final T service; try { //获得构造器 Constructor<T> constructor = serviceClass.getConstructor(Context.class); //实例化一个对象 service = constructor.newInstance(mContext); } catch (InstantiationException ex) { throw new RuntimeException("Failed to create service " + name + ": service could not be instantiated", ex); } catch (IllegalAccessException ex) { throw new RuntimeException("Failed to create service " + name + ": service must have a public constructor with a Context argument", ex); } catch (NoSuchMethodException ex) { throw new RuntimeException("Failed to create service " + name + ": service must have a public constructor with a Context argument", ex); } catch (InvocationTargetException ex) { throw new RuntimeException("Failed to create service " + name + ": service constructor threw an exception", ex); } // Register it. mServices.add(service);//这里的mServices, 是SystemServiceManager对象维护的一个动态数组,保存所管理的所有SystemServices // Start it. try { service.onStart(); } catch (RuntimeException ex) { throw new RuntimeException("Failed to start service " + name + ": onStart threw an exception", ex); } return service; } finally { Trace.traceEnd(Trace.TRACE_TAG_SYSTEM_SERVER); } }这里我们需要说明一下,在上面调用这个方法的时候,我们传递进来的参数是一个类,而不是这个类的对象,也就是说我们仅仅给出了类型并没有进行实例化!因此这里的方法参数是一个泛型。在这个方法中我们首先获得传递进来类的名字,然后进行一个很重要的操作,那就是java类型判断,使用isAssignableFrom完成,isAssignableFrom和instanceof类似,只是instanceof针对类的对象进行判断,而isAssignableFrom针对类进行判断,也就是说这是在只有类而没有类的对象的时候进行判断类之间的继承关系的方式。我们这里判断了传递进来的类是不是SystemService类的子类,如果不是的话直接刨除运行时异常立即停止运行,因为服务必须继承自SystemService类!代码中的异常信息也可以看到这一点。接下来,就获得类的构造器,并且实例化一个对象:
final T service; try { Constructor<T> constructor = serviceClass.getConstructor(Context.class); //获得类LifeCycle的构造器 service = constructor.newInstance(mContext); //实例化Lifecycle 的一个对象:下面是LifeCycle的构造器:
public Lifecycle(Context context) { super(context); mService = new ActivityManagerService(context); }我们可以看到,这里实例化了一个ActivityManagerService类的对象,我们看一下ActivityManagerService类的构造器: // Note: This method is invoked on the main thread but may need to attach various // handlers to other threads. So take care to be explicit about the looper. public ActivityManagerService(Context systemContext) { mContext = systemContext; mFactoryTest = FactoryTest.getMode(); //获得当前运行在SystemServer进程中的ActivityThread对象 mSystemThread = ActivityThread.currentActivityThread(); Slog.i(TAG, "Memory class: " + ActivityManager.staticGetMemoryClass()); //创建用于处理本线程消息的线程和Handler对象;Handler对象是MainHandler类 mHandlerThread = new ServiceThread(TAG, android.os.Process.THREAD_PRIORITY_FOREGROUND, false /*allowIo*/); mHandlerThread.start(); mHandler = new MainHandler(mHandlerThread.getLooper()); mUiHandler = new UiHandler(); /* static; one-time init here */ if (sKillHandler == null) { sKillThread = new ServiceThread(TAG + ":kill", android.os.Process.THREAD_PRIORITY_BACKGROUND, true /* allowIo */); sKillThread.start(); sKillHandler = new KillHandler(sKillThread.getLooper()); } //创建Intent广播管理类对象 mFgBroadcastQueue = new BroadcastQueue(this, mHandler, "foreground", BROADCAST_FG_TIMEOUT, false); mBgBroadcastQueue = new BroadcastQueue(this, mHandler, "background", BROADCAST_BG_TIMEOUT, true); mBroadcastQueues[0] = mFgBroadcastQueue; mBroadcastQueues[1] = mBgBroadcastQueue; //所有的Service列表对象 mServices = new ActiveServices(this); //所有的Provider列表对象 mProviderMap = new ProviderMap(this); mAppErrors = new AppErrors(mContext, this); // TODO: Move creation of battery stats service outside of activity manager service. //获取/data/system目录,该目录用于创建MainHandler? File dataDir = Environment.getDataDirectory(); File systemDir = new File(dataDir, "system"); systemDir.mkdirs(); //获取Battery服务对象 mBatteryStatsService = new BatteryStatsService(systemDir, mHandler); mBatteryStatsService.getActiveStatistics().readLocked(); mBatteryStatsService.scheduleWriteToDisk(); mOnBattery = DEBUG_POWER ? true : mBatteryStatsService.getActiveStatistics().getIsOnBattery(); mBatteryStatsService.getActiveStatistics().setCallback(this); //获取进程状态信息对象 mProcessStats = new ProcessStatsService(this, new File(systemDir, "procstats")); //获取App权限管理服务对象 mAppOpsService = new AppOpsService(new File(systemDir, "appops.xml"), mHandler); mAppOpsService.startWatchingMode(AppOpsManager.OP_RUN_IN_BACKGROUND, null, new IAppOpsCallback.Stub() { @Override public void opChanged(int op, int uid, String packageName) { if (op == AppOpsManager.OP_RUN_IN_BACKGROUND && packageName != null) { if (mAppOpsService.checkOperation(op, uid, packageName) != AppOpsManager.MODE_ALLOWED) { runInBackgroundDisabled(uid); } } } }); //打开/data/system/urigrants.xml, 管理URI权限 mGrantFile = new AtomicFile(new File(systemDir, "urigrants.xml")); //获取用户控制对象 mUserController = new UserController(this); //获取OpenGL ES版本 GL_ES_VERSION = SystemProperties.getInt("ro.opengles.version", ConfigurationInfo.GL_ES_VERSION_UNDEFINED); mTrackingAssociations = "1".equals(SystemProperties.get("debug.track-associations")); //恢复默认设置??? mConfiguration.setToDefaults(); mConfiguration.setLocales(LocaleList.getDefault()); mConfigurationSeq = mConfiguration.seq = 1; //CPU跟踪初始化 mProcessCpuTracker.init(); mCompatModePackages = new CompatModePackages(this, systemDir, mHandler); //创建Intent防火墙(6.0以后版本) mIntentFirewall = new IntentFirewall(new IntentFirewallInterface(), mHandler); mStackSupervisor = new ActivityStackSupervisor(this); mActivityStarter = new ActivityStarter(this, mStackSupervisor); mRecentTasks = new RecentTasks(this, mStackSupervisor); //CPU使用监控进程 mProcessCpuThread = new Thread("CpuTracker") { @Override public void run() { while (true) { try { try { synchronized(this) { final long now = SystemClock.uptimeMillis(); long nextCpuDelay = (mLastCpuTime.get()+MONITOR_CPU_MAX_TIME)-now; long nextWriteDelay = (mLastWriteTime+BATTERY_STATS_TIME)-now; //Slog.i(TAG, "Cpu delay=" + nextCpuDelay // + ", write delay=" + nextWriteDelay); if (nextWriteDelay < nextCpuDelay) { nextCpuDelay = nextWriteDelay; } if (nextCpuDelay > 0) { mProcessCpuMutexFree.set(true); this.wait(nextCpuDelay); } } } catch (InterruptedException e) { } updateCpuStatsNow(); } catch (Exception e) { Slog.e(TAG, "Unexpected exception collecting process stats", e); } } } }; //将服务加入看门狗的监控 Watchdog.getInstance().addMonitor(this); Watchdog.getInstance().addThread(mHandler); }这个构造器比较长,并且基本都是一些AMS日常工作的初始化,包括创建四大组件的管理对象以及一些内部对象,因此我们这里就不详细分析构造器的工作了,后面分析AMS的服务逻辑的时候我们在来分析对应的初始化工作。
现在我们只要知道在AMS的构造器中做了这些工作就可以了:
1. 创建一堆类的对象,这些对象对于AMS的日常工作来说是必需的。
2. 初始化battery stats相关服务,AMS除了负责activity的管理工作,还负责battery stats相关的工作
3. 初始化cpu统计相关服务,主要是启动一个线程,轮询处理。为AMS提供有关CPU运行统计方面数据做准备。
再回到:
startService@SystemServiceManager.java中,继续看:
最后进行这个方法中最重要的操作,那就是将服务添加到SystemServiceManager中去,方便别的进程使用Binder查找到这个服务:
// Register it. mServices.add(service); //mServices是个动态数组需要注意的是,这里的添加注册服务并不是Binder添加注册服务,我们看一下mServices的类型就知道了:
public class SystemServiceManager { private static final String TAG = "SystemServiceManager"; private final Context mContext; private boolean mSafeMode; // Services that should receive lifecycle events. private final ArrayList<SystemService> mServices = new ArrayList<SystemService>();是的,mServices就是一个列表,这个列表中包含了它启动的所有SystemService类的服务,以便于后面调用它的生命周期方法。接下来的操作就是回调我们前面提到的onStart方法:
// Start it. try { service.onStart(); //这里调用ActivityManagerService内部类LifeCycle的OnStart方法 } catch (RuntimeException ex) { throw new RuntimeException("Failed to start service " + name + ": onStart threw an exception", ex); } return service;这里就回调到了AMS中Lifecycle内部类的onStart方法了,最后就是将实例化的service返回。接下来我们先分析一下Lifecycle的onStart: @Override public void onStart() { mService.start(); }我们看到,这里直接调用ActivityManagerService的start方法:
start@ActivityManagerService.java private void start() { Process.removeAllProcessGroups(); mProcessCpuThread.start(); mBatteryStatsService.publish(mContext); mAppOpsService.publish(mContext); Slog.d("AppOps", "AppOpsService published"); LocalServices.addService(ActivityManagerInternal.class, new LocalService()); }这里的start方法很是简单:
首先是调用Process类的removeAllProcessGroups方法移除所有的进程组,清空所有记录;
然后就是启动ProcessCpuThread线程,mProcessCpuThread这个对象就是在刚才的构造器中初始化的;
下面是发布BatteryStatsService,调用的是publish方法:
publish@BatteryStatsService.java
public void publish(Context context) { mContext = context; mStats.setRadioScanningTimeout(mContext.getResources().getInteger( com.android.internal.R.integer.config_radioScanningTimeout) * 1000L); mStats.setPowerProfile(new PowerProfile(context)); ServiceManager.addService(BatteryStats.SERVICE_NAME, asBinder()); }我们看到,这里首先就是将Battery stats服务注册到SM中去,然后就是设置一些运行时参数,具体这些参数是什么含义,读者可以自己分析一下BatteryStatsService的实现,这里我们就不详细分析了。start方法的接下来的操作就是发布AppOpsService了,AppOpsService这个服务是提供android app ops服务的,什么是android app ops服务呢?App Ops是在android 4.3中加入的一个权限管理框架,这个框架可以让你自由地赋予或者撤销某个app的权限,方便管理,下图是操作时候的界面:
好了,如果读者还没有晕掉的话,你会知道上面我们都是在分析SystemServiceManager中的startService方法。。。。。
到目前为止,我们的分析流程是这样的:
1. startBootstrapServices@SystemServer.java
2. startService@SystemServiceManager.java
3. Lifecycle@ActivityManagerService.java
4. onStart@Lifecycle
5. start@ActivityManagerService.java
现在我们回过头来看下startBootstrapServices@SystemServer.java中AMS的启动部分:
// Activity manager runs the show. mActivityManagerService = mSystemServiceManager.startService( ActivityManagerService.Lifecycle.class).getService(); mActivityManagerService.setSystemServiceManager(mSystemServiceManager); mActivityManagerService.setInstaller(installer);
我们发现我们刚刚分析完了mSystemServiceManager.startService(ActivityManagerService.Lifecycle.class)这部分的逻辑!!
在这方法调用完成之后会返回Lifecycle类的对象(上面讲解过,不知道你是不是记得??),然后调用这个对象的getService方法赋值给mActivityManagerService,getService方法定义如下:
getService@Lifecycle
public ActivityManagerService getService() { return mService; }而这里的mService就是在Lifecycle构造器中实例化的ActivityManagerService对象。///////////////////////////////////////////////////////////////////////////////////////////////////////////
第二个桥段:
接下来在SystemServer.java中的操作就是调用AMS的setSystemServiceManager来将SystemServiceManager类的对象设置进去:
setSystemServiceManager@ActivityManagerService
public void setSystemServiceManager(SystemServiceManager mgr) { mSystemServiceManager = mgr; }这里就只是将对象保存下来,以后会使用到。SystemServiceManager是一个创建,启动,和管理其他有关SystemService类系统服务的管理类,我们从这个类的代码注释也能看到:/**
* Manages creating, starting, and other lifecycle events of
* {@link com.android.server.SystemService system services}.
*
* {@hide}
*/
这里说的很清楚,并且这个类的方法也是简单明了,具体这个类在AMS中怎么使用,我们后面分析AMS的业务逻辑的时候会提到。在startBootstrapServices@SystemServer.java的最后就是调用setInstaller方法将installer设置进去。installer是用来安装app的,我们的AMS使用它只是想在AMS的启动完成的时候调用installer的markBootComplete方法告诉它现在AMS启动完成了,installer可以进行工作了。这个调用是在AMS的finishBooting方法中调用的,finishBooting是ActivityStackSupervisor中初始化完毕之后回调的,ActivityStackSupervisor是用来管理ActivityStack的,这个类是android 5.0中新引入的。这部分涉及到ActivityStack的管理,所以这里不过多涉及,后面我们分析ActivityStack实现时再来详述这部分。现在大家只要知道,AMS启动最后它的finishBooting会被ActivityStackSupervisor回调,然后这个方法中会调用installer的markBootComplete,并且还会调用SystemServiceManager的startBootPhase通知启动的阶段信息:
startBootPhase@SystemServiceManager.java
/** * Starts the specified boot phase for all system services that have been started up to * this point. * * @param phase The boot phase to start. */ public void startBootPhase(final int phase) { if (phase <= mCurrentPhase) { throw new IllegalArgumentException("Next phase must be larger than previous"); } mCurrentPhase = phase; Slog.i(TAG, "Starting phase " + mCurrentPhase); try { Trace.traceBegin(Trace.TRACE_TAG_SYSTEM_SERVER, "OnBootPhase " + phase); final int serviceLen = mServices.size(); for (int i = 0; i < serviceLen; i++) { final SystemService service = mServices.get(i); try { service.onBootPhase(mCurrentPhase); } catch (Exception ex) { throw new RuntimeException("Failed to boot service " + service.getClass().getName() + ": onBootPhase threw an exception during phase " + mCurrentPhase, ex); } } } finally { Trace.traceEnd(Trace.TRACE_TAG_SYSTEM_SERVER); } }这部分代码比较简单,可以看到SystemServiceManager会从mServices列表中检出所有的service并且调用他们的onBootPhase方法通知启动的阶段信息。到这里,AMS启动只是完成基本的准备阶段,下面还有很多的工作需要做的,大家有点耐心啊~~AMS作为android系统的重量级的服务,怎么会就那么简单呢??你说是吧?还是踏踏实实地看代码吧~~~~
接下的操作还是在startBootstrapServices方法中:
startBootstrapServices@SystemServer.java
// Power manager needs to be started early because other services need it. // Native daemons may be watching for it to be registered so it must be ready // to handle incoming binder calls immediately (including being able to verify // the permissions for those calls). mPowerManagerService = mSystemServiceManager.startService(PowerManagerService.class); // Now that the power manager has been started, let the activity manager // initialize power management features. Trace.traceBegin(Trace.TRACE_TAG_SYSTEM_SERVER, "InitPowerManagement"); mActivityManagerService.initPowerManagement(); Trace.traceEnd(Trace.TRACE_TAG_SYSTEM_SERVER);
这里的操作比较简单,注释中说道,既然power manager已经启动了,那么我们的AMS就可以初始化和battery stats相关的工作了。这里我们暂时先不详细分析initPowerManagement的过程,后面我们分析AMS的电源部分的时候会详细说明这一块的内容。接着往下看startBootstrapServices的中关于AMS的代码:
// Set up the Application instance for the system process and get started. mActivityManagerService.setSystemProcess();这是startBootstrapServices中关于AMS的最后一个操作了,现在大家想一想,我们的AMS是一个Binder公共服务,每一个app都能通过getSystemService找到它的,但是到目前为止我们并没有看到任何关于在Binder中注册服务的逻辑啊?现在我们看一下setSystemProcess的实现:
setSystemProcess@ActivityManagerService.java
public void setSystemProcess() { try { ServiceManager.addService(Context.ACTIVITY_SERVICE, this, true); ServiceManager.addService(ProcessStats.SERVICE_NAME, mProcessStats); ServiceManager.addService("meminfo", new MemBinder(this)); ServiceManager.addService("gfxinfo", new GraphicsBinder(this)); ServiceManager.addService("dbinfo", new DbBinder(this)); if (MONITOR_CPU_USAGE) { ServiceManager.addService("cpuinfo", new CpuBinder(this)); } ServiceManager.addService("permission", new PermissionController(this)); ServiceManager.addService("processinfo", new ProcessInfoService(this)); ApplicationInfo info = mContext.getPackageManager().getApplicationInfo( "android", STOCK_PM_FLAGS | MATCH_SYSTEM_ONLY); mSystemThread.installSystemApplicationInfo(info, getClass().getClassLoader()); synchronized (this) { ProcessRecord app = newProcessRecordLocked(info, info.processName, false, 0); app.persistent = true; app.pid = MY_PID; app.maxAdj = ProcessList.SYSTEM_ADJ; app.makeActive(mSystemThread.getApplicationThread(), mProcessStats); synchronized (mPidsSelfLocked) { mPidsSelfLocked.put(app.pid, app); } updateLruProcessLocked(app, false, null); updateOomAdjLocked(); } } catch (PackageManager.NameNotFoundException e) { throw new RuntimeException( "Unable to find android system package", e); } }就是这里了,我们看到这个方法上来的第一句就是ServiceManager.addService(Context.ACTIVITY_SERVICE, this, true);这句话就是我们想要找的,这句话的意思就是通过Binder向系统服务大管家ServiceManager(SM)注册我们的服务,这样android中的其他进程就可以通过context的getSystemService找到我们的服务了。这个方法中的接下来的代码让我们感觉AMS挺不务正业的,它还分管着meminfo,gfxinfo,dbinfo,cpuinfo,permission,processinfo等业务,还真是忙啊!这里我们先不看这些业务,因为我们知道只有Activity的管理业务才是AMS的主页,其他的都只是副业而已了。startOtherServices@SystemServer.java: private void startOtherServices() { ...... // We now tell the activity manager it is okay to run third party // code. It will call back into us once it has gotten to the state // where third party code can really run (but before it has actually // started launching the initial applications), for us to complete our // initialization. mActivityManagerService.systemReady(new Runnable() { @Override public void run() { Slog.i(TAG, "Making services ready"); mSystemServiceManager.startBootPhase( SystemService.PHASE_ACTIVITY_MANAGER_READY);1). 如果现在已经启动完毕再次调用的话,就执行回调代码
systemReady@ActivityManagerService.java:
public void systemReady(final Runnable goingCallback) { synchronized(this) { if (mSystemReady) { // If we're done calling all the receivers, run the next "boot phase" passed in // by the SystemServer if (goingCallback != null) { goingCallback.run(); } return; }首先我们看到,这个方法中的全部代码都是处在保护区中的,也就是说必须保证线程间安全,刚开始我们的mSystemReady是false,所以这里的代码不会执行 public void systemReady(final Runnable goingCallback) { synchronized(this) { if (mSystemReady) { // If we're done calling all the receivers, run the next "boot phase" passed in // by the SystemServer if (goingCallback != null) { goingCallback.run(); } return; } mLocalDeviceIdleController //先执行这里 = LocalServices.getService(DeviceIdleController.LocalService.class); // Make sure we have the current profile info, since it is needed for security checks. mUserController.onSystemReady(); mRecentTasks.onSystemReadyLocked(); mAppOpsService.systemReady(); mSystemReady = true; }这里是获得设备idle控制器,主要用于广播发送中的控制,后面我们分析广播机制的时候会提到这个内容。2.
mUserController.onSystemReady();
3.
mRecentTasks.onSystemReadyLocked();
4.
mAppOpsService.systemReady();
5. 清理多余进程,除了persistent进程
ArrayList<ProcessRecord> procsToKill = null; synchronized(mPidsSelfLocked) { for (int i=mPidsSelfLocked.size()-1; i>=0; i--) { ProcessRecord proc = mPidsSelfLocked.valueAt(i); if (!isAllowedWhileBooting(proc.info)){ if (procsToKill == null) { procsToKill = new ArrayList<ProcessRecord>(); } procsToKill.add(proc); } } } synchronized(this) { if (procsToKill != null) { for (int i=procsToKill.size()-1; i>=0; i--) { ProcessRecord proc = procsToKill.get(i); Slog.i(TAG, "Removing system update proc: " + proc); removeProcessLocked(proc, true, false, "system update done"); } } // Now that we have cleaned up any update processes, we // are ready to start launching real processes and know that // we won't trample on them any more. mProcessesReady = true; }这段代码的作用就是找到已经启动的应用进程,然后杀死他们,为什么呢?目的就是为了在home启动之前准备一个干净的环境。home启动之前的环境怎么会不干净呢?我们之前提到了,android系统会发送一个intent消息给系统模块,通知他们进行相应的升级,这里的这些模块就是有可能会在home运行之前运行的,为了不让这些模块的运行干扰我们home的正常逻辑,所以要就杀死他们。但是这里我们看到代码中定义了有一种进程是不会被杀死的,就是isAllowedWhileBooting返回true的进程,这个方法会检查进程是否带有FLAG_PERSISTENT标记,如果有的话就不用杀死他们,因为带有这个标识的进程下面我们还有启动他们的。6. 如果是工厂测试模式,则启动工厂测试模块
synchronized(this) { // Make sure we have no pre-ready processes sitting around. if (mFactoryTest == FactoryTest.FACTORY_TEST_LOW_LEVEL) { ResolveInfo ri = mContext.getPackageManager() .resolveActivity(new Intent(Intent.ACTION_FACTORY_TEST), STOCK_PM_FLAGS); CharSequence errorMsg = null; if (ri != null) { ActivityInfo ai = ri.activityInfo; ApplicationInfo app = ai.applicationInfo; if ((app.flags&ApplicationInfo.FLAG_SYSTEM) != 0) { mTopAction = Intent.ACTION_FACTORY_TEST; mTopData = null; mTopComponent = new ComponentName(app.packageName, ai.name); } else { errorMsg = mContext.getResources().getText( com.android.internal.R.string.factorytest_not_system); } } else { errorMsg = mContext.getResources().getText( com.android.internal.R.string.factorytest_no_action); } if (errorMsg != null) { mTopAction = null; mTopData = null; mTopComponent = null; Message msg = Message.obtain(); msg.what = SHOW_FACTORY_ERROR_UI_MSG; msg.getData().putCharSequence("msg", errorMsg); mUiHandler.sendMessage(msg); } } }这是判断如果当前系统处于“工厂测试模式”的话,就会启动用于工厂测试的模块。我们的手机在生产出厂的时候,都要进行工厂测试的,在工厂模式下运行的程序需要响应intent ACTION_FACTORY_TEST消息。这里主要就是查找响应该消息的程序,并且放在mTopComponent中,如果没有找到,就发送工场测试失败的消息。
7. 读取设置信息
retrieveSettings();
8. 打开URI读取权限
final int currentUserId; synchronized (this) { currentUserId = mUserController.getCurrentUserIdLocked(); readGrantedUriPermissionsLocked(); }上面我们打开了URI权限的配置文件,这里我们就读取URI权限。9.执行参数的callback,完成SystemServer的处理逻辑
if (goingCallback != null) goingCallback.run();systemReady方法的参数就是一个Runnable对象,这里当这个对象不为空的时候,回调它的run方法,这个run方法主要执行SystemServer自己在这块的逻辑,主要就是一些后续的设置,准备,启动system ui,AMS开始观察本地程序的crash,和回调很多模块的systemReady和systemrunning方法。这个回调方法比较长,这里就不详细分析了。
10.
mBatteryStatsService.noteEvent(BatteryStats.HistoryItem.EVENT_USER_RUNNING_START, Integer.toString(currentUserId), currentUserId); mBatteryStatsService.noteEvent(BatteryStats.HistoryItem.EVENT_USER_FOREGROUND_START, Integer.toString(currentUserId), currentUserId);
11. 启动当前用户
mSystemServiceManager.startUser(currentUserId);这里开始启动当前用户,为用户和系统交互做home桌面启动前的准备。
12. 启动带有FLAG_PERSISTENT标记的应用,并且启动home launcher
synchronized (this) { // Only start up encryption-aware persistent apps; once user is // unlocked we'll come back around and start unaware apps startPersistentApps(PackageManager.MATCH_DIRECT_BOOT_AWARE); // Start up initial activity. mBooting = true; // Enable home activity for system user, so that the system can always boot if (UserManager.isSplitSystemUser()) { ComponentName cName = new ComponentName(mContext, SystemUserHomeActivity.class); try { AppGlobals.getPackageManager().setComponentEnabledSetting(cName, PackageManager.COMPONENT_ENABLED_STATE_ENABLED, 0, UserHandle.USER_SYSTEM); } catch (RemoteException e) { throw e.rethrowAsRuntimeException(); } } startHomeActivityLocked(currentUserId, "systemReady"); //启动Home桌面App try { if (AppGlobals.getPackageManager().hasSystemUidErrors()) { Slog.e(TAG, "UIDs on the system are inconsistent, you need to wipe your" + " data partition or your device will be unstable."); mUiHandler.obtainMessage(SHOW_UID_ERROR_UI_MSG).sendToTarget(); } } catch (RemoteException e) { } if (!Build.isBuildConsistent()) { Slog.e(TAG, "Build fingerprint is not consistent, warning user"); mUiHandler.obtainMessage(SHOW_FINGERPRINT_ERROR_UI_MSG).sendToTarget(); } long ident = Binder.clearCallingIdentity(); try { //发送用户启动完成的消息 Intent intent = new Intent(Intent.ACTION_USER_STARTED); intent.addFlags(Intent.FLAG_RECEIVER_REGISTERED_ONLY | Intent.FLAG_RECEIVER_FOREGROUND); intent.putExtra(Intent.EXTRA_USER_HANDLE, currentUserId); broadcastIntentLocked(null, null, intent, null, null, 0, null, null, null, AppOpsManager.OP_NONE, null, false, false, MY_PID, Process.SYSTEM_UID, currentUserId); intent = new Intent(Intent.ACTION_USER_STARTING); intent.addFlags(Intent.FLAG_RECEIVER_REGISTERED_ONLY); intent.putExtra(Intent.EXTRA_USER_HANDLE, currentUserId); broadcastIntentLocked(null, null, intent, null, new IIntentReceiver.Stub() { @Override public void performReceive(Intent intent, int resultCode, String data, Bundle extras, boolean ordered, boolean sticky, int sendingUser) throws RemoteException { } }, 0, null, null, new String[] {INTERACT_ACROSS_USERS}, AppOpsManager.OP_NONE, null, true, false, MY_PID, Process.SYSTEM_UID, UserHandle.USER_ALL); } catch (Throwable t) { Slog.wtf(TAG, "Failed sending first user broadcasts", t); } finally { Binder.restoreCallingIdentity(ident); } <pre class="prettyprint" name="code"><code class="hljs java has-numbering"><span class="hljs-comment"> // 开始恢复显示activity栈顶的界面,也就是home的主界面。</span></code> mStackSupervisor.resumeFocusedStackTopActivityLocked(); mUserController.sendUserSwitchBroadcastsLocked(-1, currentUserId); }这段代码的作用就是启动带有FLAG_PERSISTENT标记的app,启动应用通过调用addAppLocked方法完成,这个方法后面我们分析AMS的进程管理的时候再详细描述。
接着就是启动我们熟悉的home了,通过调用startHomeActivityLocked方法完成,
这个方法会首先查找当前home启动器,然后再启动对应的启动器(因为用户可能会下载安装了第三方的启动器)。home启动完成之后,系统会发送ACTION_BOOT_COMPLETE消息,通知app系统启动完成。
到这里,AMS的主体业务才算是启动完毕。
- AMS (1):System Server 启动 AMS
- AMS-启动AMS(AMS在SystemServer中的调用轨迹)
- Ams
- ams
- Activity启动过程(一)AMS
- Android ActivityManagerService(AMS)的启动分析
- Android ActivityManagerService(AMS)的启动分析
- AMS启动Activity过程
- AMS (2): AMS 如何进程管理?
- AMS (3): AMS 如何管理Activity?
- Android6.0 AMS启动Activity(六) AMS与PKMS关系(通过Intent获取ActivityInfo)
- Android6.0 AMS启动Activity(四) AMS内部一些成员变量
- Android6.0 AMS启动Activity(六) AMS与PKMS关系(通过Intent获取ActivityInfo)
- Android解析ActivityManagerService(一)AMS启动流程和AMS家族
- Android AMS原理分析(1)
- Ams分析之activity启动
- Android6.0之AMS启动
- AMS-启动Activity之二
- Android 实现在控件下面滑出式的菜单栏
- two_sum_testcode
- ADB 常用命令
- 深入理解SpringRedis的使用
- 总线设备驱动模型
- AMS (1):System Server 启动 AMS
- C# HTML解析工具HtmlAgilityPack使用实例(二)--Web页面
- 记录一下,去掉ScrollView滑动到边缘时出现的弧形阴影效果
- 什么是Hive
- 关于window下设置tomcat服务启动并且设置内存大小
- keras theano 小栗子
- opencv-ios开发笔记12 svm参数设置和自动优选
- HDFS分布式文件系统系列---基础
- 文件学习5