读书笔记:Learn C++ (1)
来源:互联网 发布:知乎三里屯不知道诊所 编辑:程序博客网 时间:2024/05/26 07:30
1) Writing code is as much of an art as it is a science -- people have all different kinds of techniques and styles. You may find some techniques and styles more challenging than other, and that’s normal. Just keep reading and working to understand. Ask lots of questions. And just as importantly, find challenging projects for yourself. The best way to learn is to do -- to run into problems, and then overcome them.
2) I’m not aware of a good source for exercises. I’ve always assigned myself projects. What are you interested in? If games, write a game. If finance, write a stock predictor. If graphics, learn some OpenGL. Start simple, and grow it over time. You’ll learn a ton by doing things wrong the first time and having to go back and redo them.
3) After C++, the next thing I would study is algorithms. Things like sorting, linked lists, maps, etc… (all of which are implemented in the STL). Those will expand your toolkit considerably and allow you to tackle bigger challenges.
* Learn more about data structures and algorithms.
* Learn more about the functionality of the standard template library.
* Learn more about 3d graphics (openGL).
* Learn more about graphical user interfaces (e.g. WxWidgets, QT).
* Learn more about graphical application development (e.g. SDL).
0.4 — Introduction to development
Before we can write and execute our first program, we need to understand in more detail how C++ programs get developed. Here is a graphic outlining a simplistic approach:
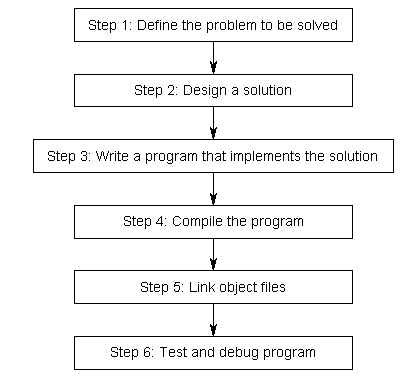
Step 1: Define the problem that you would like to solve.
This is the “what” step, where you figure out what you are going to solve. Coming up with the initial idea for what you would like to program can be the easiest step, or the hardest. But conceptually, it is the simplest. All you need is an idea that can be well defined, and you’re ready for the next step.
Here are a few examples:
- “I want to write a program that will allow me to enter numbers, then calculates the average.”
- “I want to write a program that generates a 2d maze and lets the user navigate through it.”
- “I want to write a program that reads in a file of stock prices and predicts whether the stock will go up or down.”
Step 2: Determine how you are going to solve the problem.
This is the “how” step, where you determine how you are going to solve the problem you came up with in step 1. It is also the step that is most neglected in software development. The crux of the issue is that there are many ways to solve a problem -- however, some of these solutions are good and some of them are bad. Too often, a programmer will get an idea, sit down, and immediately start coding a solution. This often generates a solution that falls into the bad category.
Typically, good solutions have the following characteristics:
- They are straightforward.
- They are well documented (especially any assumptions being made).
- They are built modularly, so parts can be reused or changed later without impacting other parts of the program.
- They are robust, and can recover or give useful error messages when something unexpected happens.
When you sit down and start coding right away, you’re typically thinking “I want to do _this_”, so you implement the solution that gets you there the fastest. This can lead to programs that are fragile, hard to change or extend, or have lots of bugs.
Studies have shown that only 20% of a programmer’s time is actually spent writing the initial program. The other 80% is spent debugging (fixing errors) or maintaining (adding features to) a program. Consequently, it’s worth your time to spend a little extra time up front before you start coding thinking about the best way to tackle a problem, what assumptions you are making, and how you might plan for the future, in order to save yourself a lot of time and trouble down the road.
We’ll talk more about how to effectively design solutions to problems in a future lesson.
Step 3: Write the program
In order to write the program, we need two things: First we need knowledge of a programming language -- that’s what these tutorials are for! Second, we need an editor. It’s possible to write a program using any editor you want, even something as simple as Window’s notepad or Unix’s vi or pico. However, we strongly urge you to use an editor that is designed for coding. Don’t worry if you don’t have one yet. We’ll cover how to install one soon.
A typical editor designed for coding has a few features that make programming much easier, including:
1) Line numbering. Line numbering is useful when the compiler gives us an error. A typical compiler error will state “error, line 64”. Without an editor that shows line numbers, finding line 64 can be a real hassle.
2) Syntax highlighting and coloring. Syntax highlighting and coloring changes the color of various parts of your program to make it easier to see the overall structure of your program.
3) An unambiguous font. Non-programming fonts often make it hard to distinguish between the number 0 and the letter O, or between the number 1, the letter l (lower case L), and the letter I (upper case i). A good programming font will differentiate these symbols in order to ensure one isn’t accidentally used in place of the other.
Your C++ programs should be called name.cpp, where name is replaced with the name of your program. The .cpp extension tells the compiler (and you) that this is a C++ source code file that contains C++ instructions. Note that some people use the extension .cc instead of .cpp, but we recommend you use .cpp.
Also note that many complex C++ programs have multiple .cpp files. Although most of the programs you will be creating initially will only have a single .cpp file, it is possible to write single programs that have tens if not hundreds of individual .cpp files.
Step 4: Compiling
In order to compile a program, we need a program called a compiler. The job of the compiler is twofold:
1) To check your program and make sure it follows the rules of the C++ language. If it does not, the compiler will give you an error to help pinpoint what needs fixing.
2) To convert each file of source code into a machine language file called an object file. Object files are typically named name.o or name.obj, where name is the same name as the .cpp file it was produced from. If your program had 5 .cpp files, the compiler would generate 5 object files.

For illustrative purposes only, most Linux and Mac OS X systems come with a C++ compiler called g++. To use g++ to compile a file from the command line, we would do this:
g++ -c file1.cpp file2.cpp file3.cpp
This would create file1.o, file2.o, and file3.o. The -c means “compile only”, which tells g++ to just produce .o (object) files.
Other compilers are available for Linux, Windows, and just about every other system. We will discuss installing a compiler in the next section, so there is no need to do so now.
For complex projects, some development environments use a makefile, which is a file that tells the compiler which files to compile. Makefiles are an advanced topic, and entire books have been written about them. Fortunately, you don’t need to worry about them, so we will not discuss them here.
Step 5: Linking
Linking is the process of taking all the object files generated by the compiler and combining them into a single executable program that you can run. This is done by a program called the linker.
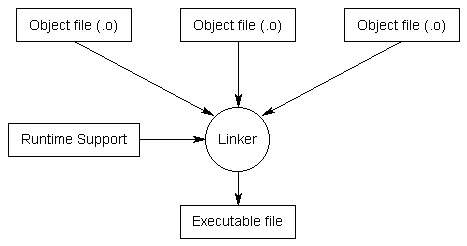
In addition to the object files for a program, the linker also includes files from the C++ standard library (or any other precompiled libraries you’re using, such as graphics or sound libraries). The C++ language itself is fairly small and simple. However, it comes with a large library of optional components that may be utilized by your programs, and these components live in the C++ standard library. For example, if you wanted to output something to the screen, your program would include a special command to tell the compiler that you wanted to use the I/O (input/output) routines from the C++ standard library.
Once the linker is finished linking all the object files (assuming all goes well), you will have an executable file.
Again, for illustrative purposes, to link the .o files we created above on a Linux or OS X machine, we can again use g++:
g++ -o prog file1.o file2.o file3.o
The -o tells g++ that we want an executable file named “prog” that is built from file1.o, file2.o, and file3.o
The compile and link steps can be combined together if desired:
g++ -o prog file1.cpp file2.cpp file3.cpp
Which will combine the compile and link steps together and directly produce an executable file named “prog”.
Step 6: Testing and Debugging
This is the fun part (hopefully)! You are able to run your executable and see whether it produces the output you were expecting. If not, then it’s time for some debugging. We will discuss debugging in more detail soon.
Note that steps 3, 4, 5, and 6 all involve software. While you can use separate programs for each of these functions, a software package known as an integrated development environment (IDE)bundles and integrates all of these features together. With a typical IDE, you get a code editor that does line numbering and syntax highlighting. You get a compiler and a linker. The IDE will automatically generate the parameters necessary to compile and link your program into an executable, even if it includes multiple files. And when you need to debug your program, you can use the integrated debugger. Furthermore, IDE’s typically bundle a number of other helpful editing features, such as integrated help, name completion, hierarchy browsers, and sometimes a version control system.
5.11 — Introduction to testing your code
So, you’ve written a program, it compiles, and it even appears to work! What now?
Well, it depends. If you’ve written your program to be run once and discarded, then you’re done. In this case, it may not matter that your program doesn’t work for every case -- if it works for the one case you needed it for, and you’re only going to run it once, then you’re done.
If your program is entirely linear (has no conditionals, such as if or switch statements), takes no inputs, and produces the correct answer, then you’re done. In this case, you’ve already tested the entire program by running it and validating the output.
But with C++, more likely you’ve written a program you intend to run many times, that uses loops and conditional logic, and accepts user input. You’ve possibly written functions that can be reused in other programs. Maybe you’re even intending to distribute this program to other people (who may try things you haven’t though of). In this case, you really should be validating that your program works like you think it does under a wide variety of conditions, and that requires some proactive testing.
Just because your program worked for one set of inputs doesn’t mean it’s going to work in all cases.
Software verification (a.k.a. software testing) is the process of determining whether or not the software works as expected in all cases.
The testing challenge
Before we talk about some practical ways to test your code, let’s talk about why comprehensive testing is difficult.
Consider this simple program:
#include <iostream>#include <string> void compare(int x, int y){if (x > y)std::cout << x << " is greater than " << y << '\n'; // case 1else if (x < y)std::cout << x << " is less than " << y << '\n'; // case 2elsestd::cout << x << " is equal to " << y << '\n'; // case 3} int main(){std::cout << "Enter a number: ";int x;std::cin >> x; std::cout << "Enter another number: ";int y;std::cin >> y; compare(x, y);}Assuming a 4-byte integer, explicitly testing this program with every possible combination of inputs would require that you run the program 18,446,744,073,709,551,616 (~18 quintillion) times. Clearly that’s not a feasible task!
Every time we ask for user input, or have a conditional in our code, we increase the number of possible ways our program can execute by some multiplicative factor. For all but the simplest programs, explicitly testing every combination of inputs becomes quickly untenable.
Now, your intuition should be telling you that you really shouldn’t need to run the above program 18 quintillion times to ensure it works. You may reason that if the statement that executes when x > y is true works for one pair of x and y values, it should work for any pair of x and y where x > y. Given that, it becomes apparent that we really only need to run it about three times (one for each branch) to have a high degree of confidence it works as desired. There are other similar tricks we can use to dramatically reduce the number of times we have to test something that make testing manageable.
There’s a lot that can be written about testing methodologies -- in fact, we could write a whole chapter on it. But since it’s not a C++ specific topic, we’ll stick to a brief and informal introduction, covered from the point of view you (as the developer) testing your own code. In the next few subsections, we’ll talk about some practical things you should be thinking about as you test your code.
How to test your code: Informal testing
Most developers do informal testing as they write their programs. After writing a unit of code (a function, a class, or some other discrete “package” of code), the developer writes some code to test the unit that was just added, and then erases the test once the test passes. For example, for the following isLowerVowel() function, you might write the following code:
#include <iostream> bool isLowerVowel(char c){ switch (c) { case 'a': case 'e': case 'i': case 'o': case 'u': return true; default: return false; }} int main(){ std::cout << isLowerVowel('a'); // temporary test code, should produce 1 std::cout << isLowerVowel('q'); // temporary test code, should produce 0 return 0;}If the results come back as 1 and 0, then you’re good to go. You know your function works, so you can erase that temporary test code, and continue programming.
Testing tip #1: Write your program in small, well defined units (functions), and compile often along the way
Consider an auto manufacturer that is building a custom concept car. Which of the following do you think they do?
a) Build (or buy) and test each car component individually before installing it. Once the component has been proven to work, integrate it into the car and retest it to make sure the integration worked. At the end, test the whole car, as a final validation that everything seems good.
b) Build a car out of all of the components all in one go, then test the whole thing for the first time right at the end.
It probably seems obvious that option a) is a better choice. And yet, many new programmers write code like option b)!
In case b), if any of the car parts were to not work as expected, the mechanic would have to diagnose the entire car to determine what was wrong -- the issue could be anywhere. A symptom might have many causes -- for example, is the car not starting due to a faulty spark plug, battery, fuel pump, or somewhere else? This leads to lots of wasted time trying to identify exactly where the problems are, and what to do about them. And if a problem is found, the consequences can be disastrous -- a change in one area might cause “ripple effects” (changes) in other parts of the program. In the worst case, you might end up rewriting a huge portion of the program!
In case a), the company tests as they go. If any component is bad right out of the box, they’ll know immediately and can fix/replace it. Nothing is integrated into the car until it’s proven working. By the time they get around to having the whole car assembled, they should have reasonable confidence that the car will work -- after all, all the parts have been tested. It’s still possible that something happened while connecting all the parts, but that’s a lot less fewer things to have to worry about and potentially debug.
The above analogy holds true for programs as well, though for some reason, new programmers often don’t realize it. You’re much better off writing small functions, and then compiling and testing them immediately. That way, if you make a mistake, you’ll know it has to be in the small amount of code that you changed since the last time you compiled/tested. That means many less places to look, and far less time spent debugging.
Rule: Compile often, and test any non-trivial functions when you write them
Testing tip #2: Aim for 100% statement coverage
The term code coverage is used to describe how much of the source code of a program is executed while testing. There are many different metrics used for code coverage, but there are few worth talking about in this informal context.
Statement coverage refers to the percentage of statements in your code that have been exercised by your testing routines.
Consider the following function:
int foo(int x, int y){ bool z = y; if (x > y) { z = x; } return z;}Calling this function as foo(1, 0) will give you complete statement coverage for this function, as every statement in the function will execute.
For our isLowerVowel() function:
bool isLowerVowel(char c){ switch (c) { case 'a': case 'e': case 'i': case 'o': case 'u': return true; default: return false; }}This function will require two calls to test all of the statements, as there is no way to reach statement 2 and 3 in the same function call.
Rule: Ensure your testing hits every statement in the function.
Testing tip 3: Aim for 100% branch coverage
Branch coverage refers to the percentage of branches that have been executed, with the affirmative case and negative case counting separately. An if statement has two branches -- a true case, and false case (even if there is no corresponding statement to execute). A switch can have many branches.
int foo(int x, int y){ bool z = y; if (x > y) { z = x; } return z;}The previous call to foo(1, 0) gave us 100% statement coverage and exercised the positive use case, but that only gives us 50% branch coverage. We need one more call, to foo(0, 1), to test the use case where the if statement does not execute.
bool isLowerVowel(char c){ switch (c) { case 'a': case 'e': case 'i': case 'o': case 'u': return true; default: return false; }}In the isLowerVowel() function, two calls (such as isLowerVowel(‘a’) and isLowerVowel(‘q’)) will be needed to give you 100% branch coverage (multiple cases that feed into the same body don’t need to be tested separately, if one works, they all should).
Revisiting the compare function above:
3 calls are needed to get 100% branch coverage here: compare(1,0) tests the positive use case for the first if statement. compare(0, 1) tests the negative use case for the first if statement and the positive use case for the second if statement. compare(0, 0) tests the negative use case for second if statements and executes the else statement. Thus, we can say this function is testable with 3 calls (not 18 quintillion).
Rule: Test each of your branches such that they are true at least once and false at least once.
Testing tip #4: Aim for 100% loop coverage
Loop coverage (informally called “the 0, 1, 2 test”) says that if you have a loop in your code, you should ensure it works properly when it iterates 0 times, 1 time, and 2 times. If it works correctly for the 2 iteration case, it should work correctly for all iterations greater than 2. These three tests therefore cover all possibilities (since a loop can’t execute a negative number of times).
Consider:
#include <iostream>int spam(int timesToPrint){ for (int count=0; count < timesToPrint; ++count) std::cout << "Spam!!!";}To test the loop within this function properly, you should call it three times: spam(0) to test the zero-iteration case, spam(1) to test the one-iteration case, and spam(2) to test the two-iteration case. If spam(2) works, then spam(n) should work, where n>2.
Rule: Use the 0, 1, 2 test to ensure your loops work correctly with different number of iterations
Testing tip #5: Ensure you’re testing different categories of input
When writing functions that accept parameters, or when accepting user input, consider what happens with different categories of input. In this context, we’re using the term “category” to mean a set of inputs that have similar characteristics.
For example, if I wrote a function to produce the square root of an integer, what values would it make sense to test it with? You’d probably start with some normal value, like 4. But it would also be a good idea to test with 0, and a negative number.
Here are some basic guidelines for category testing:
For integers, make sure you’ve considered how your function handles negative values, zero, and positive values. For user input, you should also check for overflow if that’s relevant.
For floating point numbers, make sure you’ve considered how your function handles precision issues. Good test values are 0.1 and -0.1 (to test numbers that are slightly larger than expected) and 0.6 and -0.6 (to test numbers that are slightly smaller than expected).
For strings, make sure you’ve considered how your function handles an empty string (just a null terminator), normal valid strings, strings that have whitespace, and strings that are all whitespace. If your function takes a pointer to a char array, don’t forget to test nullptr as well (don’t worry if this doesn’t make sense, we haven’t covered it yet).
Rule: Test different categories of input values to make sure your unit handles them properly
How to test your code: Preserving your tests
Although writing tests and erasing them is good enough for quick and temporary testing, for code that you expect to be reusing or modifying in the future, it might make more sense to preserve your tests so they can be run again in the future. For example, instead of erasing your temporary test code, you could move it into a test() function:
#include <iostream> bool isLowerVowel(char c){ switch (c) { case 'a': case 'e': case 'i': case 'o': case 'u': return true; default: return false; }} // not called from anywhere right now// but here if you want to retest things latervoid test(){ std::cout << isLowerVowel('a'); // temporary test code, should produce 1 std::cout << isLowerVowel('q'); // temporary test code, should produce 0} int main(){ return 0;}How to test your code: Automating your test functions
One problem with the above test function is that it relies on you to manually verify the results when you run it. We can do better by writing a function that contains both the tests AND the expected answers.
#include <iostream> bool isLowerVowel(char c){ switch (c) { case 'a': case 'e': case 'i': case 'o': case 'u': return true; default: return false; }} // returns the number of the test that failed, or 0 if all tests passedint test(){ if (isLowerVowel('a') != 1) return 1; if (isLowerVowel('q') != 0) return 2; return 0;} int main(){ return 0;}Now, you can call test() at any time to re-prove that you haven’t broken anything, and the test routine will do all the work for you. This is particularly useful when going back and modifying old code, to ensure you haven’t accidentally broken anything!
- 读书笔记:Learn C++ (1)
- Learn Objective-C: Day 1
- 【读书笔记】scikit-learn Cookbook
- c#learn
- learn python the hard way 读书笔记(1)
- c programe language learn notes 1
- Let us learn C in Code <1>
- c programe language learn notes 1
- c程序设计语言读书笔记(1)
- C primer 读书笔记1
- Effective C++(1)读书笔记
- 读书笔记《谭浩强C++》1
- 《effective c++》读书笔记1
- <Effective C++>读书笔记-1
- Learn Objective-C
- Learn Objective-C
- Learn Objective‐C
- Learn Objective‐C
- velocity模板的基本知识
- 使用PHP生成PDF文档
- 冒泡排序算法
- RecyclerView分栏显示处理
- caffe学习系列三添加新的Layer
- 读书笔记:Learn C++ (1)
- Android 6.0后的权限问题
- caffe-windows
- 在VS2010环境下配置opencv
- ADT Bundle下载和安装
- idea 关于自动导包的设置
- 6 Python中的format()函数
- Hive的体系结构
- 清空自己,重新开始~ Like a baby