libev的使用
来源:互联网 发布:ubuntu 17.04 163源 编辑:程序博客网 时间:2024/06/05 20:53
什么是Reactor模式
Reactor模式首先是事件驱动的,有一个或多个并发输入源,有一个Service Handler,有多个Request Handlers;这个Service Handler会同步的将输入的请求(Event)多路复用的分发给相应的Request Handler。

Reactor模式的优点
大大减少线程数;
事件驱动,功能复用;
解耦, 模块化;
线程数对于程序的影响: 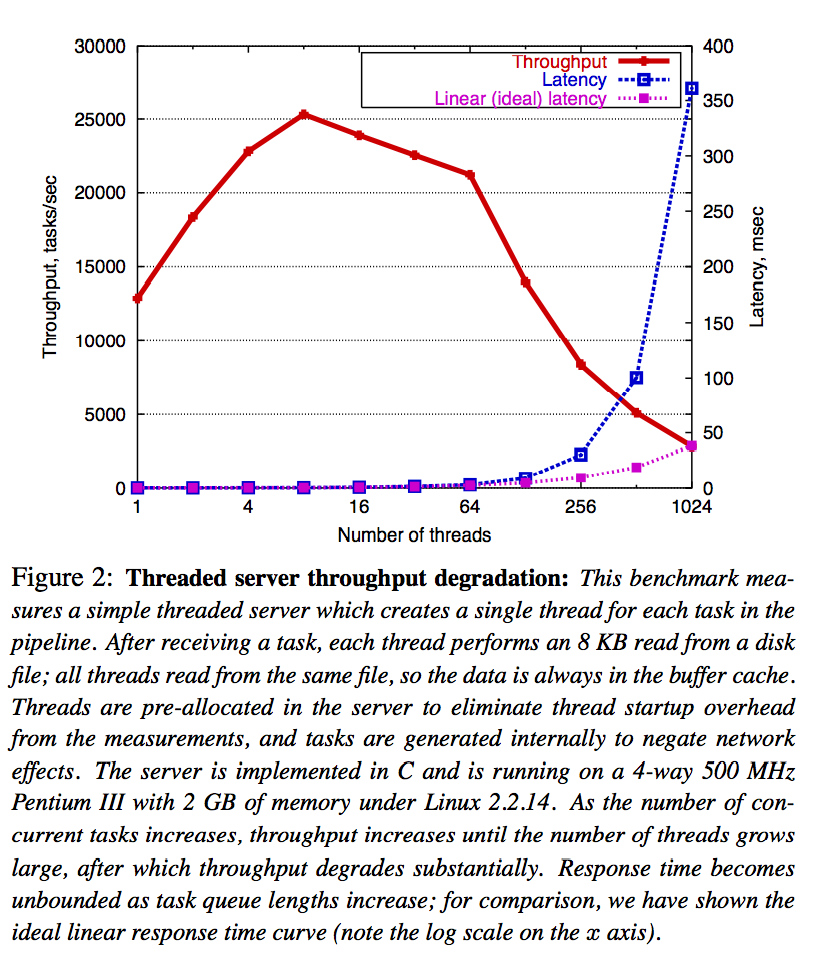
throughput 吞吐量
latency 延时
三个loop全局量的初始化
if ( g_RtmpHubMgr::Instance().Init( &stConfigFileIni ) == -1 ) { break; } //接收RTMP流的监听;zhb if ( g_AccessServer.Init( &stConfigFileIni ) == -1 ) { break; } if ( g_PushManger::Instance().Init( &stConfigFileIni ) == -1 ) { break; } g_stRtmpHubLoop.RunThread(); g_stIoLoop.RunThread(); g_stPushLoop.RunThread();第一步:初始化,启动线程池
例如:
//启动线程池,建立ev_run函数的所有事件的主体循环 zhb if ( g_stIoLoop.Init( iIOThreadNum ) == -1 ) { GAL_ERROR_PRINT << "Rtmp Server create I/O Threads failed num = " << iIOThreadNum; GAL_ERROR << "Rtmp Server create I/O Threads failed num = " << iIOThreadNum; return -1; }main函数启动线程
g_stRtmpHubLoop.RunThread();也就建立的libev的主体大循环
//线程池的事件主体大循环 zhbuint32_t CGEV_Loop::Event_Run( int flags ){ m_iDone = GEVBREAK_CANCEL; do { //更新变动的句柄 Fd_Reify(); gev_tstamp waittime = 0.; gev_tstamp sleeptime = 0.; m_iPipe_Write_Wanted = 1;//标记管道可以写 //计算等待时间 Calculate_BlockingTime( flags, waittime, sleeptime ); //i/o事件获取g m_pstEvent->Poll( this, waittime ); /* 标记管道不写,因为接下来调用i/o等待函数(select/epoll), 所以在等待期间如果发生异步调用,不要再调用管道写了, 而是等待结束后直接调用异步事件处理 */ m_iPipe_Write_Wanted = 0; //GAL_DEBUG_PRINT << ">>>>>>>>>>>>>>> thread = " << (uint32_t)pthread_self();// if ( m_iAsyncPending )// {// GAL_DEBUG_PRINT << " m_iAsyncPending = " << m_iAsyncPending;// } if ( m_iPipe_Write_Skipped ) { //直接调用异步事件处理 //GAL_DEBUG_PRINT << "s w s w s w s w s w s w s w s w s w s w s w s w s w s w s w s w "; Event_Feed( &m_stPipe_W, GEVIOMASK_CUSTOM ); } m_iPipe_Write_Wanted = 1;//标记管道可以写 //更新时间 Time_Update( waittime + sleeptime ); //执行定时器时间 Timers_Reify(); //执行i/o事件 Event_Invoke_Pending(); //GAL_DEBUG_PRINT << "<<<<<<<<<<<<<< thread = " << (uint32_t)pthread_self(); } while ( m_iActivecnt && !m_iDone & !( flags & ( GEVRUN_ONCE | GEVRUN_NOWAIT ) ) ); if ( m_iDone == GEVBREAK_ONE ) { m_iDone = GEVBREAK_CANCEL; } return m_iActivecnt;}**第二步: 关于evloop的初始化:
获取一个ev_loop实例,有了这个ev_loop实例,那么可以设置好这个libev实例的各种Watcher,也就是可以对各类事件(Watcher)设置回调函数。**
//启动libev实例的主体循环,启动线程池; zhb if ( g_stRtmpHubLoop.Init( iThread ) == -1 ) { GAL_ERROR << "framehub thread pool failed " << iThread << " failed ..."; GAL_ERROR_PRINT << "framehub thread pool failed " << iThread << " failed ..."; return -1; } int iE = 0; //获取一个ev_loop实例,也就是事件循环的主体。 zhb m_pstLoop = g_stRtmpHubLoop.GetNextLoop( iE ); GAL_DEBUG_PRINT << "loop = " << iE; if ( m_stCMDQueue.Init() == -1 ) { return -1; } //创建libev的消息watcher,并设置好回调函数 CVCPSFramehubMgr::Trigger。 zhb m_pstThreadWatcher = m_pstLoop->Event_Async_Init( &Method_Thunk< CVCPSFramehubMgr, &CVCPSFramehubMgr::Trigger > ); m_pstThreadWatcher->data = this; if ( m_pstLoop->Event_Async_Start( m_pstThreadWatcher ) == -1 ) { GAL_ERROR_PRINT << "async start failed ..."; return -1; } //创建定时器 timer 的watcher,并设置好回调函数 。zhb m_pstCheckTimer = m_pstLoop->Event_Timer_Init( &Method_Thunk<CVCPSFramehubMgr, &CVCPSFramehubMgr::CheckNosendFrameHub >, (gev_tstamp)60, (gev_tstamp)60 ); m_pstCheckTimer->data = this; if ( m_pstLoop->Event_Timer_Start( m_pstCheckTimer ) == -1 ) { GAL_ERROR_PRINT << "async start failed ..."; return -1; }删除之前建立的两个watcher
m_pstLoop->Event_Async_Del( m_pstThreadWatcher ); m_pstLoop->Event_Timer_Del( m_pstCheckTimer );关于evloop的理解
关于libev实例的evloop,evloop贯穿整个libev的所有信息,可以看到这个libev所有安排了的watcher及其回调等。
CGEV_Loop* m_pstEventLoop; //m_pstEventLoop 处理线程;zhb libev实例的初始化函数默认调用了,所以Notify 函数是默认的消息通信回调函数。
m_ppstThreadWatcher[ i ] = m_pstEventLoop[i].Event_Async_Init( &Method_Thunk<CThreadPool,&CThreadPool::Notify > ); m_ppstThreadWatcher[ i ]->data = this; m_pstEventLoop[i].Event_Async_Start( m_ppstThreadWatcher[i] );所以Trigger是libev实例的默认的消息处理函数。
void CThreadPool::Notify( GEV_IO_Watcher* w, int revents ){ if ( m_iNelts == 0 ) { Trigger( m_pstQueue, 0 ); } else if ( m_iNelts == 1 ) { Trigger( &m_pstQueue[0], 0 ); } else { int iE = 0;#if 0 unsigned MyThreadID = ::GetCurrentThreadId(); for ( ; iE < m_iNelts; iE++ ) { if ( m_pThreadID[ iE ] == MyThreadID ) { break; } }#else pthread_t MyThreadID = pthread_self(); for ( ; iE < m_iNelts; iE++ ) { if ( m_phThread[ iE ] == MyThreadID ) { break; } }#endif if ( iE == m_iNelts ) { fprintf( stderr,"get cur thread self ID failed ..."); assert( 0 ); } Trigger( &m_pstQueue[iE], iE ); }}消息发送
void CThreadPool::AddAysncMsg( const PGEV_InMsgHeader& pstMsg,int iElt ){ if ( iElt < 0 ) { return; } if ( m_iNelts == 0 ) { m_pstQueue->push( pstMsg ); m_pstEventLoop->Event_Async_Send( m_ppstThreadWatcher[0] ); } else { if ( iElt < m_iNelts ) { m_pstQueue[ iElt ].push( pstMsg ); m_pstEventLoop[ iElt ].Event_Async_Send( m_ppstThreadWatcher[iElt] ); } }}关于 Attach 的使用
pstClient->Attach( iElt, &(m_pstEventLoop[iElt]), ullSn );//对一个推流客户端进行初始化:包括对m_tFd 回调进行初始化 ,对时间控制 回调初始化;uint32_t CRtmpPS_Client::Attach( int iElt,CGEV_Loop* pstEventLoop,uint64_t ullSn ){ m_ullSn = ullSn; m_iElt = iElt; CGEV_Auxiliary::GEV_socket_set_option( m_tFd,GEV_SOCKOPT_NONBLOCK,1 ); //GAL_DEBUG_PRINT << "new client Sn = " << ullSn << " Elt = " << m_iElt; m_pstEventLoop = pstEventLoop; GAL_DEBUG_PRINT << "CRtmpPS_Client! Event_IO_Init...111 "; m_pstIO_Read = m_pstEventLoop->Event_IO_Init( m_tFd, &Method_Thunk<CRtmpPS_Client, &CRtmpPS_Client::Notify >, GEVIOMASK_READ | GEVIOMASK_ET ); m_pstIO_Read->data = this; m_iNewEv = GEVIOMASK_READ; m_pstEventLoop->Event_IO_Start( m_pstIO_Read ); m_iCurEv = m_iNewEv; m_tStartTime = time(NULL); m_pstCheckTimer = m_pstEventLoop->Event_Timer_Init( &Method_Thunk< CRtmpPS_Client,&CRtmpPS_Client::CheckTime >,(gev_tstamp)15,(gev_tstamp)15 ); m_pstCheckTimer->data = this; m_iNewEv |= GEVIOMASK_TIMER; m_pstEventLoop->Event_Timer_Start( m_pstCheckTimer ); m_iCurEv = m_iNewEv; return 0;}第三步:启动处理线程,各个libev实例正式开始运行
g_stRtmpHubLoop.RunThread(); g_stIoLoop.RunThread(); g_stPushLoop.RunThread();总结: libev的使用,关键就在于evloop的初始化(设置回调),搜索evloop能够看到这个libev的所有事件,所有事件的处理回调。
0 0
- libev源码分析--libev的使用
- libev的使用
- Libev使用
- Libev 使用
- 使用 libev 库的服务器模型
- libev的入门笔记(基本使用)
- libev多线程使用例
- libev timer封装使用
- libev-简单使用解析
- libev多线程使用例
- 使用libev写服务器
- 使用libev库编写的回射服务器
- libev的使用——结合Socket编程
- libev:libevent的挑战者
- libev 的几篇文章
- libev库的用法
- libev库的用法
- libev库的用法
- java.lang.IllegalStateException: Web app root system property already set to different value
- ActiveMQ之消息指针
- php面向对象语法5 final类,抽象类,接口结构(不是类)
- 《编程之法》习题集答案整理-第二章
- ActiveMQ 集群
- libev的使用
- Handlebars.js 预编译
- linux基础第一课
- typeof 的用法和用处
- ansys工作平面平移转动
- OpenCL实现序列卷积
- C. Polycarp at the Radio
- JAVA基本语法注意事项总结
- OJ-上海交大-1021. 从前有座山