Getting Started with Pipeline 学习Pipeline
来源:互联网 发布:dnf数据出现异常 编辑:程序博客网 时间:2024/06/04 22:04
Overview
Audience and Purpose
This document is intended for novice users of the Jenkins pipeline feature. The document explains what a pipeline is, why that matters, and how to create the different kinds of pipelines.
本文档面向Jenkins管道特性的新手。 该文档解释了什么是管道,为什么重要,以及如何创建不同类型的管道。
Why Pipeline?
While standard Jenkins "freestyle" jobs support simple continuous integration by allowing you to define sequential tasks in an application lifecycle, they do not create a record of execution that persists through any planned or unplanned restarts, enable one script to address all the steps in a complex workflow, or confer the other advantages of pipelines.
虽然标准的Jenkins“自由式”作业通过允许在应用程序生命周期中定义顺序任务来支持简单的持续集成,但它们不会创建通过任何计划或计划外重新启动持续执行的记录,使一个脚本能够处理所有步骤 复杂的工作流程,或赋予管道的其他优点。
In contrast to freestyle jobs, pipelines enable you to define the whole application lifecycle. Pipeline functionality helps Jenkins to support continuous delivery (CD). The Pipeline plugin was built with requirements for a flexible, extensible, and script-based CD workflow capability in mind.
与自由式工作相反,管道使您能够定义整个应用程序生命周期。 管道功能帮助Jenkins支持连续交付(CD)。 Pipeline插件构建时考虑了灵活,可扩展和基于脚本的CD工作流功能的要求。
Accordingly, pipeline functionality is:
Durable: Pipelines can survive both planned and unplanned restarts of your Jenkins master.
Pausable: Pipelines can optionally stop and wait for human input or approval before completing the jobs for which they were built.
Versatile: Pipelines support complex real-world CD requirements, including the ability to fork or join, loop, and work in parallel with each other.
Extensible: The Pipeline plugin supports custom extensions to its DSL (domain scripting language) and multiple options for integration with other plugins.
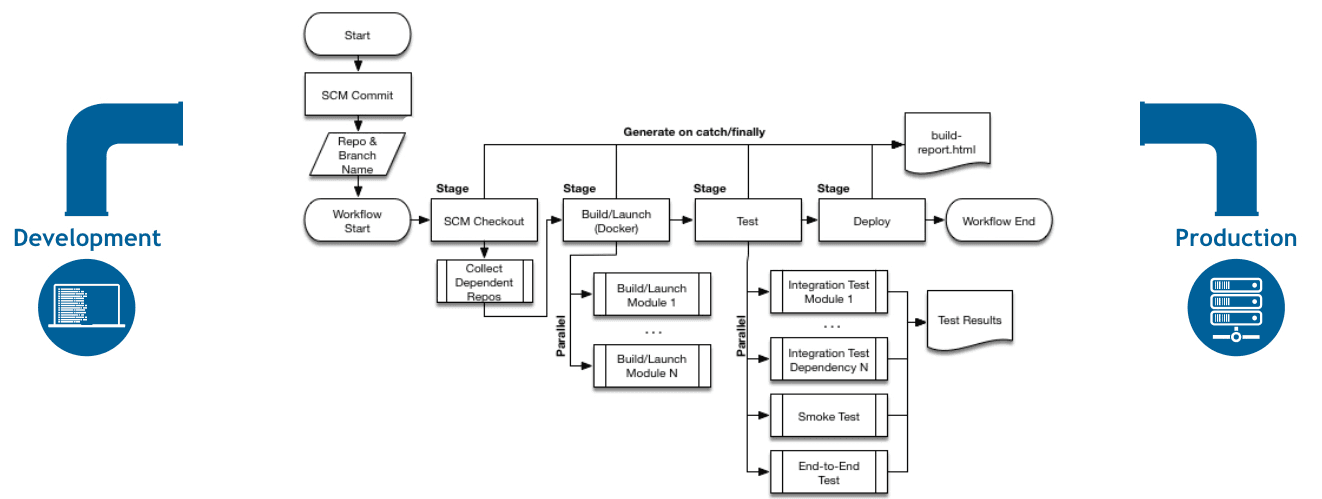
The flowchart below is an example of one continuous delivery scenario enabled by the Pipeline plugin:
因此,管线功能是:
耐用:管道可以在计划和计划外重新启动您的Jenkins主人生存。
可停止:管道可以选择停止并等待人工输入或批准,然后再完成其构建的作业。
通用:流水线支持复杂的现实世界CD要求,包括分叉或连接,循环和彼此并行工作的能力。
可扩展:Pipeline插件支持对其DSL(域脚本语言)的自定义扩展和用于与其他插件集成的多个选项。
以下流程图是由管道插件启用的一个连续交付方案的示例:
Pipeline Defined
Pipelines are Jenkins jobs enabled by the Pipeline (formerly called "workflow") plugin and built with simple text scripts that use a Pipeline DSL (domain-specific language) based on the Groovy programming language.
Pipelines leverage the power of multiple steps to execute both simple and complex tasks according to parameters that you establish. Once created, pipelines can build code and orchestrate the work required to drive applications from commit to delivery.
管道是由Pipeline(以前称为“工作流”)插件启用的Jenkins作业,并使用简单的文本脚本构建,使用基于Groovy编程语言的管道DSL(领域专用语言)。
管道利用多个步骤的功能根据您建立的参数执行简单和复杂的任务。 一旦创建,管道可以构建代码并编排从提交到交付的应用所需的工作。
Pipeline Vocabulary
Pipeline terms such as "step," "node," and "stage" are a subset of the vocabulary used for Jenkins in general.
- 诸如“step”,“node”和“stage”的流水线术语是用于通常的Jenkins的词汇表的子集。
- Step
A "step" (often called a "build step") is a single task that is part of sequence. Steps tell Jenkins what to do.
“步骤”(通常称为“构建步骤”)是作为序列的一部分的单个任务。 步骤告诉jenkins做什么。
- Node
In pipeline coding contexts, a "node" is a step that does two things, typically by enlisting help from available executors on agents:
Schedules the steps contained within it to run by adding them to the Jenkins build queue (so that as soon as an executor slot is free on a node, the appropriate steps run).
Creates a workspace, meaning a file directory specific to a particular job, where resource-intensive processing can occur without negatively impacting your pipeline performance. Workspaces created by node are automatically removed after all the steps contained inside the node declaration finish executing. It is a best practice to do all material work, such as building or running shell scripts, within nodes, because node blocks in a stage tell Jenkins that the steps within them are resource-intensive enough to be scheduled, request help from the agent pool, and lock a workspace only as long as they need it.
In Jenkins generally, "node" also means any computer that is part of your Jenkins installation, whether that computer is used as a master or as an agent.
在管道编码上下文中,“节点”是执行两个操作的步骤,通常通过从代理上的可用执行器获取帮助:
通过将其中包含的步骤添加到Jenkins构建队列(以便一旦执行器插槽在节点上可用,就运行相应的步骤)来运行它包含的步骤。
创建工作空间,意味着特定于特定作业的文件目录,其中可以进行资源密集型处理,而不会对流水线性能产生负面影响。在节点声明中包含的所有 步骤完成执行后,将自动删除由节点创建的工作空间。在节点中执行所有重要工作(例如构建或运行shell脚本)是最佳做法,因为阶段中的节点 块告诉Jenkins其中的步骤是足够资源调度的,请求代理池的帮助,并只锁定工作区,只要它们需要它。
在Jenkins中,“节点”还指任何作为Jenkins安装的一部分的计算机,无论该计算机是作为主机还是作为代理。
- Stage
A "stage" is a logically distinct part of the execution of any task, with parameters for locking, ordering, and labeling its part of a process relative to other parts of the same process. Pipeline syntax is often comprised of stages. Each stage step can have one or more build steps within it. It is a best practice to work within stages because they help with organization by lending logical divisions to a pipelines, and because the Jenkins Pipeline visualization feature displays stages as unique segments of the pipeline.
“阶段”是任何任务的执行的逻辑上不同的部分,具有用于相对于同一进程的其他部分锁定,排序和标记其过程的部分的参数。 流水线语法通常由阶段组成。 每个阶段步骤可以在其内具有一个或多个构建步骤。 这是一个最佳实践,在阶段内工作,因为它们通过将逻辑分区借给管道来帮助组织,并且因为Jenkins管道可视化功能将阶段显示为管道的唯一段。
Familiarity with Jenkins terms such as "master," "agent," and "executor" also helps with understanding how pipelines work. These terms are not specific to pipelines:- 熟悉Jenkins术语,如“master”,“agent”和“executor人”也有助于了解管道的工作原理。 这些术语不是特定于管道:
master - A "master" is the computer where the Jenkins server is installed and running; it handles tasks for your build system. Pipeline scripts are parsed on masters, where Groovy code runs and node blocks allocate executors and workspaces for use by any nested steps (such as
sh) that might request one or both.agent - An "agent" (formerly "slave") is a computer set up to offload available projects from the master. Your configuration determines the number and scope of operations that an agent can perform. Operations are performed by executors.
executor - An "executor" is a computational resource for running builds or Pipeline steps. It can run on master or agent machines, either by itself or in parallel with other executors.
master - “master”是安装并运行Jenkins服务器的计算机; 它处理您的构建系统的任务。 管道脚本在主器件上解析,Groovy代码在其中运行,节点块分配执行器和工作空间以供可能请求其中一个或两个的任何嵌套步骤(例如sh)使用。
agent - “agent”(以前称为“slave”)是一台计算机,设置为从主机卸载可用项目。 您的配置确定代理程序可以执行的操作的数量和范围。 操作由执行程序执行。
xecutor- “executor”是用于运行构建或流水线步骤的计算资源。 它可以在主机或代理机上运行,无论是自身还是与其他执行程序并行运行。
Preparing Jenkins to Run Pipelines
To run pipelines, you need to have a Jenkins instance that is set up with the appropriate plugins. This requires:
Jenkins 1.642.3 or later (Jenkins 2 is recommended)
The Pipeline plugin
Installing the Pipeline Plugin
The Pipeline plugin is installed in the same way as other Jenkins plugins. Installing the Pipeline plugin also installs the suite of related plugins on which it depends:
Open Jenkins in your web browser.
On the Manage Jenkins page for your installation, navigate to Manage Plugins.
Find Pipeline from among the plugins listed on the Available tab (You can do this by scrolling through the plugin list or by using "Pipeline" as a term to filter results).
Select the checkbox for Pipeline plugin.
Select either Install without restart or Download now and install after restart.
Restart Jenkins.
Pipeline Plugin Context
The Pipeline plugin works with a suite of related plugins that enhance the pipeline functionality of your Jenkins setup. The related plugins typically introduce additional pipeline syntax or visualizations.
For example, the table below, while not comprehensive, describes a few pipeline-related plugins in terms of their importance to pipeline functionality (required, recommended, or optional).
To get the basic pipeline functionality, you only need to install the main Pipeline plugin, but recommended plugins add additional capabilities that you will probably want. For example, it is a best practice to develop pipelines as code by storing a Jenkinsfile with pipeline script in your SCM, so that you can apply the same version control and testing to pipelines as you do to your other software, and that is why the Multibranch Pipeline plugin is recommended.
Pipeline插件与一组相关的插件配合使用,增强Jenkins设置的管道功能。 相关的插件通常引入附加的流水线语法或可视化。
例如,下面的表格并不全面,描述了一些管道相关的插件在管道功能(必需,推荐或可选)方面的重要性。
要获得基本的管道功能,您只需要安装主要的Pipeline插件,但推荐的插件添加您可能需要的附加功能。 例如,最佳实践是通过在您的SCM中存储具有管道脚本的Jenkins文件来开发管道作为代码,以便您可以对管道应用与其他软件相同的版本控制和测试,这就是为什么 建议使用多分支管道插件。
Optional plugins are mainly useful if you are creating pipelines that are related to the technologies that they support.
如果您正在创建与其支持的技术相关的管道,则可选插件对你们是有用的。
Pipeline (workflow-aggregator)
Installs the core pipeline engine and its dependent plugins: Pipeline: API, Pipeline: Basic Steps, Pipeline: Durable Task Step, Pipeline: Execution Support, Pipeline: Global Shared Library for CPS pipeline, Pipeline: Groovy CPS Execution, Pipeline: Job, Pipeline: SCM Step, Pipeline: Step API
required
Pipeline: Stage View
Provides a graphical swimlane view of pipeline stage execution, as well as a build history of the stages
提供流水线阶段执行的图形泳道视图,以及阶段的构建历史
recommended
Multibranch Pipeline
Adds "Multibranch Pipeline" item type which enables Jenkins to automatically build branches that contain a Jenkinsfile
添加“多分支管道”项目类型,使Jenkins能够自动构建包含Jenkins文件的分支
recommended
GitHub Branch Source
Adds GitHub Organization Folder item type and adds "GitHub" as a branch source on Multibranch pipelines
添加GitHub组织文件夹项目类型,并在多分支管道上添加“GitHub”作为分支源
recommended for teams hosting repositories in GitHub
Bitbucket Branch Source
Adds Bitbucket Team item type and adds "Bitbucket" as a branch source on Multibranch pipelines
recommended for teams hosting repositories in Bitbucket; best with Bitbucket Server 4.0 or later.
Docker Pipeline
Enables pipeline to build and use Docker containers inside pipeline scripts.
使管道能够在管道脚本中构建和使用Docker容器。
optional
More Information
As with any Jenkins plugin, you can install the Pipeline plugin using the Plugin Manager in a running Jenkins instance.
To explore Pipeline without installing Jenkins separately or accessing your production system, you can run a Docker demo of Pipeline functionality.
Pipeline-related plugins are regularly "whitelisted" as compatible with or designed for Pipeline usage. For more information, see the Plugin Compatibility With Pipeline web page.
When you get flows from source control through Jenkinsfile or a Pipeline Global Library, you may also have to whitelist method calls in the Script Security Plugin.
与任何Jenkins插件一样,您可以使用插件管理器在运行的Jenkins实例中安装Pipeline插件。
要在不单独安装Jenkins或访问生产系统的情况下探索Pipeline,您可以运行管道功能的Docker演示。
管道相关的插件定期“列入白名单”,与管道使用兼容或设计。 有关详细信息,请参阅Plugin与Pipeline兼容的网页。
当从源控件通过Jenkinsfile或Pipeline全局库获得流时,您可能还必须在Script Security Plugin中将方法调用列入白名单。
Several plugins available in the Jenkins ecosystem but not actually related to the Pipeline feature set described in this guide also use the terms "pipeline," "DSL," and "Job DSL" in their names. For example:
Build Pipeline plugin - provides a way to execute Jenkins jobs sequentially
Build Flow Plugin - introduces a job type that lets you define an orchestration process as a script.
This guide describes the Pipeline Plugin that supports the current Pipeline feature set.
Approaches to Defining Pipeline Script
You can create pipelines in either of the following ways:
Through script entered in the configuration page of the web interface for your Jenkins instance.
Through a
Jenkinsfilethat you create with a text editor and then check into your project’s source control repository, where it can be accessed when you select the Pipeline Script from SCM option while configuring the Pipeline in Jenkins.通过脚本输入您的Jenkins实例的Web界面的配置页。
通过使用文本编辑器创建的Jenkins文件,然后检查项目的源代码控制存储库,当您在Jenkins中配置流水线时,从SCM选项选择流水线脚本时,可以访问它。
When you use a Jenkinsfile, it is a best practice to put #!groovy at the top of the file so that IDEs and GitHub diffs detect the Groovy language properly.
当您使用Jenkins文件时,最好将#!groovy放在文件的顶部,以便IDE和GitHub diff可以正确检测Groovy语言。
Creating a Simple Pipeline
Initial pipeline usage typically involves the following tasks:
初始管道使用通常包括以下任务:
Downloading and installing the Pipeline plugin (Unless it is already part of your Jenkins installation)
Creating a Pipeline of a specific type
Configuring your Pipeline
Controlling flow (workflow) through your Pipeline
Scaling your Pipeline
下载和安装Pipeline插件(除非它已经是Jenkins安装的一部分)
创建特定类型的管道
配置管道
通过您的管道控制流(工作流)
缩放您的管道
To create a simple pipeline from the Jenkins interface, perform the following steps:
Click New Item on your Jenkins home page, enter a name for your (pipeline) job, select Pipeline, and click OK.
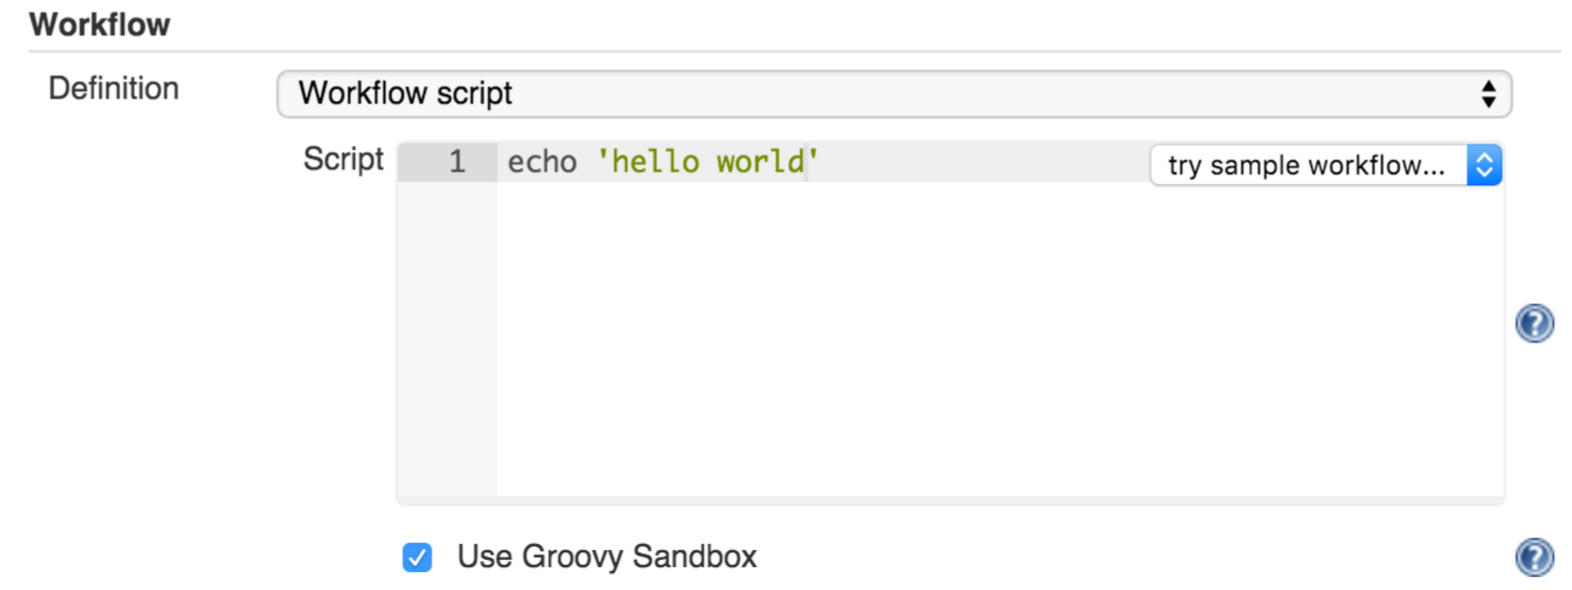
In the Script text area of the configuration screen, enter your pipeline script. If you are new to pipeline creation, you might want to start by opening Snippet Generator and selecting the "Hello Word" snippet.
Check the Use Groovy Sandbox option below the Script text area.
Click Save.
Click Build Now to create the pipeline.
Click ▾ and select Console Output to see the output.
Pipelines are written as Groovy scripts that tell Jenkins what to do when they are run. Relevant bits of syntax are introduced as needed, so while an understanding of Groovy is helpful, it is not required to use Pipeline.
管道编写为Groovy脚本,告诉Jenkins当它们运行时要做什么。 根据需要引入了相关的语法位,因此理解Groovy是有帮助的,但不需要使用Pipeline。
If you are a Jenkins administrator (in other words, authorized to approve your own scripts), sandboxing is optional but efficient, because it lets scripts run without approval as long as they limit themselves to operations that Jenkins considers inherently safe.
如果您是Jenkins管理员(换句话说,授权批准您自己的脚本),沙盒是可选的,但有效,因为它允许脚本没有批准,只要他们限制自己的操作,Jenkins认为本质上是安全的。
To use pathnames that include spaces, bracket those pathnames between escaped double quotes using \". The extra quotation marks ensure that any spaces in pathnames are parsed properly.
要使用包含空格的路径名,请使用\“将转义双引号之间的路径名括起来。额外的引号可确保正确解析路径名中的任何空格。
The following example shows a successful build of a pipeline created with a one-line script that uses the echo step to output the phrase, "Hello from Pipeline":
node { echo 'Hello from Pipeline'}Started by user anonymous[Pipeline] echoHello from Pipeline[Pipeline] End of PipelineFinished: SUCCESS
You can also create complex and multibranch pipelines in the script entry area of the Jenkins configuration page, but because they contain multiple stages and the configuration page UI provides limited scripting space, pipeline creation is more commonly done using an editor of your choice from which scripts can be loaded into Jenkins using the Pipeline script from SCM option.
您还可以在Jenkins配置页面的脚本输入区域中创建复杂和多分支管道,但是因为它们包含多个阶段,并且配置页面UI提供有限的脚本空间,所以使用您选择的编辑器 可以使用SCM选项中的Pipeline脚本加载到Jenkins中。
It is a best practice to use parallel steps whenever you can, as long as you remember not to attempt so much parallel processing that it swamps the number of available executors. For example, you can acquire a node within the parallel branches of your pipeline:
这是一个最佳实践,只要你能够使用并行步骤,只要你记得不要尝试这么多的并行处理,它集满了可用执行器的数量。 例如,您可以获取管道并行分支中的一个节点:
parallel 'integration-tests':{ node('mvn-3.3'){}}, 'functional-tests':{ node('selenium'){}}Creating Multibranch Pipelines
The Multibranch Pipeline project type enables you to configure different jobs for different branches of the same project. In a multibranch pipeline configuration, Jenkins automatically discovers, manages, and executes jobs for multiple source repositories and branches. This eliminates the need for manual job creation and management, as would otherwise be necessary when, for example, a developer adds a new feature to an existing product.
多分支管道项目类型允许您为同一项目的不同分支配置不同的作业。 在多分支管道配置中,Jenkins自动发现,管理和执行多个源存储库和分支的作业。 这消除了对例如当开发者向现有产品添加新特征时将需要的手动作业创建和管理的需要。
A multibranch pipeline project always includes a Jenkinsfile in its repository root. Jenkins automatically creates a sub-project for each branch that it finds in a repository with a Jenkinsfile.
多分支管道项目总是在其存储库根目录中包含一个Jenkinsfile。 Jenkins自动为每个分支创建一个子项目,它在一个Jenkinsfile存储库中找到。
Multibranch pipelines use the same version control as the rest of your software development process. This "pipeline as code" approach has the following advantages:
多分支管道使用与其余软件开发过程相同的版本控制。 这种“作为代码的管道”方法具有以下优点:
You can modify pipeline code without special editing permissions.
Finding out who changed what and why no longer depends on whether developers remember to comment their code changes in configuration files.
Version control makes the history of changes to code readily apparent.
您可以修改管道代码而无需特殊编辑权限。
找出谁改变了什么,为什么不再取决于开发人员是否记得在配置文件中评论他们的代码更改。
版本控制使得代码更改的历史记录变得显而易见。
To create a Multibranch Pipeline:
Click New Item on your Jenkins home page, enter a name for your job, select Multibranch Pipeline, and click OK.
Configure your SCM source (options include Git, GitHub, Mercurial, Subversion, and Bitbucket), supplying information about the owner, scan credentials, and repository in appropriate fields. For example, if you select Git as the branch source, you are prompted for the usual connection information, but then rather than enter a fixed refspec (Git’s name for a source/destination pair), you would enter a branch name pattern (Use default settings to look for any branch).
Configure the other multibranch pipeline options:
API endpoint - an alternate API endpoint to use a self-hosted GitHub Enterprise
Checkout credentials - alternate credentials to use when checking out the code (cloning)
Include branches - a regular expression to specify branches to include
Exclude branches - a regular expression to specify branches to exclude; note that this will takes precedence over the contents of include expressions
Save your configuration.
2,配置您的SCM源(选项包括Git,GitHub,Mercurial,Subversion和Bitbucket),在适当的字段中提供有关所有者,扫描凭据和存储库的信息。 例如,如果选择Git作为分支源,则会提示您输入常用的连接信息,但是不要输入固定的refspec(源/目标对的Git名称),您可以输入分支名称模式(使用默认 设置以查找任何分支)。
3,配置其他多分支管道选项:
API端点 - 使用自承载GitHub Enterprise的备用API端点
Checkout凭证 - 在签出代码时使用的备用凭据(克隆)
包括分支 - 指定要包括的分支的正则表达式
排除分支 - 指定要排除的分支的正则表达式; 请注意,这将优先于include表达式的内容
Jenkins automatically scans the designated repository and creates appropriate branches.
Jenkins自动扫描指定的存储库并创建适当的分支。
例如(再次在Git),如果你开始一个主分支,然后想试验一些变化,因此git checkout -b newfeature并推送一些提交,Jenkins会自动检测你的仓库中的新分支,并创建一个新的子项目。这个子项目将有自己的建设历史无关主干(主线)。
For example (again in Git), if you started with a master branch, and then wanted to experiment with some changes, and so did git checkout -b newfeature and pushed some commits, Jenkins would automatically detect the new branch in your repository and create a new sub-project for it. That sub-project would have its own build history unrelated to the trunk (main line).
If you choose, you can ask for the sub-project to be automatically removed after its branch is merged with the main line and deleted. To change your Pipeline script—for example, to add a new Jenkins publisher step corresponding to new reports that your Makefile/pom.xml/etc. is creating—you edit the appropriate Jenkinsfile. Your Pipeline script is always synchronized with the rest of the source code you are working on.
如果选择,您可以要求子项目在其分支与主行合并并删除后自动删除。要更改您的Pipeline脚本 - 例如,添加一个新的Jenkins发布者步骤,对应于您的Makefile / pom.xml / etc的新报表。正在创建 - 您编辑相应的Jenkins文件。您的Pipeline脚本始终与您正在处理的其他源代码同步。
Multibranch Pipeline projects expose the name of the branch being built with the BRANCH_NAME environment variable. In multibranch pipelines, the checkout scm step checks out the specific commit that the Jenkinsfile originated, so as to maintain branch integrity.
Loading Pipeline Scripts from SCM
Complex pipelines would be cumbersome to write and maintain if you could only do that in the text area provided by the Jenkins job configuration page.
Accordingly, you also have the option of writing pipeline scripts (Jenkinsfiles) with the editor that you use in your IDE (integrated development environment) or SCM system, and then loading those scripts into Jenkins using the Pipeline Script from SCM option enabled by the workflow-scm-step plugin, which is one of the plugins that the Pipeline plugin depends on and automatically installs.
Loading pipeline scripts using the checkout scm step leverages the idea of "pipeline as code," and lets you maintain pipelines using version control and standalone Groovy editors.
To do this, select Pipeline script from SCM when defining the pipeline.
With the Pipeline script from SCM option selected, you do not enter any Groovy code in the Jenkins UI; you just indicate by specifying a path where in source code you want to retrieve the pipeline from. When you update the designated repository, a new build is triggered, as long as your job is configured with an SCM polling trigger.
如果您只能在Jenkins作业配置页面提供的文本区域中进行编写和维护,复杂管道将很麻烦。
因此,您还可以选择使用您在IDE(集成开发环境)或SCM系统中使用的编辑器编写管道脚本(Jenkinsfiles),然后使用工作流启用的SCM选项中的管道脚本将这些脚本加载到Jenkins中-scm-step插件,这是Pipeline插件依赖并自动安装的插件之一。
使用checkout scm步骤加载流水线脚本利用“管道作为代码”的概念,并允许您使用版本控制和独立的Groovy编辑器来维护管道。
为此,在定义管道时从SCM中选择流水线脚本。
使用来自SCM选项的Pipeline脚本,您不在Jenkins UI中输入任何Groovy代码;您只需通过指定源代码中要从中检索管道的路径来指示。更新指定的存储库时,只要您的作业配置了SCM轮询触发器,就会触发新的构建。
Writing Pipeline Scripts in the Jenkins UI
Because Pipelines are comprised of text scripts, they can be written (edited) in the same script creation area of the Jenkins user interface where you create them:
Using Snippet Generator
You can use the Snippet Generator tool to create syntax examples for individual steps with which you might not be familiar, or to add relevant syntax to a step with a long and complex configuration.
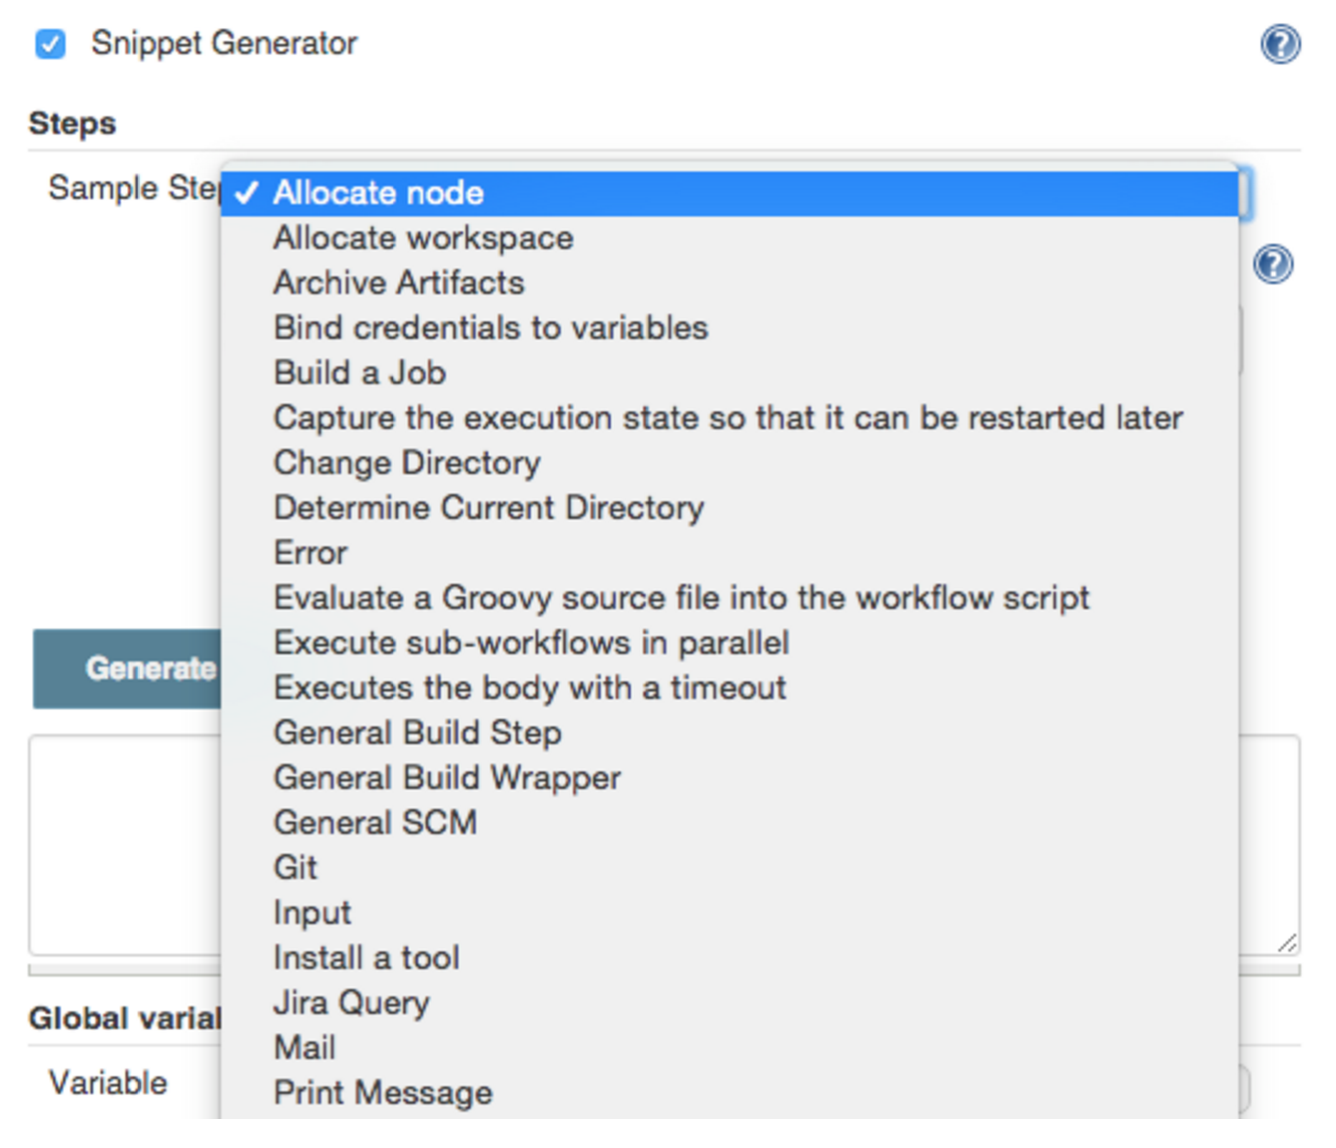
Snippet Generator is dynamically populated with a list of the steps available for pipeline configuration. Depending on the plugins installed to your Jenkins environment, you may see more or fewer items in the list exposed by Snippet Generator.
To add one or more steps from Snippet Generator to your pipeline code:
您可以使用代码段生成器工具为您可能不熟悉的各个步骤创建语法示例,或者向具有长而复杂配置的步骤添加相关语法。
片段生成器动态填充可用于管道配置的步骤列表。 根据安装到您的Jenkins环境的插件,您可能会看到Snippet Generator公开的列表中的更多或更少的项目。
要从代码段生成器向您的管道代码添加一个或多个步骤:
Open Snippet Generator
Scroll to the step you want
Click that step
Configure the selected step, if presented with configuration options
Click Generate Groovy to see a Groovy snippet that runs the step as configured
Optionally select and configure additional steps
When you click Generate Groovy after selecting a step, you see the function name used for that step, the names of any parameters it takes (if they are not default parameters), and the syntax used by Snippet Generator to create that step.
You can copy and paste the generated code right into your Pipeline, or use it as a starting point, perhaps deleting any optional parameters that you do not need.
To access information about steps marked with the help icon (question mark), click on that icon.
当您在选择步骤后单击生成Groovy时,将看到用于该步骤的函数名称,所需的任何参数的名称(如果它们不是默认参数)以及Snippet Generator用于创建该步骤的语法。
您可以将生成的代码复制并粘贴到管道中,或将其用作起点,也许删除任何不需要的可选参数。
要访问标有帮助图标(问号)的步骤的信息,请单击该图标。
Basic Groovy Syntax for Pipeline Configuration
You typically add functionality to a new pipeline by performing the following tasks:
Adding nodes
Adding more complex logic (usually expressed as stages and steps)
To configure a pipeline you have created through the Jenkins UI, select the pipeline and click Configure.
If you run Jenkins on Linux or another Unix-like operating system with a Git repository that you want to test, for example, you can do that with syntax like the following, substituting your own name for "joe-user":
要配置通过Jenkins UI创建的流水线,请选择流水线,然后单击配置。
例如,如果您在Linux或其他类似于具有Git存储库的操作系统上运行Jenkins,例如,您可以使用下面的语法替换您自己的名称为“joe-user”:
node { git url: 'https://github.com/joe_user/simple-maven-project-with-tests.git' def mvnHome = tool 'M3' sh "${mvnHome}/bin/mvn -B verify" }In Windows environments, use bat in place of sh and use backslashes as the file separator where needed (backslashes need to be escaped inside strings).
For example, rather than:
sh "${mvnHome}/bin/mvn -B verify"you would use:
bat "${mvnHome}\\bin\\mvn -B verify"Your Groovy pipeline script can include functions, conditional tests, loops, try/catch/finally blocks, and so on.
Sample syntax for one node in a Java environment that is using the open source Maven build automation tool (note the definition for mvnHome) is shown below:
您的Groovy管道脚本可以包括函数,条件测试,循环,try / catch / finally块等。
使用开放源代码Maven构建自动化工具(请注意mvnHome的定义)的Java环境中的一个节点的示例语法如下所示:

Pipeline Sample (graphic) key:
defis a keyword to define a function (you can also give a Java type in place ofdefto make it look more like a Java method)=~is Groovy syntax to match text against a regular expression[0] looks up the first match
[1] looks up the first (…) group within that match
readFilestep loads a text file from the workspace and returns its content (Note: Do not usejava.io.Filemethods, these refer to files on the master where Jenkins is running, not files in the current workspace).The
writeFilestep saves content to a text file in the workspaceThe
fileExistsstep checks whether a file exists without loading it.def是一个关键字来定义一个函数(你也可以给一个Java类型代替def,使它看起来更像一个Java方法)
=〜是用于将文本与正则表达式匹配的Groovy语法
[0]查找第一个匹配
[1]查找该匹配中的第一个(...)组
readFile步骤从工作区加载文本文件并返回其内容(注意:不要使用java.io.File方法,这些方法指的是运行Jenkins的主节点上的文件,而不是当前工作区中的文件)。
writeFile步骤将内容保存到工作空间中的文本文件
fileExists步骤在没有加载文件的情况下检查文件是否存在。
The tool step makes sure a tool with the given name is installed on the current node. The script needs to know where it was installed, so the tool can be run later. For this, you need a variable.
The def keyword in Groovy is the quickest way to define a new variable (with no specific type).
In the sample syntax discussed above, a variable is defined by the following expression:
工具步骤确保具有给定名称的工具安装在当前节点上。 脚本需要知道它安装在哪里,所以该工具可以稍后运行。 为此,您需要一个变量。
Groovy中的def关键字是定义新变量(没有特定类型)的最快方式。
在上面讨论的示例语法中,变量由以下表达式定义:
def mvnHome = tool 'M3'This ensures that M3 is installed somewhere accessible to Jenkins and assigns the return value of the step (an installation path) to the mvnHome variable.
这确保M3安装在Jenkins可访问的地方,并将步骤的返回值(安装路径)分配给maven Home变量。
Advanced Groovy Syntax for Pipeline Configuration
Groovy lets you omit parentheses around function arguments. The named-parameter syntax is also a shorthand for creating a map, which in Groovy uses the syntax [key1: value1, key2: value2], so you could write:
git([url: 'https://github.com/joe_user/simple-maven-project-with-tests.git', branch: 'master'])For convenience, when calling steps taking only one parameter (or only one mandatory parameter), you can omit the parameter name. For example:
sh 'echo hello'is really shorthand for:
sh([script: 'echo hello'])Managing the Environment
One way to use tools by default is to add them to your executable path using the special variable env that is defined for all pipelines:
默认情况下使用工具的一种方法是使用为所有管道定义的特殊变量env将它们添加到可执行路径:
node { git url: 'https://github.com/joe_user/simple-maven-project-with-tests.git' def mvnHome = tool 'M3' env.PATH = "${mvnHome}/bin:${env.PATH}" sh 'mvn -B verify' }Properties of this variable are environment variables on the current node.
You can override certain environment variables, and the overrides are seen by subsequent
shsteps (or anything else that pays attention to environment variables).You can run
mvnwithout a fully-qualified path.此变量的属性是当前节点上的环境变量。
您可以覆盖某些环境变量,并且后续的sh步骤(或任何注意环境变量的其他内容)都会看到覆盖。
您可以在没有完全限定路径的情况下运行mvn。
Setting a variable such as PATH in this way is only safe if you are using a single agent for this build. Alternatively, you can use the withEnv step to set a variable within a scope:
node { git url: 'https://github.com/jglick/simple-maven-project-with-tests.git' withEnv(["PATH+MAVEN=${tool 'M3'}/bin"]) { sh 'mvn -B verify' } }Jenkins defines some environment variables by default:
Example: env.BUILD_TAG can be used to get a tag like jenkins-projname-1 from Groovy code, or $BUILD_TAG can be used from a sh script. The Snippet Generator help for the withEnv step has more detail on this topic.
Build Parameters
If you configured your pipeline to accept parameters using the Build with Parameters option, those parameters are accessible as Groovy variables of the same name.
如果使用“使用参数构建”选项将流水线配置为接受参数,则这些参数可以作为同名的Groovy变量访问。
Types of Executors
Every Pipeline build runs on a Jenkins master using a flyweight executor, which is an uncounted (because it’s a temporary rather than configured) slot. Flyweight executors require very little computing power. A flyweight executor (sometimes also called a flyweight task) represents Groovy script, which is idle as it waits for a step to complete.
每个Pipeline构建在Jenkins主控上使用flyweight执行器运行,这是一个未计数的(因为它是一个临时的而不是配置的)插槽。 flyweight执行器只需要很少的计算能力。 flyweight执行器(有时也称为flyweight任务)表示Groovy脚本,它在等待完成一个步骤时处于空闲状态。
To highlight the contrast between executor types, some Jenkins documentation calls any regular executor a heavyweight executor.
When you run a node step, an executor is allocated on a node, which is usually an agent, as soon as an appropriate node is available.
It is a best practice to avoid placing input within a node. The input element pauses pipeline execution to wait for either automatic or manual approval. By design and by nature, approval can take some time, so placing input within a node wastes resources by tying up both the flyweight executor used for input and the regular executor used by the node block, which will not be free for other tasks until input is complete.
为了突出执行器类型之间的对比,一些Jenkins文档调用任何常规执行器一个重量级的执行器。
运行节点步骤时,只要适当的节点可用,就会在节点(通常是代理)上分配执行程序。
避免在节点中放置输入是最佳做法。 输入元素暂停管道执行以等待自动或手动批准。 通过设计和性质,批准可能需要一些时间,因此将输入放置在节点内通过绑定用于输入的重执行器和由节点块使用的常规执行器来说是浪费资源的,这对于其他任务来说这个节点一直不是空闲的,直到输入完成才行。
虽然任何运行管道的flyweight执行器在流水线脚本空闲(任务之间)时都是隐藏的,但Jenkins页面上的Build Executor Status窗口部件显示两种类型的执行器的状态。 如果代理上的一个可用执行程序已通过暂停的流水线构建压入服务,并且启动了同一管道的第二个构建,则两个构建都显示为在主服务器上运行,但第二个构建将显示在构建队列中,直到 初始构建完成,执行者可以自由地帮助进一步处理。
When you use inputs, it is a best practice to wrap them in timeouts. Wrapping inputs in timeouts allows them to be cleaned up if approvals do not occur within a given window. For example:
当使用输入时,最好将它们包装在超时中。 在超时中包装输入允许在给定窗口内未发生批准时清除输入。 例如:
timeout(time:5, unit:'DAYS') { input message:'Approve deployment?', submitter: 'it-ops'}Recording Test Results and Artifacts
If there are any test failures in a given build, you want Jenkins to record them and then proceed, rather than stopping. If you want it saved, you must capture the .jar that you built. The following sample code for a node shows how (As previously seen in examples from this guide, Maven is being used as a build tool):
node { git 'https://github.com/joe_user/simple-maven-project-with-tests.git' def mvnHome = tool 'M3' sh "${mvnHome}/bin/mvn -B -Dmaven.test.failure.ignore verify" archiveArtifacts artifacts: '**/target/*.jar', fingerprint: true junit '**/target/surefire-reports/TEST-*.xml' }(Older versions of Pipeline require a slightly more verbose syntax. The “snippet generator” can be used to see the exact format.)
If tests fail, the Pipeline is marked unstable (as denoted by a yellow ball in the Jenkins UI), and you can browse "Test Result Trend" to see the relevant history.
You should see Last Successful Artifacts on the Pipeline index page.
(旧版本的Pipeline需要稍微更详细的语法,“snippet生成器”可用于查看确切的格式。)
如果测试失败,则管道被标记为不稳定(如Jenkins UI中的黄色球所示),您可以浏览“测试结果趋势”以查看相关历史记录。
您应该在Pipeline索引页上看到Last Successful Artifacts。原文地址:https://jenkins.io/doc/book/pipeline/overview/
- Getting Started with Pipeline 学习Pipeline
- 学习Getting Started With TensorFlow
- Pipeline
- PIpeline
- pipeline
- Pipeline
- Mini-Shell with pipeline
- Getting Started with Smartphone
- Getting Started With JasperReports
- Getting started with OpenCV
- Getting Started with DWR
- Getting Started With JasperReports
- Getting Started with MASM
- Getting started with BlazeDS
- Getting Started with RMAN
- Getting started with LAM
- Getting started with Davinci
- Getting Started with Monkey
- 多项式的加减乘及求导(数组)
- 占座廊坊
- (第25讲)java中的多态的深入理解
- 写给初学前端工程的建议
- 通过Ajax从Servlet获取数据完成登录实例
- Getting Started with Pipeline 学习Pipeline
- decimal 和double的运算速度比较
- js日期时间函数 js日期相加减的例子
- android示例之下载文件并写入到SD卡的指定目录中
- QT主窗口的停靠窗口实现
- html head 内置标签顺序
- 7.查看本机的ip地址,查看本机的程序的端口号
- 对struct array进行排序
- 教你搭建你自己的Git服务器