EventBus的使用
来源:互联网 发布:qt编程视频教程 编辑:程序博客网 时间:2024/06/06 03:23
什么是EventBus
EventBus是一个Android端优化的publish/subscribe消息总线,简化了应用程序内各组件间、组件与后台线程间的通信。比如请求网络,等网络返回时通过Handler或Broadcast通知UI,两个Fragment之间需要通过Listener通信,这些需求都可以通过EventBus实现。
详细Demo:Android EventBus实战
EventBus框架
大家谈到EventBus,总会想到greenrobot的EventBus,但是实际上EventBus是一个通用的叫法,例如Google出品的Guava,Guava是一个庞大的库,EventBus只是它附带的一个小功能,因此实际项目中使用并不多。用的最多的是greenrobot/EventBus,这个库的优点是接口简洁,集成方便,但是限定了方法名,不支持注解。另一个库square/otto修改自 Guava ,用的人也不少。
这篇博文暂时只讨论greenrobot的EventBus库。
基本用法
很多文章会讲到Subscriber,以及Publisher和ThreadMode等概念,我觉得暂时没有必要,简单粗暴,直接上代码:
添加依赖库:
首先你要为你的app添加依赖库:
<code style="font-family: 'Source Code Pro', Consolas, Menlo, Monaco, 'Courier New', monospace; font-size: 1em; color: inherit; padding: 0px; white-space: inherit;"><span class="hljs-title" style="color: rgb(133, 153, 0);">compile</span> <span class="hljs-string" style="color: rgb(42, 161, 152);">'de.greenrobot:eventbus:3.0.0-beta1'</span></code>
关于如何添加依赖库,请参考Gradle for Android 第三篇( 依赖管理 )。
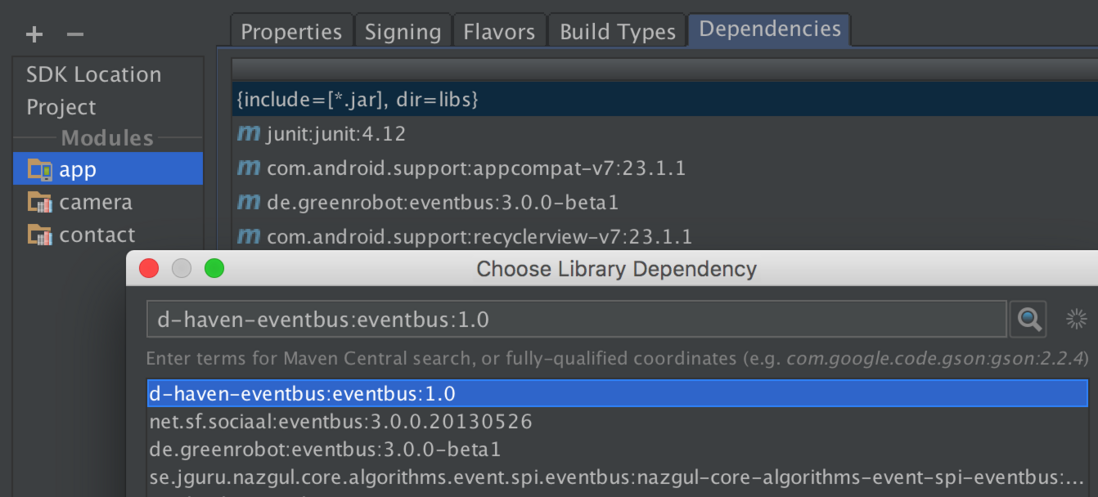
有些人会问为什么是beta版本,因为eventbus现阶段3.0版本只处于beta测试阶段。有些人会问如何找到eventbus 3.0.0版本,具体添加:
注册
举个例子,你需要在一个activity中注册eventbus事件,然后定义接收方法,这和Android的广播机制很像,你需要首先注册广播,然后需要编写内部类,实现接收广播,然后操作UI,在EventBus中,你同样需要这么做。
<code style="font-family: 'Source Code Pro', Consolas, Menlo, Monaco, 'Courier New', monospace; font-size: 1em; color: inherit; padding: 0px; white-space: inherit;"><span class="hljs-annotation" style="color: rgb(155, 133, 157);">@Override</span><span class="hljs-function"><span class="hljs-keyword" style="color: rgb(133, 153, 0);">protected</span> <span class="hljs-keyword" style="color: rgb(133, 153, 0);">void</span> <span class="hljs-title" style="color: rgb(38, 139, 210);">onCreate</span><span class="hljs-params" style="color: rgb(102, 0, 102);">(Bundle savedInstanceState)</span> </span>{ <span class="hljs-keyword" style="color: rgb(133, 153, 0);">super</span>.onCreate(savedInstanceState); setContentView(R.layout.activity_main); EventBus.getDefault().register(<span class="hljs-keyword" style="color: rgb(133, 153, 0);">this</span>);}<span class="hljs-annotation" style="color: rgb(155, 133, 157);">@Override</span><span class="hljs-function"><span class="hljs-keyword" style="color: rgb(133, 153, 0);">protected</span> <span class="hljs-keyword" style="color: rgb(133, 153, 0);">void</span> <span class="hljs-title" style="color: rgb(38, 139, 210);">onDestroy</span><span class="hljs-params" style="color: rgb(102, 0, 102);">()</span> </span>{ <span class="hljs-keyword" style="color: rgb(133, 153, 0);">super</span>.onDestroy(); EventBus.getDefault().unregister(<span class="hljs-keyword" style="color: rgb(133, 153, 0);">this</span>);}</code>订阅者
类似广播,但是有别于2.4版本,你不必再去约定OnEvent方法开头了(看不懂没关系):
<code style="font-family: 'Source Code Pro', Consolas, Menlo, Monaco, 'Courier New', monospace; font-size: 1em; color: inherit; padding: 0px; white-space: inherit;"><span class="hljs-annotation" style="color: rgb(155, 133, 157);">@Subscribe</span>(threadMode = ThreadMode.MainThread)<span class="hljs-function"><span class="hljs-keyword" style="color: rgb(133, 153, 0);">public</span> <span class="hljs-keyword" style="color: rgb(133, 153, 0);">void</span> <span class="hljs-title" style="color: rgb(38, 139, 210);">helloEventBus</span><span class="hljs-params" style="color: rgb(102, 0, 102);">(String message)</span></span>{ mText.setText(message);}</code>该操作很简单,定义了一个hello方法,需要传入String参数,在其中操作UI操作,注意:
我们添加了注解@Subscribe,其含义为订阅者,在其内传入了threadMode,我们定义为ThreadMode.MainThread,其含义为该方法在UI线程完成,这样你就不要担心抛出异常啦。是不是很简单?
发布者
既然你在某个地方订阅了内容,当然就会在某个地方发布消息。举个例子,你的这个activity需要http请求,而http请求你肯定是在异步线程中操作,其返回结果后,你可以这么写:
<code style="font-family: 'Source Code Pro', Consolas, Menlo, Monaco, 'Courier New', monospace; font-size: 1em; color: inherit; padding: 0px; white-space: inherit;"><span class="hljs-built_in" style="color: rgb(38, 139, 210);">String</span> json=<span class="hljs-string" style="color: rgb(42, 161, 152);">""</span>;EventBus.getDefault().post(json);</code>
这样就OK了,你可以试下能否正常运行了!
原理初探
你订阅了内容,所以你需要在该类注册EventBus,而你订阅的方法需要传入String,即你的接收信息为String类型,那么在post的时候,你post出去的也应该是String类型,其才会接收到消息。
如果你post的是对象
首先你需要定义一个类似pojo类:
<code style="font-family: 'Source Code Pro', Consolas, Menlo, Monaco, 'Courier New', monospace; font-size: 1em; color: inherit; padding: 0px; white-space: inherit;"><span class="hljs-keyword" style="color: rgb(133, 153, 0);">public</span> <span class="hljs-class"><span class="hljs-keyword" style="color: rgb(133, 153, 0);">class</span> <span class="hljs-title" style="color: rgb(181, 137, 0);">MessageEvent</span> </span>{ <span class="hljs-keyword" style="color: rgb(133, 153, 0);">public</span> <span class="hljs-keyword" style="color: rgb(133, 153, 0);">final</span> String name; <span class="hljs-keyword" style="color: rgb(133, 153, 0);">public</span> <span class="hljs-keyword" style="color: rgb(133, 153, 0);">final</span> String password; <span class="hljs-function"><span class="hljs-keyword" style="color: rgb(133, 153, 0);">public</span> <span class="hljs-title" style="color: rgb(38, 139, 210);">MessageEvent</span><span class="hljs-params" style="color: rgb(102, 0, 102);">(String name,String password)</span> </span>{ <span class="hljs-keyword" style="color: rgb(133, 153, 0);">this</span>.name = name; <span class="hljs-keyword" style="color: rgb(133, 153, 0);">this</span>.password=password; }}</code>然后你post的时候:
<code style="font-family: 'Source Code Pro', Consolas, Menlo, Monaco, 'Courier New', monospace; font-size: 1em; color: inherit; padding: 0px; white-space: inherit;">EventBus.getDefault().post(<span class="hljs-keyword" style="color: rgb(133, 153, 0);">new</span> MessageEvent(<span class="hljs-string" style="color: rgb(42, 161, 152);">"hello"</span>,<span class="hljs-string" style="color: rgb(42, 161, 152);">"world"</span>));</code>
当然,你接收的方法也需要改为:
<code style="font-family: 'Source Code Pro', Consolas, Menlo, Monaco, 'Courier New', monospace; font-size: 1em; color: inherit; padding: 0px; white-space: inherit;"><span class="hljs-annotation" style="color: rgb(155, 133, 157);">@Subscribe</span>(threadMode = ThreadMode.MainThread)<span class="hljs-function"><span class="hljs-keyword" style="color: rgb(133, 153, 0);">public</span> <span class="hljs-keyword" style="color: rgb(133, 153, 0);">void</span> <span class="hljs-title" style="color: rgb(38, 139, 210);">helloEventBus</span><span class="hljs-params" style="color: rgb(102, 0, 102);">(MessageEvent message)</span></span>{ mText.setText(message.name);}</code>疑问,当你post了消息之后,你的订阅者有多个,每一个都接收吗?能否做到指定接收者。
首先声明,EventBus 3.0的改动针对2.4的改动并不是特别大,但是对于其性能的提升是另外一个说法了,所以建议学习EventBus 3.0。
注解
新增的@Subscribe
threadMode = ThreadMode.MainThread
用注解的方式代替约定的方法名规范,是其最大的改变。在2.4中,你可能需要这么定义:
<code style="font-family: 'Source Code Pro', Consolas, Menlo, Monaco, 'Courier New', monospace; font-size: 1em; color: inherit; padding: 0px; white-space: inherit;"><span class="hljs-function"><span class="hljs-keyword" style="color: rgb(133, 153, 0);">public</span> <span class="hljs-keyword" style="color: rgb(133, 153, 0);">void</span> <span class="hljs-title" style="color: rgb(38, 139, 210);">onEventMainThread</span><span class="hljs-params" style="color: rgb(102, 0, 102);">(MessageEvent <span class="hljs-keyword" style="color: rgb(133, 153, 0);">event</span>)</span> </span>{ log(<span class="hljs-keyword" style="color: rgb(133, 153, 0);">event</span>.message); } </code>该方法为接收消息后在主线程中处理事件,而在3.0中:
<code style="font-family: 'Source Code Pro', Consolas, Menlo, Monaco, 'Courier New', monospace; font-size: 1em; color: inherit; padding: 0px; white-space: inherit;">@Subscribe(threadMode = ThreadMode.MainThread) <span class="hljs-comment" style="color: rgb(147, 161, 161);">//在ui线程执行</span><span class="hljs-function"><span class="hljs-keyword" style="color: rgb(133, 153, 0);">public</span> <span class="hljs-keyword" style="color: rgb(133, 153, 0);">void</span> <span class="hljs-title" style="color: rgb(38, 139, 210);">onUserEvent</span><span class="hljs-params" style="color: rgb(102, 0, 102);">(UserEvent <span class="hljs-keyword" style="color: rgb(133, 153, 0);">event</span>)</span> </span>{ log(<span class="hljs-keyword" style="color: rgb(133, 153, 0);">event</span>.message); } </code>其中ThreadMode提供了四个常量:
MainThread 主线程
BackgroundThread 后台线程
Async 后台线程
PostThread 发送线程(默认)
BackgroundThread:当事件是在UI线程发出,那么事件处理实际上是需要新建单独线程,如果是在后台线程发出,那么事件处理就在该线程。该事件处理方法应该是快速的,避免阻塞后台线程。
Async:发送事件方不需要等待事件处理完毕。这种方式适用于该事件处理方法需要较长时间,例如网络请求。
sticky = true
默认情况下,其为false。什么情况下使用sticky呢?
相信大多数使用过EventBus 2.4的同学或多或少的使用过:
<code style="font-family: 'Source Code Pro', Consolas, Menlo, Monaco, 'Courier New', monospace; font-size: 1em; color: inherit; padding: 0px; white-space: inherit;">EventBus.getDefault().postSticky(<span class="hljs-keyword" style="color: rgb(133, 153, 0);">new</span> VoteEvent(obj));EventBus.getDefault().registerSticky(<span class="hljs-keyword" style="color: rgb(133, 153, 0);">this</span>);</code>
你会发现非常的麻烦,那么在3.0中:
<code style="font-family: 'Source Code Pro', Consolas, Menlo, Monaco, 'Courier New', monospace; font-size: 1em; color: inherit; padding: 0px; white-space: inherit;">EventBus.getDefault().postSticky(<span class="hljs-keyword" style="color: rgb(133, 153, 0);">new</span> VoteEvent(obj));EventBus.getDefault().register(<span class="hljs-keyword" style="color: rgb(133, 153, 0);">this</span>);<span class="hljs-property">@Subscribe</span>(sticky = <span class="hljs-literal" style="color: rgb(0, 102, 102);">true</span>)</code>
什么时候使用sticy,当你希望你的事件不被马上处理的时候,举个栗子,比如说,在一个详情页点赞之后,产生一个VoteEvent,VoteEvent并不立即被消费,而是等用户退出详情页回到商品列表之后,接收到该事件,然后刷新Adapter等。其实这就是之前我们用startActivityForResult和onActivityResult做的事情。
priority = 1
相信大部分人知道该用法,值越小优先级越低,默认为0。
建议
推荐大家在使用EventBus的时候,创建一个事件类,把你的每一个参数(或者可能发生冲突的参数),封装成一个类:
<code style="font-family: 'Source Code Pro', Consolas, Menlo, Monaco, 'Courier New', monospace; font-size: 1em; color: inherit; padding: 0px; white-space: inherit;"><span class="hljs-keyword" style="color: rgb(133, 153, 0);">public</span> <span class="hljs-class"><span class="hljs-keyword" style="color: rgb(133, 153, 0);">class</span> <span class="hljs-title" style="color: rgb(181, 137, 0);">Event</span> </span>{ <span class="hljs-keyword" style="color: rgb(133, 153, 0);">public</span> <span class="hljs-keyword" style="color: rgb(133, 153, 0);">static</span> <span class="hljs-class"><span class="hljs-keyword" style="color: rgb(133, 153, 0);">class</span> <span class="hljs-title" style="color: rgb(181, 137, 0);">UserListEvent</span> </span>{ <span class="hljs-keyword" style="color: rgb(133, 153, 0);">public</span> <span class="hljs-keyword" style="color: rgb(133, 153, 0);">List</span><User> users ; } <span class="hljs-keyword" style="color: rgb(133, 153, 0);">public</span> <span class="hljs-keyword" style="color: rgb(133, 153, 0);">static</span> <span class="hljs-class"><span class="hljs-keyword" style="color: rgb(133, 153, 0);">class</span> <span class="hljs-title" style="color: rgb(181, 137, 0);">ItemListEvent</span> </span>{ <span class="hljs-keyword" style="color: rgb(133, 153, 0);">public</span> <span class="hljs-keyword" style="color: rgb(133, 153, 0);">List</span><Item> items; } } </code>添加processor
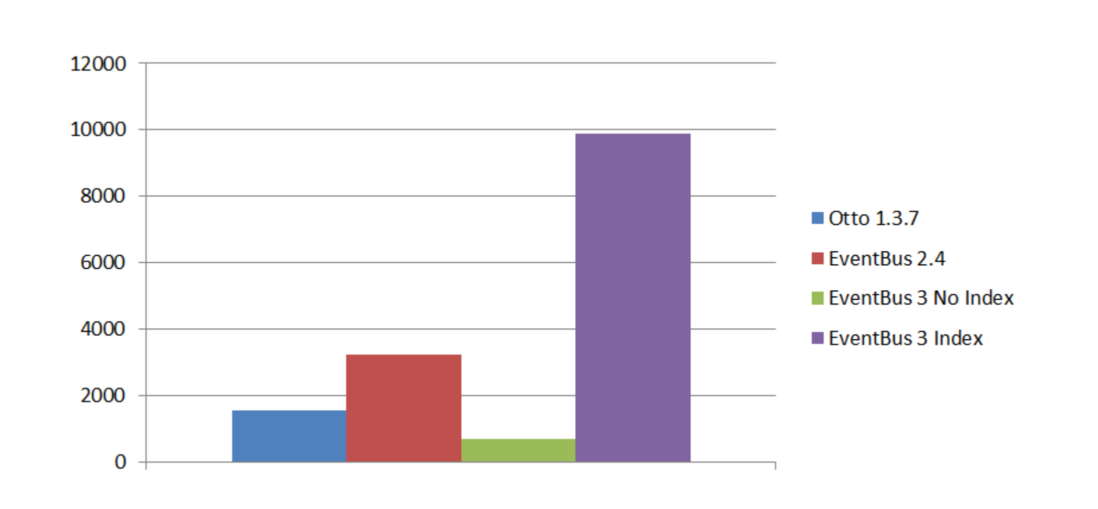
按照Markus Junginger的说法(EventBus创作者),在3.0中,如果你想进一步提升你的app的性能,你需要添加:
<code style="font-family: 'Source Code Pro', Consolas, Menlo, Monaco, 'Courier New', monospace; font-size: 1em; color: inherit; padding: 0px; white-space: inherit;"><span class="hljs-title" style="color: rgb(133, 153, 0);">provided</span> <span class="hljs-string" style="color: rgb(42, 161, 152);">'de.greenrobot:eventbus-annotation-processor:3.0.0-beta1'</span></code>
其在编译的时候为注册类构建了一个索引,而不是在运行时,这样的结果是其让EventBus 3.0的性能提升了一倍,相比2.4来说,其会是它的3到6倍。大家可以感受下:
- EventBus 《二》 Android EventBus的简单使用
- EventBus的使用初试
- EventBus的使用
- EventBus的使用
- EventBus的简单使用
- EventBus的使用
- eventbus的使用
- EventBus的初步使用:
- EventBus的使用
- EventBus的简单使用
- EventBus的使用总结
- EventBus的使用
- EventBus框架的使用
- EventBus的简单使用
- Eventbus的基本使用
- EventBus的使用
- EventBus的使用
- EventBus的简单使用
- Flask UnicodeDecodeError
- Java中super的几种用法
- ecshop在前台模板中打印数组
- 数据结构示例之获取子字符串
- socketpair 双向传输
- EventBus的使用
- 怎么修改标题才不影响SEO排名_修改网站标题的正确方法
- Android 沉浸式状态栏攻略 让你的状态栏变色吧
- EventBus的使用散记
- Python 进阶_OOP 面向对象编程_静态方法和类方法
- 市场发布时---app加固
- 解决 RecyclerView条目点击事件,分享自定义adapter
- Android Facebook SDK接入笔记
- 欢迎使用CSDN-markdown编辑器