myeclipse10 离线安装svn插件,以及svn的使用
来源:互联网 发布:婚庆网站源码 编辑:程序博客网 时间:2024/05/17 17:40
1.插件的安装
说到插件,myeclipse自8.X开始,插件安装就变得巨难用,通常最好还是用离线安装,在线安装很可能出问题,下面仅以SVN安装为例,其他诸如ADT15,Aptana等都可采用
1.首先下载SVN包:svn-1.6
2.解压SVN包,然后找到其中的两个文件夹:features 和 plugins
3.随意建一个文件夹(位置和名称自己定就好了,我的是E:\myEclipsePlugin\svn),然后把第二步的解压好的features 和 plugins放到这个文件夹下
4.找到myeclipse的安装目录,下面有一个configuration\org.eclipse.equinox.simpleconfigurator\bundles.info 文件。现在需要做的就是在该文件内添加的东西
5.添加的内容用下面的类生成:
import java.io.File; import java.util.ArrayList; import java.util.List; /** * MyEclipse9 插件配置代码生成器 */ public class PluginConfigCreator { public PluginConfigCreator() { } public void print(String path) { List<String> list = getFileList(path); if (list == null) { return; } int length = list.size(); for (int i = 0; i < length; i++) { String result = ""; String thePath = getFormatPath(getString(list.get(i))); File file = new File(thePath); if (file.isDirectory()) { String fileName = file.getName(); if (fileName.indexOf("_") < 0) { print(thePath); continue; } String[] filenames = fileName.split("_"); String filename1 = filenames[0]; String filename2 = filenames[1]; result = filename1 + "," + filename2 + ",file:/" + path + "/" + fileName + "\\,4,false"; System.out.println(result); } else if (file.isFile()) { String fileName = file.getName(); if (fileName.indexOf("_") < 0) { continue; } int last = fileName.lastIndexOf("_");// 最后一个下划线的位置 String filename1 = fileName.substring(0, last); String filename2 = fileName.substring(last + 1, fileName .length() - 4); result = filename1 + "," + filename2 + ",file:/" + path + "/" + fileName + ",4,false"; System.out.println(result); } } } public List<String> getFileList(String path) { path = getFormatPath(path); path = path + "/"; File filePath = new File(path); if (!filePath.isDirectory()) { return null; } String[] filelist = filePath.list(); List<String> filelistFilter = new ArrayList<String>(); for (int i = 0; i < filelist.length; i++) { String tempfilename = getFormatPath(path + filelist[i]); filelistFilter.add(tempfilename); } return filelistFilter; } public String getString(Object object) { if (object == null) { return ""; } return String.valueOf(object); } public String getFormatPath(String path) { path = path.replaceAll("\\\\", "/"); path = path.replaceAll("//", "/"); return path; } public static void main(String[] args) { /*你的SVN的features 和 plugins复制后放的目录*/ String plugin = "F:\\MyEclipse10.0\\myEclipsePlugin\\svn"; new PluginConfigCreator().print(plugin); } } 别忘了把plugin 改成你的svn的路径6.把以上生成的字符串(一大堆)添加到第四步bundles.info文件的后面,然后重启myeclipse即可。
2.Eclipse SVN 使用教程
点击编译器右上角的Open Perspective 打开SVN资源库界面,新建一个资源库
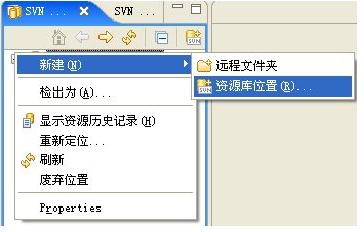
选择资源库的位置,这里我们就用刚才搭好的 svn://localhost/ts 作为工程目录,点击Finish后如果成功则会看到版本服务器中工程的树形结构了(可能需要用户密码验证)。在svn://localhost/ts 根目录上点右键,选择“验出”(英文版的可能叫 Check Out),在弹出窗口中选择“作为空间的项目验出”,下边的项目名称随便叫,我这里还是用 SVNtest 作为项目名称。
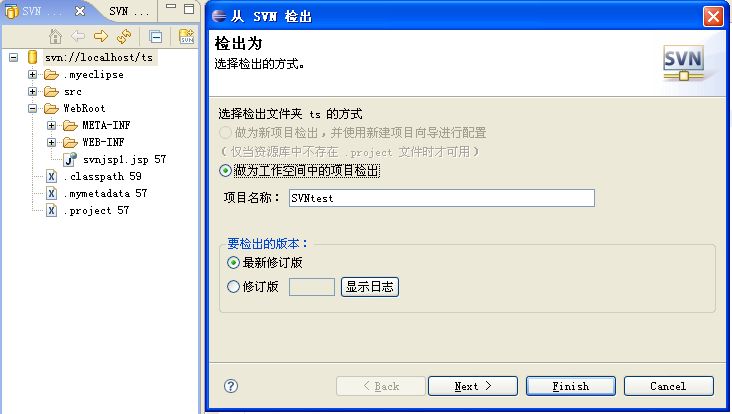
一切没有问题了点击Finish。之后它就会从服务器上把工程下到你本地了。好啦,来到Eclipse编辑栏会发现刚才下的工程文件都会带有SVN版本控制标记了,再去Workspace看看,也会发现下载的工程文件夹,并且也有控制标记。 而且里我们会发现在SVN控制下的文件多出来一个Team选单,打开一看原来就是一个客户端工具呀,提交,更新,同步,合并,切换……我们再熟悉不过了,自己试试吧 ^_^。

http://blog.163.com/xueling1231989@126/blog/static/10264080720122273196653/
fuweizhi31
http://fuweizhi31.blog.163.com/blog/static/29280367201282611715497/
- myeclipse10 离线安装svn插件,以及svn的使用
- MyEclipse10离线安装SVN插件
- MyEclipse10 svn插件安装。。
- myeclipse10安装SVN插件
- myeclipse10安装svn插件
- Myeclipse10安装svn插件
- MyEclipse10 安装 SVN 插件
- MyEclipse10 SVN 插件安装
- Myeclipse10安装svn插件
- myeclipse10安装svn插件
- Myeclipse10安装svn插件
- Myeclipse10安装svn插件
- MyEclipse10安装SVN插件
- myeclipse10 安装SVN插件
- MyEclipse10安装SVN插件
- MyEclipse10安装SVN插件
- MyEclipse10安装SVN插件
- MyEclipse10安装SVN插件
- Canvas文字渲染
- 关于使用eclipse开发android应用,更换jdk1.8之后遇到的eclipse闪退以及更换jdk1.7之后运行项目报错:Unsupported major.minor version 52.0
- 泛型 (下) - 细节和局限性
- Oracle总结(1)
- Android Fragment应用实战,使用碎片向ActivityGroup说再见
- myeclipse10 离线安装svn插件,以及svn的使用
- 拯救无法启动的虚拟机文件.vmdk中的数据
- 利用JDBC访问MySQL数据库
- No resource identifier found for attribute 'headerLayout' in package错误解决方法
- 阴阳师妖怪出处(简洁版)
- RandomAccessFile
- css注意事项06
- weed-fs因网络环境发生改变导致服务器不能正常相应的修正记录
- 利用pipework开源网络配置工具配置docker容器网络和host主机网络在同一个网段