Spring-注入外部值
来源:互联网 发布:网络男歌手好听的歌 编辑:程序博客网 时间:2024/06/05 09:27
Spring注入需要初始化,但前面均使用硬编码注入,如:
JavaConfig配置:
1 package soundSystem; 2 3 import org.springframework.stereotype.Component; 4 5 /** 6 * CompactDisc接口的实现类,此类中定义了CD的名字和作者以及打印相关信息的方法 7 * @author yan 8 */ 9 @Component("compactd")//用于扫描来动态生成bean10 public class SgtPeppers implements CompactDisc{11 12 private String title="K歌之王";13 private String artist="陈奕迅";14 @Override15 public void cdInfo() {16 System.out.print("This CD's title:"+title+";artist:"+artist);17 }18 19 }
xml配置(需要实现setter方法):
1 <bean id="cd" class="soundSystem.SgtPeppers">2 <property name="title" value="L.O.V.E"></property>3 <property name="artist" value="May Day"></property>4 </bean>
Spring允许注入外部值,这样不用受到硬编码的限制:
--JavaConfig(显式bean)
主要是在配置类中实现:
1.在配置类类名上方添加注解@PropertySource("classpath:/sp.properties"),参数为文件全路径名,properties文件是专门用来存放k-v值对的;
2.在配置类中定义Environment env,并添加@AutoWired注解;
3.在定义bean的方法中使用env.getProperty()方法配置文件(*.properties)中的值来赋给bean作为参数。
1 package com.spring.config; 2 3 import org.springframework.beans.factory.annotation.Autowired; 4 import org.springframework.context.annotation.Bean; 5 import org.springframework.context.annotation.ComponentScan; 6 import org.springframework.context.annotation.Configuration; 7 import org.springframework.context.annotation.PropertySource; 8 import org.springframework.core.env.Environment; 9 10 import com.spring.custom.Person;11 12 @Configuration("com.spring.custom")13 @ComponentScan(basePackages={"com.spring"})14 @PropertySource("classpath:/sp.properties")15 public class CreatureSpingConfig {16 @Autowired17 Environment env;18 @Bean19 public Person person(){20 return new Person(env.getProperty("name"), env.getProperty("age",Integer.class), env.getProperty("sex"));21 }22 }
这样就实现了从外部文件注入的目标了。
注:getProperty("key值")返回的是String类型,但并不是所有参数都是String类型,所以这个方法有几个重载形式
解释如下:
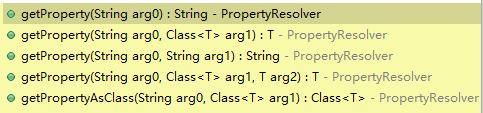
1 public interface PropertyResolver { 2 3 //是否包含某个属性 4 boolean containsProperty(String key); 5 6 //获取属性值 如果找不到返回null 7 String getProperty(String key); 8 9 //获取属性值,如果找不到返回默认值 10 String getProperty(String key, String defaultValue); 11 12 //获取指定类型的属性值,找不到返回null 13 <T> T getProperty(String key, Class<T> targetType); 14 15 //获取指定类型的属性值,找不到返回默认值 16 <T> T getProperty(String key, Class<T> targetType, T defaultValue); 17 18 //获取属性值为某个Class类型,找不到返回null,如果类型不兼容将抛出ConversionException 19 <T> Class<T> getPropertyAsClass(String key, Class<T> targetType); 20 21 //获取属性值,找不到抛出异常IllegalStateException 22 String getRequiredProperty(String key) throws IllegalStateException; 23 24 //获取指定类型的属性值,找不到抛出异常IllegalStateException 25 <T> T getRequiredProperty(String key, Class<T> targetType) throws IllegalStateException; 26 27 //替换文本中的占位符(${key})到属性值,找不到不解析 28 String resolvePlaceholders(String text); 29 30 //替换文本中的占位符(${key})到属性值,找不到抛出异常IllegalArgumentException 31 String resolveRequiredPlaceholders(String text) throws IllegalArgumentException; 32 33 }
这里列举的是PropertyResolver接口中定义的方法,是因为Environment继承了这个接口,上例中我们使用了第7行和第13行的getProperty的两种重载的形式,当然也可是设置默认值。
--JavaConfig(注解生成bean)演示@Value注解使用方式
实现类:
1 package com.spring.beans; 2 3 import org.springframework.beans.factory.annotation.Autowired; 4 import org.springframework.beans.factory.annotation.Value; 5 import org.springframework.stereotype.Component; 6 @Component//自动生成bean 7 public class VCD implements CompactDisc{ 8 9 private String title;10 private String artist;11 private int year;12 13 //定义有参构造14 @Autowired//必须写,不写会报错(目前不知原因)15 public VCD(@Value("${title}")String title, @Value("${artist}")String artist,@Value("${year}")int year) {16 super();17 this.title = title;18 this.artist = artist;19 this.year=year;}20 @Override21 public void play() {22 System.out.println("Playing CD's title is"+title+",the artist is"+artist+",the year is"+year);23 }24 }
配置类:
1 package com.spring.config; 2 3 import org.springframework.beans.factory.annotation.Autowired; 4 import org.springframework.beans.factory.annotation.Configurable; 5 import org.springframework.context.annotation.Bean; 6 import org.springframework.context.annotation.ComponentScan; 7 import org.springframework.context.annotation.Configuration; 8 //import org.springframework.context.annotation.ImportResource; 9 import org.springframework.context.annotation.PropertySource;10 import org.springframework.context.support.PropertySourcesPlaceholderConfigurer;11 import org.springframework.core.env.Environment;12 13 14 @Configuration//表明这是一个Spring的配置类15 @ComponentScan(value="com.spring")//表示需要扫描的包,因为演示所用为显式bean,所以其实这里没必要添加此注解16 @PropertySource(value="classpath:propertiesSource.properties")17 //@ImportResource("classpath:spring.xml")//引入XML配置文件18 public class SpringConfig {19 /**20 * 因为采用混合配置,故注释掉重复bean及无用变量21 */22 @Autowired 23 private Environment e;24 25 @Bean//要使用@Value注解需要添加此bean26 public static PropertySourcesPlaceholderConfigurer pc(){27 return new PropertySourcesPlaceholderConfigurer();28 }29 }
配置文件:
title=L.O.V.Eartist=May Dayyear=2006
注:
- 要使用@Value需要添加PropertySourcesPlaceholderConfigurer类的bean;
- 需要在使用@Value处添加@AutoWired注解,否则会出错。
--XML(显式bean)
此处使用混合配置,以CD为例。
配置类:
1 package com.spring.config; 2 3 //import org.springframework.beans.factory.annotation.Autowired; 4 //import org.springframework.beans.factory.annotation.Configurable; 5 //import org.springframework.context.annotation.Bean; 6 import org.springframework.context.annotation.ComponentScan; 7 import org.springframework.context.annotation.Configuration; 8 import org.springframework.context.annotation.ImportResource; 9 //import org.springframework.context.annotation.PropertySource;10 //import org.springframework.core.env.Environment;11 12 13 @Configuration//表明这是一个Spring的配置类14 @ComponentScan(value="com.spring")//表示需要扫描的包,因为演示所用为显式bean,所以其实这里没必要添加此注解15 //@PropertySource(value="classpath:propertiesSource.properties")16 @ImportResource("classpath:spring.xml")//引入XML配置文件17 public class SpringConfig {18 /**19 * 因为采用混合配置,故注释掉重复bean及无用变量20 */21 // @Autowired 22 // private Environment e;23 24 // @Bean25 // public CompactDisc cd(){26 // return new VCD(e.getProperty("title"),e.getProperty("artist"));27 // }28 }
实现类:
1 package com.spring.beans; 2 public class VCD implements CompactDisc{ 3 4 private String title; 5 private String artist; 6 private int year; 7 //定义有参构造 8 public VCD(String title, String artist,int year) { 9 super();10 this.title = title;11 this.artist = artist;12 this.year=year;13 System.out.println("Playing CD's title is"+this.title+",the artist is"+this.artist+",the year is"+this.year);}14 @Override15 public void play() {}16 }
在XML中:
<?xml version="1.0" encoding="UTF-8"?> <beans xmlns="http://www.springframework.org/schema/beans" xmlns:c="http://www.springframework.org/schema/c" xmlns:xsi="http://www.w3.org/2001/XMLSchema-instance" xmlns:p="http://www.springframework.org/schema/p" xmlns:context="http://www.springframework.org/schema/context" xsi:schemaLocation="http://www.springframework.org/schema/beans http://www.springframework.org/schema/beans/spring-beans.xsd http://www.springframework.org/schema/context http://www.springframework.org/schema/context/spring-context.xsd "> <context:property-placeholder location="classpath:propertiesSource.properties"/> <bean id="cd" class="com.spring.beans.VCD" c:_0="${title}" c:_1="${artist}" c:_2="${year}"> </bean> </beans>
配置文件中:
title=L.O.V.Eartist=May Dayyear=2006
这样便可以实现从外部注入属性值了。
注意:
- 在XML配置中,要添加<context:property-placeholder/>标签,其属性location的值便为配置文件的路径,这与JavaConfig中的@PropertySource起同样的作用;
- 从例子中可以看出,构造器注入,可以使用c-命名空间来设置初始值,格式如:c:_index,index为构造器中参数的索引值,从0开始。而<context:property-placeholder/>标签是专门用来匹配属性占位符的,缺少此标签则不起作用。
2016-10-25 21:20:52
资料参考:
- Environment用法:http://blog.csdn.net/hdngbj/article/details/18003001#
- 混合配置用法:http://www.cnblogs.com/yw0219/p/5989865.html
0 0
- Spring-注入外部值
- ibatis+spring+struts spring 外部注入 SqlMapClientTemplate
- Spring属性注入(从外部属性文件注入)
- spring注入:设值注入
- Spring注入:设值注入、构造注入
- spring依赖注入 注入值 spring表达式
- Spring 注入枚举值
- Spring设值注入
- spring----filed值注入
- Spring注入集合值
- Spring设值注入
- Spring--IoC_值注入
- Spring 设值注入
- Spring高级注入之属性值注入
- Spring高级注入之Field值注入
- Spring高级注入之Method值注入
- Spring高级注入之Method值注入
- Spring高级注入之Field值注入
- C# NPOI修改xlsx表格
- Spring-处理自动装配的歧义性
- Spring-bean的作用域
- windows环境下mongodb下载、安装和使用总结
- ActiveMQ笔记(1):编译、安装、示例代码
- Spring-注入外部值
- SQL-字符串连接聚合函数
- Spring-AOP
- 使用GitHub和Eclipse进行javaEE开发步骤
- MyEclipse安装EGit插件方法
- server library[unbound] 服务未绑定解决办法
- Shimeji开源桌宠代码学习(1)
- Spring-JDBC配置
- 解决error: Your local changes to the following files would be overwritten by merge