SpringMVC笔记系列(1)——用一个例子帮你入门
来源:互联网 发布:外网代理软件 编辑:程序博客网 时间:2024/06/04 18:22
说明:本文章的内容转载至:https://my.oschina.net/happyBKs/blog/411547
如有侵权的地方,请联系本人,本人将会立即删除!
构造一个SpringMVC项目的基本步骤是:
基本步骤:
加入jar包
在web.xml中配置DispatcherServlet (springMVC需要配一个这样的servlet。还记得struts2里吗?需要配一个filter)
加入SpringMVC的配置文件
编写处理请求的处理器,并标识为处理器
编写视图
加入jar
其实需要的只有以下几个jar:(版本描述省略)
spring- beans.jar
spring- content.jar
spring- core.jar
spring- expression.jar
spring- web.jar
spring- webmvc.jar
spring- aop.jar
还有一个common-logging,是一个单独的项目jar,用来为spring做日志。
common-logging.jar
好吧。现在我们尝搭建一个开发的项目环境。
忘记什么李X第三版等经典系列的书籍的介绍的步骤吧,当你发现spring官网已经完全改版。只能找到maven和gradle的依赖描述的时候,就别指望找到那个download链接然后从解压包里挑出这几个jar了。
咱们还是用maven来完成这一切吧。为了让学弟和学妹们不至于被这种小问题卡住,我就不跳过了这一步骤了。
我的开发环境是STS。
步骤1:新建一个maven-archetype-webapp项目
步骤2:在pom.xml中加入依赖。
注意:官网上只在spring-framework项目下提供了spring-context的maven依赖描述,但是没有找到springMVC的。一次这里我把两个依赖全加入了。(关于什么是Maven?什么依赖?请看我happyBKs的Maven入门系列的博客)
<project xmlns="http://maven.apache.org/POM/4.0.0" xmlns:xsi="http://www.w3.org/2001/XMLSchema-instance" xsi:schemaLocation="http://maven.apache.org/POM/4.0.0 http://maven.apache.org/maven-v4_0_0.xsd"> <modelVersion>4.0.0</modelVersion> <groupId>com.happyBKs.springmvc</groupId> <artifactId>mymvc</artifactId> <packaging>war</packaging> <version>0.0.1-SNAPSHOT</version> <name>mymvc Maven Webapp</name> <url>http://maven.apache.org</url> <dependencies> <dependency> <groupId>junit</groupId> <artifactId>junit</artifactId> <version>4.10</version> <scope>test</scope> </dependency> <dependency> <groupId>org.springframework</groupId> <artifactId>spring-context</artifactId> <version>4.1.6.RELEASE</version> </dependency> <dependency> <groupId>org.springframework</groupId> <artifactId>spring-webmvc</artifactId> <version>4.1.6.RELEASE</version> </dependency> </dependencies> <build> <finalName>mymvc</finalName> </build></project>系统自动添加所需要的所有jar。

步骤3:配置DispatcherServlet。
需要在web.xml配置。(可以用alt+/选择其中的springDispatcherServlet)
web-app> <display-name>Archetype Created Web Application</display-name> <!-- 配置DispatcherServlet --> <!-- 下面的代码为STS自动生成,如果是一般的eclipse需要安装springIDE插件 --> <!-- The front controller of this Spring Web application, responsible for handling all application requests --> <servlet> <servlet-name>springDispatcherServlet</servlet-name> <servlet-class>org.springframework.web.servlet.DispatcherServlet</servlet-class> <!-- 配置DispatcherServlet的一个初始化参数:配置springmvc 配置位置和名称 --> <init-param> <param-name>contextConfigLocation</param-name> <param-value>classpath:springmvc.xml</param-value><!-- classpath下的springmvc.xml --> </init-param> <!-- load-on-startup是指这个servlet是在当前web应用被加载的时候就被创建,而不是第一次被请求的时候被创建 --> <load-on-startup>1</load-on-startup> </servlet> <!-- Map all requests to the DispatcherServlet for handling --> <!-- /代表可以应答所有请求,由springDispatcherServlet处理 --> <servlet-mapping> <servlet-name>springDispatcherServlet</servlet-name> <url-pattern>/</url-pattern> </servlet-mapping></web-app>步骤4:按照上面springDispatcherServlet的配置的contextConfigLocation参数的值,即springmvc.xml
这里需要做的不是新建一个xml,而是一个spring bean configuration file。在maven的src/main/resources下新建spring bean configuration file。
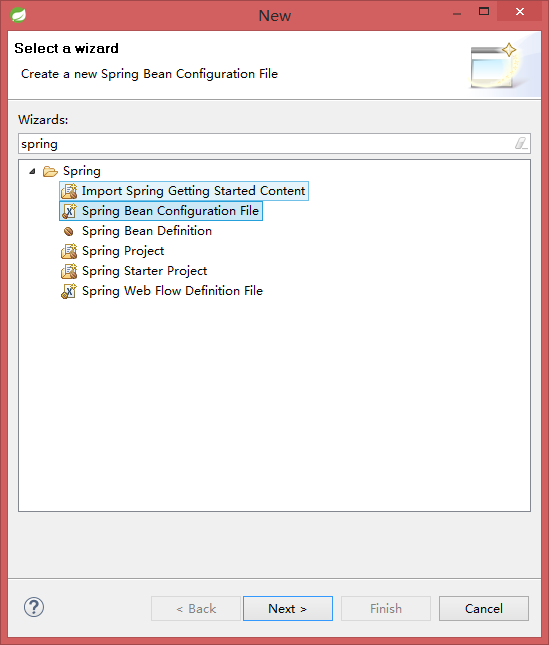
填入springmvc.xml, 点击下一步。

选择bean, context, mvc三个xsd命名空间声明。
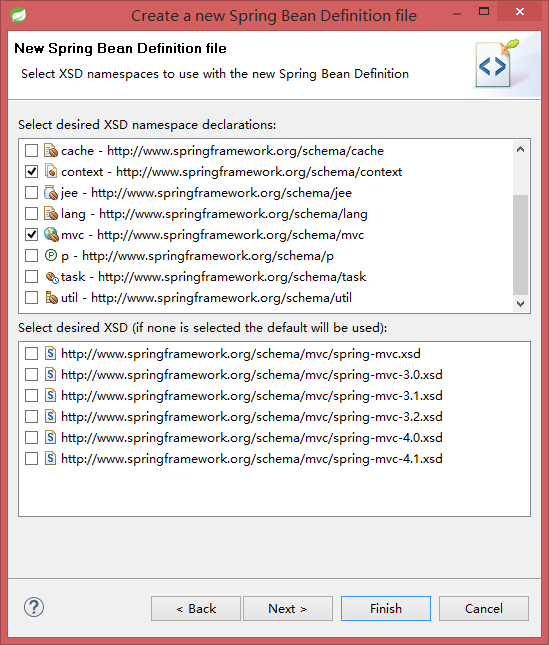
生成的springmvc.xml如下:
<?xml version="1.0" encoding="UTF-8"?><beans xmlns="http://www.springframework.org/schema/beans" xmlns:xsi="http://www.w3.org/2001/XMLSchema-instance" xmlns:context="http://www.springframework.org/schema/context" xmlns:mvc="http://www.springframework.org/schema/mvc" xsi:schemaLocation="http://www.springframework.org/schema/beans http://www.springframework.org/schema/beans/spring-beans.xsd http://www.springframework.org/schema/context http://www.springframework.org/schema/context/spring-context-4.1.xsd http://www.springframework.org/schema/mvc http://www.springframework.org/schema/mvc/spring-mvc-4.1.xsd"></beans>步骤5:编写请求处理器。
首先建一个包。这个包用于请求存放请求处理器。因为接下来需要在springmvc.xml设置一个自动搜索的包,也就是这个包了。
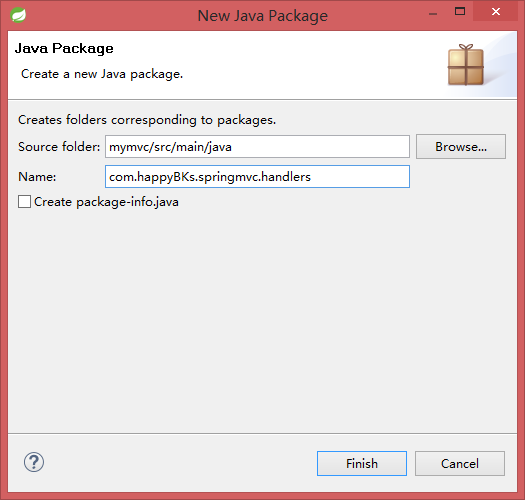
步骤6:新建一个类,HelloWorld类。
在src/main/java下的com.happyBKs.springmvc.handlers下建立HelloWorld类。
package com.happyBKs.springmvc.handlers;public class HelloWorld { public String hello() { System.out.println("hello, springMVC!"); return "baymax"; }}步骤7:在springmvc.xml设置自动扫描控制器的包名称。
如果我们想把HelloWorld类标识为一个控制,需要配置一下。
回到springmvc.xml中。
配置自动扫描的包:
加入context:component-scan标签的 base-package属性,加入刚才设置的处理器包com.happyBKs.springmvc.handlers。
步骤8:标识类为控制器。@Controller
package com.happyBKs.springmvc.handlers;import org.springframework.stereotype.Controller;@Controllerpublic class HelloWorld { public String hello() { System.out.println("hello, springMVC!"); return "baymax"; }}在handler里这个控制器就是一个请求处理器。
步骤9:配置springmvc.xml。
既然前面已经有了作为控制器的类,来处理请求。那么现在需要让springmvc能够将请求映射到这个类的方法上。但是项目中有这么多得类,要让springmvc如何寻找是哪个类呢?答案是在springmvc.xml中配置搜索包空间。(当然具体到哪个类方法上,需要标注类@Controllor并标注方法@RequestMapping,标注方法后面会讲到)
另外一个需要配置的就是,如果生成物理视图。这里需要设定前缀和后缀。前缀更像是目录路径,后缀则像是文件名后缀类型。
<?xml version="1.0" encoding="UTF-8"?><beans xmlns="http://www.springframework.org/schema/beans" xmlns:xsi="http://www.w3.org/2001/XMLSchema-instance" xmlns:context="http://www.springframework.org/schema/context" xmlns:mvc="http://www.springframework.org/schema/mvc" xsi:schemaLocation="http://www.springframework.org/schema/beans http://www.springframework.org/schema/beans/spring-beans.xsd http://www.springframework.org/schema/context http://www.springframework.org/schema/context/spring-context-4.1.xsd http://www.springframework.org/schema/mvc http://www.springframework.org/schema/mvc/spring-mvc-4.1.xsd"><!-- 配置自动扫描的包 --><context:component-scan base-package="com.happyBKs.springmvc.handlers"></context:component-scan><!-- 配置视图解析器:如何把handler方法 的返回值 解析为 实际的物理视图--><bean class="org.springframework.web.servlet.view.InternalResourceViewResolver"><property name="prefix" value="/views/"></property><property name="suffix" value=".jsp"></property></bean>步骤10:映射请求。使用@RequetMapping。
将HelloWorld类的hello方法用@RequetMapping来映射请求。
package com.happyBKs.springmvc.handlers;import org.springframework.stereotype.Controller;import org.springframework.web.bind.annotation.RequestMapping;@Controllerpublic class HelloWorld { //这个方法需要能够应答一个请求,即相应index.jsp的请求。 /* * 1.使用@RequestMapping注解 来映射请求的URL * 这的声明的/happyBKs与index.jsp的href="happyBKs"对应,所以能够相应。 * * 2.返回值会通过视图解析器解析为物理视图,对于InternalResourceViewResolver视图解析器会做如下解析: * 通过 prefix + returnValue + subfix 的方式得到物理视图,然后做转发操作 * * /views/baymax.jsp * */ @RequestMapping("/happyBKs") public String hello() { System.out.println("hello, springMVC!"); return "/baymax"; } //返回了一个baymax,对应了哪个页面呢?还需要在springmvc.xml的配置视图解析}之后我们可以构造一个请求页面,如webapp下写一个index.jsp。
<html><body><h2>Hello World!</h2><a href="happyBKs">Hi, I am HappyBKs. I want a baymax.</a><p><img src="img/mybaymax.jpg"/></p></body></html>超链接的请求内容,正好可以映射到刚才hello方法上。
而hello方法返回值会通过视图解析器解析为物理视图,对于InternalResourceViewResolver视图解析器会做如下解析:
通过 prefix + returnValue + subfix 的方式得到物理视图,然后做转发操作
/views/baymax.jsp
好,我们在webapp下为其建立对应的views文件夹和baymax.jsp:
<%@ page language="java" contentType="text/html; charset=ISO-8859-1" pageEncoding="ISO-8859-1"%><!DOCTYPE html PUBLIC "-//W3C//DTD HTML 4.01 Transitional//EN" "http://www.w3.org/TR/html4/loose.dtd"><html><head><meta http-equiv="Content-Type" content="text/html; charset=ISO-8859-1"><title>Insert title here</title></head><body> <p><img src="/mymvc/img/mybaymax.jpg"/></p> <h4>Hello, I am Baymax, your personal healthcare companion. </h4> <a href="baymax.html">go to</a></body></html>资源管理器如下:

步骤11:运行看看吧。这里提一下,如果你跟我应使用STS,需要运行时制定以下Server,可能需要新建一个。在elipse中在建立项目时一般就已经建立了,这里STS需要自己配一下。不难,自己试试吧,在Servers窗口中新建,无论是你STS内置Server还是你自行外接一个Tomcat都可以。

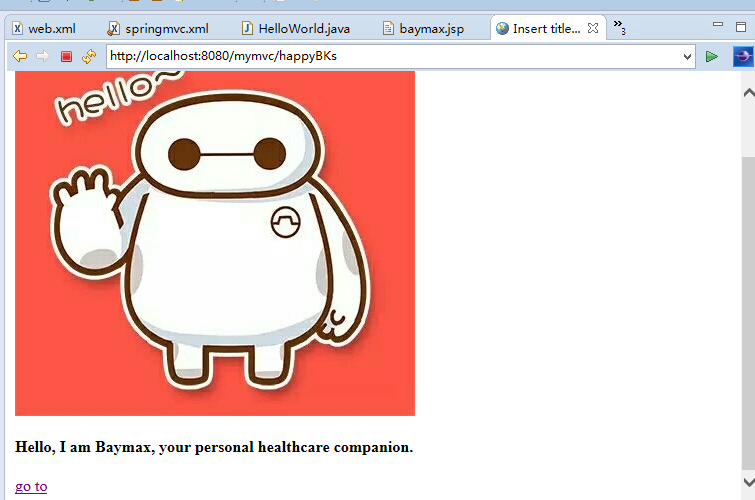
点击超链接,请求happyBKs, web.xml中将所有请求”/”,全部交给了springDispatcherServlet。springDispatcherServlet的参数contextConfigLocation的值制定了springmvc配置文件是哪一个。
springmvc.xml配置文件配置了处理请求的控制器类的包空间范围,即制定了搜索包空间;并且制定了如何与控制器方法返回值共同构造物理视图的前缀和后缀。控制器包中定义的控制器类的某个方法标识了请求映射@RequesMapping(“/happyBKs”),并与请求页面的超链接请求happyBKs对应上。至此,springmvc的逻辑基本说明了。
- SpringMVC笔记系列(1)——用一个例子帮你入门
- 一个例子帮你搞懂C#语言高级特性系列(01) --- 运算符重载
- 一个例子帮你搞懂C#语言高级特性系列(03) --- 方法扩展
- 一个例子帮你搞懂C#语言高级特性系列(04) --- 匿名类型
- 一个例子帮你搞懂C#语言高级特性系列(05) --- 语言集成查询(LINQ)
- 一个例子帮你搞懂C#语言高级特性系列(02) --- 委托、事件和Lambda表达式
- SpringMVC自学系列(1)——入门了解
- springmvc入门例子(AbstractCommandController)
- C# 串口操作系列(1) -- 入门篇,一个标准的,简陋的串口例子。(转帖)
- (待阅读)[托福听力]【手把手帮你搞定IBT】2013系列—— Lecture解题技巧
- springMVC笔记系列——RequestParam注解
- SpringMVC入门小例子——表单提交
- SpringMVC基础入门 springmvc例子
- SpringMVC基础——一个简单的例子
- SpringMVC入门例子
- springmvc入门小例子
- SpringMVC入门例子
- 1. SpringMVC 入门例子
- 阻塞
- 【IDE-Visual Studio】Command line error D8016
- OCR tesseract中文无法识别问题
- TensorFlow实验环境搭建
- win7 mysql的安装和常见问题解决
- SpringMVC笔记系列(1)——用一个例子帮你入门
- jeecg——代码生成器配置
- PHP文件中变量之间的传递
- Codeforces 311C
- 第十四周项目6—二叉排序树中查找的路径
- android 6.0以上系统apk自动安装失败问题
- [2016/12/2]求一个32位二进制数中1的数量
- psi-probe监控apache-tomcat-7.0.73 window版
- Dojo1.11官方教程文档翻译(4.2)数组