使用AdaptiveTrigger实现自适应布局
来源:互联网 发布:清华五道口考研知乎 编辑:程序博客网 时间:2024/05/17 23:54
这篇博客将介绍如何在UWP开发中使用AdaptiveTrigger实现自适应布局。
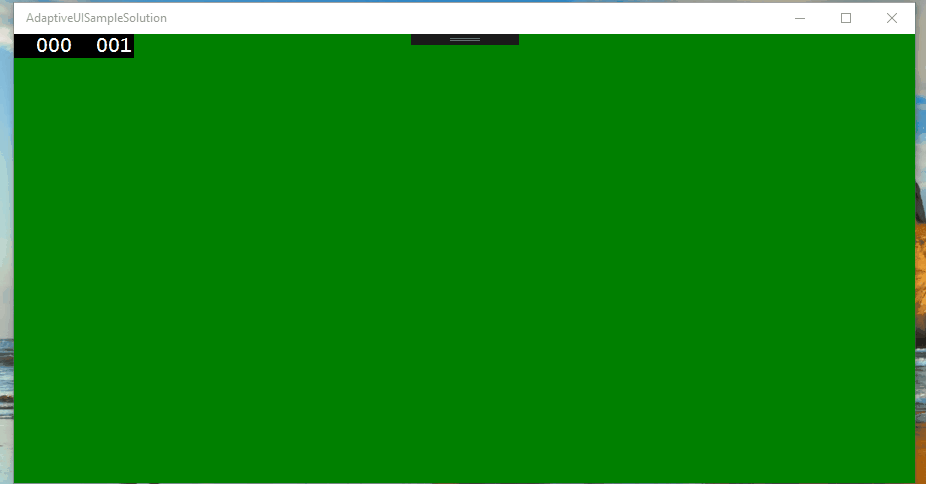
场景1:窗体宽度大于800时,窗体背景色为绿色,窗体在0到800之间为蓝色。
XAML Code:

<Grid x:Name="LayoutRoot" Background="{ThemeResource ApplicationPageBackgroundThemeBrush}"> <VisualStateManager.VisualStateGroups> <VisualStateGroup x:Name="WindowStates"> <!--Windows's size >= 800, background green--> <VisualState x:Name="WideState"> <VisualState.StateTriggers> <AdaptiveTrigger MinWindowWidth="800" /> </VisualState.StateTriggers> <VisualState.Setters> <Setter Target="LayoutRoot.Background" Value="Green" /> </VisualState.Setters> </VisualState> <!--Windows's size >0 and < 800, background blue--> <VisualState x:Name="NarrowState"> <VisualState.StateTriggers> <AdaptiveTrigger MinWindowWidth="0" /> </VisualState.StateTriggers> <VisualState.Setters> <Setter Target="LayoutRoot.Background" Value="Blue" /> </VisualState.Setters> </VisualState> </VisualStateGroup> </VisualStateManager.VisualStateGroups></Grid>
在VisualStateGroup中有两组VisualState对Grid的背景色进行了设置。
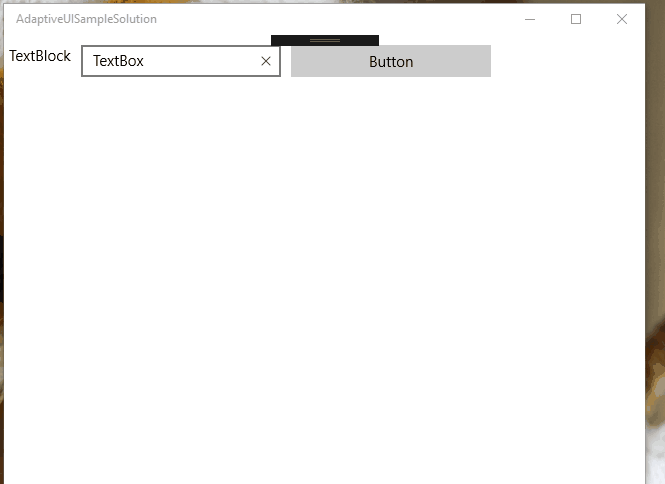
场景2:一个窗体上面有一个TextBlock,TextBox,Button。当窗体宽度合适时,这三个控件水平排放;缩小窗体后,垂直排放。
XAML Code:
<Grid x:Name="LayoutRoot" Background="{ThemeResource ApplicationPageBackgroundThemeBrush}"> <RelativePanel HorizontalAlignment="Stretch"> <TextBlock x:Name="MyTextBlock" Text="TextBlock" Margin="5,10"/> <TextBox x:Name="MyTextBox" Text="TextBox" Width="200" Margin="5,10"/> <Button x:Name="MyButton" Content="Button" Margin="5,10" Width="200" /> </RelativePanel> <VisualStateManager.VisualStateGroups> <VisualStateGroup x:Name="WindowState"> <VisualState x:Name="WideState"> <VisualState.StateTriggers> <AdaptiveTrigger MinWindowWidth="600" /> </VisualState.StateTriggers> <VisualState.Setters> <Setter Target="MyTextBox.(RelativePanel.RightOf)" Value="MyTextBlock" /> <Setter Target="MyButton.(RelativePanel.RightOf)" Value="MyTextBox" /> </VisualState.Setters> </VisualState> <VisualState x:Name="NarrowState"> <VisualState.StateTriggers> <AdaptiveTrigger MinWindowWidth="0" /> </VisualState.StateTriggers> <VisualState.Setters> <Setter Target="MyTextBox.(RelativePanel.Below)" Value="MyTextBlock" /> <Setter Target="MyTextBox.(RelativePanel.AlignLeftWith)" Value="MyTextBlock" /> <Setter Target="MyButton.(RelativePanel.Below)" Value="MyTextBox" /> <Setter Target="MyButton.(RelativePanel.AlignLeftWith)" Value="MyTextBlock" /> </VisualState.Setters> </VisualState> </VisualStateGroup> </VisualStateManager.VisualStateGroups></Grid>
VisualState.Setter的Target中RalativePanel的内容都用括号圈起来了是因为这些都是附加属性。这里同时引入了一个UWP支持的布局控件RelativePanel,关于RelativePanel布局,
可以参考:https://msdn.microsoft.com/en-us/library/windows/apps/windows.ui.xaml.controls.relativepanel.aspx
0 0
- 使用AdaptiveTrigger实现自适应布局
- 使用css实现三栏自适应布局
- 使用rem单位实现布局自适应
- rem布局实现自适应
- HTML,使用div+css实现自适应table布局
- 使用 `text-align:justify;` 实现横栏自适应布局
- 使用CSS实现三栏自适应布局(两边宽度固定,中间自适应)
- 使用CSS实现三栏自适应布局(两边宽度固定,中间自适应)
- 实现网页布局的自适应
- 多种方法实现自适应布局
- 实现一个自适应布局 两列布局
- 使用Flexible实现手淘H5页面的终端适配rem自适应布局-移动端自适应必备
- 三栏自适应布局实现(左右固定宽度,中间自适应)
- 网页中三列自适应高度布局的实现
- 网页中三列自适应高度布局的实现
- css3的calc()实现自适应布局
- 实现图片和绝对布局的自适应
- 实现左边定宽,右边自适应布局
- PADS中创建不规则焊盘
- Compare接口与Comparator接口区别与理解
- 递归调用
- SPI的时钟极性和相位
- Oracle,day4,函数
- 使用AdaptiveTrigger实现自适应布局
- \r与\n的区别
- 关闭vultr账户方法
- [架构之美]一款APP从"想法-开发-上线-产品"的全过程
- 一位资深的老玩家,畅聊当年与linux的趣事
- codeforces471D——MUH and Cube Walls(KMP)
- POJ 3268 - Silver Cow Party dijkstra+转置矩阵
- The Game of iGameGuardian7.3.1
- 学习Django之创建第一个项目