第一次调用JNI
来源:互联网 发布:福州锐捷网络招聘 编辑:程序博客网 时间:2024/06/15 11:27
1、新建一个类,声明native方法。这个类是java与C/C++交互的中介,方法由java声明,由C/C++实现。
不在Activity类里面写是为了避免编译时报错:找不到android.support.v7.app.AppCompatActivity

public class printHello { public synchronized static native String printHello(); static { System.loadLibrary("printHello"); }}
新建一个JNI文件
Rebuil一下,出现classes文件
然后输入命令:
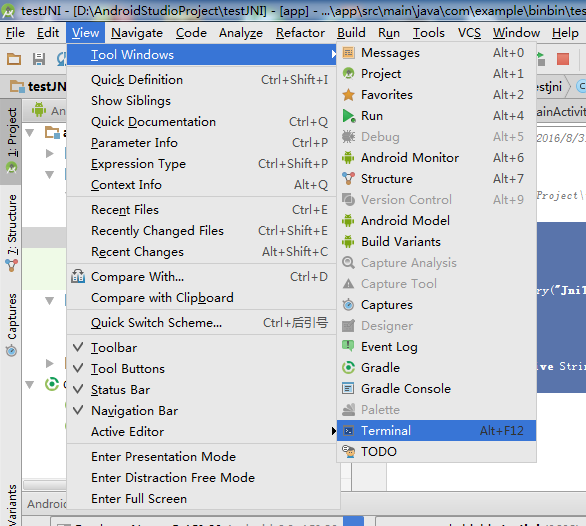
输入命令
cd app/build/intermediates/classes/debug回车后输入命令
javah -jni (这里是报名).(上面你写的类名)
javah -jni com.example.administrator.myjni.printHello
这个时候就会在你的jni文件下生成一个文件.h
把这个文件复制到你建的jni 文件下
这个文件在build >>classes>>目录下会生成一个.h文件
这个是生的文件
/* DO NOT EDIT THIS FILE - it is machine generated */#include <jni.h>/* Header for class com_example_administrator_myjni_printHello */#ifndef _Included_com_example_administrator_myjni_printHello#define _Included_com_example_administrator_myjni_printHello#ifdef __cplusplusextern "C" {#endif/* * Class: com_example_administrator_myjni_printHello * Method: printHello * Signature: ()Ljava/lang/String; */JNIEXPORT jstring JNICALL Java_com_example_administrator_myjni_printHello_printHello (JNIEnv *, jobject);#ifdef __cplusplus}#endif#endif
新建一个.C文件,名字随便
拷贝.h文件里面的内容,修改为
/* DO NOT EDIT THIS FILE - it is machine generated */#include <jni.h>/* Header for class com_example_administrator_myjni_printHello */#ifndef _Included_com_example_administrator_myjni_printHello#define _Included_com_example_administrator_myjni_printHello#ifdef __cplusplusextern "C" {#endif/* * Class: com_example_administrator_myjni_printHello * Method: printHello * Signature: ()Ljava/lang/String; */JNIEXPORT jstring JNICALL Java_com_example_administrator_myjni_printHello_printHello (JNIEnv *env, jclass jobj){ //返回一句话 return (*env)->NewStringUTF(env,"JNI JAVA调用C就是这么简单");}#ifdef __cplusplus}#endif#endif
还要在jni文件夹下添加一个空白的util.c文件,不然会报错,我也不知道为什么。
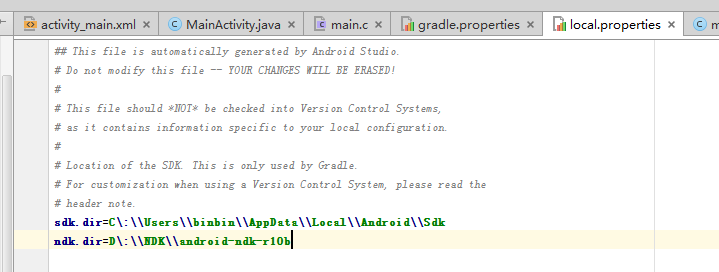
5、配置NDK
打开Project的local.properties文件添加NDK路径
打开app Module的build.gradle文件,在defaultConfig节点里添加以下代码
注意这里的moduleName,是我们在之前自己编写的类里面加载的so库名
ndk { moduleName "xxxxx" ldLibs "log", "z", "m" abiFilters "armeabi", "armeabi-v7a", "x86" }
还要在gradle.properties里面加上这么一句话:
android.useDeprecatedNdk=true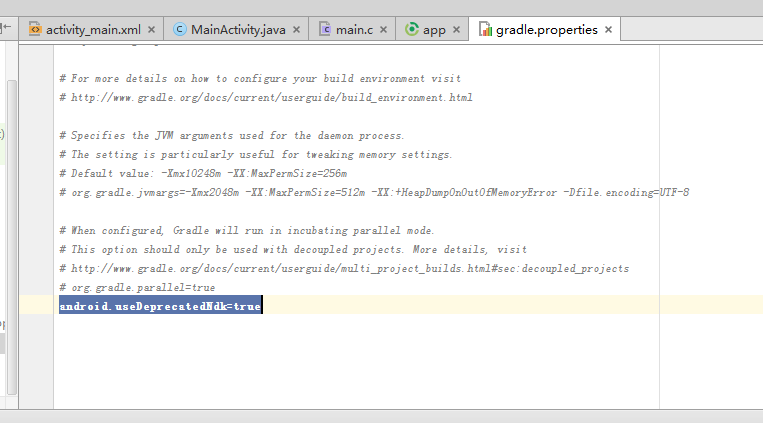
6、生成SO库
完成以上步骤之后,我们rebuild一下就可以生成so库了
在项目的app\build\intermediates\ndk\debug\lib路径下

7、配置so库
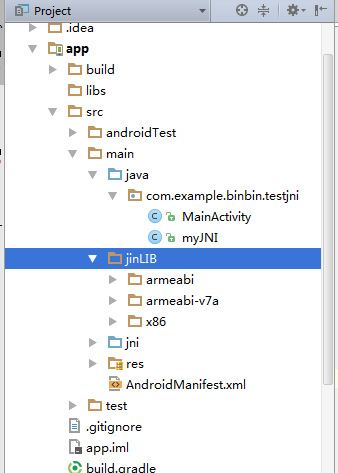
在src\main下新建文件夹jniLIB,并将生成的SO文件拷贝到该文件夹下
8、使用JNI
因为native方法声明成了静态的方法,在Activity里面直接调用myJNI类就行
@Overrideprotected void onCreate(Bundle savedInstanceState) { super.onCreate(savedInstanceState); setContentView(R.layout.activity_main); Button button = (Button) findViewById(R.id.button); final TextView textView = (TextView) findViewById(R.id.textView); button.setOnClickListener(new View.OnClickListener() { @Override public void onClick(View view) { textView.setText(printHello.printHello() + "");//加""} });}}
ok!
0 0
- 第一次调用JNI
- 第一次尝试使用 AS 调用JNI~
- 第一次使用JNI
- Android JNI 第一次使用
- JNI调用
- JNI调用
- JNI调用
- JNI调用
- JNI调用
- jni 调用
- jni调用
- JNI调用
- 非eclipse 下 实现,jni 调用 c++,自己第一次成功实现
- jsp调用jni方法
- JNI调用的注意事项
- 使用jni调用unrar
- 通过JNI调用matlab
- java 调用dll JNI
- sp<> 强指针类的用法
- RxBus使用总结
- JavaScript编写城市联动框和时间联动框
- 解决plsql导入后中文乱码
- ASP.NET网站程序防SQL注入式攻击方法
- 第一次调用JNI
- hibernate注解详解
- 对malloc calloc realloc函数以及free函数的认识
- 如何定制嵌入式Linux发布版
- hiveJdbc ha 链接报错
- Android---java.lang.SecurityException: Permission Denial: getTasks() from p
- 一条sql语句执行的整个过程所涉及到的知识点:
- 说一说z-index容易被忽略的那些特性
- 第十一周牛顿迭代法求根