深度学习tensorflow入门-CNN
来源:互联网 发布:手机图文排版软件 编辑:程序博客网 时间:2024/04/28 18:28
请支持原文博客地址
Blog
CNN简介
这里对CNN只做非常简单的介绍,具体的细节,后面的博文会讲到。CNN代表的是Convolutional Neuron Network,这里的Convolution指的卷积,主要是用来对图片的进行进行降维,除了卷积,还有一个pooling的操作,作用也是用来将维的,不过两者的原理不同。
其实一开始训练的图片的时候,一般都直接使用我们的一片教程那样的方法,将层数增多,最后的准确率也可以达到98%; 但是后来,学者就开始思考,仔细观察一张图片,你会发现,图片矩阵中很多的0,是一个典型的稀疏矩阵,全连接的神经网络,完全将稀疏部分和稠密的部分一视同仁,显然效率效率不高,因此出来了现在的CNN。
Convolution
convolution首先要定义一个kernel的矩阵,然后一步一步的对整个图片进行映射,并计算,例如,下面的图片,kernel矩阵为[[1,0,1][0,1,0],[1,0,1]](这个在权值W中设定形状,例如第一层的[5,5,1,32],kernel就是一个5×5×1的矩阵,后面的32表示映射出来的举证的代谢哦啊),在原始图片上一步一步(通过stride参数设定)的移动这个kernel矩阵,最后对下图的映射接:
- 原始矩阵

- kernel矩阵

- after convolution

另外,源代码中,我们原始矩阵为28*28*1, 按照这种每次移动一个位置的方法,最后得到的矩阵大小应该是(28-5+1)*(28-5+1)*1的,但是源码中最后的结果却还是28×28×1,这篇问答对这个问题作了很好的解释[question](http://cs.stackexchange.com/questions/49658/convolutional-neural-network-example-in-tensorflow)
从官网提供的解释来说,这里使用到的是varnila版本的convolution,也就是说,convolution之后得到的矩阵大小和以前的是一样能的。
Pooling
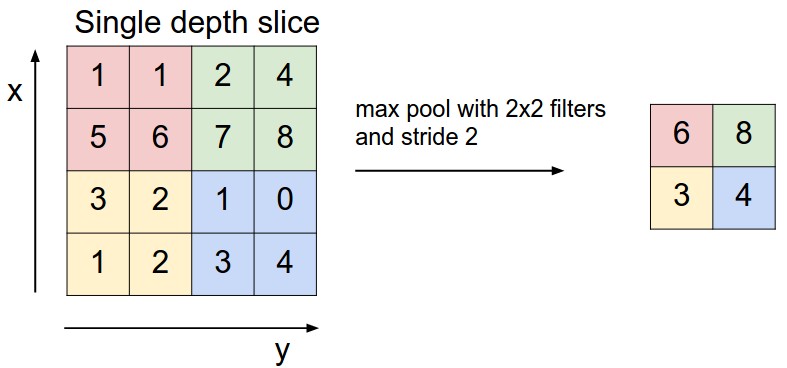
一般用到的Pooling, 叫做max pooling,也就是取矩阵中的最大值,例如下图解释说明,过滤器为2×2的矩阵,stride是2,在tensorflow中对应了tf.nn.max_pool(x, ksize=[1,2,2,1], strides=[1,2,2,1], padding=’SAME’)这句代码,ksize就是filter, 看第二个和第三个参数,第一个参数代表batch的数量,一般为1,第4个参数代表了channel,因为图片是有颜色channel的,一般为3个channel,因为我们这里是灰色的图片,所以这里为1。stride和ksize是一一对应的,代表在每个方向上面的步数,这里的第二个参数2代表了每次在height方向上面的移动距离,第三个参数代表在width方向上面的移动距离。最后我们取出每个映射矩阵中的最大值!
结构
下面我们要实现的CNN结果如下图:

首先,convolution和pool一般是先后进行,这里我们总共进行了两次convolution和两次pooling
- zero-padding the 28x28x1 image to 32x32x1
- applying 5x5x32 convolution to get 28x28x32
- max-pooling down to 14x14x32
- zero-padding the 14x14x32 to 18x18x32
- applying 5x5x32x64 convolution to get 14x14x64
- max-pooling down to 7x7x64.
代码实现
下面看看具体的代码实现
{% highlight python %}
from tensorflow.examples.tutorials.mnist import input_data
import tensorflow as tf
import argparse
import sys
FLAGS = None
def weigt_variable(shape):
initial = tf.truncated_normal(shape, stddev=0.1)
return tf.Variable(initial)
def bias_variable(shape):
initial = tf.constant(0.1, shape=shape)
return tf.Variable(initial)
def conv2d(x,W):
return tf.nn.conv2d(x,W,strides=[1,1,1,1],padding=’SAME’)#Computes a 2-D convolution given 4-D input and filter tensors#
def max_pool_2_2(x):
return tf.nn.max_pool(x, ksize=[1,2,2,1], strides=[1,2,2,1], padding=’SAME’)
def main(_):
mnist = input_data.read_data_sets(FLAGS.data_dir,one_hot=True)
x = tf.placeholder(tf.float32,[None, 784])W = tf.Variable(tf.zeros([784,10]))b = tf.Variable(tf.zeros([10]))y = tf.matmul(x,W) + b #matmul means matrix multiplication#defince the loss and optimizery_ = tf.placeholder(tf.float32,[None,10])# first layerW_conv1 = weigt_variable([5,5,1,32])b_conv1 = bias_variable([32])x_image = tf.reshape(x,[-1,28,28,1])h_conv1 = tf.nn.relu(conv2d(x_image,W_conv1)+b_conv1)h_pool1 = max_pool_2_2(h_conv1)# seconde layerW_conv2 = weigt_variable([5,5,32,64])b_conv2 = bias_variable([64])h_conv2 = tf.nn.relu(conv2d(h_pool1,W_conv2)+b_conv2)h_pool2 = max_pool_2_2(h_conv2)# densely connected layerW_fc1 = weigt_variable(([7*7*64, 1024]))b_fc1 = bias_variable([1024])h_pool2_flat = tf.reshape(h_pool2, [-1, 7*7*64])h_fc1 = tf.nn.relu(tf.matmul(h_pool2_flat, W_fc1)+b_fc1)# dropoutkeep_prob = tf.placeholder(tf.float32)h_fc1_drop = tf.nn.dropout(h_fc1, keep_prob)# readout layerW_fc2 = weigt_variable([1024,10])b_fc2 = bias_variable([10])y_conv = tf.matmul(h_fc1_drop, W_fc2) + b_fc2cross_entropy = tf.reduce_mean(tf.nn.softmax_cross_entropy_with_logits(y_conv,y_))train_step = tf.train.AdamOptimizer(1e-4).minimize(cross_entropy)correct_prediction = tf.equal(tf.argmax(y_conv, 1), tf.argmax(y_, 1))accuracy = tf.reduce_mean(tf.cast(correct_prediction, tf.float32))sess = tf.InteractiveSession()# trainsess.run(tf.global_variables_initializer())for i in range(20000): batch = mnist.train.next_batch(100) if i%100 == 0: train_accuracy = accuracy.eval(feed_dict={x: batch[0],y_: batch[1], keep_prob: 1.0 }) print("step %d, training accuracy %g"%(i, train_accuracy)) train_step.run(feed_dict={x:batch[0],y_:batch[1], keep_prob: 0.5})print("test accuracy %g"%accuracy.eval(feed_dict={x: mnist.test.images, y_: mnist.test.labels,keep_prob: 1.0}))if name == ‘main‘:
parser = argparse.ArgumentParser()
parser.add_argument(‘–data_dir’, type=str, default=’dataset’, help=”Directory for storing data”)
FLAGS, unparsed = parser.parse_known_args()
tf.app.run(main = main, argv=[sys.argv[0]] + unparsed)
{% endhighlight %}
我的输出结果为 1 !!!百分之百的准确率,也是没谁了,哈哈。
- weight的结果什么意思?
例如,[5,5,1,32],前面三个代表了kernel矩阵的Height,width以及channel, 32这个其实有有点困惑的,参照[question](http://stackoverflow.com/questions/38201178/understanding-deep-mnist-for-experts), 其实就是创建32个kernel矩阵,分别对这张图片进行处理,由于创建矩阵的时候用的truncated_normal,这个函数从高斯分布随机的产生数字,因此得到的矩阵每次都不一样,于是乎,对一张照片使用不同的32个kernel进行convolution之后,得到了32个卷积之后的矩阵,这就解释了上面的结构图中的尺寸问题。至于为什么是32,这个是实证经验得来的.
[5,5,32,64],注意第二次卷积的kernel的channel是32,而不是1,所以输出的矩阵大小为14×14×64,而不是14*14*2048.
- strides为什么是4维的?
4维分别代表了[batch, height, width, channels],大多数情况下strides = [1, stride, stride, 1]
- conv2d的解释
参照conv2d的注释[conv2d](https://github.com/tensorflow/tensorflow/blob/master/tensorflow/g3doc/api_docs/python/functions_and_classes/shard8/tf.nn.conv2d.md)
- 为什么要使用weight_variableh和bias_variable对初始值进行设定,而不默认全部使用0?
参照conv2d的注释对于weight,使用高斯是为了随机产生一些数据,防止出现太多的对称矩阵
参照conv2d的注释对于bias, 因为我们使用了relu函数进行计算,relu函数如下:

对于小于0的数字,就变成0了,如果一个神经元输出0,意味着对下一个神经元就没有贡献了,就变成了所谓的dead neuron,初始化为0.1可以防止这个问题!
Reference
- https://www.tensorflow.org/versions/r0.12/tutorials/mnist/pros/index.html
- https://adeshpande3.github.io/adeshpande3.github.io/A-Beginner’s-Guide-To-Understanding-Convolutional-Neural-Networks/
- http://neuralnetworksanddeeplearning.com/chap6.html
- http://cs.stackexchange.com/questions/49658/convolutional-neural-network-example-in-tensorflow
- http://www.slideshare.net/ssuser06e0c5/explanation-on-tensorflow-example-deep-mnist-for-expert
- 深度学习tensorflow入门-CNN
- CNN入门详解及TensorFlow源码实现--深度学习笔记
- 深度学习-CNN入门
- 2、Tensorflow:TensorFlow深度学习入门(上)
- 3、Tensorflow:TensorFlow深度学习入门(下)
- 深度学习---TensorFlow学习笔记:搭建CNN模型
- 深度学习:卷积神经网络CNN入门
- [note] 深度学习 tensorflow 笔记(3) cnn 卷积神经网络
- Tensorflow深度学习之二:简单卷积神经网络CNN
- 使用tensorflow搭建CNN网络(3)---《深度学习》
- Tensorflow深度学习笔记(九)--卷积神经网络(CNN)
- [深度学习框架] Tensorflow上使用CNN进行mnist分类
- TensorFlow入门-MNIST & CNN
- tensorflow入门Day4-CNN
- TensorFlow入门-CIFAR10&CNN
- 《白话深度学习与Tensorflow》学习笔记(1)深度学习框架、CNN、VC维
- TensorFlow深度学习笔记 Tensorboard入门
- [深度学习] TensorFlow 入门之基本使用
- JasperReport技术积累
- protobuf rpc介绍
- jstl <c:forEach>
- 2.1 深度学习常用软件包和环境配置
- 第22篇 ninja的安装(三)及安装graphviz
- 深度学习tensorflow入门-CNN
- c#(vs2013)、 matlab(2014a)混合编程
- 使用Wireshark简单分析ICMP报文(ping)
- 手动向maven仓库添加jar包,cmd命令
- Java网络编程UDP与TCP协议
- Android下自定义的jar库文件编译和调用
- 【分享集成】如何使用友盟分享面板进行自定义
- react+webpack+webstorm开发环境搭建
- Matlab rms与std的区别