【Android】Anroid5.0+新控件---酷炫标题栏的简单学习
来源:互联网 发布:it技术分类 编辑:程序博客网 时间:2024/06/13 23:10
Android5.0+推出的新控件感觉特别酷,最近想模仿大神做个看图App出来,所以先把这些新控件用熟悉了。
新控件的介绍、使用等等网上相应的文章已经特别多了,题主也没那能力去写篇详解出来,本篇随笔记录的主要是题主学习这些新控件时遇见的一些困惑以及在搞了半天后的一丝理解,或许也有新手也会碰到跟我一样的困惑,相互学习哈,如果有哪个地方理解错了,还望告知。
效果
首先看下效果,本篇也就是只记录以下两张动图中所涉及到的新控件
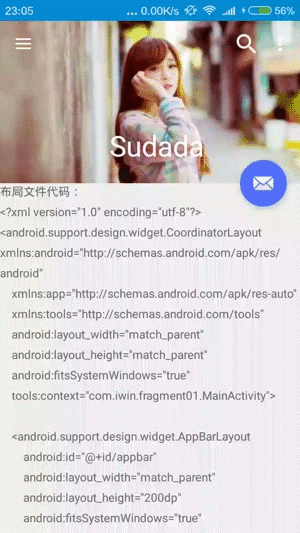
AppBarLayout+CollapsingToolbarLayout+Toolbar
以前手机里的App风格虽然各种各样,但对于标题栏其实都差不多,很少能见到类似上图中的效果。题主之前一直以为标题栏也就是一个简单的导航栏,也就是放个标题,配几个图标而已。但其实还可以像上面一样实现一些较酷炫的效果的。
首先介绍下这里用到的控件:AppBarLayout+CollapsingToolbarLayout+Toolbar
AppBarLayout + CollapsingToolbarLayout
AppBarLayout is a vertical LinearLayout which implements many of the features of material designs app bar concept, namely scrolling gestures.
CollapsingToolbarLayout is a wrapper for Toolbar which implements a collapsing app bar. It is designed to be used as a direct child of a AppBarLayout.
上面是官网的介绍,AppBarLayout其实就是一个继承自LinearLayout,默认实现子控件垂直布局的基本容器,相区别于LinearLayout的是,它提供给它的子控件一个响应滑动事件的行为。
CollapsingToolbarLayout则只是一个对Toolbar进行包装,实现了可以对标题栏进行折叠功能的一个基本容器,它是作为AppBarLayout的直接子布局来使用。
这么说好像也不怎么好理解,题主就按自己的理解讲得通俗点,举个例子:
上面那张动图里,标题栏包括了一个Toolbar、一个背景图(imageView)、一个FAB按钮。这里的Toolbar、imageView都是AppbarLayout的子控件。
当滑动屏幕时,子控件都做出了相应的行为(滑出屏幕,固定顶端等),这些行为其实就是AppbarLayout提供给它子控件的功能。也就是说,如果我们想要让我们的标题栏控件能够响应滑动事件的话,就需要用AppBarLayout作为他们的父容器。
至于CollapsingToolbarLayout则是给子控件提供了折叠的功能,什么是折叠呢?往下看
不知道大家学习的时候会不会跟题主一样,有个疑问:既然AppBarLayout已经为子控件提供了响应滑动的行为,那么为什么还需要一个CollapsingToolbarLayout?
我们先来看下,上面那动画实现的布局代码结构:
<AppBarLayout> <CollapsingToolbarLayout app:layout_scrollFlags="scroll|exitUntilCollapsed|snap"> <ImageView app:layout_collapseMode="parallax"> </ImageView> <Toolbar app:layout_collapseMode="pin"> </Toolbar> </CollapsingToolbarLayout></AppBarLayout>CollapsingToolbarLayout作为AppBarLayout的子控件,设置了ScrollFlags的属性值,因此它可以响应滑动事件,所以会出现上面动图的效果。
那么,我们来尝试下,如果去掉CollapsingToolbarLayout会怎么样呢?
布局代码结构:
<AppBarLayout> <ImageView app:layout_scrollFlags="scroll"> </ImageView> <Toolbar app:layout_scrollFlags="scroll|exitUntilCollapsed"> </Toolbar></AppBarLayout>效果:
图片背景只是简单的往上滑,没有之前那种视差的效果了。而且Toolbar也跑到下面去了,那么,我们在把ImageView和Toolbar换个位置试下:
布局代码结构:
<AppBarLayout> <Toolbar app:layout_scrollFlags="scroll|exitUntilCollapsed"> </Toolbar> <ImageView app:layout_scrollFlags="scroll"> </ImageView></AppBarLayout>效果:
Toolbar和ImageView不滑动了!!为什么,下面说。
很明显的一点,ImageView和Toolbar变成了线性垂直布局的了。细心点的读者会发现,我们上面刚提到过AppBarLayout是继承自LinearLayout默认实现子控件垂直布局。
也就是说,AppBarLayout只是提供给它的子控件们,按照从上到下的优先级来响应子控件设置的响应行为。什么意思,如果AppBarLayout的第一个子控件没有设置ScrollFlags属性或者没有设置scroll值,那么这个子控件就不会响应滑动事件,那么这个子控件下方的控件即使设置了各种响应行为,也不会有任何效果。
我们上面的代码中,Toolbar是AppBarLayout的第一个子控件,虽然设置了scroll值,但也设置了exitUntilCollapsed值,这个的作用是,当向上滑动时,这个控件也会跟着滑出屏幕,直到它还留在屏幕内的高度达到最小高度(没有设置好像默认就是wrap_content)时停止。
再回到我们问题来,Toolbar已经达到了它的最小高度了,所以它被固定在顶端不会动了,因此,即便在它下方的ImageView也设置了scroll属性值,但由于是线性布局,它也就动不了了。所以也就有了CollapsingToolbarLayout。
所以,CollapsingToolbarLayout就是给这些子控件们安排具体的滑动细节,例如:ImageView要实现渐变的效果;Toolbar的标题要能够有收缩/扩展的效果;最上面的子控件不动,下面的先滑动等等效果。这些就是由CollapsingToolbarLayout来提供的效果。
总结下,Toolbar、ImageView都是作为标题栏的元素,AppBarLayout给它们提供可以响应滑动的行为,而CollapsingToolbarLayout则是来安排谁不动,谁先动、怎么动。
如何使用
好了,这样一来对于AppBarLayout和CollapsingToolbarLayout就有一个大概的理解了,那么下面就看看该怎么用。
AppBarLayout
Children should provide their desired scrolling behavior through setScrollFlags(int) and the associated layout xml attribute: app:layout_scrollFlags.
AppBarLayout提供了一个布局参数scrollFlags,通过在它的子控件中设置这个属性的值,就可以实现相应的行为。使用方法就像上面官网说的,可以在xml布局文件中直接在子控件中通过设置app:layout_scrollFlags,也可以在java代码中通过子控件实例对象调用setScrollFlags(int)来实现。
至于ScrollFlags的值一共有以下几种:
scroll|enterAlways|enterAlwaysCollapsed|exitUntilCollapsed|snap
scroll: 想要子控件能有响应的行为,scroll是必须要设置的;也就是说,要想其他值能起作用,那么scroll值必须设置,中间用|隔开。这点很重要,网上很多文章只是介绍ScrollFlags属性有这几个取值,新手自己动手时往往不知道scroll是必须要的,经常就出现没任何滑动的效果。然后就卡在这,比如题主(囧)。
enterAlways|enterAlwaysCollapsed:把这两个放一起介绍是因为,后者要起作用必须要在前者的基础上,也就是说两个值都设置时后者才会起作用。至于作用其实就是当你一向下滑动屏幕时,控件就能马上显示出来,不必滑到顶端。
snap:当你停止滑到屏幕时,控件自动恢复原样或者自动滑到底。
CollapsingToolbarLayout
跟AppBarLayout很像,CollapsingToolbarLayout提供了一个布局参数CollapseMode,一样是两种方法,xml布局文件中通过app:layout_collapseMode设置,或者在java代码中调用setCollapseMode(int)。
注意
ScrollFlags属性只能设置在AppBarLayout的子控件上面,在孙子或曾孙子等等设置没有效果。拿上面的例子说,CollapsingToolbarLayout是AppBarLayout的子控件,ImageView、Toolbar是AppBarLayout的孙子控件,如果你在ImageView、Toolbar控件上面设置app:layout_scrollFlags属性值是不会起作用的,只有在CollapsingToolbarLayout设置才能起作用。
题主开始时想当然的以为在CollapsingToolbarLayout上面只设置scroll值,在ImageView、上设置snap,在Toolbar上面设置exitUntilCollapsed。这样就可以单独设置各自需要的效果。本来还自己这样想是正确的,结果一直没得到预期的效果,在这里瞎琢磨了半天(囧)。
例如
<android.support.design.widget.AppBarLayout android:id="@+id/appbar" android:layout_width="match_parent" android:layout_height="wrap_content" android:fitsSystemWindows="true" android:theme="@style/AppTheme.AppBarOverlay"> <android.support.design.widget.CollapsingToolbarLayout android:id="@+id/collapse" android:layout_width="match_parent" android:layout_height="match_parent" app:contentScrim="?attr/colorPrimary" app:expandedTitleGravity="bottom|center" app:expandedTitleMarginStart="48dp" app:layout_scrollFlags="scroll|exitUntilCollapsed|snap"> <ImageView android:layout_width="match_parent" android:layout_height="wrap_content" android:scaleType="centerCrop" android:src="@drawable/meinv3" app:layout_collapseMode="parallax" app:layout_collapseParallaxMultiplier="0.7" /> <android.support.v7.widget.Toolbar android:id="@+id/toolbar" android:layout_width="match_parent" android:layout_height="?attr/actionBarSize" android:minWidth="?attr/actionBarSize" app:layout_collapseMode="pin" app:popupTheme="@style/AppTheme.PopupOverlay" /> </android.support.design.widget.CollapsingToolbarLayout> </android.support.design.widget.AppBarLayout>- 【Android】Anroid5.0+新控件---酷炫标题栏的简单学习
- Android学习笔记之自定义控件--标题栏
- Android 功能最强的自定义标题栏控件
- 简单自定义Android系统,标题栏和控件样式
- android studio 去掉标题栏的简单方法
- Android 新控件学习总结
- android 总结学习 简单的UI控件
- Anroid5.0下webview显示本地图片
- Android简单自定义标题栏
- android 页面标题栏公用控件
- Android 自定义控件 自定义标题栏
- Android自定义控件-常用标题栏
- Android自定义标题栏控件(补充)
- Android通用标题栏组合控件
- Android 组合控件之标题栏
- Android 开发的新控件
- Android自定义控件之app标题栏的封装
- 【学习】Android标题栏
- 网站安全之几种常见的网络攻击方式
- awk实现数据库查询功能
- good website
- iOS开发 跳转到指定界面(栈中不存在的界面)
- Android开发-自定义View-AndroidStudio(四)简介动画
- 【Android】Anroid5.0+新控件---酷炫标题栏的简单学习
- DOS命令之断开本机远程连接BAT
- node环境下,jsdoc使用方法简介
- Fresco图片加载框架使用方法完全指南
- 使用easyui dialog 弹出框的一些注意事项
- OFFICE 2007下右键新建OFFICE 2003的快捷方式
- Android Studio 百度地图 230错误 Scode码校验失败应急处理 只看楼主收藏回复
- VGG Convolutional Neural Networks Practical(3)pooling
- 使用 Java 8 语言功能