基于HTK语音工具包进行孤立词识别的使用教程
来源:互联网 发布:java递归对象中的属性 编辑:程序博客网 时间:2024/04/30 01:16
转自:
https://my.oschina.net/jamesju/blog/116151
1前言
最近一直在研究HTK语音识别工具包,前几天完成了工具包的安装编译和测试,这几天又按耐不住好奇,决定自己动手搞一搞,尝试一下用这个工具包,进行简单的孤立词识别,看了几天的文档,做了各种尝试,总算跌跌撞撞的实现了,把步骤记录下来,以后作为参考。
2孤立词识别系统
在本系统中我们将要实现三个词的识别系统,词汇集为:{brightness, channel,color}。
2.1搭建步骤
A:创建语料库,brightness, channel,color各录制5次。
B:声学分析,把wavform的声音文件转换为mfcc格式。
C:模型定义,为词典里面的每一个词建立一个HMM原型。
D:模型训练,HMM模型初始化和迭代。
E:问题定义,即语法定义。
F:对测试结合进行识别
G:评测
2.2 工作环境搭建
创建如下目录结构:
(1) data/:存储训练和测试数据(语音文件、语音标签、特征矢量文件)。子目录:data/train/lab data/train/wav data/train/mfcc data/test/lab data/test/wav data/test/mfcc
(2) analysis/: 存储声学分析步骤的文件
(3) training/: 存储初始化和训练步骤的文件
(4) model/: 存储识别系统的模型(HMMs)的相关文件。子目录:model/proto
(5) def/: 存储任务定义的相关文件
(6) test:/ 存储测试相关文件

2.3 标准HTK工具选项
一些标准选项对于每个HTK工具都是通用的。
(1) -A: 显示命令行参数
(2) -D: 显示配置设置
(3) -T 1: 显示算法动作的相关信息
完整的选项列表请参见:htkbook
3 语料库的准备
我们来录制{brightness, channel,color}这个三个词的读音。同时每个录音都要进行标注,也就是有一个文
本文件与其对应描述它的内容。
3.1 录音
我们将上述三个词各录制5次,保存为wav格式。并存放 在data/train/wav/brightness data/train/wav/channel data/train/wav/channel中。

3.2 标注
我们可以用相关的语音处理软件进行标注。并把标注的文件放到 data/train/lab/brightness data/train/lab/brightness data/train/lab/color中。

标注.lab文件的格式如下:

4 声学分析
从原始的声音文件转换为特征矢量文件:
需要创建的文件:
(1) analysis.conf
创建目录:training/
说明:配置文件,说明了特征矢量的特性
内容:
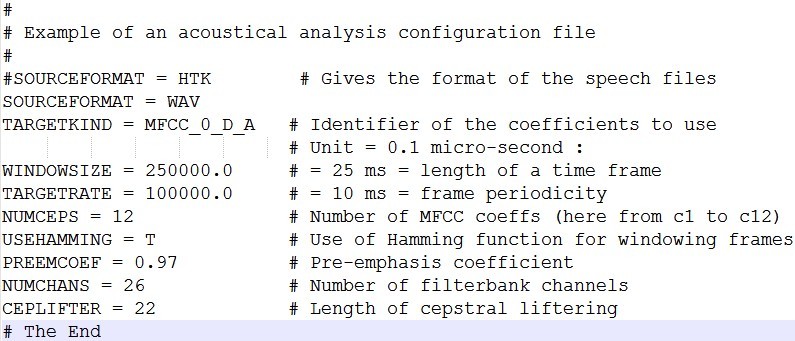
注:参数意义详见:htkbook
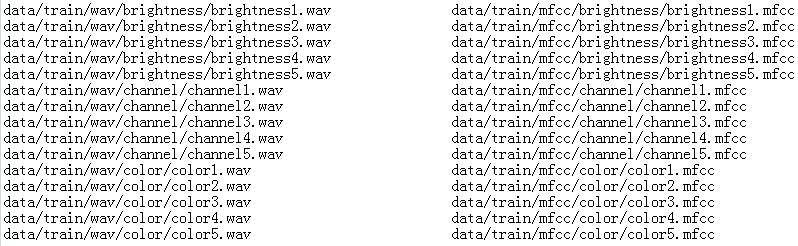
(1) targetlist_train.txt
创建目录:training/
说明:列出源文件和目的的文件的位置,即声音文件和特征文件
内容:
指令:Hcopy -A -D -C training/analysis.conf -S training/targetlist_train.txt
运行结果:
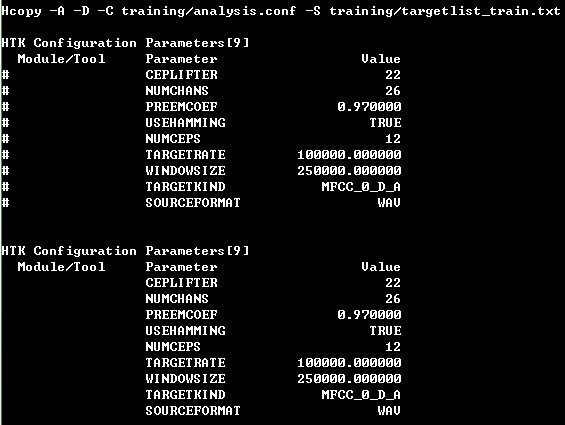
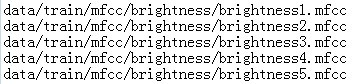
我们会看到:

5 HMM定义
需要创建的文件:hmm_brightness hmm_channel hmm_color hmm_silb hmm_sile
创建目录:model/proto
说明:用来定义单词的HMM模型
内容:
hmm_brightness:
~o <VecSize> 39 <MFCC_0_D_A>
~h "brightness"
<BeginHMM>
<NumStates> 10
<State> 2
<Mean> 39
0.0 0.0 0.0 0.0 0.0 0.0 0.0 0.0 0.0 0.0 0.0 0.0 0.0
0.0 0.0 0.0 0.0 0.0 0.0 0.0 0.0 0.0 0.0 0.0 0.0 0.0
0.0 0.0 0.0 0.0 0.0 0.0 0.0 0.0 0.0 0.0 0.0 0.0 0.0
<Variance> 39
1.0 1.0 1.0 1.0 1.0 1.0 1.0 1.0 1.0 1.0 1.0 1.0 1.0
1.0 1.0 1.0 1.0 1.0 1.0 1.0 1.0 1.0 1.0 1.0 1.0 1.0
1.0 1.0 1.0 1.0 1.0 1.0 1.0 1.0 1.0 1.0 1.0 1.0 1.0
<State> 3
<Mean> 39
0.0 0.0 0.0 0.0 0.0 0.0 0.0 0.0 0.0 0.0 0.0 0.0 0.0
0.0 0.0 0.0 0.0 0.0 0.0 0.0 0.0 0.0 0.0 0.0 0.0 0.0
0.0 0.0 0.0 0.0 0.0 0.0 0.0 0.0 0.0 0.0 0.0 0.0 0.0
<Variance> 39
1.0 1.0 1.0 1.0 1.0 1.0 1.0 1.0 1.0 1.0 1.0 1.0 1.0
1.0 1.0 1.0 1.0 1.0 1.0 1.0 1.0 1.0 1.0 1.0 1.0 1.0
1.0 1.0 1.0 1.0 1.0 1.0 1.0 1.0 1.0 1.0 1.0 1.0 1.0
<State> 4
<Mean> 39
0.0 0.0 0.0 0.0 0.0 0.0 0.0 0.0 0.0 0.0 0.0 0.0 0.0
0.0 0.0 0.0 0.0 0.0 0.0 0.0 0.0 0.0 0.0 0.0 0.0 0.0
0.0 0.0 0.0 0.0 0.0 0.0 0.0 0.0 0.0 0.0 0.0 0.0 0.0
<Variance> 39
1.0 1.0 1.0 1.0 1.0 1.0 1.0 1.0 1.0 1.0 1.0 1.0 1.0
1.0 1.0 1.0 1.0 1.0 1.0 1.0 1.0 1.0 1.0 1.0 1.0 1.0
1.0 1.0 1.0 1.0 1.0 1.0 1.0 1.0 1.0 1.0 1.0 1.0 1.0
<State> 5
<Mean> 39
0.0 0.0 0.0 0.0 0.0 0.0 0.0 0.0 0.0 0.0 0.0 0.0 0.0
0.0 0.0 0.0 0.0 0.0 0.0 0.0 0.0 0.0 0.0 0.0 0.0 0.0
0.0 0.0 0.0 0.0 0.0 0.0 0.0 0.0 0.0 0.0 0.0 0.0 0.0
<Variance> 39
1.0 1.0 1.0 1.0 1.0 1.0 1.0 1.0 1.0 1.0 1.0 1.0 1.0
1.0 1.0 1.0 1.0 1.0 1.0 1.0 1.0 1.0 1.0 1.0 1.0 1.0
1.0 1.0 1.0 1.0 1.0 1.0 1.0 1.0 1.0 1.0 1.0 1.0 1.0
<State> 6
<Mean> 39
0.0 0.0 0.0 0.0 0.0 0.0 0.0 0.0 0.0 0.0 0.0 0.0 0.0
0.0 0.0 0.0 0.0 0.0 0.0 0.0 0.0 0.0 0.0 0.0 0.0 0.0
0.0 0.0 0.0 0.0 0.0 0.0 0.0 0.0 0.0 0.0 0.0 0.0 0.0
<Variance> 39
1.0 1.0 1.0 1.0 1.0 1.0 1.0 1.0 1.0 1.0 1.0 1.0 1.0
1.0 1.0 1.0 1.0 1.0 1.0 1.0 1.0 1.0 1.0 1.0 1.0 1.0
1.0 1.0 1.0 1.0 1.0 1.0 1.0 1.0 1.0 1.0 1.0 1.0 1.0
<State> 7
<Mean> 39
0.0 0.0 0.0 0.0 0.0 0.0 0.0 0.0 0.0 0.0 0.0 0.0 0.0
0.0 0.0 0.0 0.0 0.0 0.0 0.0 0.0 0.0 0.0 0.0 0.0 0.0
0.0 0.0 0.0 0.0 0.0 0.0 0.0 0.0 0.0 0.0 0.0 0.0 0.0
<Variance> 39
1.0 1.0 1.0 1.0 1.0 1.0 1.0 1.0 1.0 1.0 1.0 1.0 1.0
1.0 1.0 1.0 1.0 1.0 1.0 1.0 1.0 1.0 1.0 1.0 1.0 1.0
1.0 1.0 1.0 1.0 1.0 1.0 1.0 1.0 1.0 1.0 1.0 1.0 1.0
<State> 8
<Mean> 39
0.0 0.0 0.0 0.0 0.0 0.0 0.0 0.0 0.0 0.0 0.0 0.0 0.0
0.0 0.0 0.0 0.0 0.0 0.0 0.0 0.0 0.0 0.0 0.0 0.0 0.0
0.0 0.0 0.0 0.0 0.0 0.0 0.0 0.0 0.0 0.0 0.0 0.0 0.0
<Variance> 39
1.0 1.0 1.0 1.0 1.0 1.0 1.0 1.0 1.0 1.0 1.0 1.0 1.0
1.0 1.0 1.0 1.0 1.0 1.0 1.0 1.0 1.0 1.0 1.0 1.0 1.0
1.0 1.0 1.0 1.0 1.0 1.0 1.0 1.0 1.0 1.0 1.0 1.0 1.0
<State> 9
<Mean> 39
0.0 0.0 0.0 0.0 0.0 0.0 0.0 0.0 0.0 0.0 0.0 0.0 0.0
0.0 0.0 0.0 0.0 0.0 0.0 0.0 0.0 0.0 0.0 0.0 0.0 0.0
0.0 0.0 0.0 0.0 0.0 0.0 0.0 0.0 0.0 0.0 0.0 0.0 0.0
<Variance> 39
1.0 1.0 1.0 1.0 1.0 1.0 1.0 1.0 1.0 1.0 1.0 1.0 1.0
1.0 1.0 1.0 1.0 1.0 1.0 1.0 1.0 1.0 1.0 1.0 1.0 1.0
1.0 1.0 1.0 1.0 1.0 1.0 1.0 1.0 1.0 1.0 1.0 1.0 1.0
<TransP> 10
0.0 1.0 0.0 0.0 0.0 0.0 0.0 0.0 0.0 0.0
0.0 0.5 0.5 0.0 0.0 0.0 0.0 0.0 0.0 0.0
0.0 0.0 0.5 0.5 0.0 0.0 0.0 0.0 0.0 0.0
0.0 0.0 0.0 0.5 0.5 0.0 0.0 0.0 0.0 0.0
0.0 0.0 0.0 0.0 0.5 0.5 0.0 0.0 0.0 0.0
0.0 0.0 0.0 0.0 0.0 0.5 0.5 0.0 0.0 0.0
0.0 0.0 0.0 0.0 0.0 0.0 0.5 0.5 0.0 0.0
0.0 0.0 0.0 0.0 0.0 0.0 0.0 0.5 0.5 0.0
0.0 0.0 0.0 0.0 0.0 0.0 0.0 0.0 0.5 0.5
0.0 0.0 0.0 0.0 0.0 0.0 0.0 0.0 0.0 0.0
<EndHMM>
注:hmm_channel hmm_color同hmm_brightness,不过最上面的名字要分别换成channel和color
hmm_silb:
~o <VecSize> 39 <MFCC_0_D_A>
~h "silb"
<BeginHMM>
<NumStates> 3
<State> 2
<Mean> 39
0.0 0.0 0.0 0.0 0.0 0.0 0.0 0.0 0.0 0.0 0.0 0.0 0.0
0.0 0.0 0.0 0.0 0.0 0.0 0.0 0.0 0.0 0.0 0.0 0.0 0.0
0.0 0.0 0.0 0.0 0.0 0.0 0.0 0.0 0.0 0.0 0.0 0.0 0.0
<Variance> 39
1.0 1.0 1.0 1.0 1.0 1.0 1.0 1.0 1.0 1.0 1.0 1.0 1.0
1.0 1.0 1.0 1.0 1.0 1.0 1.0 1.0 1.0 1.0 1.0 1.0 1.0
1.0 1.0 1.0 1.0 1.0 1.0 1.0 1.0 1.0 1.0 1.0 1.0 1.0
<TransP> 3
0.0 1.0 0.0
0.0 0.5 0.5
0.0 0.0 0.0
<EndHMM>
注:hmm_sile同hmm_silb,只修改名字就好。
6 HMM训练
6.1 初始化
需要创建的文件:
(1) trainlist_brightness.txt trainlist_channel.txt trainlist_color.txt trainlist_silb.txt trainlist_sile.txt
创建目录:training/
说明:特征矢量文件路径
内容:


(2) hmm0目录
创建目录:model/
说明:初始化后的HMM模型存放的位置
指令:
Hinit -A -D -T 1 -S training/trainlist_brightness.txt -M model/hmm0 -H model/proto/hmm_brightness -l brightness -L data/train/lab/brightness brightness
Hinit -A -D -T 1 -S training/trainlist_channel.txt -M model/hmm0 -H model/proto/hmm_channel -l channel -L data/train/lab/channel channel
Hinit -A -D -T 1 -S training/trainlist_color.txt -M model/hmm0 -H model/proto/hmm_color -l color -L data/train/lab/color color
Hinit -A -D -T 1 -S training/trainlist_silb.txt -M model/hmm0 -H model/proto/hmm_silb -l silb -L data/train/lab/brightness silb
Hinit -A -D -T 1 -S training/trainlist_sile.txt -M model/hmm0 -H model/proto/hmm_sile -l sile -L data/train/lab/brightness sile
初始化之后我们可以再hmm0文件夹中看到:

6.2 训练
需要创建的目录:hmm1 hmm2 hmm3
创建位置: model/
每次,HRest迭代(即当前再估计迭代中的迭代)显示在屏幕上,通过change
量度标示收敛性。一旦这个量度值不再从一个HRest迭代到下个迭代减少(绝对值),过程就该停止了,迭代一般2-3次就可以了。
指令:
HRest -A -D -T 1 -S training/trainlist_brightness.txt -M model/hmm1 -H model/hmm0/hmm_brightness -l brightness -L data/train/lab/brightness brightness
HRest -A -D -T 1 -S training/trainlist_brightness.txt -M model/hmm2 -H model/hmm1/hmm_brightness -l brightness -L data/train/lab/brightness brightness
HRest -A -D -T 1 -S training/trainlist_brightness.txt -M model/hmm3 -H model/hmm2/hmm_brightness -l brightness -L data/train/lab/brightness brightness
HRest -A -D -T 1 -S training/trainlist_channel.txt -M model/hmm1 -H model/hmm0/hmm_channel -l channel -L data/train/lab/channel channel
HRest -A -D -T 1 -S training/trainlist_channel.txt -M model/hmm2 -H model/hmm1/hmm_channel -l channel -L data/train/lab/channel channel
HRest -A -D -T 1 -S training/trainlist_channel.txt -M model/hmm3 -H model/hmm2/hmm_channel -l channel -L data/train/lab/channel channel
HRest -A -D -T 1 -S training/trainlist_color.txt -M model/hmm1 -H model/hmm0/hmm_color -l color -L data/train/lab/color color
HRest -A -D -T 1 -S training/trainlist_color.txt -M model/hmm2 -H model/hmm1/hmm_color -l color -L data/train/lab/color color
HRest -A -D -T 1 -S training/trainlist_color.txt -M model/hmm3 -H model/hmm2/hmm_color -l color -L data/train/lab/color color
HRest -A -D -T 1 -S training/trainlist_silb.txt -M model/hmm1 -H model/hmm0/hmm_silb -l silb -L data/train/lab/brightness silb
HRest -A -D -T 1 -S training/trainlist_silb.txt -M model/hmm2 -H model/hmm1/hmm_silb -l silb -L data/train/lab/brightness silb
HRest -A -D -T 1 -S training/trainlist_silb.txt -M model/hmm3 -H model/hmm2/hmm_silb -l silb -L data/train/lab/brightness silb
HRest -A -D -T 1 -S training/trainlist_sile.txt -M model/hmm1 -H model/hmm0/hmm_sile -l sile -L data/train/lab/brightness sile
HRest -A -D -T 1 -S training/trainlist_sile.txt -M model/hmm2 -H model/hmm1/hmm_sile -l sile -L data/train/lab/brightness sile
HRest -A -D -T 1 -S training/trainlist_sile.txt -M model/hmm3 -H model/hmm2/hmm_sile -l sile -L data/train/lab/brightness sile

7.任务定义
7.1 建立语法规则和字典
需要创建的文件:
(1) gram.txt
创建的目录:def
说明:在使用我们的单词模型之前,要定义识别器的基本结构(任务语法)。我们首先定义最简单的语法:开始停顿、接着简单单词(这里指brightness, channel, color)、结束停顿。
内容:
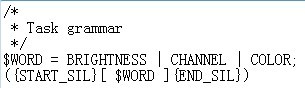
注:用括号{}括住START_SIL和END_SIL表示其可不存在或者重复多次(允许在单词之前或之后长时间的停顿,或者根本没有停顿)。括号[]括住$WORD表示零个或一次出现(如果没有单词,可能只是识别停顿)。
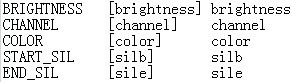
(2) dict.txt
创建的目录:def
说明:系统要知道HMM模型与语法变量BRIGHTNESS、CHANNEL、COLOR、START_SIL和END_SIL的对应关系。这种信息存储在文本文件中,命名为任务字典。
内容:
7.2 网络
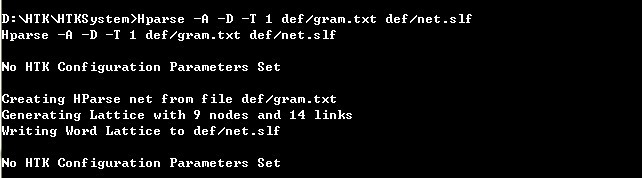
建立任务网络:
生成的文件:net.slf
命令:Hparse -A -D -T 1 def/gram.txt def/net.slf
运行结果:
8 识别
8.1 准备测试数据
需要准备的文件:
(1) hmmlist.txt
创建的目录:test/
说明:列出了要使用的模型的名字(brightness, channel,color,silb,sile) ,每个一行,最后要加一个空行。
内容:

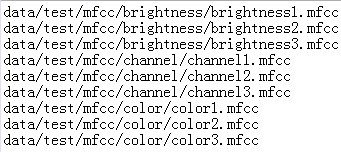
(2) targetlist_test.txt
创建的目录:test/
内容:

命令:
Hcopy -A -D -C test/analysis.conf -S test/targetlist_test.txt
8.2 识别
基本方法:
需要创建的文件:
(1) result文件夹
(2) reco.mlf
创建的目录:result/
初始内容:
#!MLF!#
(3) hmmsdef.mmf
创建的目录:test
命令等同于:-H model/hmm3/hmm_brightness -H model/hmm3/hmm_channel -H model/hmm3/hmm_color -H model/hmm_silb -H model/hmm3/hmm_sile
内容:hmm3中的所有文件的内容一起粘贴。
注意:只保留一个"~O"
命令:
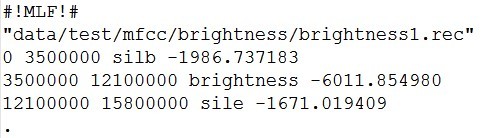
Hvite -A -D -T 1 -H test/hmmsdef.mmf -i result/reco.mlf -w def/net.slf def/dict.txt test/hmmlist.txt data/test/mfcc/brightness/brightness1.mfcc
结果会在reco.mlf中显示:
交互方式:
需要创建的文件:
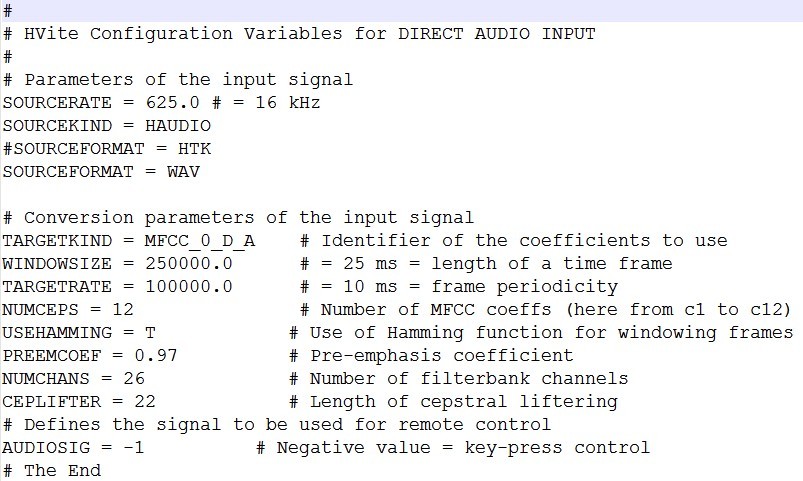
directin.conf
创建的目录:test
说明:是Hvite的配置文件,允许使用直接音频输入,为了允许从输入信号中直接提取声学系数,这个文件必须包含前面训练数据使用的声学分析配置参数。
内容:
指令:
Hvite -A -D -T 1 -C test/directin.conf -g -H test/hmmsedf.mmf -w def/net.mlf def/dict.txt test/hmmlist.txt
9 性能测试
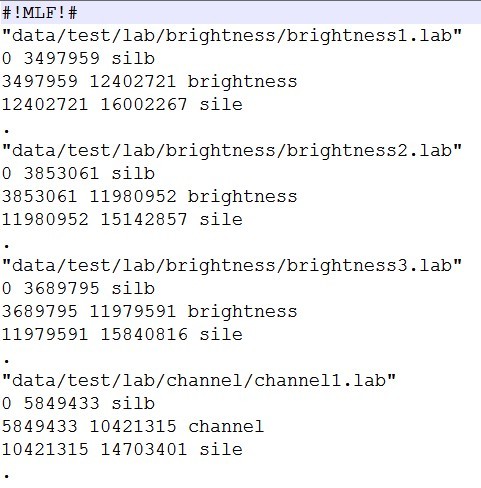
9.1 主标签文件
在性能评测之前,我们需要创建两个文件,命名为主标签文件,扩展名是.mlf:
·第一个文件包含整个训练集的正确副本,即是通过手工标注的副本。把ref.mlf记作参考副本。
·第二个文件包含整个测试集的识别副本,即识别器产生的假设副本。把reco.mlf记为识别副本。
通过比较每项数据的参考副本和识别假设,进行性能评测。
内容:
ref.mlf
需要创建的文件:testlist.txt
说明:测试路径
内容:
命令:
Hvite -A -D -T 1 -S test/testlist.txt -H test/hmmsdef.mmf -i result/reco.mlf -w def/net.slf def/dict.txt test/hmmlist.txt
运行之后会看到:
reco.mlf中:

9.2 错误率
需要创建的文件:
labellist.txt
说明:出现在副本文件中的标签列表
创建的目录:result
内容:

results.txt
创建的目录:result
说明:存放错误率结果
命令:
HResults -A -D -T 1 -e ??? sil -
I result/ref.mlf result/labellist.txt result/reco.mlf > result/results.txt
最后显示结果为:

注:由于选取的数据集很小只有9个词,非常有限,所以识别率是100%。
第一行(SENT)给出句子的识别率(%Correct=100.00),第二行(WORD)给出的是单词的识别率(%Corr=100.00)。上图中,这两个比率是相同的,这是因为我们的任务语法仅使用一个单词(除了停顿之外)作为句子。这是孤立词识别任务。这里只要考虑第一行(SENT)就够了。H=9 给出的是测试数据被正确识别的数量,S=0,表示识别相反的数量。N=0表示测试数据总数。
10 总结
经过了几天的学习和测试,终于完成了基于HTK工具包进行孤立词识别的工作,掌握了孤立词识别的基本使用方法,具体的细节参数使用在日后的工作中还需要再斟酌。
- 2,HTK学习_基于HTK语音工具包进行孤立词识别的使用教程
- 基于HTK语音工具包进行孤立词识别的使用教程
- 使用HTK语音工具包进行孤立词识别基础教程
- 语音识别系统之htk------孤立词识别(yesno)
- 语音识别-----HTK语音识别工具包的安装和编译
- HTK语音识别工具包的安装和编译
- HTK语音识别工具包的安装和编译
- Windows下配置HTK语音识别工具包
- htk 搭建语音命令识别工具包
- HTK的安装和使用(Yes Or No孤立词识别)
- windows下安装编译HTK语音识别工具包
- windows下安装编译HTK语音识别工具包
- 基于HTK语音工具包 的学习<递进式>
- 机器学习&数据挖掘笔记_13(用htk完成简单的孤立词识别)
- HTK语音识别HResults的结果解释
- HTK 语音识别 ASK
- 基于HTK的连续语音识别系统搭建学习笔记(一)
- 基于HTK的连续语音识别系统搭建学习笔记(二)
- 文章标题spring-boot + spring-data-jpa 实现简单的增删改查
- Timer 的 schedule()方法
- STM32 UART常用的3种中断接收
- php简单的表格验证测试
- cocos2d-js之入门篇
- 基于HTK语音工具包进行孤立词识别的使用教程
- [分享]【2015原创】阿里云新手入门视频教程
- 鼠标点击后,所有div掉下来
- Android Scroller完全解析,关于Scroller你所需知道的一切
- 语音识别工具箱之HTK安装与使用
- java_Timer定时器
- [leetcode]206. Reverse Linked List
- KALDI工具箱运行TIMIT语料库库实例教程
- [Leectode] Game of Life