mongodb3.4.1分片
来源:互联网 发布:itv198高清网络电视 编辑:程序博客网 时间:2024/05/17 01:25
下载
https://www.mongodb.com/download-center
tar -xvf mongodb-linux-x86_64-amazon-3.4.1.tgz
mv mongodb-linux-x86_64-amazon-3.4.1 /usr/local/mongodb环境变量
vim /etc/profile末尾添加
export MONGODB_HOME="/usr/local/mongodb"export PATH="$MONGODB_HOME/bin:$PATH"
source /etc/profile
bin目录下个文件功能

mkdir /mongodbcd /mongodbmkdir 27017 27018 27019 27020 27021添加配置文件
cat 27017.cnf dbpath = /mongodb/27017logpath = /mongodb/27017/27017.logfork = true port = 27017复制到其他目录,更改相应端口,目录
启动
mongod --config /mongodb/27017/27017.cnf about to fork child process, waiting until server is ready for connections.forked process: 21306child process started successfully, parent exiting
分片图示(转载)
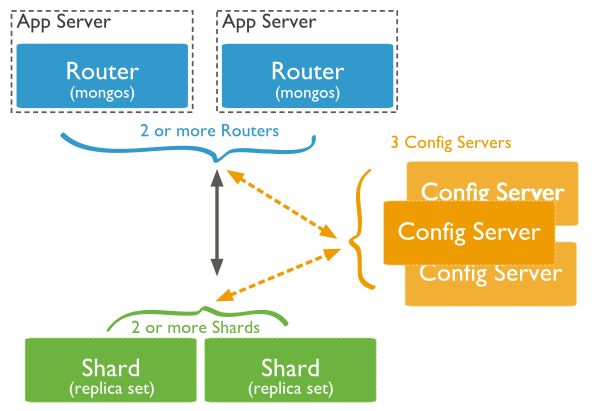
- Shard:
用于存储实际的数据块,实际生产环境中一个shard server角色可由几台机器组个一个replica set承担,防止主机单点故障
- Config Server:
mongod实例,存储了整个 ClusterMetadata,其中包括 chunk信息。
- Query Routers:
前端路由,客户端由此接入,且让整个集群看上去像单一数据库,前端应用可以透明使用。
本次实验架构
27017:shard
27018:shard
27019:config server
27020:config server
27021:routers
启动shard
分片集群的所有组件,Config server、mongod、mongos 都能相互感知整个分片集群的存在,了解整个分片集群的配置信息,这样能避免分片集群的误配置,比如在现在的版本,有可能会将一个 shard 错误的加到多个 sharded cluster 了。这个特性引入了如下限制:
分片集群里 mongod 启动时,必须显式配置 sharding.clusterRole 为 shardsrv
3.4版本的 mongos 不能连接低版本的 mongod
mongod --config /mongodb/27017/27017.cnf --shardsvrmongod --config /mongodb/27018/27018.cnf --shardsvr
启动config
Config server 的 Primary 节点负责负载均衡
MongoDB 3.2及以前版本里,分片集群的负载均衡由 mongos 负责,多个 mongos 会抢一个分布式锁,抢锁成功的 mongos 会对执行负载均衡任务,在 shard 间迁移 chunk;在3.4版本里,负载均衡将由 Config server 的 Primary 节点负责,预计会在负载均衡并发度及效率上会有大的提升。不再支持 SCCC Config server 的模式
MongoDB 3.2版本引入了复制集模式的 Config Server(CSRS 模式),在此之前,Config server 由多个镜像的单节点组成(SCCC模式),3.4版本里,MongoDB 将不再支持 SCCC模式的 Config server。所以config server需要配置副本集或者主从
mongod --config /mongodb/27019/27019.cnf --configsvr --replSet TTT
mongod --config /mongodb/27020/27020.cnf --configsvr --replSet TTT
> var rsconf={_id:'TTT',members:[{_id:0,host:'127.0.0.1:27019'},{_id:1,host:'127.0.0.1:27020'}]}> rs.initiate(rsconf){ "ok" : 1 }启动routers
mongos --config /mongodb/27021/27021.cnf --configdb TTT/127.0.0.1:27019,127.0.0.1:27020
全部进程
ps -ef |grep mongoroot 23434 1 0 14:28 ? 00:00:20 mongod --config /mongodb/27017/27017.cnf --shardsvrroot 23454 1 0 14:28 ? 00:00:20 mongod --config /mongodb/27018/27018.cnf --shardsvrroot 23529 1 0 14:53 ? 00:00:13 mongod --config /mongodb/27019/27019.cnf --configsvr --replSet TTTroot 23561 1 0 14:54 ? 00:00:13 mongod --config /mongodb/27020/27020.cnf --configsvr --replSet TTTroot 25558 1 0 15:27 ? 00:00:00 mongos --config /mongodb/27021/27021.cnf --configdb TTT/127.0.0.1:27019,127.0.0.1:27020
登录,配置
admin登录mongo --port 27021
首先要添加分片
use test
db.runCommand({addshard:'127.0.0.1:27017'}){ "shardAdded" : "shard0000", "ok" : 1 }mongos> db.runCommand({addshard:'127.0.0.1:27018'}){ "shardAdded" : "shard0001", "ok" : 1 }再添加需要分片的数据库
db.runCommand({enablesharding:'test'}){ "ok" : 1 }db.runCommand({shardcollection:'test.t1',key:{name:1}}){ "collectionsharded" : "test.t1", "ok" : 1 }上面指定了test库,t1集合为分片集合,片键为name
测试
插入10万数据测试
db.runCommand({shardcollection:'test.t1',key:{name:1}}){ "collectionsharded" : "test.t1", "ok" : 1 }mongos> for(var i=1;i<=10000;i++){... db.test.t1.insert({t1_id:i,name:'id_'+i});... }查看分片情况db.printShardingStatus()--- Sharding Status --- sharding version: {"_id" : 1,"minCompatibleVersion" : 5,"currentVersion" : 6,"clusterId" : ObjectId("58748b7815c07c59a32f1d8d")} shards:{ "_id" : "shard0000", "host" : "127.0.0.1:27017", "state" : 1 }{ "_id" : "shard0001", "host" : "127.0.0.1:27018", "state" : 1 } active mongoses:"3.4.1" : 1 autosplit:Currently enabled: yes balancer:Currently enabled: yesCurrently running: noBalancer lock taken at Tue Jan 10 2017 15:21:36 GMT+0800 (CST) by ConfigServer:BalancerFailed balancer rounds in last 5 attempts: 0Migration Results for the last 24 hours: 1 : Success databases:{ "_id" : "test", "primary" : "shard0000", "partitioned" : true }test.t1shard key: { "name" : 1 }unique: falsebalancing: truechunks:shard00002shard00011{ "name" : { "$minKey" : 1 } } -->> { "name" : "id_10" } on : shard0001 Timestamp(2, 0) { "name" : "id_10" } -->> { "name" : "id_8" } on : shard0000 Timestamp(2, 1) { "name" : "id_8" } -->> { "name" : { "$maxKey" : 1 } } on : shard0000 Timestamp(1, 3)搜索片键直接到相应分片查询,如果搜索非片键则全部分片查询
db.t1.find({name:'id_2'}).explain()db.t1.find({t1_id:100}).explain()参考
http://www.runoob.com/mongodb/mongodb-sharding.html
http://kb.cnblogs.com/page/152995/
0 0
- mongodb3.4.1分片
- mongodb3 分片部署手记
- Mongodb3.4分片搭建
- 配置MongoDB3.04集群分片
- 配置MongoDB3.04集群分片
- mongodb3.0.3集群分片搭建
- mongodb3.4.7分片集群部署
- mongodb3.0 单机数据迁移 分片复制集
- MongoDB3.0.1分片部署,国内3.0的部署文档还不是很多(何志雄)。
- mongodb3.0分片及java代码连接操作测试(开启用户验证)
- MongoDB学习记录09-分片-单节点(mongodb3.2版本以前)
- MongoDB学习记录10-分片-副本集(mongodb3.2版本以前)
- MongoDB学习记录11-分片-副本集(mongodb3.2版本以后)
- 分片
- IP分片,TCP分片
- mongodb 添加用户报错TypeError:db.addUser is not a function (mongodb3.4.1)
- mongodb 添加用户报错TypeError:db.addUser is not a function (mongodb3.4.1)
- mongodb 添加用户报错TypeError:db.addUser is not a function (mongodb3.4.1)
- Java压缩技术(三) ZIP解压缩——Java原生实现
- Linux基础之sed流编辑器详解
- 系统学习深度学习(二) --自编码器,DA算法,SDA,稀疏自编码器
- EL表达式
- 嵌入式:上层or底层?有意思~
- mongodb3.4.1分片
- Android开发之MVP模式
- Java压缩技术(四) GZIP——Java原生实现
- 【小黄象专访】:“微信小程序俱乐部”用心打造小程序领域的高质量社群
- Lua中的元方法总结
- JAVA 上转型对象
- linux下查询文件的创建时间和访问时间
- html5标签语义化
- redis 用setbit(bitmap)统计活跃用户