CentOS 7安装Etherpad(在线协作编辑)
来源:互联网 发布:女生喜欢大的吗 知乎 编辑:程序博客网 时间:2024/05/22 08:02
Etherpad 是一个线上共制平台,是基于网络的实时合作文档编辑器,三、四个人可以坐在自己电脑前,同时对一份文档修改,也同时能看到其他人的修改。
CentOS 7 安装 Etherpad
1、先安装一些工具
# yum install curl vim gcc-c++ make
2、安装MariaDB
# yum install mariadb-server
启动MariaDB服务:
# systemctl start mariadb.service
# systemctl enable mariadb.service
运行MariaDB初始化脚本:
# mysql_secure_installation
Mariadb初始密码为空;
3、为Etherpad创建一个数据库和用户
# mysql -u root -p
MariaDB [(none)]> CREATE DATABASE etherpad;
MariaDB [(none)]> GRANT ALL PRIVILEGES ON etherpad.* TO 'etherpad'@'localhost' IDENTIFIED BY 'test1234';
MariaDB [(none)]> FLUSH PRIVILEGES;
MariaDB [(none)]> \q
创建数据库etherpad;用户etherpad,密码test1234。
4、安装Node.js
# curl -sL https://rpm.nodesource.com/setup | sudo bash -
# yum install nodejs
查看nodejs版本:
# node --version

5、创建一个Linux用户
# adduser --home /opt/etherpad --shell /bin/bash etherpad
# install -d -m 755 -o etherpad -g etherpad /opt/etherpad
6、安装Etherpad
切换到新用户:
# su - etherpad
使用git clone源码:
$ cd
$ git clone https://github.com/ether/etherpad-lite
创建配置文件:
$ cp ~/etherpad-lite/settings.json.template ~/etherpad-lite/settings.json
编辑settings.json文件:
$ sudo vim ~/etherpad-lite/settings.json
如果你要使用Nginx做反向代理,把“ip”: “0.0.0.0” 改为 “ip”: “127.0.0.1”,trustProxy设置为true。
注释掉”dbType” : “dirty”。
数据库配置:
"dbType" : "mysql",
"dbSettings" : {
"user" : "etherpad",
"host" : "localhost",
"password": "test1234",
"database": "etherpad"
},
添加管理员用户:
"users": {
"admin": {
"password": "admin123",
"is_admin": true
}
},
保存退出。
安装依赖:
$ ~/etherpad-lite/bin/installDeps.sh
启动Etherpad:
$ ~/etherpad-lite/bin/run.sh
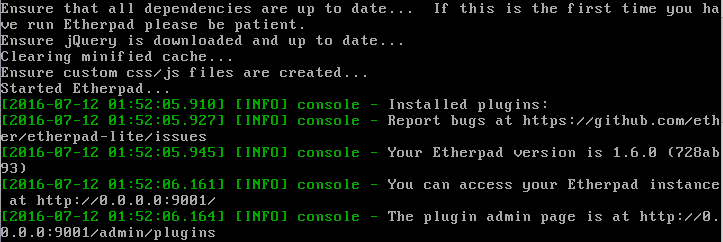
使用浏览器访问:your_server_ip:9001
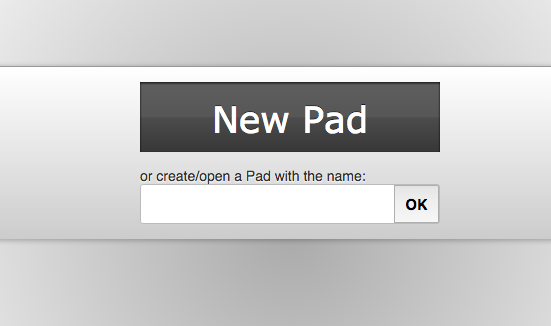
创建新文档(New Pad),(链接:http://your_ip:9001/p/r5Lc37e42P):

把链接发送给合作伙伴,协作编写同一个文档。每个人编辑的文本会使用不用的颜色,非常方便区分。
7、后续配置
把etherpad注册为系统服务
使用Nginx做反向代理(域名->127.0.0.1:9001)
本文永久更新地址:http://www.linuxdiyf.com/linux/22391.html
0 0
- CentOS 7安装Etherpad(在线协作编辑)
- CentOS 7安装Etherpad(在线协作编辑)
- CentOS 7安装Etherpad(在线协作编辑)
- CentOS 7安装Etherpad(在线协作编辑)
- 阿里云 ECS(centos 7.2镜像) 搭建 Etherpad(在线协作编辑 与一起写相仿)
- centos下安装etherpad
- CentOS 安装 Etherpad (多人一起写)
- CentOS 7在线安装MySQL
- CentOS 在线安装mysql5.7
- centos 7在线安装mysql步骤
- CentOS 通过yum在线安装MySQL5.7
- centos在线安装最新版mysql5.7
- centos 在线安装 gcc
- Centos在线安装openshift
- 介绍一个开源的在线文档编辑器Etherpad
- CentOS 7 安装mysql(在线安装版)
- centos 在线安装telnet服务
- 【CentOS】如何在线安装pcre
- viewPager 重写 预加载缓存左右滑动等
- 关于RunLoop
- 开启Tomcat APR运行模式,优化并发性能
- memcache安全配置
- List中安全地删除对象
- CentOS 7安装Etherpad(在线协作编辑)
- 单向关系中的JoinColumn
- Advanced searching - fields reference
- 后台服务后台遇到的坑整理,以及做活动的优化经历,redis需要读写分离吗以及其他问题
- SpringMVC学习笔记(五)验证用户输入
- NGUI动态字体的制作
- [soap] -- soap简单使用
- 关于Ehcache缓存中timeToLiveSeconds和timeToIdleSeconds区别
- css代码建议