Android之Bluetooth—蓝牙操作
来源:互联网 发布:淘宝商家客服人工服务 编辑:程序博客网 时间:2024/04/28 20:50
一:什么是蓝牙
1:Bluetooth是目前使用最广泛的无线通讯协议,近距离无线通讯的标准。传说瑞典有个国王特别爱吃蓝莓导致自己的牙齿天天都是蓝色的,在他执政期间这位国王非常善于交际,能说会到,和邻国的搞得关系非常好,这个Bluetooth的发明者觉得蓝牙它的作用就是在近距离沟通周围的设备,跟这个国王很类似,于是起名叫蓝牙。
2:主要针对短距离设备通讯(10米)
3:无线耳机,无线鼠标,无线键盘

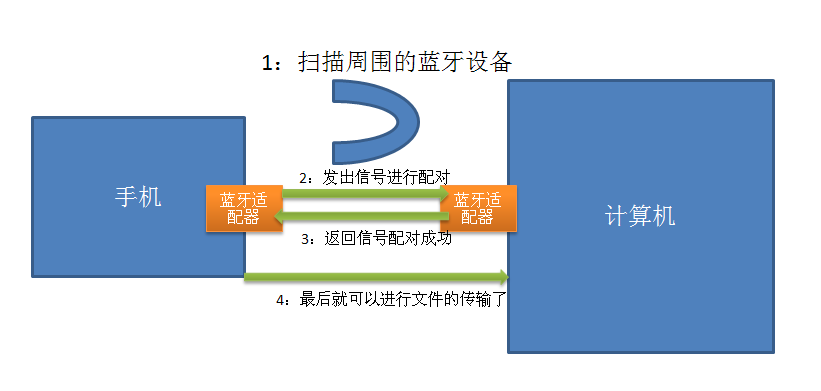
二:蓝牙工作流程图
首先两个设备上都要有蓝牙设备或者专业一点叫蓝牙适配器,以手机和电脑为例我画了如下流程图。其次在手机上进行扫描,扫描周围蓝蓝牙设备,先找到手机附近的电脑,然后给它发出一个信号需要进行蓝牙的配对,再次返回一个信号说明手机和电脑已经配对成功了,最后配对成功后可以进行文件传输了。这是一个最基本的一个流程。
三:与蓝牙相关的最重要的两个API
1:BuletoothAdapter
这个类的对象代表了本地的蓝牙适配器,相当于蓝牙工作流程图中的手机里的蓝牙适配器,也就是说比如这个应用程序是运行在手机上,那么手机上的蓝牙适配器就是本地蓝牙适配器。
2:BuletoothDevice
这个类的对象代表了远程的蓝牙设备,相当于蓝牙工作流程图中的计算机里的蓝牙适配器,也就是说比如这个应用程序是运行在手机上,那么BuletoothDevice代表了你要连接的远程的那个设备上面的蓝牙适配器。
四:硬件准备
今天这个示例必须运行在具有安卓2.0SDK以上的手机上面,不能运行在模拟器上面,因为现在的模拟器是不能模拟蓝牙的,所以必须有个安卓的手机,另外要有台具有蓝牙适配器的电脑。手机和电脑来进行配对,只能通过手动来进行,不可能通过代码是实现配对,因为安全性的问题不能通过应用程序自动的来进行配对,一旦配对成功就可以进行文件的传输了。如何配对在这里就不讲解了。
五:如何蓝牙配对
本来是要拿手机和电脑作为调试的,但是我的电脑上面没有蓝牙适配器,所以就用蓝牙笔代替了。
1:插入手机
如果发现没有驱动系统会提示安装驱动

2 :下载豌豆荚
豌豆荚会自动安装手机对应型号的USB驱动,USB调试默认是打开的(一定要开启手机的USB调试),等待安装完成。

3 :打开在eclipse的DDMS视图里的Devices这一区域出现了你的手机设备的数字名称了。

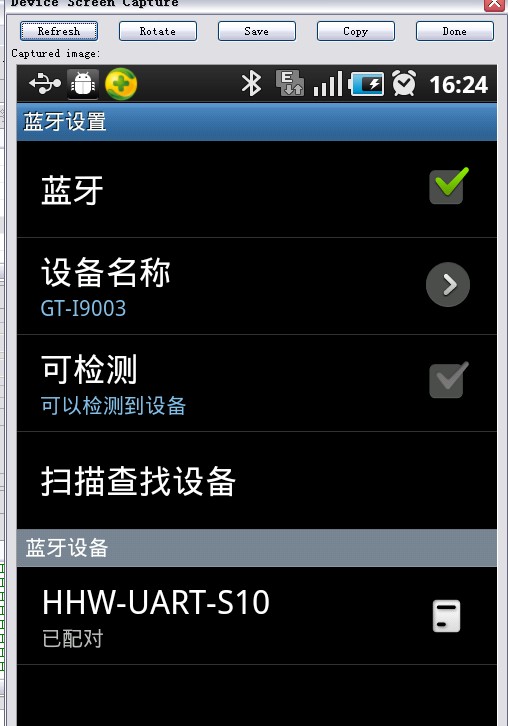
4:打开手机上的“设置”
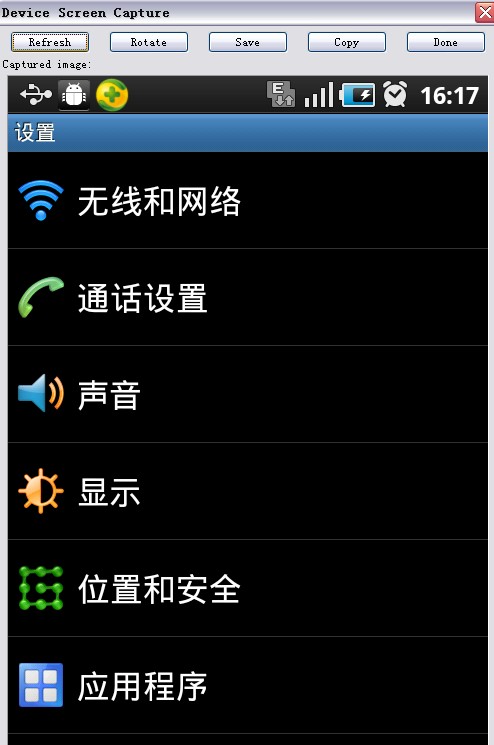
5:选择“无线和网络”
给蓝牙打上勾,此时手机头部的蓝牙小图标已打开,表示开启了蓝牙
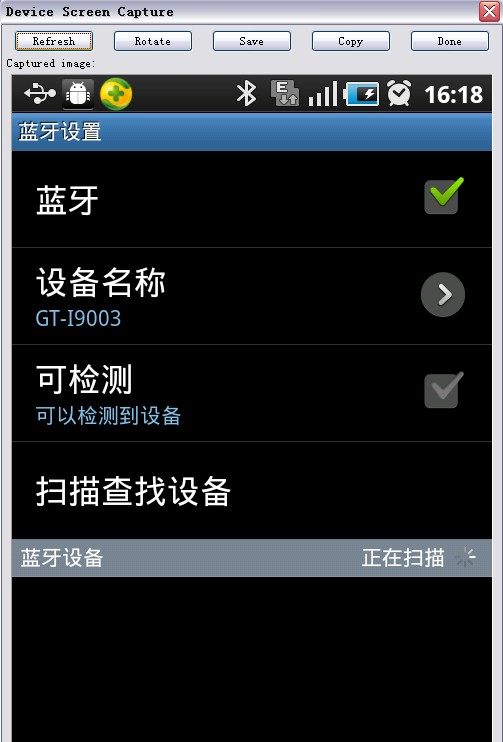
6:扫描配对
拿起蓝牙笔,打开它的开关,点击手机上面的“扫描查找设备”

7:请求配对
输入密钥请求配对,然后等待配对成功

六:实现效果
扫描已配对的远程蓝牙设备
代码步骤
1:需要在AndroidMainfest.xml里声明蓝牙权限
<uses-permission android:name="android.permission.BLUETOOTH" />
2:获得BluetoothAdapter对象
3:判断当前设备中是否拥有蓝牙设备
4:判断当前设备中的蓝牙设备是否已经打开
5:得到所有已经配对的蓝牙设备对象
七:
1. 使用蓝牙的响应权限
<uses-permission android:name="android.permission.BLUETOOTH" />
<uses-permission android:name="android.permission.BLUETOOTH_ADMIN" />
在这里首先要了解对蓝牙操作一个核心类BluetoothAdapter
BluetoothAdapter adapter = BluetoothAdapter.getDefaultAdapter();
//直接打开系统的蓝牙设置面板
Intent intent = new Intent(BluetoothAdapter.ACTION_REQUEST_ENABLE);
startActivityForResult(intent, 0x1);
//直接打开蓝牙
adapter.enable();
//关闭蓝牙
adapter.disable();
//打开本机的蓝牙发现功能(默认打开120秒,可以将时间最多延长至300秒)
Intent discoveryIntent = new Intent(BluetoothAdapter.ACTION_REQUEST_DISCOVERABLE);
discoverableIntent.putExtra(BluetoothAdapter.EXTRA_DISCOVERABLE_DURATION, 300);//设置持续时间(最多300秒)
3.搜索蓝牙设备
使用BluetoothAdapter的startDiscovery()方法来搜索蓝牙设备
startDiscovery()方法是一个异步方法,调用后会立即返回。该方法会进行对其他蓝牙设备的搜索,该过程会持续12秒。该方法调用后,搜索过程实际上是在一个System Service中进行的,所以可以调用cancelDiscovery()方法来停止搜索(该方法可以在未执行discovery请求时调用)。
请求Discovery后,系统开始搜索蓝牙设备,在这个过程中,系统会发送以下三个广播:
ACTION_DISCOVERY_START:开始搜索
ACTION_DISCOVERY_FINISHED:搜索结束
ACTION_FOUND:找到设备,这个Intent中包含两个extra fields:EXTRA_DEVICE和EXTRA_CLASS,分别包含BluetooDevice和BluetoothClass。
我们可以自己注册相应的BroadcastReceiver来接收响应的广播,以便实现某些功能
// 创建一个接收ACTION_FOUND广播的BroadcastReceiver
private final BroadcastReceiver mReceiver = new BroadcastReceiver() {
public void onReceive(Context context, Intent intent) {
String action = intent.getAction();
// 发现设备
if (BluetoothDevice.ACTION_FOUND.equals(action)) {
// 从Intent中获取设备对象
BluetoothDevice device = intent.getParcelableExtra(BluetoothDevice.EXTRA_DEVICE);
// 将设备名称和地址放入array adapter,以便在ListView中显示
mArrayAdapter.add(device.getName() + "\n" + device.getAddress());
}
}
};
// 注册BroadcastReceiver
IntentFilter filter = new IntentFilter(BluetoothDevice.ACTION_FOUND);
registerReceiver(mReceiver, filter); // 不要忘了之后解除绑定
4. 蓝牙Socket通信
如果打算建议两个蓝牙设备之间的连接,则必须实现服务器端与客户端的机制。当两个设备在同一个RFCOMM channel下分别拥有一个连接的BluetoothSocket,这两个设备才可以说是建立了连接。
服务器设备与客户端设备获取BluetoothSocket的途径是不同的。服务器设备是通过accepted一个incoming connection来获取的,而客户端设备则是通过打开一个到服务器的RFCOMM channel来获取的。
服务器端的实现
通过调用BluetoothAdapter的listenUsingRfcommWithServiceRecord(String, UUID)方法来获取BluetoothServerSocket(UUID用于客户端与服务器端之间的配对)
调用BluetoothServerSocket的accept()方法监听连接请求,如果收到请求,则返回一个BluetoothSocket实例(此方法为block方法,应置于新线程中)
如果不想在accept其他的连接,则调用BluetoothServerSocket的close()方法释放资源(调用该方法后,之前获得的BluetoothSocket实例并没有close。但由于RFCOMM一个时刻只允许在一条channel中有一个连接,则一般在accept一个连接后,便close掉BluetoothServerSocket)
private class AcceptThread extends Thread {
private final BluetoothServerSocket mmServerSocket;
public AcceptThread() {
// Use a temporary object that is later assigned to mmServerSocket,
// because mmServerSocket is final
BluetoothServerSocket tmp = null;
try {
// MY_UUID is the app's UUID string, also used by the client code
tmp = mBluetoothAdapter.listenUsingRfcommWithServiceRecord(NAME, MY_UUID);
} catch (IOException e) { }
mmServerSocket = tmp;
}
public void run() {
BluetoothSocket socket = null;
// Keep listening until exception occurs or a socket is returned
while (true) {
try {
socket = mmServerSocket.accept();
} catch (IOException e) {
break;
}
// If a connection was accepted
if (socket != null) {
// Do work to manage the connection (in a separate thread)
manageConnectedSocket(socket);
mmServerSocket.close();
break;
}
}
}
/** Will cancel the listening socket, and cause the thread to finish */
public void cancel() {
try {
mmServerSocket.close();
} catch (IOException e) { }
}
}
客户端的实现
通过搜索得到服务器端的BluetoothService
调用BluetoothService的listenUsingRfcommWithServiceRecord(String, UUID)方法获取BluetoothSocket(该UUID应该同于服务器端的UUID)
调用BluetoothSocket的connect()方法(该方法为block方法),如果UUID同服务器端的UUID匹配,并且连接被服务器端accept,则connect()方法返回
注意:在调用connect()方法之前,应当确定当前没有搜索设备,否则连接会变得非常慢并且容易失败
private class ConnectThread extends Thread {
private final BluetoothSocket mmSocket;
private final BluetoothDevice mmDevice;
public ConnectThread(BluetoothDevice device) {
// Use a temporary object that is later assigned to mmSocket,
// because mmSocket is final
BluetoothSocket tmp = null;
mmDevice = device;
// Get a BluetoothSocket to connect with the given BluetoothDevice
try {
// MY_UUID is the app's UUID string, also used by the server code
tmp = device.createRfcommSocketToServiceRecord(MY_UUID);
} catch (IOException e) { }
mmSocket = tmp;
}
public void run() {
// Cancel discovery because it will slow down the connection
mBluetoothAdapter.cancelDiscovery();
try {
// Connect the device through the socket. This will block
// until it succeeds or throws an exception
mmSocket.connect();
} catch (IOException connectException) {
// Unable to connect; close the socket and get out
try {
mmSocket.close();
} catch (IOException closeException) { }
return;
}
// Do work to manage the connection (in a separate thread)
manageConnectedSocket(mmSocket);
}
/** Will cancel an in-progress connection, and close the socket */
public void cancel() {
try {
mmSocket.close();
} catch (IOException e) { }
}
}
连接管理(数据通信)
分别通过BluetoothSocket的getInputStream()和getOutputStream()方法获取InputStream和OutputStream
使用read(bytes[])和write(bytes[])方法分别进行读写操作
注意:read(bytes[])方法会一直block,知道从流中读取到信息,而write(bytes[])方法并不是经常的block(比如在另一设备没有及时read或者中间缓冲区已满的情况下,write方法会block)
private class ConnectedThread extends Thread {
private final BluetoothSocket mmSocket;
private final InputStream mmInStream;
private final OutputStream mmOutStream;
public ConnectedThread(BluetoothSocket socket) {
mmSocket = socket;
InputStream tmpIn = null;
OutputStream tmpOut = null;
// Get the input and output streams, using temp objects because
// member streams are final
try {
tmpIn = socket.getInputStream();
tmpOut = socket.getOutputStream();
} catch (IOException e) { }
mmInStream = tmpIn;
mmOutStream = tmpOut;
}
public void run() {
byte[] buffer = new byte[1024]; // buffer store for the stream
int bytes; // bytes returned from read()
// Keep listening to the InputStream until an exception occurs
while (true) {
try {
// Read from the InputStream
bytes = mmInStream.read(buffer);
// Send the obtained bytes to the UI Activity
mHandler.obtainMessage(MESSAGE_READ, bytes, -1, buffer)
.sendToTarget();
} catch (IOException e) {
break;
}
}
}
/* Call this from the main Activity to send data to the remote device */
public void write(byte[] bytes) {
try {
mmOutStream.write(bytes);
} catch (IOException e) { }
}
/* Call this from the main Activity to shutdown the connection */
public void cancel() {
try {
mmSocket.close();
} catch (IOException e) { }
}
}
除了这个常量,有提供其它的API,支持不同任务的其他常数。它们在下面列出。
此常数用于开启蓝牙的发现2ACTION_STATE_CHANGED
此常量将通知蓝牙状态已经改变3ACTION_FOUND
此常数用于接收关于所发现的每个设备的信息
启用了蓝牙功能之后,可以通过调用 getBondedDevices()方法来获取配对设备列表。它返回一组的蓝牙设备。其语法如下:
private Set<BluetoothDevice>pairedDevices;pairedDevices = BA.getBondedDevices();
除了配对的设备,还有API,让更多蓝牙控制权等方法。它们在下面列出。
这种方法使适配器,如果未启用2isEnabled()
如果适配器已启用此方法返回true3disable()
该方法禁用适配器4getName()
此方法返回的蓝牙适配器的名称5setName(String name)
此方法更改蓝牙名称6getState()
此方法返回蓝牙适配器的当前状态7startDiscovery()
此方法开始蓝牙120秒的发现过程。
package com.example.administrator.bluetoothdemo;import android.bluetooth.BluetoothAdapter;import android.bluetooth.BluetoothDevice;import android.content.BroadcastReceiver;import android.content.Context;import android.content.Intent;import android.content.IntentFilter;import android.os.Bundle;import android.support.v7.app.AppCompatActivity;import android.util.Log;import android.view.View;import android.widget.Button;import android.widget.TextView;import android.widget.Toast;import java.util.Iterator;import java.util.Set;public class MainActivity extends AppCompatActivity implements View.OnClickListener{ private static String TAG = "Bluetooth_State"; private BluetoothAdapter mBluetoothAdapter; // 本机蓝牙适配器对象 private TextView btDesc; private Button btOpen; private Button btClose; private Button btOpenBySystem; // 调用系统API去打开蓝牙 private Button btDiscoveryDevice; private Button btCancelDiscovery; private Button btDiscoveryBySystem; //调用系统Api去扫描蓝牙设备 /** Called when the activity is first created. */ @Override public void onCreate(Bundle savedInstanceState) { super.onCreate(savedInstanceState); setContentView(R.layout.activity_main); mBluetoothAdapter = BluetoothAdapter.getDefaultAdapter(); // 获得本机蓝牙适配器对象引用 if (mBluetoothAdapter == null) { toast("对不起 ,您的机器不具备蓝牙功能"); return; } IntentFilter bluetoothFilter = new IntentFilter(); bluetoothFilter.addAction(BluetoothAdapter.ACTION_STATE_CHANGED); bluetoothFilter.addAction(BluetoothAdapter.ACTION_SCAN_MODE_CHANGED); this.registerReceiver(BluetoothReciever, bluetoothFilter); //蓝牙扫描相关设备 IntentFilter btDiscoveryFilter = new IntentFilter(); btDiscoveryFilter.addAction(BluetoothAdapter.ACTION_DISCOVERY_STARTED); btDiscoveryFilter.addAction(BluetoothAdapter.ACTION_DISCOVERY_FINISHED); btDiscoveryFilter.addAction(BluetoothDevice.ACTION_FOUND); btDiscoveryFilter.addAction(BluetoothDevice.ACTION_BOND_STATE_CHANGED); this.registerReceiver(BTDiscoveryReceiver, btDiscoveryFilter); int initialBTState = mBluetoothAdapter.getState(); printBTState(initialBTState); // 初始时蓝牙状态 initialViews(); btDesc.setText(" Name : " + mBluetoothAdapter.getName() + " Address : " + mBluetoothAdapter.getAddress() + " Scan Mode --" + mBluetoothAdapter.getScanMode()); //打印处当前已经绑定成功的蓝牙设备 Set<BluetoothDevice> bts = mBluetoothAdapter.getBondedDevices(); Iterator<BluetoothDevice> iterator = bts.iterator(); while(iterator.hasNext()) { BluetoothDevice bd = iterator.next() ; Log.i(TAG , " Name : " + bd.getName() + " Address : "+ bd.getAddress() ); ; Log.i(TAG, "Device class" + bd.getBluetoothClass()); } BluetoothDevice findDevice = mBluetoothAdapter.getRemoteDevice("00:11:22:33:AA:BB"); Log.i(TAG , "findDevice Name : " + findDevice.getName() + " findDevice Address : "+ findDevice.getAddress() ); ; Log.i(TAG , "findDevice class" + findDevice.getBluetoothClass()); } private void initialViews() { btDesc = (TextView) findViewById(R.id.btDesc); btOpen = (Button) findViewById(R.id.btOpen); btClose = (Button) findViewById(R.id.btClose); btOpenBySystem = (Button) findViewById(R.id.btOpenBySystem); btDiscoveryDevice = (Button) findViewById(R.id.btDiscoveryDevice); btCancelDiscovery = (Button) findViewById(R.id.btCancelDiscovery); btDiscoveryBySystem = (Button) findViewById(R.id.btDiscoveryBySystem); btOpen.setOnClickListener(this); btClose.setOnClickListener(this); btOpenBySystem.setOnClickListener(this); btDiscoveryDevice.setOnClickListener(this); btCancelDiscovery.setOnClickListener(this); btDiscoveryBySystem.setOnClickListener(this); } //蓝牙开个状态以及扫描状态的广播接收器 private BroadcastReceiver BluetoothReciever = new BroadcastReceiver() { @Override public void onReceive(Context context, Intent intent) { // TODO Auto-generated method stub if (BluetoothAdapter.ACTION_STATE_CHANGED.equals(intent.getAction())) { Log.v(TAG, "### Bluetooth State has changed ##"); int btState = intent.getIntExtra(BluetoothAdapter.EXTRA_STATE, BluetoothAdapter.STATE_OFF); printBTState(btState); } else if(BluetoothAdapter.ACTION_SCAN_MODE_CHANGED.equals(intent.getAction())) { Log.v(TAG, "### ACTION_SCAN_MODE_CHANGED##"); int cur_mode_state = intent.getIntExtra(BluetoothAdapter.EXTRA_SCAN_MODE, BluetoothAdapter.SCAN_MODE_NONE); int previous_mode_state = intent.getIntExtra(BluetoothAdapter.EXTRA_PREVIOUS_SCAN_MODE, BluetoothAdapter.SCAN_MODE_NONE); Log.v(TAG, "### cur_mode_state ##" + cur_mode_state + " ~~ previous_mode_state" + previous_mode_state); } } }; //蓝牙扫描时的广播接收器 private BroadcastReceiver BTDiscoveryReceiver = new BroadcastReceiver() { @Override public void onReceive(Context context, Intent intent) { // TODO Auto-generated method stub if (BluetoothAdapter.ACTION_DISCOVERY_STARTED.equals(intent.getAction())) { Log.v(TAG, "### BT ACTION_DISCOVERY_STARTED ##"); } else if(BluetoothAdapter.ACTION_DISCOVERY_FINISHED.equals(intent.getAction())) { Log.v(TAG, "### BT ACTION_DISCOVERY_FINISHED ##"); } else if(BluetoothDevice.ACTION_FOUND.equals(intent.getAction())) { Log.v(TAG, "### BT BluetoothDevice.ACTION_FOUND ##"); BluetoothDevice btDevice = intent.getParcelableExtra(BluetoothDevice.EXTRA_DEVICE); if(btDevice != null) Log.v(TAG , "Name : " + btDevice.getName() + " Address: " + btDevice.getAddress()); } else if(BluetoothDevice.ACTION_BOND_STATE_CHANGED.equals(intent.getAction())) { Log.v(TAG, "### BT ACTION_BOND_STATE_CHANGED ##"); int cur_bond_state = intent.getIntExtra(BluetoothDevice.EXTRA_BOND_STATE, BluetoothDevice.BOND_NONE); int previous_bond_state = intent.getIntExtra(BluetoothDevice.EXTRA_PREVIOUS_BOND_STATE, BluetoothDevice.BOND_NONE); Log.v(TAG, "### cur_bond_state ##" + cur_bond_state + " ~~ previous_bond_state" + previous_bond_state); } } }; private void printBTState(int btState) { switch (btState) { case BluetoothAdapter.STATE_OFF: toast("蓝牙状态:已关闭"); Log.v(TAG, "BT State : BluetoothAdapter.STATE_OFF ###"); break; case BluetoothAdapter.STATE_TURNING_OFF: toast("蓝牙状态:正在关闭"); Log.v(TAG, "BT State : BluetoothAdapter.STATE_TURNING_OFF ###"); break; case BluetoothAdapter.STATE_TURNING_ON: toast("蓝牙状态:正在打开"); Log.v(TAG, "BT State :BluetoothAdapter.STATE_TURNING_ON ###"); break; case BluetoothAdapter.STATE_ON: toast("蓝牙状态:已打开"); Log.v(TAG, "BT State :BluetoothAdapter.STATE_ON ###"); break; default: break; } } private final int REQUEST_OPEN_BT_CODE = 1; private final int REQUEST_DISCOVERY_BT_CODE = 2; @Override public void onClick(View v) { // TODO Auto-generated method stub boolean wasBtOpened = mBluetoothAdapter.isEnabled(); // 是否已经打开 switch (v.getId()) { case R.id.btOpen: // 打开 boolean result = mBluetoothAdapter.enable(); if (result) toast("蓝牙打开操作成功"); else if (wasBtOpened) toast("蓝牙已经打开了"); else toast("蓝牙打开失败"); break; case R.id.btClose: // 关闭 boolean result1 = mBluetoothAdapter.disable(); if (result1) toast("蓝牙关闭操作成功"); else if (!wasBtOpened) toast("蓝牙已经关闭"); else toast("蓝牙关闭失败."); break; case R.id.btOpenBySystem: //调用系统API打开蓝牙设备 Log.e(TAG, " ## click btOpenBySystem ##"); if (!wasBtOpened) //未打开蓝牙,才需要打开蓝牙 { Intent intent = new Intent(BluetoothAdapter.ACTION_REQUEST_ENABLE); startActivityForResult(intent, REQUEST_OPEN_BT_CODE); } else toast("Hi ,蓝牙已经打开了,不需要在打开啦 ~~~"); break; case R.id.btDiscoveryDevice: //扫描时,必须先打开蓝牙 if (!mBluetoothAdapter.isDiscovering()){ Log.i(TAG, "btCancelDiscovery ### the bluetooth dont't discovering"); mBluetoothAdapter.startDiscovery(); } else toast("蓝牙正在搜索设备了 ---- "); break; case R.id.btCancelDiscovery: //取消扫描 if (mBluetoothAdapter.isDiscovering()){ Log.i(TAG, "btCancelDiscovery ### the bluetooth is isDiscovering"); mBluetoothAdapter.cancelDiscovery(); } else toast("蓝牙并未搜索设备 ---- "); break; case R.id.btDiscoveryBySystem : //使蓝牙能被扫描 Intent discoveryintent = new Intent(BluetoothAdapter.ACTION_REQUEST_DISCOVERABLE); discoveryintent.putExtra(BluetoothAdapter.EXTRA_DISCOVERABLE_DURATION, 300); startActivityForResult(discoveryintent, REQUEST_DISCOVERY_BT_CODE); break ; } } //请求码 protected void onActivityResult(int requestCode, int resultCode, Intent data) { if(requestCode == REQUEST_OPEN_BT_CODE){ if (resultCode == RESULT_CANCELED) { toast("Sorry , 用户拒绝了您的打开蓝牙请求."); } else toast("Year , 用户允许了您的打开蓝牙请求."); } else if(requestCode == REQUEST_DISCOVERY_BT_CODE) { if (resultCode == RESULT_CANCELED) { toast("Sorry , 用户拒绝了,您的蓝牙不能被扫描."); } else toast("Year , 用户允许了,您的蓝牙能被扫描"); } } private void toast(String str) { Toast.makeText(MainActivity.this, str, Toast.LENGTH_SHORT).show(); }}2、xml
<?xml version="1.0" encoding="utf-8"?><LinearLayout xmlns:android="http://schemas.android.com/apk/res/android" android:layout_width="fill_parent" android:layout_height="fill_parent" android:orientation="vertical"> <TextView android:id="@+id/btDesc" android:layout_width="fill_parent" android:layout_height="wrap_content" android:text="hello" /> <Button android:id="@+id/btOpen" android:layout_width="wrap_content" android:layout_height="wrap_content" android:text="打开蓝牙"> </Button> <Button android:id="@+id/btClose" android:layout_width="wrap_content" android:layout_height="wrap_content" android:text="关闭蓝牙"> </Button> <Button android:id="@+id/btOpenBySystem" android:layout_width="wrap_content" android:layout_height="wrap_content" android:text="调用系统API打开蓝牙"> </Button> <Button android:id="@+id/btDiscoveryDevice" android:layout_width="wrap_content" android:layout_height="wrap_content" android:text="搜索蓝牙设备"> </Button> <Button android:id="@+id/btCancelDiscovery" android:layout_width="wrap_content" android:layout_height="wrap_content" android:text="停止搜索蓝牙设备"> </Button> <Button android:id="@+id/btDiscoveryBySystem" android:layout_width="wrap_content" android:layout_height="wrap_content" android:text="调用系统API搜索蓝牙设备"> </Button></LinearLayout>3、清单文件--权限
<uses-permission android:name="android.permission.BLUETOOTH" /><uses-permission android:name="android.permission.BLUETOOTH_ADMIN" />
- Android之Bluetooth—蓝牙操作
- Android深入浅出系列之Bluetooth—蓝牙操作(一)
- Android深入浅出系列之Bluetooth—蓝牙操作(二)
- Android深入浅出系列之Bluetooth—蓝牙操作(一)
- Android深入浅出系列之Bluetooth—蓝牙操作(二)
- Android深入浅出系列之Bluetooth—蓝牙操作(一)
- Android深入浅出系列之Bluetooth—蓝牙操作(二)
- Android深入浅出系列之Bluetooth—蓝牙操作(一)
- Android深入浅出系列之Bluetooth—蓝牙操作(一)
- Android深入浅出系列之Bluetooth—蓝牙操作(二)
- Android深入浅出系列之Bluetooth—蓝牙操作(一)
- Android深入浅出系列之Bluetooth—蓝牙操作(一)
- Android深入浅出系列之Bluetooth—蓝牙操作(二)
- Android Bluetooth蓝牙基本操作
- Android深入浅出系列之Bluetooth-蓝牙操作(一)
- Bluetooth--- android -- 蓝牙 bluetooth
- Android开发之蓝牙(Bluetooth)操作(一)--扫描已经配对的蓝牙设备
- Android开发之蓝牙(Bluetooth)操作(一)--扫描已经配对的蓝牙设备(转)
- Tomcat的版本、Servlet/JSP版本、JavaEE版本、JavaSE版本 四者之间的对应关系
- 多重背包—C - HDU 2191 - 悼念512汶川大地震遇难同胞――珍惜现在,感恩生活
- Mysql 5.7 的‘虚拟列’是做什么?
- h5的简介
- Unity在Editor模式下查看Shader动态效果
- Android之Bluetooth—蓝牙操作
- day07 复习练习
- Java中Runnable和Thread的区别
- 图文详解Windows下安装使用Redis
- Linux系统调用--getrlimit()与setrlimit()函数详解
- struts2:struts.properties配置文件介绍及常量加载顺序
- [bzoj1488][HNOI2009]图的同构——Polya定理
- Js中如何判断一个对象为数组类型
- 关于getClass().getClassLoader()