仿《雷霆战机》飞行射击手游开发--新手引导
来源:互联网 发布:品茗软件破解版闪退 编辑:程序博客网 时间:2024/04/30 00:00
转载请注明:http://www.cnblogs.com/thorqq/p/6403666.html
Windows试玩版下载:
http://files.cnblogs.com/files/thorqq/Raiden-win.part1.rar
http://files.cnblogs.com/files/thorqq/Raiden-win.part2.rar
传统的新手引导方式一般是设置一个全局的静态变量来保存当前新手引导进度,然后在项目中每个可能出现新手引导的位置添加一句判断:若当前新手引导步骤等于我所期望的步骤就执行引导部分的逻辑,新手引导常常逻辑杂乱,而且跟界面的逻辑常常交叉在一块,弄的不好的话代码里到处都是if else,保存各种临时状态变量。
本文将以仿雷霆战机游戏为例,说说其中关于新手引导的设计。
游戏效果
下面先看游戏中比较典型的两类引导
1、 菜单引导
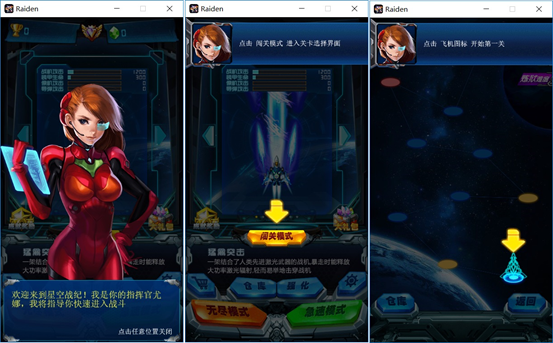
当用于初次启动游戏时,通过两三个步骤引导让用户快速的进入游戏,体验游戏的快感,所以,这里采用了三个步骤:
a) 大xiong妹妹出没,吸引男性玩家的眼球,引导玩家进入主菜单;
b) 引导玩家选择默认飞机,并进入关卡选择界面;
c) 引导玩家选择第一关,并进入战斗界面;
2、 游戏引导
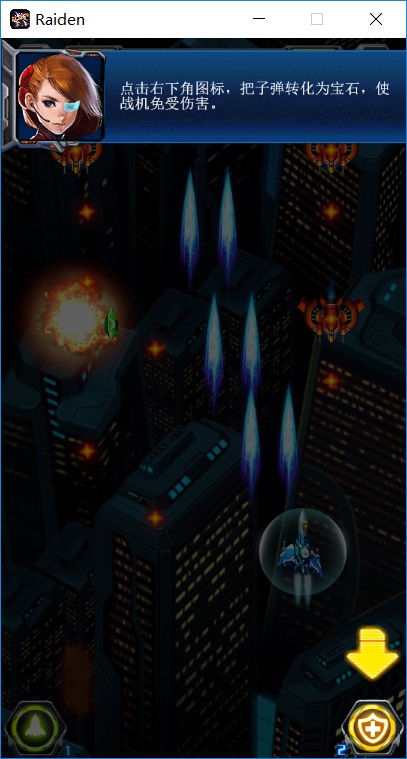
在游戏过程中,当满足一定的条件时,就暂停游戏,弹出游戏道具(上图中时护盾,可以把屏幕上的子弹全部变成宝石)的使用方法说明,并引导玩家体验道具的效果。
新手引导的显示效果为:
a) 突出显示需要用户点击的控件(例如:按钮),其他部门全部降低亮度
b) 用动画箭头指向该控件,方便玩家识别
c) 显示文字说明,告知玩家相关的操作步骤或道具使用方法
要让界面变暗很简单,覆盖一个半透明的层就可以了。那么怎么才能让某个控件变亮呢?easy,把这个控件从父节点上摘下来,挂到半透明层上就可以了。
原理介绍完毕,下面该讲讲代码设计了。
接口调用
菜单引导一般放在界面的onEnter函数中,这样,当玩家进入该界面时就会立刻触发新手引导逻辑。下面是出现美女欢迎界面的函数,怎么样,只有几行代码,很简单吧。
void MenuMainUI::onEnter(){Layer::onEnter();//美女新手引导Guide* pGuide = GuideMgr::getInstance()->show(GuideType::WelcomeGirl, this, nullptr, [this](){GuideMgr::getInstance()->show(GuideType::WelcomeClickButtonLevel, this, m_pBtnLevel);});}在上面的代码中,我们使用了这个函数:
Guide* GuideMgr::show(int guideType, Node* parent, Node* widget, const std::function<void()>& callback)
其中:
1) guideType是引导类型,有如下的取值:
const int WelcomeGirl = 10; //第一次进入游戏后的欢迎说明const int WelcomeClickButtonLevel = 20; //点击闯关模式const int WelcomeClickMissionOne = 30; //点击第一关const int GameShield = 140; //护盾引导
2) parent是父节点,一般是当前的界面层。半透明层就是要挂在这个节点下。
3) widget是需要高亮显示的控件节点。对于美女引导来说,没有控件需要高亮显示,所以传入nullptr;对于第二个引导界面来说,是“闯关模式“按钮节点。
4) callback是lambda表达式。当用户点击引导界面的任意处使得引导界面消失时,就会调用callback。在这个例子中,我们使用这个参数来实现两个引导界面连续出现。
GuideMgr::show()函数返回Guide对象指针,这是什么鬼?我们后面再说。
我们再看下护盾使用引导界面的调用代码:
void HubLayer::displayGuideShield(){Guide* pGuide = GuideMgr::getInstance()->show(GuideType::GameShield, this->getParent(), m_pBtnShield);if (pGuide){m_pPlaneLayer->pause();}}void HubLayer::menuShieldCallback(Ref* pSender){if (GuideMgr::getInstance()->destory(GuideType::GameShield)){m_pPlaneLayer->resume();}}逻辑很简单,弹出引导界面,并暂停游戏。点击护盾按钮后,销毁引导层,恢复游戏运行,这时,满屏的子弹哗啦啦的变成了宝石。
新手引导接口调用貌似看着挺简单的,似乎也不太会破坏原有代码的美观。那么其内部逻辑是不是很复杂呢?
实现原理
新手引导实现代码设计如下几个类:
1) PopupLayer类:显示半透明层,响应用户的各种触摸操作
2) Guide类:显示新手引导的主逻辑
3) GuideMgr类:管理所有的新手引导Guide类
4) GuideWelcomeGirl/ GuideWelcomeClickButtonLevel/ GuideWelcomeClickMissionOne/ GuideGameShield类:继承自Guide类,用于实现各种引导。
下面我们逐个分析这些类。
半透明层
class PopupLayer : public LayerColor{public:PopupLayer();~PopupLayer();virtual bool init();virtual bool doInit() = 0;//touch事件监听 屏蔽向下触摸virtual bool onTouchBegan(Touch *touch, Event *event) override;virtual void onTouchMoved(Touch *touch, Event *event) override;virtual void onTouchEnded(Touch* touch, Event* event) override;virtual std::function<bool(Touch*, Event*)> getTouchBeganFunc() { return CC_CALLBACK_2(PopupLayer::onTouchBegan, this); };virtual std::function<void(Touch*, Event*)> getTouchMovedFunc() { return CC_CALLBACK_2(PopupLayer::onTouchMoved, this); }virtual std::function<void(Touch*, Event*)> getTouchEndedFunc() { return CC_CALLBACK_2(PopupLayer::onTouchEnded, this); }protected:EventListenerTouchOneByOne* m_pListener;};PopupLayer::PopupLayer(): m_pListener(nullptr){}PopupLayer::~PopupLayer(){Director::getInstance()->getEventDispatcher()->removeEventListener(m_pListener);}bool PopupLayer::init(){if (!LayerColor::init()){return false;}m_pListener = EventListenerTouchOneByOne::create();m_pListener->setSwallowTouches(true);m_pListener->onTouchBegan = getTouchBeganFunc();m_pListener->onTouchMoved = getTouchMovedFunc();m_pListener->onTouchEnded = getTouchEndedFunc();auto dispatcher = Director::getInstance()->getEventDispatcher();dispatcher->addEventListenerWithSceneGraphPriority(m_pListener, this);setColor(Color3B(0, 0, 0));setOpacity(160);return doInit();}bool PopupLayer::onTouchBegan(Touch *touch, Event *event){return true;}void PopupLayer::onTouchMoved(Touch *touch, Event *event){}void PopupLayer::onTouchEnded(Touch* touch, Event* event){}上面这段代码中,通过继承LayerColor,并使用setColor(Color3B(0, 0, 0)); setOpacity(160);来实现一个半透明层的遮盖,而具体的界面初始化和触摸响应,则由子类来重写doInit/onTouchBegan/ onTouchMoved/ onTouchEnded来实现。
新手引导基类
先上代码
#define DECLARE_GUIDE(name)\private:\static bool mInit; \static int mType; \public:\static Guide* create()\{\return new name(); \}\static bool checkCondition();#define REGISTER_GUIDE(type, name) \bool name::mInit = GuideMgr::getInstance()->registerFunc(type, name::checkCondition, name::create); \int name::mType = type;class Guide : public PopupLayer{public:Guide();public://显示Guide* show(int GuideType, Node* pRoot, Node* pTarget, const std::function<void()>& callback = nullptr);//还原targetvoid restore();//设置文字描述void setPrompt(const std::string& prompt);//设置玩家触摸屏幕任意一点后的响应,例如:销毁当前的引导并弹出新的引导virtual void onTouchEnded(Touch *touch, Event *event) override;virtual std::function<void(Touch*, Event*)> getTouchEndedFunc() override{return CC_CALLBACK_2(Guide::onTouchEnded, this);}virtual void onEnter() override;virtual void onExit() override;protected://在最上层创建一个GuideBg,然后把target按钮从原节点上拿下来,添加到GuideBg上virtual bool doInit() override;protected:int m_iGuideType;std::function<void()> m_callback;Node* m_pRoot;Node* m_pTarget;int m_targetLocalZOrder;Vec2 m_targetPos;Node* m_targetParent;ui::Text* m_pTextPrompt;std::string m_prompt;bool m_touchEnable;};这个类中,最重要的就是doInit函数,其功能包括了:把目标按钮从原来的父节点上摘下来,挂到半透明层上。
m_targetPos = m_pTarget->getPosition();m_targetParent = m_pTarget->getParent();m_targetLocalZOrder = m_pTarget->getLocalZOrder();//Vec2 pos = m_pRoot->convertToWorldSpace(m_pTarget->getPosition());Vec2 pos = m_pTarget->convertToWorldSpace(Vec2::ZERO);pos += m_pTarget->getAnchorPointInPoints();//将target移到本layer上m_pRoot->addChild(this);m_pTarget->retain();this->addChild(m_pTarget);m_pTarget->release();m_pTarget->setPosition(pos);
添加指示箭头动画
//m_pTarget的中心位置(根据锚点进行转换)float deltaX = (0.5 - m_pTarget->getAnchorPoint().x) * m_pTarget->getAnchorPointInPoints().x / m_pTarget->getAnchorPoint().x;float deltaY = (0.5 - m_pTarget->getAnchorPoint().y) * m_pTarget->getAnchorPointInPoints().y / m_pTarget->getAnchorPoint().y;//添加指示箭头Sprite* pArrow = Sprite::createWithSpriteFrameName("Guide_Arrow.png");const Size& targetSize = m_pTarget->getContentSize();const Size& arrowSize = pArrow->getContentSize();bool bArrowTop = true;Node* pDialogBox = nullptr;Sprite* pDialogBoxBg = nullptr;ui::Text* m_pTextPrompt = nullptr;if (m_prompt.length() > 0){pDialogBox = Preload::getInstance()->getUI("GameUI_Dialogbox.csb");FIND_UI_CONTROL_RE(ui::Text*, "Text_Content", m_pTextPrompt, pDialogBox);FIND_UI_CONTROL_RE(Sprite*, "GameUI_Dialogbox_Bg", pDialogBoxBg, pDialogBox);m_pTextPrompt->setTextAreaSize(Size(360, 110));m_pTextPrompt->ignoreContentAdaptWithSize(false);}if (m_pTarget->getPositionY() < CONSTANT::DESIGN_RES_HEIGHT / 2 + 100){//箭头在控件的上方bArrowTop = true;pArrow->setPosition(m_pTarget->getPosition().x + deltaX,m_pTarget->getPosition().y + targetSize.height / 2 + arrowSize.height / 2 + 20 + deltaY);if (pDialogBox){pDialogBox->setPosition(CONSTANT::DESIGN_RES_WIDTH / 2, CONSTANT::DESIGN_RES_HEIGHT - pDialogBoxBg->getContentSize().height / 2);m_pTextPrompt->setString(m_prompt);this->addChild(pDialogBox);}}else{//箭头在控件的下方bArrowTop = false;pArrow->setFlippedY(true);pArrow->setPosition(m_pTarget->getPosition().x + deltaX,m_pTarget->getPosition().y - targetSize.height / 2 - arrowSize.height / 2 - 20 + deltaY);if (pDialogBox){pDialogBox->setPosition(CONSTANT::DESIGN_RES_WIDTH / 2, pDialogBoxBg->getContentSize().height / 2);m_pTextPrompt->setString(m_prompt);this->addChild(pDialogBox);}}this->addChild(pArrow);//箭头动画DelayTime* pDelay = DelayTime::create(0.4f);MoveBy* pMove1 = MoveBy::create(0.15f, Vec2(0, -10.0f));MoveBy* pMove2 = MoveBy::create(0.15f, Vec2(0, 10.0f));Sequence* pSeq = nullptr;if (bArrowTop){pSeq = Sequence::create(pDelay, pMove1, pMove2, nullptr);}else{pSeq = Sequence::create(pDelay, pMove2, pMove1, nullptr);}RepeatForever* pRepeat = RepeatForever::create(pSeq);pArrow->runAction(pRepeat);m_touchEnable = false;销毁新手引导层,将目标按钮挂到原来的父节点上。
//还原targetvoid Guide::restore(){if (m_pTarget){m_pTarget->retain();this->getChildren().eraseObject(m_pTarget);m_targetParent->addChild(m_pTarget);m_pTarget->setLocalZOrder(m_targetLocalZOrder);m_pTarget->setPosition(m_targetPos);m_pTarget->release();}this->removeFromParent();}新手引导子类
这里我们简单介绍第一个美女欢迎和主菜单这两个新手引导。
//////////////////////////////////////////////////////////////////// 首次进入游戏的介绍//////////////////////////////////////////////////////////////////class GuideWelcomeGirl : public Guide{public:DECLARE_GUIDE(GuideWelcomeGirl);public:virtual bool doInit() override;};//////////////////////////////////////////////////////////////////// 首次进入游戏,点击闯关模式//////////////////////////////////////////////////////////////////class GuideWelcomeClickButtonLevel : public Guide{public:DECLARE_GUIDE(GuideWelcomeClickButtonLevel);public:virtual bool doInit() override;};
//////////////////////////////////////////////////////////////////// 首次进入游戏的介绍//////////////////////////////////////////////////////////////////REGISTER_GUIDE(GuideType::WelcomeGirl, GuideWelcomeGirl);bool GuideWelcomeGirl::checkCondition(){switch (GuideConstant::GuideDisplay){case GuideTestNoGuide: return false;//用于测试case GuideTestNecessary: return true; //用于测试default:return !GameData::getInstance()->checkGuide(mType)&& GameData::getInstance()->getLevelFinish(Difficulty::Easy) == 0;}}bool GuideWelcomeGirl::doInit(){Guide::setPrompt(GlobalData::getInstance()->getParameter(GuideConstant::StringGuideWelcome));if (!Guide::doInit()){return false;}return true;}//////////////////////////////////////////////////////////////////// 首次进入游戏,点击闯关模式//////////////////////////////////////////////////////////////////REGISTER_GUIDE(GuideType::WelcomeClickButtonLevel, GuideWelcomeClickButtonLevel);bool GuideWelcomeClickButtonLevel::checkCondition(){switch (GuideConstant::GuideDisplay){case GuideTestNoGuide: return false; //用于测试case GuideTestNecessary: return true; //用于测试default:return !GameData::getInstance()->checkGuide(mType)&& GameData::getInstance()->getLevelFinish(Difficulty::Easy) == 0;}}bool GuideWelcomeClickButtonLevel::doInit(){Guide::setPrompt(GlobalData::getInstance()->getParameter(GuideConstant::StringGuidePressLevelMode));if (!Guide::doInit()){return false;}return true;}仔细比较这两个新手引导代码,最大的区别点就在checkCondition函数,也就是判断当前的条件是否需要显示引导。然后,设置下需要现实的文字说明,接着,没了。
引导管理类
class GuideMgr{public:static GuideMgr* getInstance();bool registerFunc(int type, const std::function<bool()>& checkFunc, const std::function<Guide*()>& createFunc);Guide* show(int GuideType, Node* parent, Node* widget, const std::function<void()>& callback = nullptr);bool destory(int GuideType);void incGuideCnt();void decGuideCnt();bool hasGuide();protected:GuideMgr();private:std::map<int, std::function<bool()>> m_condMap;std::map<int, std::function<Guide*()>> m_createMap;std::map<int, Guide*> m_objectMap;int m_iCnt;static GuideMgr* m_pInstance;};
GuideMgr* GuideMgr::m_pInstance = nullptr;GuideMgr* GuideMgr::getInstance(){if (!m_pInstance){m_pInstance = new GuideMgr();}return m_pInstance;}GuideMgr::GuideMgr() : m_iCnt(0){}bool GuideMgr::registerFunc(int type, const std::function<bool()>& checkFunc, const std::function<Guide*()>& createFunc){m_condMap.insert(std::map<int, std::function<bool()>>::value_type(type, checkFunc));m_createMap.insert(std::map<int, std::function<Guide*()>>::value_type(type, createFunc));return true;}Guide* GuideMgr::show(int guideType, Node* parent, Node* widget, const std::function<void()>& callback){if (hasGuide()){return nullptr;}auto itCond = m_condMap.find(guideType);auto itCreate = m_createMap.find(guideType);if (itCond != m_condMap.end() && itCreate != m_createMap.end()){if (itCond->second()){Guide* pGuide = itCreate->second();pGuide->autorelease();if (pGuide){auto it = m_objectMap.find(guideType);if (it != m_objectMap.end()){m_objectMap.erase(it);}m_objectMap.insert(std::map<int, Guide*>::value_type(guideType, pGuide));return pGuide->show(guideType, parent, widget, callback);}}}return nullptr;}bool GuideMgr::destory(int GuideType){auto it = m_objectMap.find(GuideType);if (it != m_objectMap.end()){it->second->restore();m_objectMap.erase(it);return true;}else{return false;}}void GuideMgr::incGuideCnt(){ ++m_iCnt; }void GuideMgr::decGuideCnt(){ --m_iCnt; if (m_iCnt < 0){m_iCnt = 0;}}bool GuideMgr::hasGuide(){ return m_iCnt > 0; }没啥好说的,一个单例,两个map变量(m_condMap/m_createMap),通过引导类型来查找对应引导的条件判断和创建函数,然后创建Guide,并保存到m_objectMap中。
好了,本游戏中的新手引导相关设计介绍完了,当然这并不是一个最好的设计,如果有好的设计和模式,希望能一起讨论。
本文涉及的相关代码下载:guide.rar
有任何疑问可联系:thorqq@163.com
转载请注明:http://www.cnblogs.com/thorqq/p/6403666.html
- 仿《雷霆战机》飞行射击手游开发--新手引导
- 仿《雷霆战机》飞行射击手游开发--新手引导
- 仿《雷霆战机》飞行射击手游开发--新手引导
- 仿《雷霆战机》飞行射击手游开发--新手引导
- 仿《雷霆战机》飞行射击手游开发--新手引导
- 仿《雷霆战机》飞行射击手游开发--项目总览
- 仿《雷霆战机》飞行射击手游开发–游戏简介
- 仿《雷霆战机》飞行射击手游开发--子弹、跟踪导弹和激光
- 雷霆战机
- 雷霆战机
- A - 雷霆战机
- 1073 雷霆战机
- ACdream 1073 雷霆战机
- 雷霆战机(贪心)
- ACdream 1073 雷霆战机
- ACdream 1073 雷霆战机
- ACdream - 1073 雷霆战机
- ACdream-1073 雷霆战机
- 屏幕分辨率改变导致Maximum call stack size exceeded
- 机器学习实战 --应用实例(k-近邻算法)-- 手写数字识别
- 【Java语言程序设计(基础篇)第10版 练习题答案】Practice_9_8
- 我的四轴飞行器经验总结(二)-无人机应用场景2
- 磁带最优存储问题
- 仿《雷霆战机》飞行射击手游开发--新手引导
- 多线程
- Hadoop系列之Reporter,Partitioner,JobConf, JobClient
- 关键字volatile
- linux(centos) 保存退出vi编辑
- 软件开发中的框架链接整理
- 数据库
- 解决android studio 不同ApplicationId可能导致xmlns命名空间报错
- 九度OJ-1158:买房子