粗暴解决 HTMLTestRunner 加入截图展示功能
来源:互联网 发布:乔丹生涯总数据 编辑:程序博客网 时间:2024/06/07 00:50
最近使用appium+python来做自动化,测试报告用的网上共享的HTMLTestRunner模块,但是里面貌似没有展示截图的功能,于是自己动手稍微修改了一下!
先上成果图,点击图片名字就能打开图片
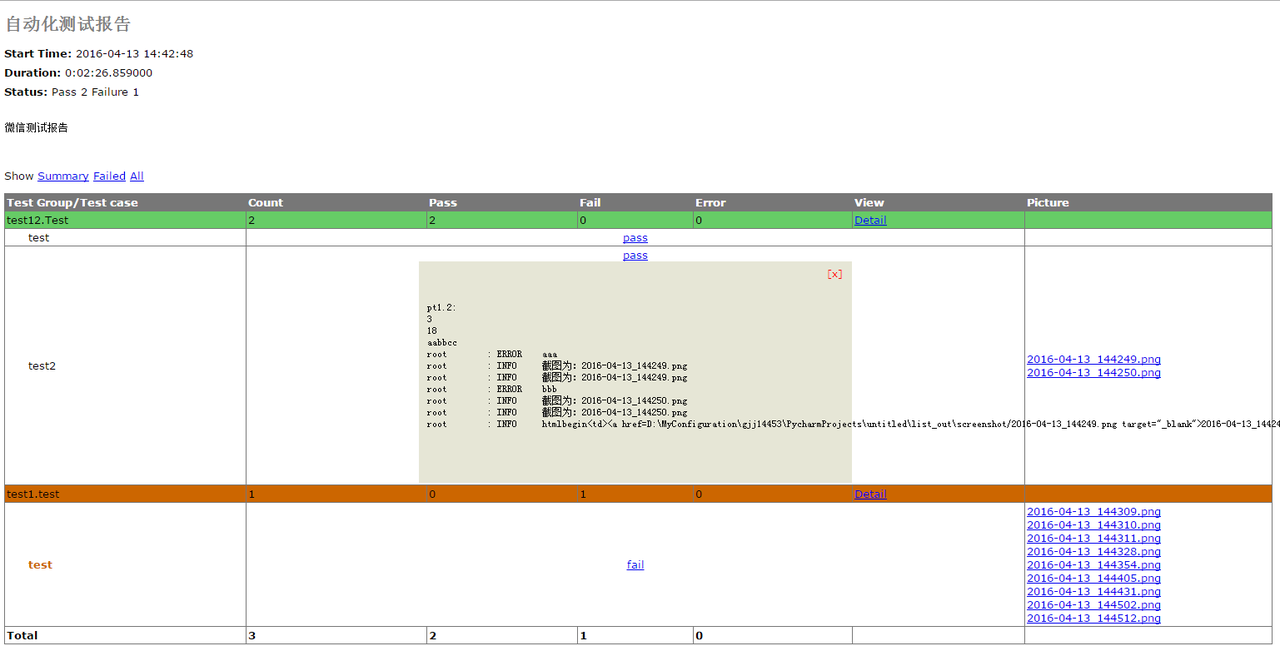
总体思路为:在HTMLTestRunner的report模板中加入一列picture,然后将用来展示图片的html打印到每个case的日志中,再从日志中将这段文字截取出来放入report中(主要是为了简单粗暴的将每个case与相关截图正确对应起来~想不到其他办法啦!欢迎高手们给出更加简单快捷的办法~)
以下为我的操作方法,有点长~
一、在HTMLTestRunner.py里的原有的html表格中插入了一列picture(在
<tr id='header_row'> <td>Test Group/Test case</td> <td>Count</td> <td>Pass</td> <td>Fail</td> <td>Error</td> <td>View</td> <td>Picture</td></tr>%(test_list)s<tr id='total_row'> <td>Total</td> <td>%(count)s</td> <td>%(Pass)s</td> <td>%(fail)s</td> <td>%(error)s</td> <td> </td> <td><a href="" target="_blank"></a></td></tr></table>二、还是在HTMLTestRunner.py里插入一行%(html)s来放置对应脚本的截图
REPORT_TEST_WITH_OUTPUT_TMPL = r"""<tr id='%(tid)s' class='%(Class)s'> <td class='%(style)s'><div class='testcase'>%(desc)s</div></td> <td colspan='5' align='center'> <!--css div popup start--> <a class="popup_link" onfocus='this.blur();' href="javascript:showTestDetail('div_%(tid)s')" > %(status)s</a> <div id='div_%(tid)s' class="popup_window"> <div style='text-align: right; color:red;cursor:pointer'> <a onfocus='this.blur();' onclick="document.getElementById('div_%(tid)s').style.display = 'none' " > [x]</a> </div> <pre> %(script)s </pre> </div> <!--css div popup end--> </td> %(html)s</tr>三、依然在HTMLTestRunner.py中,_generate_report_test()函数中,插入html的内容,因为本身初学者,对unittest和htmltestrunner都不怎么了解,观察htmltestrunner的报告发现它能展示脚本执行过程中打印的log文本,所以我强行把自己组装的用于展示图片html代码打印到执行日志中,然后通过关键字截取出来,放置在script后面的位置,也就是刚才新建的picture列(要是觉得最后report中打印的log中加入了这段html影响美观,可以在下面代码中script里删掉~我懒得写了~)
script = self.REPORT_TEST_OUTPUT_TMPL % dict( id = tid, output = saxutils.escape(uo+ue),)s = uo+uehtml = s[s.find('htmlbegin')+9:s.find('htmlend')]row = tmpl % dict( tid = tid, Class = (n == 0 and 'hiddenRow' or 'none'), style = n == 2 and 'errorCase' or (n == 1 and 'failCase' or 'none'), desc = desc, script = script, html = html, status = self.STATUS[n],)四、在自己封装的手机截屏方法中加入分别将截图名称和截图存放路径插入对应的数组中(也可以使用二维数组),以下分别为打印日志,截屏,组装html的方法,在组装完成的html代码开头和结尾分别叫上htmlbegin和htmlend作为之后截取使用的关键字
# _*_ coding:utf-8 _*___author__ = 'gjj14453'import loggingimport osimport common.myDate as myDatePATH = lambda p: os.path.abspath( os.path.join(os.path.dirname(__file__), p))pics = []picpath = []################################### 日志# 0: debug# 1:info# 2:warning# -1:error###################################def mylogger(msg, flag=1): logging.basicConfig(level=logging.INFO, format='%(asctime)s %(filename)s %(levelname)s %(message)s', datefmt='%a, %d %b %Y %H:%M:%S', filename='mylog.log', filemode='w') console = logging.StreamHandler() console.setLevel(logging.DEBUG) formatter = logging.Formatter('%(name)-12s: %(levelname)-8s %(message)s') console.setFormatter(formatter) logging.getLogger('').addHandler(console) if flag == 0: logging.debug(msg) elif flag == 1: logging.info(msg) elif flag == 2: logging.warning(msg) screenshot() elif flag == -1: logging.error(msg) screenshot() logging.getLogger('').removeHandler(console)# 截屏def screenshot(): dirname = PATH('D:\\MyConfiguration\\gjj14453\\PycharmProjects\\untitled\\list_out' + "/screenshot") os.popen("adb wait-for-device") os.popen("adb shell screencap -p /data/local/tmp/tmp.png") if not os.path.isdir(dirname): os.makedirs(dirname) pic = myDate.timestampname() + ".png" path = dirname + "/" + pic os.popen("adb pull /data/local/tmp/tmp.png " + PATH(path)) os.popen("adb shell rm /data/local/tmp/tmp.png") mylogger("截图为:" + pic) pics.append(pic) picpath.append(path)def creathtml(path, pic): html = '' if range(len(path)) > 0: for i in range(len(path)): if i == 0: html = '<a href=' + path[i] + ' target="_blank">' + pic[i] + '</a>' else: html = html + '<br /><a href=' + path[i] + ' target="_blank">' + pic[i] + '</a>' else: html = '' htmls = 'htmlbegin<td>' + html +'</td>htmlend' return htmls五、之后在case中加入打印html到日志中的语句就OK啦
class Test(unittest.TestCase): def setUp(self): log.picpath = [] log.pics = [] pass def tearDown(self): pass def test(self): log.mylogger('aaa', -1) log.mylogger('bbb', -1) log.mylogger(log.creathtml(log.picpath, log.pics))以上是大牛的原创, 好像是针对安卓测试的,自己修改了下,整合到了web端的自动化测试中了。修改的地方包括:1、移动log.py到htmlrunnertest的同级目录下2、修改log中的截图函数,直接用PIL来实现的。3、更新了截图的时机,在执行出错的时候,才去截图处理。后台后的部分代码如下。HTMLrunnertest.pydef addError(self, test, err): log.picpath = [] log.pics = [] log.mylogger('errorTTT', -1) log.mylogger(log.creathtml(log.picpath, log.pics),-1) self.error_count += 1log.py# 截屏def screenshot(): dirname = PATH('D:\\**') if not os.path.isdir(dirname): os.makedirs(dirname) pic = time.strftime("%y%m%d%H%M%S")+str(random.randint(1,100))+".png" im = ImageGrab.grab() path = dirname + "\\" + pic im.save(path) mylogger("截图为:" + pic) pics.append(pic) picpath.append(path) print 'pic path is :',path
0 0
- 粗暴解决 HTMLTestRunner 加入截图展示功能
- HTMLTestRunner(适用于3.X,有截图功能)源码
- HTMLTestRunner实现报告中的截图
- html2canvas.js网页截图功能(解决截图不全问题)
- html2canvas.js网页截图功能(解决截图不全问题)
- Android获取当前屏幕截图,简单粗暴!
- Unity3D中加入简单粗暴的暂停
- 最新MeeGo截图展示
- 相关项目截图展示
- 部分界面截图展示
- Android之截图展示
- 解决 HTMLTestRunner 中文显示乱码的问题
- python输出htmltestrunner中文乱码如何解决
- 截图功能
- 截图功能
- IOS 解决CG截图功能出现图片翻转的情况
- 安卓8.0 SystemUI 中的quick setting加入屏幕截图功能
- ZXing 粗暴修改扫描范围及截图范围
- Tensorflow代码解析(二)
- Codeforces Round #402 (Div. 2)A.B.C.D
- HTTP头部总结
- 变量---字符串
- <mvc:annotation-driven/>与<mvc:default-servlet-handler/>之间的一个问题
- 粗暴解决 HTMLTestRunner 加入截图展示功能
- 移动端 1px边框
- PHP面试题——PHP字符串翻转函数
- Gradle for Android 系列:初识 Gradle 文件
- android 反编译、反调试方法总结
- bootstrap table 分页
- 数据结构与算法描述(习题3答案)
- (三)线程------Java锁机制
- js左移右移规律