Spring--使用注解和自动装配
来源:互联网 发布:百度大数据彩票预测 编辑:程序博客网 时间:2024/05/01 03:14
Spring支持用注解配置Bean,更简便。
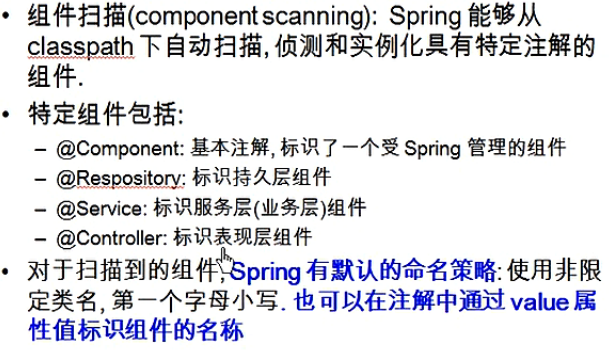
上面的组件,是根据实际情况配的。比如写的一个类,是做业务处理的,那就用注解@Service表示服务层组件,以此类推。将整体分成不同部分。
要在xml加入context命名空间
<!-- 指定Spring IOC容器扫描的包 -->2 <context:component-scan base-package="package com.guigu.spring.beans.annotation"></context:component-scan>
这样,就表示要自动扫描 基类包的类以及子包中的类。类中有注解,就会被管理
例子:
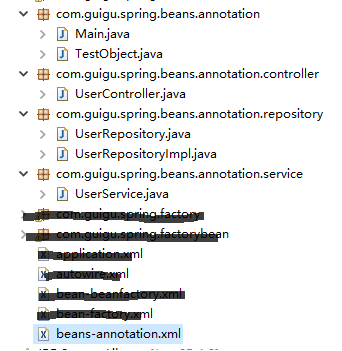
目录结构如下,第一个annotation包为要扫描的包,有下面三个子包:controller、repository、service
类里面都是一个简单的注解和一个方法:
//TestObject.javapackage com.guigu.spring.beans.annotation;import org.springframework.stereotype.Component;@Componentpublic class TestObject { }//TestObject.javapackage com.guigu.spring.beans.annotation;import org.springframework.stereotype.Component;@Componentpublic class TestObject { }//TestObject.javapackage com.guigu.spring.beans.annotation;import org.springframework.stereotype.Component;@Componentpublic class TestObject { }写一个继承,为了说明注解命名可以更改,这里改成了userRepository,否则是默认的userRepositoryImpl,下面讲//UserService.javapackage com.guigu.spring.beans.annotation.service;import org.springframework.stereotype.Service;@Servicepublic class UserService { public void add(){ System.out.println("UserService add..."); }}xml最上面已经配置,最后main函数:
package com.guigu.spring.beans.annotation;import org.springframework.context.ApplicationContext;import org.springframework.context.support.ClassPathXmlApplicationContext;import com.guigu.spring.beans.annotation.controller.UserController;import com.guigu.spring.beans.annotation.repository.UserRepository;import com.guigu.spring.beans.annotation.service.UserService;public class Main { public static void main(String[] args) { ApplicationContext ctx =new ClassPathXmlApplicationContext("beans-annotation.xml"); TestObject to = (TestObject) ctx.getBean("testObject"); System.out.println(to); UserController userController=(UserController) ctx.getBean("userController"); System.out.println(userController); UserService userservice=(UserService) ctx.getBean("userservice"); System.out.println(userservice); UserRepository userRepository=(UserRepository) ctx.getBean("userRepository"); System.out.println(userRepository); }}输出如下:说明对象被创建了

xml里面没有bean,那main函数怎么获取Bean呢?
就是用最上面图中蓝色字体。Spring默认命名,名字是它的类名第一个字符小写。如:
UserService.java类中类名是UserService ,获取bean默认名字就是userService
也可以更改,如上面的UserRepositoryImpl类,用了@Repository("userRepository"),表示bean名字为userRepository
在xml中,有一些属性和节点:
resource-pattern:只扫描特定文件
context:include-filter: 子节点表示要包含的组件
context:exclude-filter: 子节点表示要排除在外的组件
<!-- 可以通过resource-pattern指定扫描的资源 --> <context:component-scan base-package="package com.guigu.spring.beans.annotation" resource-pattern="repository/*.class"> </context:component-scan>这样,只会扫描repository包下的类,如果main函数中,还要调用其他类,报错。只能调用repository包下的类。
<!-- context:exclude-filter 子节点指定排除哪些指定表达式的组件 --> <context:component-scan base-package="package com.guigu.spring.beans.annotation"> <context:exclude-filter type="annotation" expression="package com.guigu.spring.beans.annotation.repository"/> //type类型后面看 </context:component-scan>
这表示不扫描repository子包的文件,若main函数中调用它们,会抛异常
<!-- context:include-filter 子节点指定包含哪些指定表达式的组件, 该子节点需要use-default-filters配合使用 --> <context:component-scan base-package="package com.guigu.spring.beans.annotation" use-default-filters="false"> <context:include-filter type="annotation" expression="package com.guigu.spring.beans.annotation"/> </context:component-scan>
注意,use-default-filters默认自动扫描全部,要设置成false不自动扫描,才能实现只扫描部分的功能。
<context:include-filter>和<context:exclude-filter>子节点支持多种类型的过滤表达式:
类别示例说明annotation com.yl.XxxAnnotation所有标注了XxxAnnotation的类,该类型采用目标类是否标注了某个注解进行过滤assinable com.yl.XxxService所有继承或扩展XxxService的类,该类型采用了目标类是否继承或扩展某个特定类进行过滤aspectj com.yl.*Service所有类名义Service结束的类及继承或扩展它们的类,该类型采用AspectJ表达式进行过滤regex com.yl.anno.*所有com.yl.anno包下的类。该类型采用正则表达式,根据类的类名进行过滤custom com.yl.XxxTypeFilter 采用XxxTypeFilter通过代码的方式定义过滤原则。该类必须实现org.springframewor
@Autowired:自动装配具有兼容类型的单个bean属性。可以对类成员变量、方法及构造函数进行标注,完成自动装配的工作。 通过 @Autowired的使用来代替set方法。(property 属性通过调用setter方法进行赋值)
意思就是用它,可以代替xml中的<property name="car" ref="car"> 这样的引用赋值。自动创建bean。
例子:Person类有Car对象,不用 自动装配
//Person类public class Person { private Car car; public Car getCar() { return car; } public void setCar(Car car) { this.car = car; }}//Car类public class Car { private String brand; private double price; public void setBrand(String brand) { this.brand = brand; } public void setPrice(double price) { this.price = price; }}<bean id="person" class="com.guigu.spring.bean.Person"> <property name="car" ref="car"/> </bean> <bean id="car" class="com.guigu.spring.bean.Car"> <property name="brand" value=" aodi"/> <property name="price" value="200000"/> </bean>
ApplicationContext context = new ClassPathXmlApplicationContext("autowired.xml"); Person person=(Person)ctx.getBean("person"); System.out.println(person);
这是之前的做法。
@Autowired自动装配的方法
查了一下,在之前版本的Spring中,要使用@Autowired,要在xml写上这一行代码才行
<!-- 该 BeanPostProcessor 将自动对标注 @Autowired 的 Bean 进行注入 --> <bean class="org.springframework.beans.factory.annotation.AutowiredAnnotationBeanPostProcessor"/>
但现在spring4,<context:component-scan>自动注册AutowiredAnnotationBeanPostProcessor实例,可以使用@Autowired和@Resource、和@Inject注解(一般用@Autowired)
所以,如果使用了<context:component-scan>,就不用额外注册,不然还是要
//Person类 public class Person { //@Aotuwired //自动根据xml配置实例car对象 private Car car; }<bean id="person" class="com.guigu.spring.bean.Person"> //这里就不需要再写ref="car" </bean> <bean id="car" class="com.guigu.spring.bean.Car"> <property name="brand" value=" aodi"/> <property name="price" value="200000"/> </bean>
结果和不用 @Aotuwired一样,都可以
还可以写在setter上
//Person类 public class Person { private Car car; //@Aotuwired public Car setCar(Car car){ this.car=car; } }回到注解上面的例子://UserController.java package com.guigu.spring.beans.annotation.controller; import org.springframework.stereotype.Controller; @Controller public class UserController { public void execute(){ System.out.println("UserController execute..."); } }// main函数 public class Main { public static void main(String[] args) { private UserController userController; ApplicationContext ctx =new ClassPathXmlApplicationContext("beans-annotation.xml"); userController.execute(); // 报错 } }在main函数声明userController然后直接调用它的方法,这样显然不行,因为userController都还没有创建,这时用@Autowired就很简单
// main函数 public class Main { public static void main(String[] args) { //@Autowired private UserController userController; ApplicationContext ctx =new ClassPathXmlApplicationContext("beans-annotation.xml"); userController.execute();//不报错 } }这样,就自动配置创建了userController对象,可以直接使用
注意①:@Autowired要想成功配置,得先扫描得到,就是UserController类一定要能被扫描到。
注意②:@Autowired遇到相同两个类
//UserRepository package com.guigu.spring.beans.annotation.repository; public interface UserRepository { void save(); } //UserRepositoryImpl 继承 UserRepository package com.guigu.spring.beans.annotation.repository; import org.springframework.stereotype.Repository; @Repository("userRepository"); //这里 public class UserRepositoryImpl implements UserRepository { @Override public void save() { System.out.println("UserRepositoryImpl Save..."); } //UserRepositoryImpl2 继承 UserRepository @Repository public class UserRepositoryImpl2 implements UserRepository { @Override public void save() { System.out.println("UserRepositoryImpl2 Save..."); } }// main函数 public class Main { public static void main(String[] args) { //@Autowired private UserRepository userRepository ; ApplicationContext ctx =new ClassPathXmlApplicationContext("beans-annotation.xml"); userRepository .save(); } }main函数中有@Autowired,自动创建对象,但UserRepository 类却有两个接口,它要去创建哪一个呢?
:默认情况下,若有两个,去找名字相同的,就是还没实例的这个userRepository ,若找到和它名字一样的,上面 @Repository("userRepository"); 写了名字,那就找它了。
若不是这样写@Repository("userRepository");而是 @Repository(),那就报错了。
注意③:解决②的另一个方法
若@Repository("userRepository");改成@Repository(),main函数会报错。
改一下main函数
// main函数 public class Main { public static void main(String[] args) { //@Autowired //Qualifier("userRepositoryImpl ") private UserRepository userRepository ; ApplicationContext ctx =new ClassPathXmlApplicationContext("beans-annotation.xml"); userRepository .save(); } }用Qualifier("userRepositoryImpl ");表示去找userRepositoryImpl 实例,这样也解决了。
- Spring--使用注解和自动装配
- Spring--使用注解和自动装配
- Spring 使用注解自动装配
- spring 使用注解自动装配和自动扫描机制
- Spring使用@Autowired注解自动装配
- spring 注解 自动装配
- Spring Bean自动装配和注解注入
- 注解和自动装配
- Spring使用注解装配
- Spring(三、Spring Bean自动装配和注解注入)
- spring注解自动装配Bean
- Spring自动装配(注解)
- [Spring实战系列](13)使用注解自动装配
- Spring MVC 自定义标签如何使用@Autowired自动装配注解
- 4、spring使用@Autowired注解实现自动装配
- 5、spring自动装配之@Qualifier注解的使用
- ssh使用注解自动装配
- Spring 使用注解装配Bean
- BZOJ2190: [SDOI2008]仪仗队
- Java synchronized与Lock对象锁
- 使用线性布局和相对布局做一个国际化的手机信息页面
- SSDT Hook技术详解与应用
- C#笔记整理(五)
- Spring--使用注解和自动装配
- MathType与office word07的兼容问题
- ubuntu下SSH登录qemu虚拟机
- Servlet基础
- phpstorm主题设置
- fastjson 使用方法
- spring session redis跨域共享session的总结
- 后台返回数据在前台弹出框要求换行
- C++的STL之search_n