Spring总结_04_容器和bean
来源:互联网 发布:flex java 做什么的 编辑:程序博客网 时间:2024/06/05 18:32
一.概念理解
1.容器
IoC容器负责容纳并管理bean,在Spring中,BeanFactory是IoC容器的核心接口。 它的职责包括:实例化、定位、配置应用程序中的对象及建立这些对象间的依赖。
Spring提供两种IoC容器的实现:
(1)BeanFactory :org.springframework.beans.factory.BeanFactory 是Spring IoC容器的基本实现,是Spring IoC容器实际代表者
BeanFactory是Spring框架的基础设施,面向Spring本身
(2)ApplicationContext:提供了更多的高级特性,是BeanFactory的子类。
ApplicationContext面向开发者。几乎所有的场合都直接使用ApplicationContext而非底层的BeanFactory。
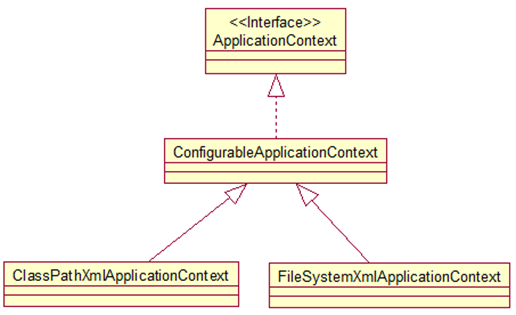
ApplicationContext 的主要实现类:
ClassPathXmlApplicationContext:从 类路径下加载配置文件
FileSystemXmlApplicationContext: 从文件系统中加载配置文件
ConfigurableApplicationContext 扩展于 ApplicationContext,新增加两个主要方法:refresh() 和 close(), 让 ApplicationContext 具有启动、刷新和关闭上下文的能力
2.bean
在Spring中,那些组成你应用程序的主体(backbone)及由Spring IoC容器所管理的对象,被称之为bean。 简单地讲,bean就是由Spring容器初始化、装配及管理的对象
bean的定义由BeanDefinition 对象来表示,该定义将包含以下信息:
- 全限定类名: 这通常就是已定义bean的实际实现类。
- bean行为的定义: 这些定义将决定bean在容器中的行为(作用域、生命周期回调等等)
- 对其他bean的引用: 这些引用bean也可以称之为协作bean(collaborators) 或依赖bean(dependencies).
- 创建bean实例时的其他配置设置。比如使用bean来定义连接池,可以通过属性或者构 造参数指定连接数,以及连接池大小限制等。
上述内容直接被翻译为每个bean定义包含的一组properties。
二.bean的配置
1. 简单实例
java bean: HelloWorld.java


package com.ray.spring;public class HelloWorld { private String name; public void setName(String name){ this.name=name; } public void hello(){ System.out.println("hello:"+name); }}
配置文件:applicationContext.xml
<?xml version="1.0" encoding="UTF-8"?><beans xmlns="http://www.springframework.org/schema/beans" xmlns:xsi="http://www.w3.org/2001/XMLSchema-instance" xmlns:util="http://www.springframework.org/schema/util" xmlns:p="http://www.springframework.org/schema/p" xsi:schemaLocation="http://www.springframework.org/schema/beans http://www.springframework.org/schema/beans/spring-beans.xsd http://www.springframework.org/schema/util http://www.springframework.org/schema/util/spring-util-4.0.xsd"> <!-- 配置一个 bean class:bean的全类名,通过反射的方式在IoC容器中创建Bean.所以要求Bean中必须有无参构造器 id:标识容器中的bean,id唯一。若有多个id,则第一个是标识符,其他为别名。 --> <bean id="helloWorld" class="com.ray.spring.HelloWorld"> <!-- 为属性赋值 通过属性注入: 通过 setter 方法注入属性值 --> <property name="name" value="Tom"></property> </bean> </beans>
bean的实例化:Main.java
package com.ray.spring;import org.springframework.context.ApplicationContext;import org.springframework.context.support.ClassPathXmlApplicationContext;public class Main { public static void main(String[] args) { //1. 创建 Spring 的 IOC 容器,ApplicationContext代表IoC容器 ApplicationContext ctx = new ClassPathXmlApplicationContext("applicationContext.xml"); /*2. 从 IOC 容器中获取 bean 的实例 2.1利用id定位到IoC容器中的bean */ HelloWorld helloWorld = (HelloWorld) ctx.getBean("helloWorld"); //2.2利用类型返回IoC容器中的bean,但要求IoC容器中必须只有一个该类型的bean //HelloWorld helloWorld = (HelloWorld) ctx.getBean("helloWorld"); //3. 使用 bean helloWorld.hello(); } }
2. bean的依赖注入
Spring 支持 3 种依赖注入的方式:属性注入、构造器注入、工厂方法注入(很少使用,不推荐)
2.1 属性注入
属性注入即通过 setter 方法注入Bean 的属性值或依赖的对象
属性注入是实际应用中最常用的注入方式。
<?xml version="1.0" encoding="UTF-8"?><beans xmlns="http://www.springframework.org/schema/beans" xmlns:xsi="http://www.w3.org/2001/XMLSchema-instance" xmlns:util="http://www.springframework.org/schema/util" xmlns:p="http://www.springframework.org/schema/p" xsi:schemaLocation="http://www.springframework.org/schema/beans http://www.springframework.org/schema/beans/spring-beans.xsd http://www.springframework.org/schema/util http://www.springframework.org/schema/util/spring-util-4.0.xsd"> <bean id="helloWorld" class="com.ray.spring.HelloWorld"> <!-- 通过属性注入: 通过 setter 方法注入属性值 <property>节点:设置属性 name :指定 Bean 的属性名称 value 或 <value> 子节点:指定属性值 --> <property name="name" value="Tom"></property> </bean> </beans>
2.2 构造器注入
构造器注入即 通过配置构造器参数,来注入Bean 的属性值或依赖的对象,它保证了 Bean 实例在实例化后就可以使用。
Java bean: Car.java
package com.ray.spring;public class Car { private String brand; private String corp; private double price; private int maxSpeed; public Car(String brand, String corp, double price) { super(); this.brand = brand; this.corp = corp; this.price = price; } public Car(String brand, String corp, int maxSpeed) { super(); this.brand = brand; this.corp = corp; this.maxSpeed = maxSpeed; } @Override public String toString() { return "Car [brand=" + brand + ", corp=" + corp + ", price=" + price + ", maxSpeed=" + maxSpeed + "]"; }}
配置文件: applicationContext.xml
<?xml version="1.0" encoding="UTF-8"?><beans xmlns="http://www.springframework.org/schema/beans" xmlns:xsi="http://www.w3.org/2001/XMLSchema-instance" xmlns:util="http://www.springframework.org/schema/util" xmlns:p="http://www.springframework.org/schema/p" xsi:schemaLocation="http://www.springframework.org/schema/beans http://www.springframework.org/schema/beans/spring-beans.xsd http://www.springframework.org/schema/util http://www.springframework.org/schema/util/spring-util-4.0.xsd"> <!-- 通过构造器注入属性值 1.按参数顺序注入--> <bean id="car1" class="com.ray.spring.Car"> <!-- 都要求: 在 Bean 中必须有对应的构造器. --> <constructor-arg value="Audi"></constructor-arg> <constructor-arg value="ShangHai"></constructor-arg> <constructor-arg value="300000"></constructor-arg> </bean> <!--2.通过参数索引注入--> <bean id="car2" class="com.ray.spring.Car"> <constructor-arg value="Audi" index="0"></constructor-arg> <constructor-arg value="ShangHai" index="1"></constructor-arg> <constructor-arg value="300000" type="double"></constructor-arg> </bean> <!--3.通过参数类型注入--> <bean id="car3" class="com.ray.spring.Car"> <constructor-arg value="Audi" type="java.lang.String"></constructor-arg> <constructor-arg value="ShangHai" type="java.lang.String"></constructor-arg> <constructor-arg value="300000" type="int"></constructor-arg> </bean></beans>
bean的实例化:
package com.ray.spring;import org.springframework.context.ApplicationContext;import org.springframework.context.support.ClassPathXmlApplicationContext;public class Main { public static void main(String[] args) { //1. 创建 Spring 的 IOC 容器,ApplicationContext代表IoC容器 ApplicationContext ctx = new ClassPathXmlApplicationContext("applicationContext.xml"); //2. 从 IOC 容器中获取 bean 的实例 Car car=(Car)ctx.getBean("car1"); System.out.println(car); car=(Car)ctx.getBean("car2"); System.out.println(car); car=(Car)ctx.getBean("car3"); System.out.println(car); } }
3.注入参数详解
3.1 字面值
(1) 字面值:可用字符串表示的值,可以通过 <value> 元素标签或 value 属性进行注入。
(2)基本数据类型及其封装类、String 等类型都可以采取字面值注入的方式
(3) 若字面值中包含特殊字符,可以使用 <![CDATA[]]> 把字面值包裹起来。
<bean id="car3" class="com.ray.spring.Car"> <constructor-arg value="Baoma" type="java.lang.String"></constructor-arg> <constructor-arg type="java.lang.String"> <value><![CDATA[<ShangHai^>]]></value> </constructor-arg> <constructor-arg value="250" type="int"></constructor-arg> </bean>
3.2 引用其他bean
组成应用程序的 Bean 经常需要相互协作以完成应用程序的功能. 要使 Bean 能够相互访问, 就必须在 Bean 配置文件中指定对 Bean 的引用
实体类:Car.java
package com.ray.spring;public class Car { private String brand; private String corp; private double price; private int maxSpeed; public Car(String brand, String corp, double price) { super(); this.brand = brand; this.corp = corp; this.price = price; } public Car(String brand, String corp, int maxSpeed) { super(); this.brand = brand; this.corp = corp; this.maxSpeed = maxSpeed; } @Override public String toString() { return "Car [brand=" + brand + ", corp=" + corp + ", price=" + price + ", maxSpeed=" + maxSpeed + "]"; }}
Person.java
package com.ray.spring;public class Person { private String name; private int age; private Car car;public String getName() { return name;}public void setName(String name) { this.name = name;}public int getAge() { return age;}public void setAge(int age) { this.age = age;}public Car getCar() { return car;}public void setCar(Car car) { this.car = car;}public Person() { }public Person(String name, int age, Car car) { super(); this.name = name; this.age = age; this.car = car;}@Overridepublic String toString() { return "Person [name=" + name + ", age=" + age + ", car=" + car + "]";} }
两种方式:
(1)使用property的 ref 属性 : 在 Bean 的配置文件中, 可以通过 <ref> 元素或 ref 属性为 Bean 的属性或构造器参数指定对 Bean 的引用.
配置文件: applicationContext.xml
<?xml version="1.0" encoding="UTF-8"?><beans xmlns="http://www.springframework.org/schema/beans" xmlns:xsi="http://www.w3.org/2001/XMLSchema-instance" xmlns:util="http://www.springframework.org/schema/util" xmlns:p="http://www.springframework.org/schema/p" xsi:schemaLocation="http://www.springframework.org/schema/beans http://www.springframework.org/schema/beans/spring-beans.xsd http://www.springframework.org/schema/util http://www.springframework.org/schema/util/spring-util-4.0.xsd"> <bean class="com.ray.spring.Car"> <constructor-arg value="Audi"></constructor-arg> <constructor-arg value="ShangHai"></constructor-arg> <constructor-arg value="300000"></constructor-arg> </bean> <!--1.通过ref属性引用--> <bean class="com.ray.spring.Person"> <property name="name" value="Tom"></property> <property name="age" value="24"></property> <property name="car" ref="car1" ></property> </bean> <!--2.通过<ref>标签引用--> <bean class="com.ray.spring.Person"> <property name="name" value="Jack"></property> <property name="age" value="22"></property> <property name="car" > <ref bean="car1" /> </property> </bean> <!--3.通过ref属性引用(构造器注入方式)--> <bean class="com.ray.spring.Person"> <constructor-arg value="jerry"></constructor-arg> <constructor-arg value="25"></constructor-arg> <constructor-arg ref="car1"></constructor-arg> </bean></beans>
(2)内部bean :在属性或构造器里包含 Bean 的声明, 这样的 Bean 称为内部 Bean
<?xml version="1.0" encoding="UTF-8"?><beans xmlns="http://www.springframework.org/schema/beans" xmlns:xsi="http://www.w3.org/2001/XMLSchema-instance" xmlns:util="http://www.springframework.org/schema/util" xmlns:p="http://www.springframework.org/schema/p" xsi:schemaLocation="http://www.springframework.org/schema/beans http://www.springframework.org/schema/beans/spring-beans.xsd http://www.springframework.org/schema/util http://www.springframework.org/schema/util/spring-util-4.0.xsd"> <bean id="person1" class="com.ray.spring.Person"> <property name="name" value="Tom"></property> <property name="age" value="24"></property> <property name="car"> <!--内部bean --> <bean class="com.ray.spring.Car"> <constructor-arg value="Ford"></constructor-arg> <constructor-arg value="ChangAn"></constructor-arg> <constructor-arg value="200000"></constructor-arg> </bean> </property></beans>
3.3 null值和级联属性
null
<bean id="person3" class="com.ray.spring.Person"> <constructor-arg value="jerry"></constructor-arg> <constructor-arg value="25"></constructor-arg> <!-- 赋值null--> <constructor-arg ><null/></constructor-arg> </bean>
级联属性
<bean id="person3" class="com.ray.spring.Person"> <constructor-arg value="jerry"></constructor-arg> <constructor-arg value="25"></constructor-arg> <!--为级联属性赋值,注意:属性要先初始化后才能为级联属性赋值,否则会抛异常,与struts2不同--> <constructor-arg ref="car1"></constructor-arg> <property name="car1.maxSpeed" value="250"></property> </bean>
3.4 集合属性
在 Spring中可以通过一组内置的 xml 标签(例如: <list>, <set> 或 <map>) 来配置集合属性.
(1)List属性配置: 配置 java.util.List 类型的属性, 需要指定 <list> 标签, 在标签里包含一些元素. 这些标签可以通过 <value> 指定简单的常量值,
通过 <ref> 指定对其他 Bean 的引用. 通过<bean> 指定内置 Bean 定义. 通过 <null/> 指定空元素. 甚至可以内嵌其他集合.
实体类:Car.java
package com.ray.spring.collections;public class Car { private String brand; private String corp; private double price; private int maxSpeed; public Car(String brand, String corp, double price) { super(); this.brand = brand; this.corp = corp; this.price = price; } public Car(String brand, String corp, int maxSpeed) { super(); this.brand = brand; this.corp = corp; this.maxSpeed = maxSpeed; } @Override public String toString() { return "Car [brand=" + brand + ", corp=" + corp + ", price=" + price + ", maxSpeed=" + maxSpeed + "]"; }}Person.java
package com.ray.spring.collections;import java.util.List;public class Person { private String name; private int age; private List<Car> cars;public String getName() { return name;}public void setName(String name) { this.name = name;}public int getAge() { return age;}public void setAge(int age) { this.age = age;}public List<Car> getCars() { return cars;}public void setCars(List<Car> cars) { this.cars = cars;}public Person() { }public Person(String name, int age, List<Car> cars) { super(); this.name = name; this.age = age; this.cars = cars;}@Overridepublic String toString() { return "Person [name=" + name + ", age=" + age + ", cars=" + cars + "]";} }
配置文件: applicationContext.xml
<?xml version="1.0" encoding="UTF-8"?><beans xmlns="http://www.springframework.org/schema/beans" xmlns:xsi="http://www.w3.org/2001/XMLSchema-instance" xmlns:util="http://www.springframework.org/schema/util" xmlns:p="http://www.springframework.org/schema/p" xsi:schemaLocation="http://www.springframework.org/schema/beans http://www.springframework.org/schema/beans/spring-beans.xsd http://www.springframework.org/schema/util http://www.springframework.org/schema/util/spring-util-4.0.xsd"> <bean id="car1" class="com.ray.spring.Car"> <constructor-arg value="Audi"></constructor-arg> <constructor-arg value="ShangHai"></constructor-arg> <constructor-arg value="300000"></constructor-arg> </bean> <bean id="car2" class="com.ray.spring.Car"> <constructor-arg value="Audi" index="0"></constructor-arg> <constructor-arg value="ShangHai" index="1"></constructor-arg> <constructor-arg value="500000" type="double"></constructor-arg> </bean> <bean id="car3" class="com.ray.spring.Car"> <constructor-arg value="Baoma" type="java.lang.String"></constructor-arg> <constructor-arg value="ShangHai" type="java.lang.String"></constructor-arg> <constructor-arg value="250" type="int"></constructor-arg> </bean> <bean id="person1" class="com.ray.spring.collections.Person"> <property name="name" value="Tom"></property> <property name="age" value="24"></property> <!--配置集合属性--> <property name="cars" > <list> <ref bean="car1" /> <ref bean="car2" /> <ref bean="car3" /> </list> </property> </bean> </beans>
bean的实例化:Main.java
package com.ray.spring.collections;import org.springframework.context.ApplicationContext;import org.springframework.context.support.ClassPathXmlApplicationContext;public class Main { public static void main(String[] args) { ApplicationContext ctx = new ClassPathXmlApplicationContext("applicationContext.xml"); Person person=(Person)ctx.getBean("person1"); System.out.println(person); } }
(2)数组的定义和 List 一样, 都使用 <list>
(3)配置 java.util.Set 需要使用 <set> 标签, 定义元素的方法与 List 一样.
(4)Map属性配置: Java.util.Map 通过 <map> 标签定义, <map> 标签里可以使用多个 <entry> 作为子标签. 每个条目包含一个键和一个值. 必须在 <key> 标签里定义键因为键和值的类型没有限制, 所以可以自由地为它们指定 <value>, <ref>, <bean> 或 <null> 元素.
可以将 Map 的键和值作为 <entry> 的属性定义: 简单常量使用 key 和 value 来定义; Bean 引用通过 key-ref 和 value-ref 属性定义;
使用 <props> 定义: Map的子类 java.util.Properties, 该标签使用多个 <prop> 作为子标签. 每个 <prop> 标签必须定义 key 属性.
实体类:Car.java
package com.ray.spring.collections;public class Car { private String brand; private String corp; private double price; private int maxSpeed; public Car(String brand, String corp, double price) { super(); this.brand = brand; this.corp = corp; this.price = price; } public Car(String brand, String corp, int maxSpeed) { super(); this.brand = brand; this.corp = corp; this.maxSpeed = maxSpeed; } @Override public String toString() { return "Car [brand=" + brand + ", corp=" + corp + ", price=" + price + ", maxSpeed=" + maxSpeed + "]"; }}
Person.java
package com.ray.spring.collections;import java.util.Map;public class Person { private String name; private int age; private Map<String,Car> cars;public String getName() { return name;}public void setName(String name) { this.name = name;}public int getAge() { return age;}public void setAge(int age) { this.age = age;}public Map<String, Car> getCars() { return cars;}public void setCars(Map<String, Car> cars) { this.cars = cars;}public Person() { }public Person(String name, int age, Map<String, Car> cars) { super(); this.name = name; this.age = age; this.cars = cars;}@Overridepublic String toString() { return "Person [name=" + name + ", age=" + age + ", cars=" + cars + "]";} }
DataSource.java
package com.ray.spring.collections;import java.util.Properties;public class DataSource { private Properties properties; public Properties getProperties() { return properties; } public void setProperties(Properties properties) { this.properties = properties; } @Override public String toString() { return "DataSource [properties=" + properties + "]"; } }
配置文件: applicationContext.xml
<?xml version="1.0" encoding="UTF-8"?><beans xmlns="http://www.springframework.org/schema/beans" xmlns:xsi="http://www.w3.org/2001/XMLSchema-instance" xmlns:util="http://www.springframework.org/schema/util" xmlns:p="http://www.springframework.org/schema/p" xsi:schemaLocation="http://www.springframework.org/schema/beans http://www.springframework.org/schema/beans/spring-beans.xsd http://www.springframework.org/schema/util http://www.springframework.org/schema/util/spring-util-4.0.xsd"> <bean id="car1" class="com.ray.spring.Car"> <constructor-arg value="Audi" index="0"></constructor-arg> <constructor-arg value="ShangHai" index="1"></constructor-arg> <constructor-arg value="300000" type="double"></constructor-arg> </bean> <bean id="car2" class="com.ray.spring.Car"> <constructor-arg value="Baoma" type="java.lang.String"></constructor-arg> <constructor-arg value="ShangHai" type="java.lang.String"></constructor-arg> <constructor-arg value="250" type="int"></constructor-arg> </bean> <bean id="car3" class="com.ray.spring.Car"> <constructor-arg value="Baoma" type="java.lang.String"></constructor-arg> <constructor-arg type="java.lang.String"> <value><![CDATA[<ShangHai^>]]></value> </constructor-arg> <constructor-arg value="250" type="int"></constructor-arg> </bean> <bean id="person1" class="com.ray.spring.collections.Person"> <property name="name" value="Rose"></property> <property name="age" value="28"></property> <!--1.使用map节点及map的entry子节点配置Map类型的成员变量--> <property name="cars" > <map> <entry key="A" value-ref="car1"></entry> <entry key="B" value-ref="car2"></entry> <entry key="C" value-ref="car3"></entry> </map> </property> </bean> <!-- 2.配置Properties属性值--> <bean id="dataSource" class="com.ray.spring.collections.DataSource"> <peoperty name="properties"> <!-- 使用props 和prop子节点来为Properties属性赋值--> <props> <prop key="user">root</prop> <prop key="password">123</prop> <prop key="jdbcUrl">jdbc:mysql:///test</prop> <prop key="driverClass">com.mysql.jdbc.Driver</prop> </props> </property> </bean> <!--3.配置单例的集合bean,以供多个bean进行引用,需要导入util命名空间--> <util:list id="cars"> <ref bean="car1"/> <ref bean="car2"/> </util:list> <bean id="person2" class="com.ray.spring.collections.Person"> <property name="name" value="jack"></property> <property name="age" value="29"></property> <property name="cars" ref="cars"></property> </bean></beans>
bean的实例化:Main.java
package com.ray.spring.collections;import org.springframework.context.ApplicationContext;import org.springframework.context.support.ClassPathXmlApplicationContext;public class Main { public static void main(String[] args) { ApplicationContext ctx = new ClassPathXmlApplicationContext("applicationContext.xml"); Person person=(Person)ctx.getBean("person1"); System.out.println(person); DataSource datasource=(DataSource)ctx.getBean("dataSource"); System.out.println(datasource); } }
3.5 p命名空间
配置文件: applicationContext.xml
<?xml version="1.0" encoding="UTF-8"?><beans xmlns="http://www.springframework.org/schema/beans" xmlns:xsi="http://www.w3.org/2001/XMLSchema-instance" xmlns:util="http://www.springframework.org/schema/util" xmlns:p="http://www.springframework.org/schema/p" xsi:schemaLocation="http://www.springframework.org/schema/beans http://www.springframework.org/schema/beans/spring-beans.xsd http://www.springframework.org/schema/util http://www.springframework.org/schema/util/spring-util-4.0.xsd"> <bean id="car1" class="com.ray.spring.Car"> <constructor-arg value="Audi" index="0"></constructor-arg> <constructor-arg value="ShangHai" index="1"></constructor-arg> <constructor-arg value="300000" type="double"></constructor-arg> </bean> <bean id="car2" class="com.ray.spring.Car"> <constructor-arg value="Baoma" type="java.lang.String"></constructor-arg> <constructor-arg value="ShangHai" type="java.lang.String"></constructor-arg> <constructor-arg value="250" type="int"></constructor-arg> </bean> <!--3.配置单例的集合bean,以供多个bean进行引用,需要导入util命名空间--> <util:list id="cars"> <ref bean="car1"/> <ref bean="car2"/> </util:list> <!--4.通过 p 命名空间为bean的属性赋值,需要先导入 p 命名空间--> <bean id="person5" class="com.ray.spring.collections.Person" p:age="30" p:name="Queen" p:cars-ref="cars"></bean></beans>
- Spring总结_04_容器和bean
- Spring总结_04_容器和bean
- Spring总结_04_容器和bean
- Spring总结_04_容器和bean
- Spring总结_04_容器和bean
- Spring总结_04_容器和bean
- Spring FrameWork 总结-- 容器和bean
- spring容器和装配Bean:
- SpringMVC容器和Spring Bean容器结合
- Spring容器和被管理的Bean
- Spring容器和被管理的Bean
- 介绍 Spring IoC 容器和 bean
- 介绍 Spring IoC 容器和 bean
- 介绍 Spring IoC 容器和 bean
- 介绍 Spring IoC 容器和 bean
- spring容器和bean的关系
- Spring容器中init Bean和destroy Bean的方式
- Spring学习总结(三)Spring容器中的Bean
- mysql 性能-数据类型篇
- uri 与url的区别
- [机器学习] 第一课01笔记
- 类与包
- uva 816 Ancient Messages (BFS)
- Spring总结_04_容器和bean
- No qualifying bean of type [services.ExportService] found for dependency问题原因
- Linux命令——网络命令
- 泛型(1)
- 1012. 数字分类
- 【c++】this指针的使用
- Linux中的同步问题(Linux驱动1)
- python: lambda, filter, map, reduce 用法
- 活动选择