Kernel Configuration: dealing with the unexpected (zz from Linux magazine)
来源:互联网 发布:网站搭建软件 编辑:程序博客网 时间:2024/05/02 04:22
Reprinted with permission of Linux Magazine
Kernel Configuration: dealing with the unexpected
by Alessandro Rubini
This article introduces to kernel configuration in order to compile a customized kernel. At the risk of being too technical, I'm also trying to explain a little of the underlying design issues; if you prefer sticking to the mere working instructions, the README file found in the source package is a good document to check.
Compiling the kernel looks like a tricky task when you first hear people talking about it; not long ago, people recompiling their kernels were considered real gurus, and I remember the thrill of my first kernel compilation, back at Linux-0.99.14. In the long run, most people learnt how to recompile their own customized kernel to get better performance out of their system. Today, you can't even be considered a real Linuxer if you don't compile kernels.
As a matter of facts, compiling a kernel is now much easier than it was a few years ago, and it is often worth the effort, to get the best from your own system. In particular, SMP workstations need a different kernel from normal uni-processor computers, and old computers (486 and 386 boxes with a small amount of RAM) will definitely suffer when running a non-customized kernel.
Note, however that a customized kernel can lead to some troubles, as the system won't even be able to boot if you make mistakes in the configuration; moreover, the same hard drive might not boot when you connect it to a different host computer (in addition to the SMP/UP problem, a kernel compiled for a recent processor family won't boot on an older processor ).
Even though most of my computers are old-fashioned and are happilyrunning version 2.0, this article concentrates on Linux-2.2, even if the differences, at the level we face things, are negligible. Version 2.2 is what you'll want to use in the near future on any recent personal computer. Also, my main focus is on the PC platform, as most Linux installations are Intel-based.
What is a kernel?
Before we begin digging in kernel configuration, I'd better restate once again what a Unix kernel is, stressing on those points that are more relevant for people who's going to create their own.
The kernel is the "innermost" part of the operating system (whence its name), and it is in charge of hardware management. It hides actual hardware by providing an abstraction layer that applications used independently of the installed hardware. A possible split-up representation of the Linux kernel is shown in figure 1.
Since the kernel is the only software allowed to deal with hardware, the choice of what parts ought to be included and what parts ought to be discarded greatly shapes what the final compiled image can do and what it can't. For example, kernel configuration dictates whether you can use a specific network interface card, whether you can access QNX partitions and whether you can route multicast packets to the Internet.
Even tough the last examples do not directly relate to installed hardware, the functionality needed to perform these tasks is nonetheless implemented at kernel level. Both interpretation of the layout of disk files (the so called filesystem-type) and the ability to handle multicast communication are part of the kernel's task -- "providing a software abstraction to physical activities".
Kernel configuration therefore reduces to finding a suitable tradeoff between system size and system features. Since kernel code (and kernel data) reside in memory for the whole lifetime of the system, the user's interest is keeping the kernel small. The more features you link in the kernel the less RAM your applications will use. Nowadays this simple relation has mostly minor importance, given the huge size of modern computers; you should nonetheless weight the issue whenever you configure an older computer.
A 2.2 kernel running on a conventional PC can be 1MB to 2MB large (and it may well extend to 3 or 4 MB if you have SCSI and a few extra devices).
Modules
Fortunately, you are not forced to analyze any kernel feature to tell whether you link it in or drop it out; parts of the kernel can be compiled as modules. A module is, technically, an object file that can be linked to a running kernel at runtime. Less technically, it is code implementing kernel-level features that can be added to a running system only when you need it, and discarded later when they are not needed any more. Still better, one of the features of the kernel enables automatic loading and unloading of modules according to what users are doing. Such feature is called kmod, and you most likely want to enable it.
A lot of system features are available as modules. Figure 1 shown marks a few of the places where functionality is modularized, but there are several more. Since a module talks with the rest of the kernel via a standardized set of function calls, most features have been modularized. You can check what features can be implemented in modules by tunning ``grep register /proc/ksyms'', as the /proc/ksyms file lists any kernel function that is made available to modules.
During the configuration process, you'll be asked several questions about features to support or discard (more on this in a while). Most of these options are also available as modules, and you can choose to compile them that way. That's how, for example, the GNU/Linux distributors are able to deliver a system that works with most hardware without emlarging the kernel to an unmanageable size.
Another interesting advantage of modularized code is that you can always compile and run a new module without being forced to reboot the system. Actually, the reason I was often compiling kernels years ago is that I needed to adapt my small 386 to new features: if I left out floppy support I was forced to recompile and reboot in order to read a diskette. Now I would just need to compile the floppy driver as a module and access the floppy (kmod will actually load the driver automagically).
Nowadays a lot of working code is distributed by third parties and made available as loadable modules. If you want to run an experimental filesystem or a device driver that is not part of the official tarball, you'll usually compile them as modules and load them into the running kernel.
Getting ready
I hear you asking real questions, the first being: do I need to compile my own kernel?
First of all, you need source code to feed the compiler with. Every distribution includes the exact source for the kernel it installs. This is required by the GNU GPL, the license Linus chose for his kernel. The source is a file called linux-2.2.10.tar.gz or so (it might be called .deb or .rpm as repackaged by the system distributor). If you have no source available -- say, if you got a reduced distribution as add-on to a magazine or other non-primary media -- you can always download it from ftp.kernel.org or one of the mirrors around the world. Note however that buying a real distribution may well be cheaper, as the complete compressed source is almost 15MB worth of data and is not trivial to download from the Internet.
Then, you need the development tools: if you didn't install at least the gcc, binutils, bin86 and gmake packages you won't be able to build your kernel (also, bash and awk are needed, but they are rarely missing from a "real" installation). In short, you can rebuild your kernel only if you areaready running a complete system. While you can build the kernel on one computer and run it elsewhere, this is not common practice for anyone but network administrators (who manage several computers at once) and GNU/Linux distributors (who need to build something that works for everyone).
Finally, you need a good mix of processing power and available time. While a Pentium-2 takes 7 minutes to compile my configuration of choice with several modules, my 486 takes two hours or more, and the 386 with 2MB of system memory would easily take a few weeks. You'll need some disk space as well: after compilation my linux-2.2.10 directory is slightly larger than 70MB. While I know processing power is not an issue with most computer owners, I underline the issue because most tasks don't really need such number crunching, so older computers are useable for doing real work and I hope people keep using them like I do.
Configuring and Compiling
Once equipped with the necessary tools, we need to run commands to have the work done. First of all, the source file must be decompressed. While I should not dig in such details but refer to the relevant README file, the README itself is inside the compressed package, so we have a cicken-and-egg problem.
To uncompress and untar, usually ``tar xvzf linux-2.2.10.tar.gz'' or anything similar will work. Most of the times you'll start from the pristine tar file (as described later, in the "Upgrading" section). If you install the source package you reveived within your own distribution, you'll find the source already installed in /usr/src, either as a linux-2.2.x directory or as a .tar.gz file, depending on the distribution you are using; in the latter case you should uncompress the file as stated above. Once you have the linux-2.2.x directory, the README file in there will be a good resource to get started.
Compiling from fresh source code is performed in four steps:
- ``make config'': the command performs the task of configuring the system. It will ask questions about whether each feature should be compiled in the kernel, made available as a module, or just discarded. The number of questions ranges from about 50 to a few hundreds (many questions just enable or disable further questions). Every question comes with associated help information, and the whole help file is more than 500k worth of data. The figures are huge, but don't be discouraged: there are alternatives to ``make config'' and I'll introduce them in a while.
- ``make depend'' instructs the system to check what files depend on what other files. This is very important in order to get a correct compiled image when you change your configuration. It is so important that it is automatically invoked by make if you forget about it.
- ``make bzImage'': this is the actual compilation step. It builds a bootable image file. If you are not running a PC but some other computer architecture, the proper compilation command will most likely be ``make boot'' instead. (``make boot'' for the PC is currently equivalent to ``make zImage'', but that is not usually what you want. More on this later).
- ``make modules'': if you chose to compile some features as modules, you'll need to build them this way. When it's done you can ``make modules_install'' to install them in the default place where kmod and other tools will look for them (i.e., they get installed into /lib/modules). Also, if you compiled modules for the kernel that is already running (if, for example you forgot a device and just added it to the configuration), you also need to invoke ``depmod -a''. I won't deal with the details of modularization here, as it's a whole topic of its own and the interested reader can refer to the relevant documentation.
The most important step, the one where user interaction is required, is the configuration one. Since the huge amount of kernel parameters makes inpractical the use of the standard ``make config'' tool, two alternatives and a shortcut have been introduced while the kernel was growing.
``make menuconfig'' uses a text-terminal pseudo-graphic interface; the tool employs the usual keys (arrows, Enter, Tab, ...) to toggle checkbuttons and similar widgets. Although menuconfig includes its own help screen (and the help associated to each question as well), I don't feel it immediately useable unless you already trained yourself with ``make config''. No extra package is needed by menuconfig because the relevant configuration tool is included in the kernel source itself; for this reason, the first step of ``make menuconfig'' is compiling itself. Figure 2 shows an xterm running the main table of menuconfig.
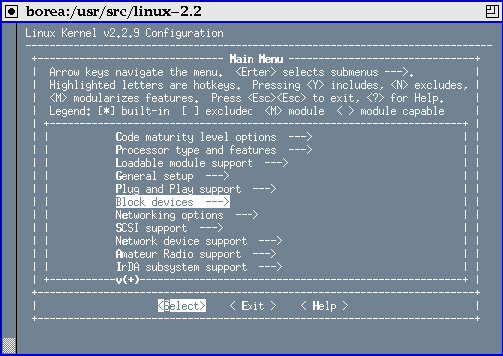
Figure 1: menuconfig running on xterm
``make xconfig'' creates a graphical interface to kernel questions. It is definitely the most friendly tool, but you'll need both Tcl/Tk installed and an X server currently running. Figure 3 is a screenshot of such configurator. (Don't be scared by the unfamiliar appearence of the desktop, I don't like default settings and run a different window manager than most people).
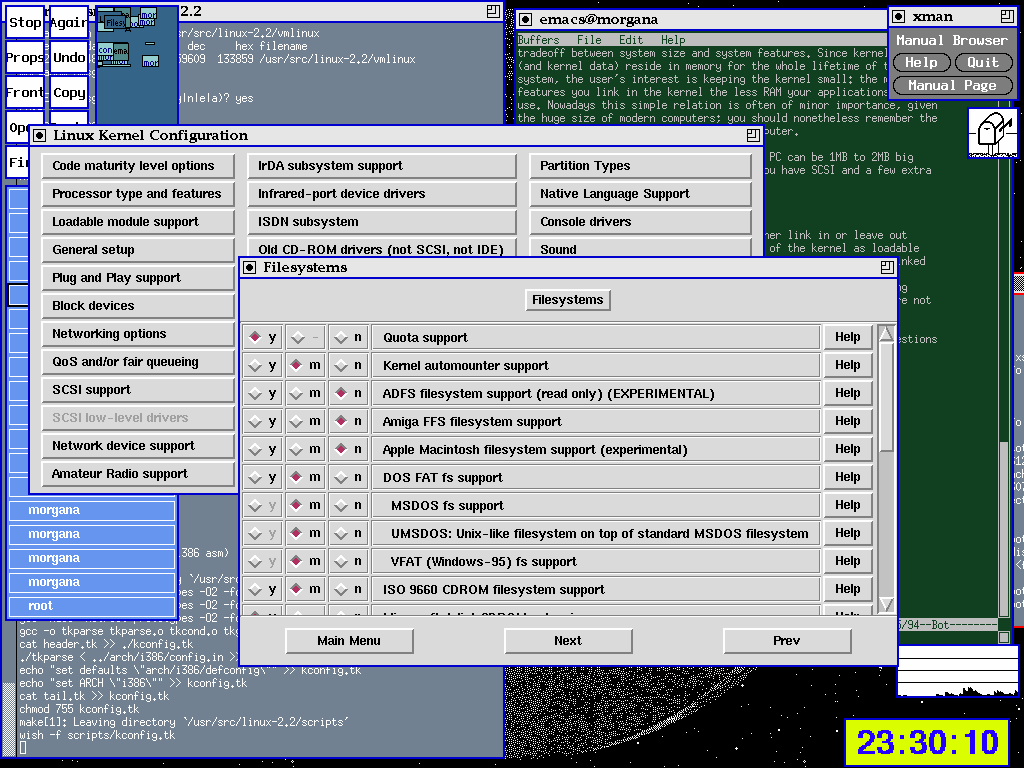
Figure 2: xconfig running on vtwm
``make oldconfig'', the shortcut, works exactly like ``make config'' but limits user interaction to asking new questions, those that you didn't answer last time you run one of the three configurators. Even though both text-based configurators mark new questions as (NEW), the only easy way to only deal with new questions is running ``make oldconfig''. The defualt reply for new question is ``No'', independent of what configurator you run.
Independently of the configuration tool being run, the output is saved as instruction files for both make and the C code. In the toplevel source directory you'll find .config, the file used by make; the autoconf.h C header will be dropped to include/linux.
The input files for the configurators are:
- .config: the current configuration is used as input the next time you configure the system. Therefore, whenever you reconfigure a kernel you only need to edit the items you want to change, without re-reading all of the questions to see if they match your needs.
- arch/i386/defconfig: the default configuration is used when no .config exists. I suspect the file represent Linus' own configuration. For other architectures use the proper platform name instead of i386.
- arch/i386/config.in: the questions to ask. The file includes other files (usually called Config.in) that reside in other directories, which are shared by several hardware architectures.
Based on this information, the best way to deal with kernel configuration, in my opinion, is using ``make xconfig'' the first time you are at it, and ``vi .config; make oldconfig'' for later refinements. For example, if you want to enable network multicast in a kernel you already configured and compiled, the easiest way to accomplish the task is removing the relevant line from .config and answering the question by making oldconfig. While you could edit .config (instead of just deleting lines), you'd need to make oldconfig anyways, in order to synchronize the C headers (and, sometimes, being asked new questions that depended on the ones you changed).
Booting your kernel
When compilation is over, you'll find a bootable image somewhere in the directory tree. If you are Intel-based, the file will be either arch/i386/boot/zImage or arch/i386/boot/bzImage, according to the commandline you passed to make. The bootable image is left down the directory tree, inside arch, because it is strictly architecture specific. Compilation also produces a ``platform independent'' file, which is called vmlinux and lives in the toplevel source directory. ``vmlinux'' is called according to the traditional Unix name vmunix, short for ``virtual-memory unix'' (the first versions didn't have virtual-memory support, and were called just unix).
While vmlinux is the real executable file that is run by the system processor (and thus you'll need it for debugging, if you ever enter the field), the booting process needs something different, mainly as a consequence of the 640kB limit that Intel processors still experience at boot time. Most other platforms supported by Linux don't need such extra processing and are able to boot vmlinux without further massaging.
The zImage file (zipped image) is a self-extracting compressed file; it is loaded into low memory (the first 64kB) and then uncompressed to high memory after the system is brought to protected mode. A zImage file bigger than about half a meg cannot be booted because it doesn't fit into low memory. The bzImage is a ``big zImage'' in that it can be bigger than half a megabyte. It gets loaded directly into high memory by using a special BIOS call, so a bzImage has no size limits, as long as it fits into the target computer.
In order to boot your newly compiled kernel, you need to arrange for the BIOS to find it. This can be done in two ways: either by dumping the image to a floppy (``cat bzImage ">" /dev/fd0'' should work, but check man rdev if you have problems in booting), or by handing the image to Lilo, the standard Linux loader (this is the preferred way, as it is much faster).
Lilo is configured by the text file /etc/lilo.conf; it can load one of several kernels, if you configure them in lilo.conf at the same time; the user can interactively choose which one to boot. Interaction can be password-protected if you are concerned about security, but this is outside of our scope. To add a new image to /etc/lilo.conf you just need to add a ``stanza'' to the file, and the stanza should describe the new image. At boot time you'll be able to interact with Lilo and type in the name of your chosen image.
One important thing to remember about Lilo is that it builds a table of physical disk blocks, and that very table is used to ask the BIOS to load data to memory. Therefore, whenever you overwrite a file used by Lilo, you need to re-run /sbin/lilo (and you need to be root to do that). One important thing to remember about custom kernels is that it's easy to make errors; as a precaustion, you should always keep the previous working image in your lilo.conf, or your system won't be bootable any more without resorting to the original installazion media. While you you won't need to reinstall the system, rescue disks are much slower and less friendly than is using the previous kernel you were running.
A sample /etc/lilo.conf, is reproduced in this page. Yours will be different, but you don't need to deal with the details unless you are interested in them, the only needed step is copying the ``image'' stanza to create another boot choice. # LILO configuration file# global section: boot from the MBR# and delay 50 tenth of secondboot = /dev/hdadelay = 50# First image, the custom oneimage = /zImage.2.2.10 root = /dev/hda1 label = Linux read-only# Then, the installation oneimage = /boot/vmlinux-2.0.36 root = /dev/hda1 label = debian read-only
# LILO configuration file# global section: boot from the MBR# and delay 50 tenth of secondboot = /dev/hdadelay = 50# First image, the custom oneimage = /zImage.2.2.10 root = /dev/hda1 label = Linux read-only# Then, the installation oneimage = /boot/vmlinux-2.0.36 root = /dev/hda1 label = debian read-only
Troubleshooting
When booting a new kernel, weird problems may happen. That's what you asked for by being unsatisfied with the default kernel provided by your GNU/Linux distribution. Let's see how to deal with the most common issues: I'm using the last line printed to the VGA text screen as a key to each type of problem.:
- ``
VFS: Cannot open root device 03:01''The message states that there is no device driver in this kernel associated to the device specified as ``root file system''. The ``name'' of the device (here,
03:01) is shown as the hex representation of its major and minor number; the major number usually represents the driver and the minor number the partition. If you look for a block driver in /dev with 3 as major number and 1 as minor number, you'll find it is /dev/hda1, the first partion of the first IDE disk.While it's unlikely you forget to include the IDE driver in your kernel, if you use IDE disks, the problem happens more often with SCSI: if the kernel won't detect your controller SCSI, it won't be able to mount the disk. In this case you need to reconfigure and recompile the kernel by specifying the correct hardware selection.
This error can also be caused by a wrong root-device selection. The root device is specified by the ``
root='' argument in the Lilo configuration file (or the kernel command line as you type it in at the Lilo prompt). If the argument is wrong, the kernel will try to access a device it cannot handle. - ``
Kernel panic: VFS: Unable to mount root fs on 03:01''If the previous message appeared, this one is present as well. When you find only this panic message, it means that the device has been opened but the kenel is unable to deal with the data structure (filesystem type) of that disk. This will happen if you didn't accept to include ext2 support in the kernel (ext2 is the standard filesystem used by Linux) or, in general if the filesystem type of your root partition (which could be something else than ext2) is left out of kernel configuration.
Once again, the error may be the result of a bogus root-device specification. If, for example, you specify the swap partition as root device, the kernel will correcly open() the device but won't find a mountable data structure in it.
- ``
Warning: unable to open an initial console'':This message means that the kernel cannot open /dev/console. Unless you played with console specifications, the problem may result from mounting the wrong partition as root device. For example, if the kernel mounts as root what should actually be mounted as /usr, it will successfully mount it but won't find a console device in that file tree. If this is the case, you'll also find the panic message described next.
If the problem is only related to console management, the system will go on running but you won't see any output printed to the screen when programs run. You might actually want that to happen in embedded systems, where you leave the VGA subsystem out of the kernel and have no serial console configured.
- ``
Kernel panic: No init found. Try passing init= option to kernel'':The reason for this problem is usually the same as the previous one: you mounted the wrong partition and no init nor sh process can be executed (if no init is found, the kernel tries to run a shell as a safe choice to allow system recovery, in case your init got trashed for unpredictable reasons).
The ``init='' suggestion included in this message reminds that tou can use the kernel command-line to tell it which program you want to be run as the first user process. I used that to develop my own version of init while leaving the real /sbin/init file where it had always been, so I could recover proper system operation at the next boot.
- Other messages, seemingly unmeaningful
Sometimes the boot process will lock after a random message, either talking about serial ports or about some device you don't have installed. When this happens, most of the times the problem is not directly related to the message you see on the console.
Most Linux device drivers don't print anything when they don't detect their hardware, to avoid annoyinging the user with unneeded messages (despite their number, all the messages you see at boot are meaningful when something goes wrong). Therefore, they don't print anything before they probe for their hardware; if probing locks the computer down, you won't have any meaningful message on screen. This problem only happens with ISA devices and ISA drivers (i.e., when a driver probes for ISA hardware and this action confuses another ISA device).
When you get hit by the problem, the best thing to do is removing unneeded drivers from kernel configuration (or compile non-essential drivers as modules) and, as a last option, removing any ``strange'' ISA device from the host computer. This problem hit me because of one of the network cards I use (horrible NE1000 clones I collected at no cost some time ago). One of such cards worked in one computer but prevented a successful boot when installed into another computer. Fortunately, recent hardware as well as non-PC hardware is much better.
If your kernel configuration is wrong, but at a lighter level, some error will be spawned by the programs involved in system startup (for example, if the kernel didn't find the network interface card, network configuration will fail); I won't deal with those errors here as they are not directly related to the boot process and their actual role and position depends on the distribution you chose.
Upgrading
In addition to tailoring the kernel to the specific computer running it, a sensible reason to compile the kernel is keeping track of updates faster than the distribution can do. Since most serious security problems and most relevant new technology are fixed and distributed inside the kernel, this is not a bad practice at all and I'll touch on it.
Om order to upgrade, you need to get a recent copy the kernel source. When you download an ``official'' kernel tar file from the Internet, you might find that it is slightly different from the one used by your distribution, and you'll need to cope with the issue. Most distributions don't use the unmodified official kernel sources, they apply instead some patches they feel useful for the user. Since the GPL license requires to state any difference from the original program and ``derived'' ones, you'll be able to reapply the same patches to the newer kernel version, if you need them. Debian for example shipped a 2.0.36 kernel with both the bigphysarea and the serial-console patches applied; the exact location of the patches was specified in README.debian so anyone could apply the same changes to a newer kernel (for example, to 2.0.37).
While dealing with patches may not be trivial (and I won't describe how to do it in this issue), most of the times you just don't need the patches your distributor applied, and can just replace the original kernel with the official one. The main problem in this case is that you can't upgrade by patching (which saves a lot of bandwidth and is described in the README file in the same kernel sources), you'll need to download the official tarball instead. Note that distributions usually include the official tarball for the kernel version they ship, even though they later patched it. This means you might even avoid downloading the lot from the Internet and just apply patches instead.
When you have the source code, the procedure for upgrading a kernel version is easy. If you upgraded the sources by applying patches, you just need to do ``make oldconfig; make depend bzImage modules modules_install'' or anything equivalent. If you untarred a new source tree, on the other hand, you'll need to recover the previous configuration by copying the .config file from the previous source directory to the new source tree and make as in the previous case.
Dealing with patches Makefiles, compilers and related tools may be though at first, but I think it is worthe the effort even for non-programmers. Recompiling the kernel is an interesting way to enter the programming world and begin brousing source code. I hope you'll enjoy it like I did.
Alessandro used to be a programmer, but he's turning from writing Free Software to advocating Free Software. He works at Prosa Srl and can be reached as
rubini@prosa.it . Verbatim copying and distribution of this entire article is permitted in any medium, provided this notice is preserved
- Kernel Configuration: dealing with the unexpected (zz from Linux magazine)
- Debugging the Linux kernel with JTAG
- Browse the Linux Kernel Source with LXR
- Browse the Linux Kernel Source with LXR
- Debugging the Linux Kernel with debugfs
- How do linux kernel know the memory configuration
- Dealing with Difficult People: Lessons from Iran and Cuba
- Linux Kernel Configuration
- Linux kernel configuration
- Unexpected EOF from the server.
- Dealing with the “Bitmap Size Exceeds VM Budget” error
- Dealing with the nonlinearly separable case using slack variables
- git pull 报错:Your configuration specifies to merge with the ref 'master'from the remote
- The kernel thread khubd, from 《Essential Linux Device Driver》
- Project configuration is not up-to-date with pom.xml. Select: Maven->Update Project... from the
- Dealing with Adversity
- What Makes Good Code Good? [zz from MSDN Magazine July 2004]
- 【zz】linux kernel boot arguments
- 开发汉英词典 -- 动词部分
- textbox屏蔽汉字输入
- Template和JSP技术
- 2.14调情方案之个性情人节
- php4 与 com 组件
- Kernel Configuration: dealing with the unexpected (zz from Linux magazine)
- C动态变量生成的小例子!
- http://blog.csdn.net/duoshanx
- Curve Fitting
- 程序员人生,累乎,乐乎? 摘自http://www.vchelp.net/cndevforum/subject_view.asp?subject_id=57486
- SQL注入与ASP木马上传的又一思路
- serv-u提升权限又一思路
- 关于评价测试用例好坏的讨论
- 【转贴】Windows 2000中10个非常有用的技巧